How to Use the Solstice_Apps Folder
The Solstice_Apps folder holds applications that are used when configuring and maintaining a Trusted Solaris environment. These applications handle local files and their corresponding NIS+ table databases.
The following programs are accessible through the Solstice_Apps folder and are used when configuring a Trusted Solaris workstation:
- Host Manager
-
For setting up network installation.
- User Manager
-
For administering users.
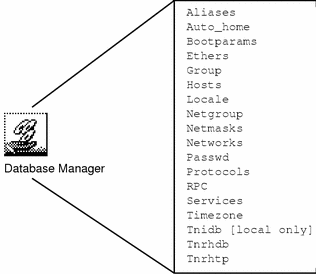
- Database Manager
-
For administering the following databases. One database is a local database only; the others are both local and NIS+ databases.
- Profile Manager
-
For adding and removing commands from a role's execution profile.
Figure 2-2 Databases Managed by the Database Manager in Solstice_Apps

To Open and Modify a Solstice_Apps Database
-
Left-click the Applications action.
The Applications icon is on the Applications subpanel to the left of the mail icon on the front panel.
-
Double-click the Solstice_Apps folder.
-
Double-click the appropriate icon, for example, one of --

-
In the Load window choose None or NIS+ for the Naming Service.
Figure 2-3 Load Window for Naming Service

-
Choose NIS+ for the Naming Service if you want the changes to be in a NIS+ table, seen by all workstations on the network.
-
Choose None if you want the changes to be in a local file, or if you are on a workstation that is not running the NIS+ naming service.
-
-
If you are loading a database managed by the Database Manager, select the database and press Return.
-
To modify entries:
-
To add an entry, choose Edit > Add.
-
To modify an existing entry, select the entry and choose Edit > Modify.
-
To change an entry, select the entry, choose Edit > Delete, then add the correct entry using Edit > Add.
-
-
Choose File > Exit to exit the database after making your changes.
To Modify the Password for a Role or User Account
The install team in the role root initially modifies the secadmin, admin, and oper passwords. The install team also gives the first users their passwords.
When the install team chooses a password, the team must select one that is not easy to guess, thus reducing the chance of an attacker gaining unauthorized access by attempting to guess passwords.
-
As secadmin (as root during installation), at label
admin_lowopen the User Manager using the appropriate name service, NIS+ for a networked installation, None for no name service. -
Select from the list of users and press the Return key.
-
Click the Password... button.
-
Make sure that for a user, the value of Status is Open.
Note -For all administrative roles, and for the user who can assume the secadmin role, use the status Always Open. Also, do not set password expiration dates on administrative roles.
-
Make sure that the Cred Table Setup box is checked for networked installations.
-
Set other password information for the account.
See "Managing User Accounts" in Trusted Solaris Administrator's Procedures for a fuller explanation.
-
Exit the Password dialog and save the information.
To Customize Idle Time
Note -
The idle time for a role is not calculated. Roles time out when their user's session times out.
-
As secadmin at label
admin_lowin User Manager, select a user, not a role. -
Click the Idle... button.
-
Press the Idle button labeled 5 mins.
-
Choose a convenient setting in keeping with your site security policy.
The options are to lock the screen or to log the user out; different time lengths are possible.
-
Click OK, then Done.
To Delete a Local User
-
In the role admin, label
admin_low, open the User Manager as a local database.The user "install" is defined locally.
-
Select the user to be deleted, such as install.
-
Select Edit > Delete.
For the user install, you do not have a home directory or mail files to delete. Other local users may have home directories and mail files to delete.
When a user is deleted from the system, the administrator must ensure that the user's home directory and any objects owned by that user are also deleted. As an alternative to deleting objects owned by the user, the administrator may change the ownership of these objects to another user who is defined on the system.
The administrator must also ensure that all batch jobs still to run that are associated with the deleted user are also deleted. The administrator must ensure that there are no objects or processes belonging to a deleted user that remain on the system.
-
Close the User Manager by selecting File > Exit when you are done.
- © 2010, Oracle Corporation and/or its affiliates
