Setting the Session Level
Note -
If your account is set up for a single-label configuration, the Trusted Solaris environment will be displayed after you close the Workstation Information dialog box and you have no need to read further in this section.
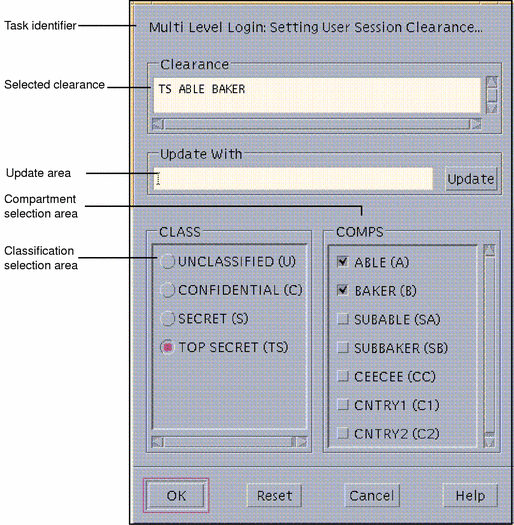
If you do not select Restrict Session to a Single Level, the Clearance Builder version of the Label Builder dialog box is displayed so that you can specify the session clearance (see Figure 2-5).
If you select Restrict Session to a Single Level, the user session label version of the Label Builder dialog box is displayed and you select the label for your entire session.
Note -
Workstations can be restricted to a limited range of session clearances and labels. For example, a workstation in a lobby might be limited to UNCLASSIFIED labels only. If the session clearance or label you enter is not accepted, check with an administrator to see if the workstation is restricted.
To Select a Clearance for a Multilevel Session
The session clearance sets the top boundary for labels of files that you will be able to access in the session. To set the clearance, you use the Clearance Builder dialog box (see Figure 2-5).
-
To use the default clearance in the Clearance field, click OK (or press Enter) and wait for the Trusted Solaris environment to be displayed.
For a different clearance, go to step 2 to build a new clearance.
-
Click the desired classification in the classification selection area.
-
Click the desired compartments (if any) in the compartments selection area.
-
Check the clearance you have built in the selected clearance field. Click OK or press Enter if it is correct or go back to step 2 to build a different clearance.
Figure 2-5 Session Clearance Builder Dialog Box

To Select a Label for a Single-level Session
The session label sets the label at which you intend to operate in this single-level session. To set the session label, you use the Single-Level Session Label Builder dialog box, which is similar to dialog box shown in Figure 2-5 except that the task identifier indicates a single-level session.
-
To use the default label in the Label field, click OK (or press Enter) and wait for the Trusted Solaris environment to be displayed.
For a different label, go to step 2 to build a new label.
-
Click the desired classification in the classification selection area.
-
Click the desired compartments (if any) in the compartments selection area.
-
Check the label you have built in the selected label field. Click OK or press Enter if it is correct or go back to step 2 to build a different label.
- © 2010, Oracle Corporation and/or its affiliates
