Trusted Path Menu
The Trusted Path (TP) menu is accessed by holding down mouse button 3 in the switch area of the Front Panel (see the following figure).
The Trusted Path menu adds the following menu items to the normal switch menu items:
-
Change Workspace Label - Changes the label of a workspace so that you can work at a different label. (This option only appears when the pointer is over a workspace button.) See "To Change the Workspace Label".
-
Assume role Role - Enables you to change roles. (A role is a special user account that gives you access to certain applications and the authorizations you need to run those applications.) The administrator at your site assigns roles. If your account has not been assigned any roles, the assume roles selections do not appear in the Trusted Path menu. See "To Change Roles".
-
Allocate Device - Enables you to mount and allocate a device so that you can securely move data on or off the system to another medium. See "To Allocate a Device".
-
Query Window Label - Shows the label for a window when you move the pointer into the window. See "To Interactively Display a Window Label".
-
Change Password - Enables you to change your password. See "Changing Your Password".
-
Shut Down - Enables you to shut down your machine (if you are authorized). See "To Shut Down Your System".
Note -
The Add Workspace command operates similarly to the standard version of CDE except that the new workspace button takes on the security characteristics of the workspace under the point or, if the pointer is not over a workspace button, the characteristics of your minimum label.
Tasks related to these menu items are described in the following sections.
To Change the Workspace Label
-
Choose Change Workspace Label.
-
Type a new label.
The label (and, if implemented, the color) of the workspace button changes. When you click the workspace button, you enter a session at the new label.
To Change Roles
-
Choose Assume Role Role from the Trusted Path menu.
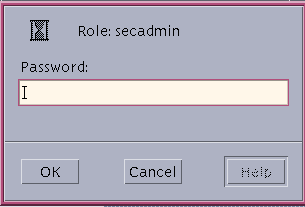
A dialog box is displayed requesting the password for the role.
-
Type the password.
A workspace button with the role name is displayed and you are shifted to this workspace.
The role workspace provides you with the special set of applications, privileges, authorizations, and the UID assigned to this role. Remember that for auditing purposes, your user account UID is attached to all transactions you make while in this role.
Figure 4-6 Role Password Dialog Box

To Allocate a Device
The Allocate Device menu item is available to authorized users only. It enables you to mount and allocate a device so that you can securely move data on or off the system to another medium. If you try to use a device without allocating it, you will get the error message "Permission Denied".
-
Choose Allocate Device from the Trusted Path menu, or choose Device Allocation Manager from the Tools subpanel in the Front Panel.
The Device Allocation Manager is displayed.
-
Look at the available device list for the device you wish to use.
The devices that you are permitted to allocate at your current label appear in this list. If the device you want to use does not appear in the list, you should check with your adminsitrator to make sure you are properly authorized. It may also be that the device is in an error state or in use by someone else.
-
Move the device you want to use from the Available Devices list to the Allocated Devices list by double-clicking the device name in the Available Devices list or selecting the device and clicking the Allocate (right-pointing) button.
Table 4-1 Device Name AbbreviationsAbbreviated Device Name
Long Version of Device Name
audio
microphone and speakers
floppy_0
floppy drive
mag_tape_0
tape drive (streaming)
cdrom_0
CDROM drive
This step starts the clean script. The clean script ensures that there is no data left over on the medium from other transactions.
Note that the label of the current workspace will be applied to the device. Any data transferred to or from the device's medium must be dominated by this label.
-
Follow the instructions in the clean script dialog boxes to load and make sure the medium has the correct label, and to mount the device.
The device name now appears in the Allocated Devices list.
Note -Until you close the command tool window, the Device Allocation Manager and its label builder windows are disabled. At this point, you will not be able to use the Device Allocation Manager in this workspace or any other.
-
Use the device to transfer data.
At any point, if you switch to a workspace with a different User ID (by assuming a role) or label, you need to make a separate allocation of the device at the label for that workspace. When you use the Occupy Workspace command from the window menu to move the Device Allocation Manager to the new workspace, the Available and Allocated Devices lists change to reflect the correct context.
-
Deallocate the device when you are finished by double-clicking the device name in the Allocated Devices list or selecting the device and clicking the Deallocate (left-pointing) button.
For the sake of security, you should always deallocate a device when you are finished using it. Deallocating a device runs a clean script that unmounts the device and advises you when the media can be removed.
Note -If you reboot your system while devices are allocated, they become deallocated.
To Interactively Display a Window Label
This operation is mainly useful if your system is not configured to display labels in the window frames.
-
Choose Query Window Label from the Trusted Path menu.
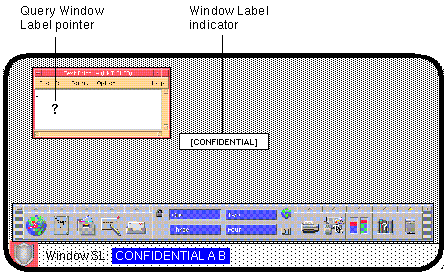
The pointer changes to a question mark.
-
Move the pointer around the screen.
The label for the region under the pointer is displayed in a small rectangular box at the center of the screen (see below).
-
Click the mouse button to return to normal mode.
Figure 4-7 Query Window Label Operation

- © 2010, Oracle Corporation and/or its affiliates
