Chapter 2 Quick Tour of the Admin Tools
This chapter presents an overview of the tools available in the Trusted Solaris environment, how they are accessed, and the databases on which they operate.
Introduction to Trusted Solaris Administration
Administration in the Trusted Solaris operating environment uses many of the same tools available in the Solaris operating environment and offers security-enhanced tools as well. The difference between the environments lies in how administration tools are accessed and how this access is restricted.
Accessing Tools in a Role Workspace
To use the Trusted Solaris administration tools, you must be in a role account with the assigned rights profiles that contain the desired trusted applications.The following procedure describes how to access a role workspace.
To Access a Role Workspace
-
Log in as a normal user.
-
Assume a role using the Trusted Path menu. If a role workspace already exists, click the role workspace button in the Front Panel.
-
Supply the role password.
Note that the default label for a role workspace is the role's minimum label, usually
ADMIN_LOW. If desired, you can switch labels by choosing Change Workspace Label from the Trusted Path menu while the pointer is over the role workspace button.
To leave a role workspace temporarily, click any other workspace button. To destroy the workspace, choose Delete from the Trusted Path menu while the pointer is over the role workspace button.
Within the role workspace, you can access four types of trusted applications:
-
Solaris Management Console tools - The Solaris Management Console (SMC) serves as a launcher for various administration tools and is available from: the Application Manager, the Tools subpanel in the Front Panel, or the command line by typing smc.
-
Commands - In the Trusted Solaris environment, administrative commands and other commands intended for restricted use are assigned to rights profiles. Opening a terminal in a role workspace launches a profile shell that gives you access to all commands assigned to the account's rights profiles. Any commands that you run are at the label of the current workspace.
-
CDE actions - The System_Admin folder in Application Manager provides actions for performing miscellaneous system administration tasks. Most of these actions apply a special version of the vi editor, adminvi(1M) to one of the configuration files. You can use the
dtpadeditor if you prefer. See "Changing the Default Admin Editor" for details.For security purposes, the editing actions cannot save a file to a different name, create a new file, or escape to a shell. All actions conform with mandatory access control and the local security policy. Any actions you launch are at the label of the current workspace, unless overridden by a rights profile.
-
Enhanced desktop tools - The Trusted Solaris operating environment provides desktop tools for administrators from the Front Panel. These tools have capabilities not available to normal users. For example, administrators can use the File Manager to set privileges and labels on executable files. Similarly, the Device Allocation Manager makes device administration capabalities available to roles. See "Understanding Device Allocation".
Remote Administration
You can perform remote administration in the Trusted Solaris operating environment using the Solaris Management Console. You can also log into a remote host from another Trusted Solaris host in the system. Depending on your site's security policy, you can make adjustments to log in from a non-Trusted Solaris system, although this will make your system somewhat less secure. See "Administering Remote Systems" under "Administering Systems in an Administrative Role" in Trusted Solaris Administrator's Procedures.
Solaris Management Console Tools
The Solaris Management Console (SMC) provides access to families of GUI-based administration tools. These tools enable you to edit items in various configuration databases.
SMC Toolboxes
The SMC tools are stored in sets referred to as toolboxes. For the security-related tools in the Trusted Solaris environment, you need to open the Trusted Solaris Management Console toolbox. Within the Trusted Solaris toolbox, you can access tools according to scope, that is, the name service for the administration files accessed by the tools: local host, NIS, or NIS+.
Organization of the Solaris Management Console
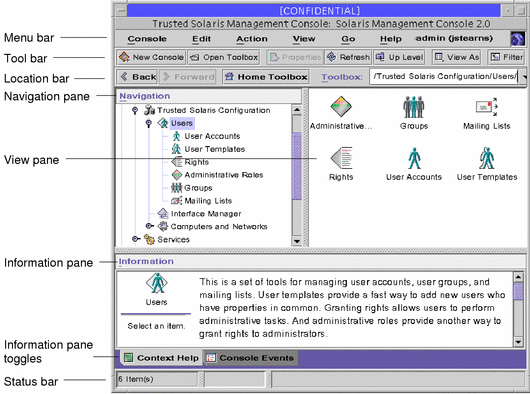
The SMC is shown in the following figure, with the Trusted Solaris toolbox loaded and the Users tool open.
Figure 2-1 Typical Trusted Solaris SMC
SMC Documentation
The main source of documentation for using the SMC and its tools is the online help system. There are two forms of online help: context-sensitive help and expanded help topics. The context-sensitive help is tied to the currently selected feature and is displayed in the information pane. The expanded help topics are available from the Help menu or by clicking cross reference links in the context-sensitive help. The help topics appear in a separate viewer.
Trusted CDE Actions
This section presents the CDE actions available to roles and describes how to use or change the restricted editor used in these actions.
To Access Trusted CDE Actions
-
Right-click the background to bring up the Workspace Menu.
-
Press Applications, then click Application Manager.
-
In the Application Manager, double-click the System_Admin icon.
The CDE action icons display in the Application Manager window.
-
Invoke the desired action by double-clicking its icon.
A window or dialog box for the appropriate action appears.
The trusted CDE actions are listed in the following table.
Table 2-1 Administrative Actions, Purposes, and Default Roles| Action Name | Purpose of Action | Default Rights Profile |
|---|---|---|
|
Creates devices by putting entries in device_allocate(4), and device_maps(4). See add_allocatable(1M). |
Device Security |
|
|
Edits any specified file |
Object Access Management |
|
|
Edits audit_class(4) |
Audit Control |
|
|
Edits audit_control(4) |
Audit Control |
|
|
Edits audit_event(4) |
Audit Control |
|
|
Edits the audit_startup.sh script. See audit_startup(1M). |
Audit Control |
|
|
Runs chk_encodings(1M) on specified encodings file |
Object Label Management |
|
|
Runs tnchkdb(1M) on local tnidb(4), tnrhdb(4), and tnrhtp(4) files |
Network Security |
|
| Check TN NIS+ Tables |
Runs tnchkdb(1M) on tnrhdb(4), and tnrhtp(4) NIS+ trusted network maps | Network Management |
|
Edits /usr/dt/config/sel_config. See sel_config(4). |
Object Label Management |
|
|
Runs ypinit(1M), using both the specified hostname for the NIS master and the specified domain name |
Name Server Security |
|
|
Runs nisclient(1M), using both the specified hostname for the NIS+ master and the specified domain name |
Name Server Security |
|
|
Runs ypinit(1M) using the specified domain name |
Name Server Security |
|
|
Runs nisserver(1M) using the specified domain name |
Name Server Security |
|
|
Edits specified label_encodings(4) file and runs chk_encodings(1M) |
Object Label Management |
|
|
Edits nsswitch.conf(4) |
Network Management |
|
|
Runs nispopulate(1M) from the specified directory |
Name Service Security |
|
|
Network Management |
||
|
Edits /etc/defaultrouter. See route(1M). |
Network Management |
|
|
Edits resolv.conf(4) |
Network Management |
|
|
Edits /etc/mail/sendmail.cf. See sendmail(1M). |
Mail Management |
|
|
Edits vfstab_adjunct(4) |
File System Security |
|
|
Edits vfstab(4) |
File System Management |
|
|
Edits tsolgateways(4) |
Network Management |
|
|
File System Management |
||
|
Runs niscat(1) with the -o option on the specified NIS+ trusted network database to display the table's attributes. |
Name Service Management |
|
|
Runs niscat(1) on the specified NIS+ trusted network database to display the table's contents. |
Name Service Management |
Admin Editor
The Admin Editor action, which can also be accessed from the command adminvi(1M), is a modified version of the vi(1) command. It restricts the user from executing shell commands and from writing to (saving to) any file other than the original file being edited. The Admin Editor action, which is assigned to the security administrator role by default, should be used in most cases instead of adminvi on the command line to edit or create administrative files. This is due to the fact that the Admin Editor is a wrapper for adminvi that incorporates auditing and allows an editor preference. You can assign the adminvi command to any users with the profile shell as their default if you need to provide them a text editor with the restrictions of adminvi.
Changing the Default Admin Editor
The Admin Editor is launched through the /usr/dt/bin/trusted_edit shell script, which brings up the editor specified in the EDITOR environment variable for the role account, restricts saves, and audits any changes made at the time the file is saved. The variable is set to adminvi(1M) by default, but the security administrator role can redefine the EDITOR variable to /usr/dt/bin/dtpad. When adminvi is specified, /bin/adminvi is invoked as root to edit the file. The adminvi command prevents the saving of the file with any other name. If dtpad(1) is specified, the New, Save, and Open options in the File menu are disabled when the action runs so that the file cannot be renamed.
Administering Users
You can administer users through either the SMC Users tool set or from the command line.
Note -
To administer users, you need to be in an administrative role with the User Manager rights profile for general user attributes and the User Security rights profile for security-related attributes.
Default User Attributes
The task of entering new users is greatly simplified by setting up default user attributes so that only those attributes unique to a specific user need be added. There are three mechanisms for setting up defaults:
-
policy.conf(4) database - Contains authorizations, rights profiles, password generation, account locking, label display, and unattended computer controls.
-
label_encodings(4) database - Contains default values for user clearances and minimum labels and public alternative names for
ADMIN_HIGHandADMIN_LOW.
-
user templates - Determines all user properties not covered by the policy.conf(4) and the label_encodings(4) databases except properties specific to a user such as user name and ID.
To create new users, use the Add User With Wizard and Add User From Template menu options. The wizard approach offers simplicity but with these tradeoffs:
-
The login shell defaults to Bourne.
-
It does not set a skeleton path for initialization files.
-
Secondary groups are not set.
The user template approach offers a larger set of user properties, but requires you to set up one or more templates of default user attributes ahead of time. Both methods should be used in conjunction with the policy.conf(4) and the label_encodings(4) databases. The User Properties dialog box lets you make modifications after the initial user information has been entered.
User Attribute Databases
User information is held in the following databases:
-
user_attr(4) - The /etc/user_attr file contains extended user attributes, using a keyword=value format.
-
auth_attr(4) - The /etc/security/auth_attr file contains the definitions of authorizations, which can be included in rights profiles.
-
prof_attr(4) - The /etc/security/prof_attr file contains the name, description, authorizations, subordinate rights profiles, and help files for rights profiles.
These databases can be edited manually, although this practice is not generally recommended.
The following figure shows how the databases work together to provide user attributes.
Figure 2-2 User Database Relationships
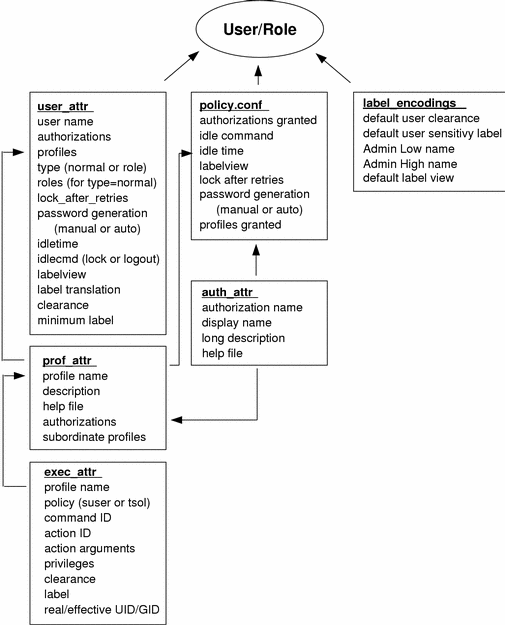
The user_attr database contains the attributes shown, including a comma-separated list of profile names. The contents of the profiles are split between the prof_attr file, which contains profile identification information, authorizations assigned to the profile, and subordinate profiles, and the exec_attr file, which contains commands and actions with their associated security attributes. The auth_attr file supplies available authorizations to the prof_attr file and the policy.conf file. (Note that although you can assign authorizations directly to users through user_attr, this practice is discouraged.) The policy.conf file supplies default attributes to be applied to all users. The label_encodings file supplies label defaults if they are not otherwise specified.
Managing Users from the Command Line
The user files can also be managed from the command line. The smuser(1M) command adds, modifies, deletes, and lists user information. You can use smmultiuser(1M) to enter a batch of users.
Managing Users Through the SMC
This section describes the SMC Users tool set and selected dialog boxes as follows:
For complete descriptions of elements in the Users tool set, refer to the online help.
Users Tool Summary
The SMC Users tool set is shown in the following figure.
Figure 2-3 SMC Users Tool
The six dialog boxes in the Users tool set are:
-
Administrative Roles dialog box - Used to create or edit a role account and assign users to roles. Note that the roles data is the same as the user data except that:
-
There is no Roles tab since roles cannot be assigned to other roles.
-
There is no Password Options tab because these are not appropriate for roles.
-
The Roles dialog box has a Users tab for assigning users to the role.
-
-
Groups dialog box - Used to create or edit user groups and change the members in the group.
-
Mailing Lists dialog box - Used to create or edit mail aliases, including changing the recipients in the list.
-
Rights dialog box - Used to create or edit a rights profile. See "Right Properties Dialog Box" for an example of the Rights Properties dialog box and a description of the rights profile data.
-
User Accounts dialog box - Used to add new users singly or in a batch, with or without a template, and lets you edit the properties of existing users. See "User Properties Dialog Box" for an example of the User Properties dialog box and a description of the user data.
-
User Templates dialog box - Used to create a named set of user properties that can be applied to new users to facilitate data entry.
User Properties Dialog Box
The User Properties dialog box is shown below with the General tab selected.
Figure 2-4 User Properties Dialog Box
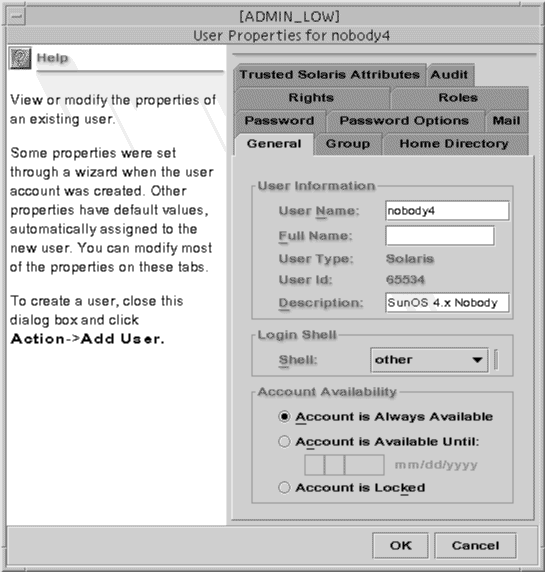
The following table describes the purpose of each tab in the User Properties dialog box.
Table 2-2 User Properties Summary|
Tab |
Description |
|---|---|
|
General |
Specifies the user, the default login shell, and the account availability. |
|
Group |
Sets the user's primary and secondary groups for the purpose of accessing and creating files and directories. |
|
Home Directory |
Specifies the user's home directory, home directory server, automounting, and directory access. |
|
Password |
Specifies whether the user or the administrator will select the first password and whether the selection and changes will be manual or from the password generator. |
|
Password Options |
Sets the time limits and requirements for password changes. |
|
|
Specifies the server that provides email and the mailbox in which it is received. |
|
Rights |
Used to assign rights profiles to the user. The precedence of the assigned rights profiles can be changed. |
|
Roles |
Allows available roles to be assigned to the user. |
|
Trusted Solaris Attributes |
Specifies the clearance and minimum label at which the user can operate and how labels are displayed to the user. Also specifies a time limit for which a computer may remain idle and the action taken when the limit is reached. |
|
Audit |
Specifies the audit classes for which the user is to be audited. |
Right Properties Dialog Box
The Rights Properties dialog box is shown below with the General tab selected.
Figure 2-5 Rights Properties Dialog Box
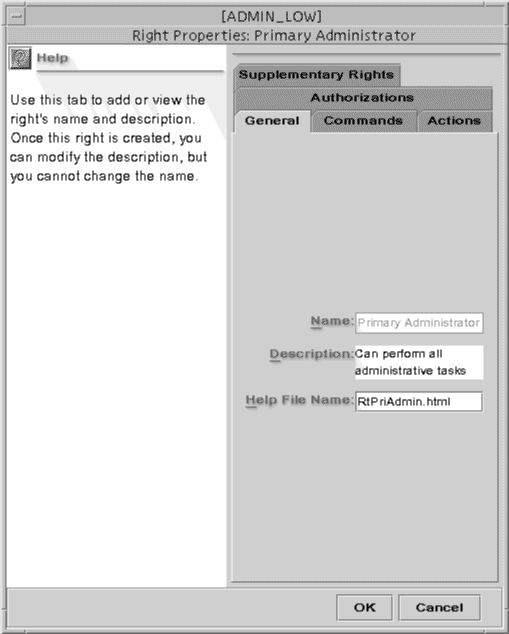
The following table describes the purpose of each tab in the Right Properties dialog box
Table 2-3 Rights Manager Dialog Box Summary|
Tab |
Description |
|---|---|
|
General |
Identifies and describes the rights profile and provides the name of the help file used to explain it. |
|
Commands |
Assigns commands to the rights profile and adds security attributes (effective and real UIDs and GIDs; minimum label and clearance; and inheritable privileges) to specific commands in the profile. |
|
Actions |
Assigns CDE actions to the rights profile and adds security attributes (effective and real UIDs and GIDs; minimum label and clearance; and inheritable privileges) to specific actions in the profile. |
|
Authorizations |
Assigns authorizations to the profile. |
|
Supplementary Rights |
Specifies other rights profiles to be contained within the current rights profile. |
Administering Hosts and Networks
The Computers and Networks tool set administers hosts and networks. A typical set is shown in the following figure.
Figure 2-6 Computers and Networks Tool
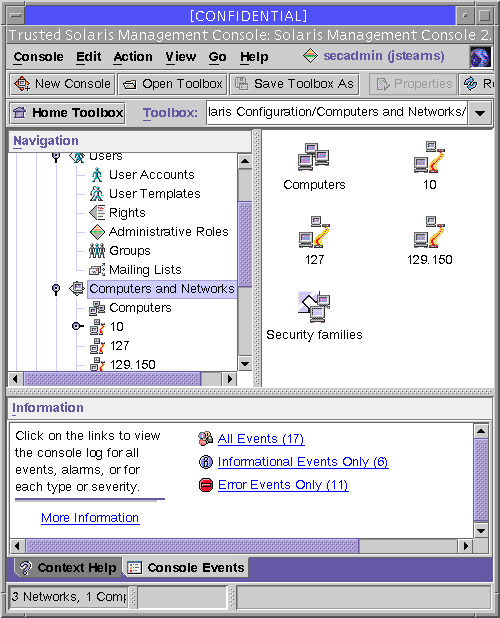
Computers and Networks gives you access to three tools:
-
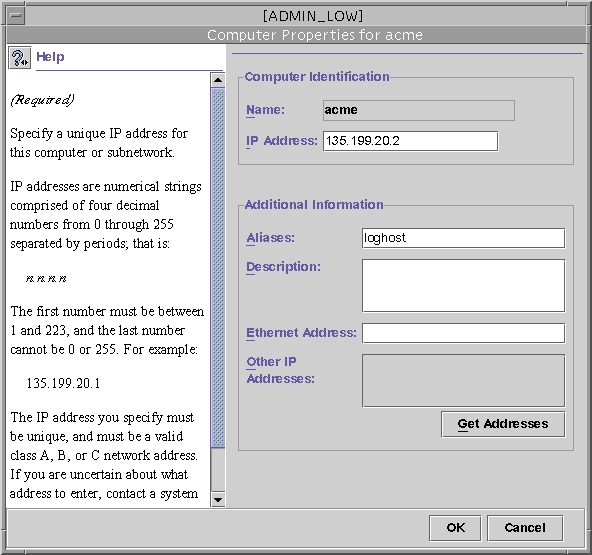
Computers tool - When open, the host icons for all local networks are displayed in the view pane. You can edit the IP address, Ethernet adress, and host alias information. A typical Properties dialog box is shown below.
Figure 2-7 Computer Properties Dialog Box
-
Subnetwork tool - This tool groups hosts by subnetwork and works the same as the Computers tool above. Its icon is displayed as two monitors connected by a cable, with a partial IP address as a caption.
-
Security families tool - Enables you to add or modify network templates including the assignments of hosts to the templates. This tool is described in more detail below.
Security Families Tool Set
A security family is a group of hosts that use a common networking protocol and have the same security requirements. As a result, you can apply the same template of network security attributes to them for the purpose of receiving and transmitting data. Trusted networking and templates are explained in more detail in Chapter 3, Administering Trusted Networking.
When the Security Families tool is opened, all available templates display as icons. You can modify either the templates or the host assignments as follows:
-
To modify a host's IP address or template assignment, select its icon and choose Properties from the popup menu, or double-click the icon.
-
To change the definition of a template, select the template icon and choose Properties from the popup menu. The Modify Template dialog box is displayed, as illustrated in the following figure.
Figure 2-8 Modify Template Dialog Box
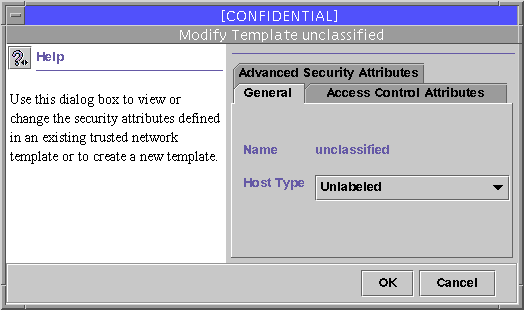
The tabs in the Modify Template dialog box are described in the following table.
Table 2-4 Template Dialog Box Summary|
Tab |
Description |
|---|---|
|
General |
Specifies templates, host types, and minimum/maximum labels. |
|
Access Control Attributes |
Specifies security attributes to be applied to incoming data from hosts to which this template is applied. The potential incoming security attributes include minimum label, maximum label, default label, and default clearance. |
|
Advanced Security Attributes |
Specifies security attributes to be applied to outgoing data to hosts to which this template is applied. The potential outgoing security attributes include DOI, IP label type, forced privileges, allowed privileges, RIPSO send class, RIPSO send PAF, RIPSO return PAF, and CIPSO domain. |
Administering Other Aspects of the Trusted Solaris Environment
This section lists other commands available for administering the Trusted Solaris operating environment.
File Management Commands
File privileges and labels can be administered either through the File Manager or the following commands:
-
getfattrflag(1) - Displays a file's security attributes.
-
setfattrflag(1) - Sets a file's security attributes.
-
getfpriv(1) - Displays getting an executable file's forced and allowed privileges.
-
setfpriv(1) - Sets an executable file's forced and allowed privileges.
-
testfpriv(1) - Checks an executable file's forced and allowed privilege sets.
File System Management Commands
The following commands are for administering attributes on file systems.
-
getfsattr(1M) - Displays the security attributes of a file system.
-
getfsattr_ufs(1M) - Displays the security attributes of a UFS file system.
-
setfsattr(1M) - Sets the security attributes on a file system. The file system should be unmounted first.
-
newsecfs(1M) - Sets security attributes on a new file system.
Mount Management
The following commands are for mounting file systems. Check the Trusted Solaris Summary section of each man page for differences from the Solaris operating environment.
-
mount(1M) - Requires the sys_mount privilege. Both mandatory and discretionary read access (or overriding privileges) are required to the mount point and the device being mounted. Depending on the configuration of the vfstab_adjunct file, the process may need some combination of the
proc_setslandproc_setclrprivileges. The mount command supports mounts to multilabel directories (MLDs). It has a special option, -S which lets you specify security attributes to be associated with the file system mount (this option requires that you have sufficient clearance for the label specified). -
share_nfs(1M) - Provides these options with -S:
-
dev|nodev - Access to character and block devices is allowed or disallowed. The default is dev.
-
priv|nopriv - Forced privileges on execution are allowed or disallowed. The default is priv.
Running share_nfs requires the following:
-
sys_nfs privilege
-
effective uid 0
-
process label of [
ADMIN_LOW]
-
-
share(1M) - Makes a resource of a specified file system type available for mounting. It requires the sys_nfs privilege.
-
unshare(1M) - Makes a resource unavailable for mounting. It requires the sys_nfs privilege.
-
nfsstat(1M) - Displays statistics concerning the NFS and RPC (remote procedure call) interfaces to the kernel. The Trusted Solaris version of the nfsstat command requires that you have the net_config privilege when using the -z option, which reinitializes the statistics.
-
nfsd(1M) - Handles client file system requests. The Trusted Solaris version of the nfsd command requires the sys_nfs and net_mac_read privileges to run.
Process Commands
The following commands are for managing processes:
-
pattr(1) - Displays the viewable Process Attribute Flags of the current process or a process specified by pid. Those flags that cannot be viewed normally can be viewed with privilege.
-
pclear(1) - Displays the clearance at which the selected process is running.
-
plabel(1) - Displays the CMW label (that is, combined sensitivity label and information label) for the process.
-
ppriv(1) - Displays the effective privileges of a process.
-
pprivtest(1) - Tests to see if the specified privileges are currently in effect.
- © 2010, Oracle Corporation and/or its affiliates
