Administering as a Role (Tasks)
To Log In and Assume a Role
-
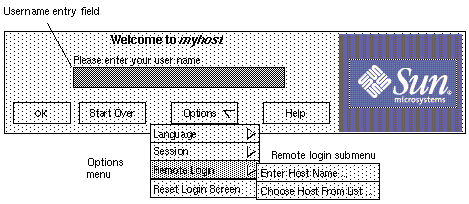
(Optional) If you are starting a login session on a remote host, choose Remote Login from the Options drop-down menu. You can either select your host name from a list (by choosing Choose Host From List) or choose Enter Host Name and type it yourself.
-
Type your username in the field, then supply a password when prompted.
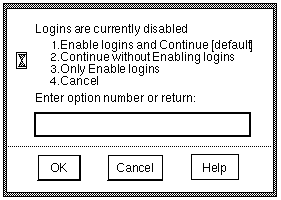
Note -If a message appears stating that logins are currently disabled, you are not currently authorized to enable logins. Ask the security administrator to give you the needed authorization, or ask an authorized person to enable logins.
-
Choose one of the options in the Enable Options dialog box shown in the following figure, then click OK.
-
Review the information in the Workstation Information dialog box shown in the following figure.
Figure 1-1 Workstation Information Dialog Box
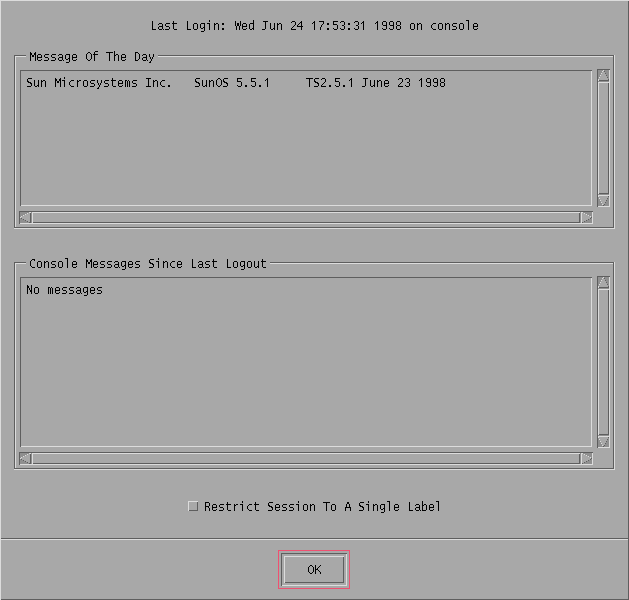
Investigate any suspicious logins, messages that could indicate inappropriate activities, and the date and time of the last login to see if it occurred at an unusual time of day, for example. Check the message of the day and the console messages since the last logout.
-
Decide whether the session should be single- or multiple-label.
If your account is configured to work at only one label, Single Level Session Label: Label appears at the bottom of the dialog box.
-
If your account is configured to work at multiple labels and you want to work with multiple labels, proceed to the next step.
-
If your account is configured to work at multiple labels but you want to work at only one label, select Restrict Session to a Single Label at the bottom of the dialog box.
-
-
Press Return or click OK.
-
If you can work at only one label or if you restricted the sessions to a single label, the Single-Label Session Login: Setting Session Label dialog box appears.
-
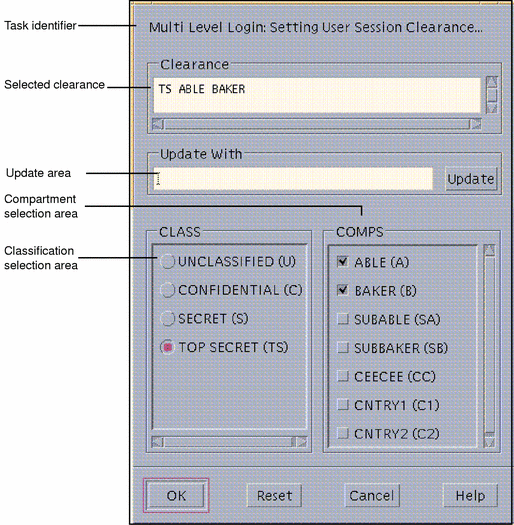
If you are allowed to work at multiple labels and decided to do so, the Multilabel Login: Setting Session Clearance dialog box appears.
-
-
Set the clearance (for a multiple-label session) or the label.
-
To accept the default clearance or default label, click OK.
-
To specify a different clearance, type the clearance name in the Clearance field or the name of the label in the Update With field.
-
To build a clearance (for multiple-label sessions) or label (for single-label sessions) interactively, select a classification in the Class area and the desired compartment components in the Comps area, then click OK.
Note -Other words may be configured at your site to appear instead of Class and Comps. See "Changing Label Component Names on Label Builders" in Trusted Solaris Label Administration for information on how the words can be changed.
-
-
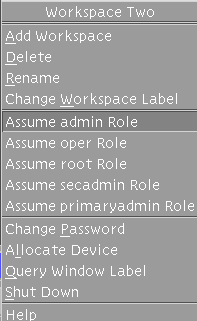
Right-click the center of the Front Panel and choose the Assume role_account_name Role option from the Trusted Path (TP) menu.
This option does not appear if you have not been assigned a role.
The following figure shows the Trusted Path menu for a user who is configured to assume the System Administrator role.
-
Type the role password when prompted and click OK.
An administrative role workspace becomes active, and a new administrative role workspace button is added to the workspace switch area.
To Leave an Administrative Role
You can leave an administrative role by choosing a user workspace, deleting the role workspace, or logging off the computer.
To choose a user workspace, click the workspace button in the Front Panel.
The role workspace is still available to you.
To delete the workspace, remove all applications from the workspace, then right-click the role workspace button in the Front Panel and choose Delete.
If others have access to this computer during your session, this procedure prevents them from using your role workspace.
To log off the computer, click the EXIT button in the Front Panel.
To Launch the Solaris Management Console
The first time on a system that you launch the Solaris Management Console and click the Load button, a delay occurs while the tools are registered and the /var/sadm/smc/ directory and its subdirectories are created. This delay typically occurs during system configuration.
When a name service is being used, the toolbox with the appropriate scope (either NIS or NIS+) must be edited on the name service master. See "Edit SMC Toolbox Definition for the Name Service" in Trusted Solaris Installation and Configuration for how to edit the toolbox.
You also edit the name service toolbox on the clients when you want to be able to modify the NIS maps or NIS+ tables from the client. The procedure "(Optional) Copy the SMC Name Server Toolbox Definition to the Client" in Trusted Solaris Installation and Configuration describes how to copy the name service master's toolbox definition to each client.
Note -
Name services support centralized administration of all user, host, and network information, which is important for both user accountability and trusted administration. Administering users and hosts locally is not as secure. There may be special circumstances where a knowledgeable security administrator decides that local accounts are both needed and permissible within your organization's security policy--even though they can make the system harder to protect and to maintain.
-
Assume a role that is configured to use the Solaris Management Console (SMC) and launch the tool in an administrative role workspace at
ADMIN_LOWin one of the following ways:-
From the Tools subpanel on the Front Panel, choose the Solaris Management Console option.
-
Click the Applications icon on the Applications subpanel of the Front Panel, then double-click the Solaris Management Console icon.
-
Invoke the smc command in a terminal.
-
From the Workspace Menu->Tools submenu, choose the Solaris Management Console option.
-
-
Select a name from the Server list, or type the name of the computer in the Server field, and then click the Load button.
The term server in this context is used to refer to a computer where the SMC server software is running.
The names of any SMC toolboxes on the specified server are loaded into the Toolboxes field.
-
Select the Trusted Solaris Management Console.
-
From the list, choose a Trusted Solaris toolbox of the appropriate scope.
The name of each toolbox starts with the name of the host where the SMC server software is running followed by one of three different scopes (Files, NIS, or NIS+), and then by a policy assignment. For example, the following shows the toolbox with the Files scope and the TSOL Policy for the Server eagle:
eagle: Scope=Files, Policy=TSOL
Note -When you are working in a Trusted Solaris environment, make sure that the Policy=TSOL on the toolbox you select. Only if you were administering a Trusted Solaris system remotely from a Solaris host would you select a toolbox whose Policy=SUSER. If no policy is specified in the toolbox name, the default is SUSER.
Scope Name
Updates
Files
Local files on the current computer.
NIS
NIS maps on the NIS name server for a NIS client host.
NIS+
NIS+ tables on the NIS+ name server for a NIS+ client host.
Note -If you are on a name service client, the name service scope works only if you have edited the toolbox files correctly on the client.
-
(Optional) Save the current toolbox to save reloading time:
-
Click the desired SMC tool.
In a name service scope, click Trusted Solaris Configuration to see the "Users" and "Computers and Networks" tools.
In a files scope, click Trusted Solaris Configuration to see the "Users", "Computers and Networks", and "Interface Manager" tools.
-
Type the role's password when prompted.
See other chapters in this guide for how to use the Users, Interface Manager, and Computers and Networks tools. Refer to the online help for additional information about the above-named tools and all other SMC tools.
-
When done, choose Exit from the Console menu.
To Launch Local Administrative Actions
-
Log in as a user who is able to assume an administrative role and assume the role.
See "To Log In and Assume a Role" if needed.
-
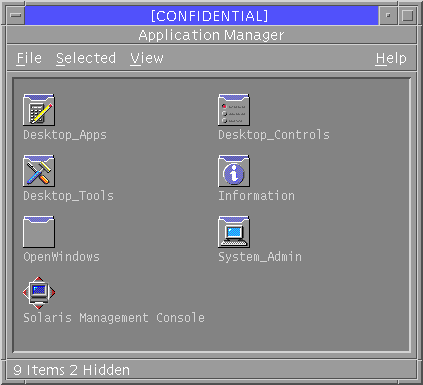
Click the Application Manager icon from the Applications subpanel on the Front Panel.

The Application Manager folder displays.
-
Double-click the System_Admin icon in the Application Manager folder.
-
Double-click the icon for the desired administrative action.
To Edit a Local File
-
Double-click the Admin Editor action in the System_Admin folder.
See "To Launch Local Administrative Actions" if you have not used the System_Admin folder before.
-
Type the pathname to the file in the dialog box that appears, and click OK.
-
Edit the file using the adminvi text-editing commands.
The adminvi(1) man page notes differences between its commands and vi(1) commands.
-
When finished editing, save the changes and quit the file.
:wq
Use :wq! if you have difficulty saving a file.
Note -You are not able to save to another file name from within the editor.
To Work at a Different Label
In a multilevel session, working at a different label requires creating a new role workspace and relabeling it.
-
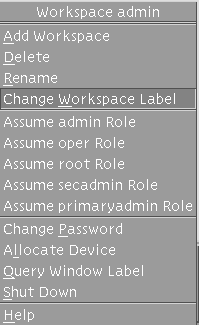
Add a new role workspace by pressing the right mouse button over a role workspace button to bring up the Workspace Role_name menu.
-
Choose Add Workspace from the menu.
A new role workspace becomes active, and a new role workspace button appears in the workspace switch area in the Front Panel.

By default, the name of new workspace is the name of the role account followed by an underline followed by a number. As shown in the example, the name of a second administrative workspace created for the admin role is admin_1.
-
Change the label of the workspace by pressing the right mouse button over the new role workspace button and choosing Change Workspace Label.
The Label Builder displays.
-
In the Label Builder dialog box, type the desired label in the text entry field under Update With, click the Update button, and click OK.
The label of the workspace changes to the label you specified in the Label Builder. Windows and applications that were invoked before the label change con tinue to run at the previous label.
To Enable Any Role to Log In Remotely
See "Managing Remote Logins" for a description of the conditions that permit and disallow remote logins.
Note -
Do the following on every computer where the role will work, to enable remote logins from that computer.
-
Assume the Security Administrator role and go to an
ADMIN_LOWworkspace. -
Use the Admin Editor action from the System_Admin folder to open the /etc/default/login file for editing.
-
Insert a pound sign (#) to comment out the line: CONSOLE=/dev/console.
#CONSOLE=/dev/console
-
Save and quit the file.
To Log In Remotely From the Command Line
Prerequisite--The role must have the Remote Login authorization, which by default is in two Rights profiles: Remote Administration, and Maintenance and Repair.
-
Ask the Security Administrator to do the procedure "To Enable Any Role to Log In Remotely" on every computer you want to use for remote logins.
-
Log in to a computer that the Security Administrator has set up for remote logins, and assume a role.
See "To Enable Any Role to Log In Remotely" for the setup procedure.
-
Log in to a remote host by typing rlogin, telnet, or ftp in a terminal in the role's workspace.
If the rlogin(1) or telnet(1) command is used to log in, all commands assigned in the current role's rights profiles are available.
If the ftp command is used, see the ftp(1) man page for the commands that are available.
To Launch Administrative Actions Remotely
-
Make sure the following prerequisites are satisfied:
-
Administrative roles can remotely log in to the computer, as described in "Allowing Remote Logins by Administrative Roles"
-
The CONSOLE=/dev/console line in the /etc/default/login file is commented out on the current host. The procedure is described in "To Enable Any Role to Log In Remotely".
-
If administering NIS+ from a NIS+ client, make sure that every NIS+ client's name is entered in the NIS+ admin group on the domain's NIS+ master, as described in "To Enable a Role to Administer NIS+".
-
-
Assume an administrative role that either has the dtappsession command in one of its rights profiles or that has the authorizations to use the SMC.
Note -The dtappsession command is in the Remote Administration profile that is included in the default profiles for all the recommended roles. The command can be launched from an administrative role workspace or can be launched as a Legacy Application in the SMC. In the list of Legacy Applications, you can differentiate the tool for the dtappsession command by looking for the Application Manager icon that appears to the left of the words Legacy Application. See the dtappsession(1) man page for more information.
-
To use the dtappsession command from the SMC, double-click the File Manager icon in the list of tools, and go to Step 5.

-
To use the dtappsession command in a terminal, do the following:
-
To avoid confusion between the remote CDE applications and any local ones, dedicate an administrative role workspace to this procedure.
See "To Work at a Different Label" for how to add an administrative role workspace, if needed.
-
In the new dedicated workspace, use the rlogin(1) command followed by the name of the remote host where you plan to administer.
# rlogin e10000domain1
-
Start remote administration by typing dtappsession followed by the name of the local host.
You can also set
DISPLAYenvironment variable on the remote host with the name of the local host. The following screen shows the command entered with the local host name of ssp_host.
# /usr/dt/bin/dtappsession ssp_host
An Application Manager that is running on the remote host displays on the local host.
As shown in the following figure, the dtappsession command brings up a Remote Administration dialog box with the name of the remote host followed by the words: Remote Administration. An Exit button displays at the bottom of the screen. The example shows the wording when the remote host's name is e10000domain1:
e10000domain1: Remote Administration Press Exit to log out of e10000domain1 Exit
-
-
When finished using the remote Application Manager, click the Exit button on the Remote Administration dialog box.
 Caution -
 Be aware that closing the Application Manager does not end the session.
-
If you launched the dtappsession command from a terminal, exit the remote login session and verify that the terminal is returned to the local host.
$ hostname
e10000domain1
$ exit
$ hostname
ssp_host
- © 2010, Oracle Corporation and/or its affiliates
