Linux Configuration
This section describes specific requirements for configuring your Linux environment before you can create Linux images using the N1 Provisioning Server software.
Additional Linux Hardware and Software Requirements
The following requirements must be met on your Linux system:
-
The PXE Boot Server machine (hereafter refered to as the Kickstart server) must be running Linux. The recommended version is Red Hat Enterprise Linux AS2.1 .
-
You need to have the Sun Fire B1600 Platform Documentation, Drivers, and Installation CD supplied by Sun with the server blade.
-
You need to have the Red Hat Enterprise Linux AS2.1 installation CDs.
Setup and Physical Connections
The Kickstart server can be networked into the N1 Provisioning Server setup in several ways. The following illustrations depict two of those possibilities.
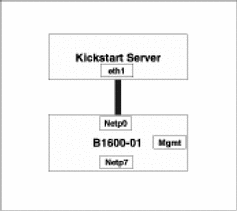
In the scenario illustrated by Figure 4–1, one of the Ethernet interfaces (if the machine has more than one) of the Kickstart server is connected directly to one of the available ports on the blade shelf. In this example, the NETP0 port is used.
Figure 4–1 Kickstart Server Attached Directly to Shelf

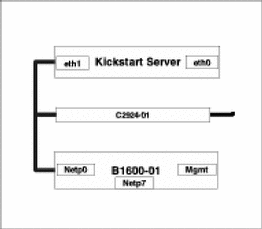
Another possibility, as depicted in Figure 4–2, is that the Kickstart server is connected to the blade shelf via an external switch. In the figure, the interface eth1 of the Kickstart server is connected to a Cisco switch C2924. One of the external ports of the shelf, in this case, NETP0, is also connected to the switch C2924.
Figure 4–2 Kickstart Server Attached to Shelf Through Switch

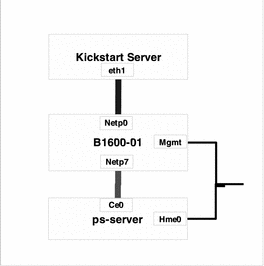
The rest of the document assumes the setup shown in Figure 4–3, in which the connections with the Provisioning Server machine are included. Note that the setup is based on the one described in Figure 4–1. The Kickstart server can be reached from an external network by using a second Ethernet interface if one exists or via terminal server (if one is configured). Alternatively, the Kickstart server can be accessed directly through its console device (monitor) if one is available. The interface connected to the shelf must be plumbed and assigned a valid Internet address.
Figure 4–3 Typical Kickstart Server Setup in N1 Provisioning Server Environment

Example 4–1 Sample Kickstart Server Configuration
The following is an example of the network configuration of the Kickstart server.
[root@ks-server root]# ifconfig -a
eth0      Link encap:Ethernet  HWaddr 00:03:47:31:71:98
          inet addr:10.5.140.151  Bcast:10.5.140.159  Mask:255.255.255.240
          UP BROADCAST RUNNING MULTICAST  MTU:1500  Metric:1
          RX packets:134432 errors:0 dropped:0 overruns:0 frame:0
          TX packets:114431 errors:0 dropped:0 overruns:0 carrier:0
          collisions:0 txqueuelen:100
          RX bytes:31829037 (30.3 Mb)  TX bytes:45777133 (43.6 Mb)
          Interrupt:10 Base address:0xc000

eth1      Link encap:Ethernet  HWaddr 00:03:47:31:71:99
          inet addr:10.40.40.1  Bcast:10.40.40.255  Mask:255.255.255.0
          UP BROADCAST RUNNING MULTICAST  MTU:1500  Metric:1
          RX packets:321940 errors:0 dropped:0 overruns:0 frame:0
          TX packets:1540859 errors:0 dropped:0 overruns:0 carrier:0
          collisions:0 txqueuelen:100
          RX bytes:48545214 (46.2 Mb)  TX bytes:2160671329 (2060.5 Mb)
          Interrupt:5 Base address:0xe000

lo        Link encap:Local Loopback
          inet addr:127.0.0.1  Mask:255.0.0.0
          UP LOOPBACK RUNNING  MTU:16436  Metric:1
          RX packets:538 errors:0 dropped:0 overruns:0 frame:0
          TX packets:538 errors:0 dropped:0 overruns:0 carrier:0
          collisions:0 txqueuelen:0
          RX bytes:42254 (41.2 Kb)  TX bytes:42254 (41.2 Kb)
[root@ks-server root]#
|
The first interface (eth0) of the server is connected to an external switch. The server is accessible through this interface. The second interface (eth1) is connected directly to the shelf and assigned an IP address of 10.40.40.1 in the 10.40.40.0 network.
Preparing the Kickstart Server
To set up the Kickstart server, see the instructions in “ Installing Linux From a PXE Boot Install Environment “ in Sun FireTM B100x and B200x Server Blade Installation and Setup Guide. Start at the beginning of Chapter 4 and stop at Step 5 in section 4.4, “Installing Linux on a Server Blade from a PXE Boot Server.”
Tip –
You can download the Sun FireTM B100x and B200x Server Blade Installation and Setup Guide from the following web site:
Configuring the Linux Installation
The default configuration files provided with the Red Hat distribution need to be modified with appropriate values for IP addresses and path names. Refer to steps 5, 6, and 7 of section 4.4, “Installing Linux on a Server Blade from a PXE Boot Server” in Sun FireTM B100x and B200x Server Blade Installation and Setup Guide. More importantly, you need to customize the disk partition and package selection information for N1 Provisioning Server 3.1, Blades Edition.
Package Selection
The Linux image must contain some packages required by N1 Provisioning Server. To ensure that these packages are included, add the entry N1 Required RPMS to the package selection list. Edit the file /<tftp_base_dir>/as-2.1/RedHat/base/comps to add the following declaration:
1 N1 Required RPMS {
    pdksh
    tftp
    tftp-server
}
The following list is an example of package selection specified by the ks.cfg file.
%packages
@ Network Managed Workstation
@ Software Development
@ Base
@ Printing Support
@ Network Support
@ Messaging and Web Tools
@ News Server
@ NFS File Server
@ Windows File Server
@ Web Server
@ Router /Firewall
@ DNS Name Server
@ Emacs
@ Utilities
@ Advanced Server
@ N1 Required RPMS
Non-standard Disk Sizes and Linux
Actual disk sizes (to the byte level) vary from vendor to vendor. Therefore, for the purpose of generalization, N1 Provisioning Server assumes the size of all disks to be 30*10 ^9 bytes or 30GB. However, the actual disk size of B100n blades is slightly more than 30*10 ^9 bytes (30005305344 bytes). Therefore, a disk image of 30*10 ^9 is guaranteed to work on all B100n/B200n server blades and a disk image of the actual size of the disk might not work on all server blades (due to the variance). Using a disk size value of 30*10 ^9 bytes for all images created ensures that the image will be deployable on all server blades.
The Linux operating system uses disk blocks towards the end of the disk also to store its data. As a result, taking a 30*10 ^9-byte snapshot of the disk leaves out a few critical disk blocks that are towards the end. A blade provisioned with this image will fail to boot. To solve this problem, create a dummy filesystem (approximately 10 MB to account for the extra bytes) towards the end of the disk and exclude this file system before taking the snapshot.
The following disk partition is one example:
part /--asprimary --fstype ext3 --size 512 --grow --ondisk hda part swap --size 2048 --ondisk hda part /tmp --fstype ext3 --size 512 --ondisk hda part /dummy --fstype ext3 --size 10 --ondisk hda |
Notice the /dummy filesystem of size 10 MBytes in the partition information.
- © 2010, Oracle Corporation and/or its affiliates
