Chapter 8 Managing Terminals and Modems With Serial Port Manager
This chapter describes how to set up and maintain modems and terminals by using the Solstice Serial Port Manager and its corresponding command-line equivalents. This is a list of the step-by-step instructions in this chapter.
Serial Port Manager configures the serial port software to work with terminals and modems by calling the pmadm command and supplying the appropriate information. It features:
-
Displays of serial port information
-
Templates for common terminal and modem configurations
-
Multiple port setup, modification, or deletion
Serial Port Manager Features
The Serial Port Manager enables you to configure or remove terminals and modems used with your serial ports. This tool also enables you to configure multiple ports at the same time.
The Seral Port Manager consists primarily of two windows: the Serial Port Manager main window and the Modify window.
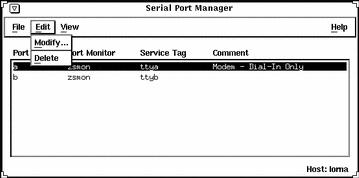
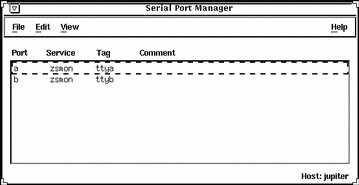
The Serial Port Manager main window displays the serial ports for the system that you are currently logged managing.

In this window, three pull-down menus enable you to:
-
Select the port that you wish to modify
-
Delete modems and terminals
-
View serial ports for different hosts
The three pull-down menus consist of the following:
|
Pull-down Menu |
Options |
Description |
|---|---|---|
|
File |
Exit |
Closes the Serial Port Manager tool |
|
Edit |
Modify |
Opens the Serial Port Manager: Modify window |
|
|
Delete |
Removes the port monitor and service tag configuration for the selected port |
|
View |
Host |
Brings up the Host window, which enables you to select from a list of available hosts |
The option that is most commonly used is the Modify option in the Edit pull-down menu. This option opens the Modify window.
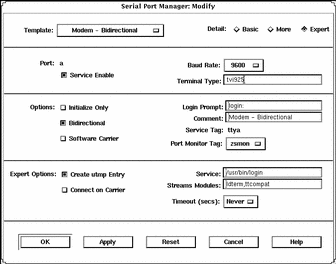
In this window, you have many options to choose from, including templates for commonly used terminal and modem configurations. The templates can be viewed by selecting the Template button, which enables you to choose one of the following template options:
-
Terminal - Hardwired
-
Modem - Dial in Only
-
Modem - Dial out Only
-
Modem - Bidirectional
-
Initialize Only - No Connection

You can select the desired option level using one of the Detail buttons described in Table 8-1. Each button displays a different level of options, as shown in the previous screen display. (Each level is separated by a thin line.)
Table 8-1 Serial Port Manager Detail Options|
Detail |
Option |
Description |
|---|---|---|
|
Basic |
Service Enable |
Button that allows you to enable (button selected) or disable (button de-selected) the associated port. |
|
|
Baud Rate |
Button that allows you to select the baud rate of your terminal or modem. You can either choose one of the listed baud rates or enter a different baud rate using the other option. |
|
|
Terminal Type |
Text entry field that allows you to specify the type of terminal that will be connected to the serial port. |
|
More |
Initialize Only |
Button that specifies that the port software is initialized, but not configured. |
|
|
Bidirectional |
Button that specifies that the port line is used in both directions. |
|
|
Software Carrier |
Button that specifies that the software carrier detection feature is used. If this option is not checked, the hardware carrier detection signal is used. |
|
|
Login Prompt |
Text entry field that allows you to change the login prompt. |
|
|
Comment |
Text entry field that allows you to type any comments to clarify the type of port the serial port is configured to be; by default, the Comment field will display the name of the serial port template that you have selected. |
|
|
Service Tag |
tty tag entry that corresponds to the selected port. |
|
|
Port Monitor Tag |
Button that allows you to select the type of monitor associated with this port; you can either choose from the list or choose the Other option and then enter the monitor type. |
|
Expert |
Create utmp Entry |
Button that when selected, specifies that a utmp entry is created upon login. This item must be checked if a login service is used. |
|
Expert (continued) |
Connect on Carrier |
Button that when selected, specifies that a port's associate service is invoked immediately when a connect indication is received. |
|
|
Service |
Text entry field that specifies the program that is run upon connection. |
|
|
Streams Modules |
Text entry field that shows the Streams modules that are pushed before the service is started. |
|
|
Timeout (secs) |
Button that allows you to chose the amount of seconds before the connection times out. |
Command-Line Equivalents of Serial Port Manager
Table 8-2 lists the commands that provide the same functionality as Serial Port Manager and can be used without running OpenWindows or Motif CDE. Many of the Serial Port Manager procedures in this chapter provide corresponding examples using the command-line equivalents.
Table 8-2 Command-Line Equivalents of Serial Port Manager|
Command |
Description |
|---|---|
|
admserialmod |
Modifies a serial port service for a terminal or modem |
|
admserialdel |
Deletes an existing serial port service for a terminal or modem |
|
admserialls |
Lists the existing services for the specified serial ports |
Files Modified by Serial Port Manager
Table 8-3 describes the files that are modified by Serial Port Manager on the system where you are modifying the serial port services.
Table 8-3 Files Modified by Serial Port Manager
Using Serial Port Manager
By using serial port manager, you can accomplish a number of tasks. The following procedures describe each of these tasks.
How to Start Serial Port Manager
-
Verify that the prerequisite steps described in Chapter 1, Introduction, are met.
-
Type solstice & from a Command or Shell Tool prompt and press Return.
-
Click the Serial Port Manager icon.
The Serial Port Manager main window is displayed.

-
(Optional) Choose Host from the View menu.
How to Configure Multiple Ports Using Serial Port Manager
-
Start Serial Port Manager from the Solstice Launcher, if not done already.
See the procedure on "How to Start Serial Port Manager" for information about starting Serial Port Manager.
-
Select the ports that you would like to modify.
You can select more than one port by single-clicking on each port listed in the Serial Port Manager main window.
-
Select the Modify option from the Edit pull-down menu.
How to Add a Terminal
-
Start Serial Port Manager from the Solstice Launcher, if not done already.
See the procedure on "How to Start Serial Port Manager" for information about starting Serial Port Manager.
-
Select the port or ports that will be used with a terminal in the Serial Port Manager main window.
-
Choose Modify from the Edit menu.
The Modify window is displayed in the Basic Detail mode. (For additional details, click on More or Expert.)
-
Change values of template entries if desired.
Example of a Command-Line Equivalent for Adding a Terminal
The following example is the equivalent of using Serial Port Manager to enable a terminal connection to port /dev/term/a.
# admserialmod -e -p hw a |
In this command,
|
-e |
Enables the port. |
|
-p hw |
Specifies that the hardwired template be used to configure the port. |
|
a |
Specifies the name of the port, in this case port a. |
How to Add a Modem
-
Start Serial Port Manager from the Solstice Launcher, if not done already.
See the procedure on "How to Start Serial Port Manager" for information about starting Serial Port Manager.
-
Select the port or ports that will be used with a modem from the Serial Port Manager main window.
-
Choose Modify from the Edit menu.
The Modify window appears in the Basic Detail mode. (For additional details, select either the More or Expert Detail modes.)
-
Choose the modem configuration from the Template menu that meets or most closely matches your modem service.
The modem template choices are described here.
Modem Configuration
Description
Modem - Dial In Only
Users may dial in to the modem but cannot dial out.
Modem - Dial Out Only
Users may dial out from the modem but cannot dial in.
Modem - Bidirectional
Users may either dial in or out from the modem.
See the Reference online help for the default values of each template. If a UUCP service will be used to dial in to your modem on a Solaris 2.x system, see "How to Configure a Modem for Use With UUCP" for the rest of the procedure.
-
Change values of template entries if desired.
Example of a Command-Line Equivalent for Adding a Modem
The following example is the equivalent of using Serial Port Manager to enable a modem to port /dev/term/b.
# admserialmod -e -p bi -b 38400 b |
In this command,
|
-e |
Enables the port. |
|
-p bi |
Specifies the bidirectional template be used to configure the port. |
|
-b 38400 |
Specifies the baud rate. |
|
b |
Specifies the name of the port. |
How to Configure a Modem for Use With UUCP
UUCP sends information using seven bits and even parity. Solaris software modem configurations use eight bits and no parity for internationalization purposes. To set up your modem service to work with UUCP, follow these instructions.
-
Start Serial Port Manager from the Solstice Launcher, if not done already.
See the procedure on "How to Start Serial Port Manager" for information about starting Serial Port Manager.
-
From the Serial Port Manager main window, select the port or ports that will be used with a modem.
-
Choose Modify Service from the Edit menu.
The Modify Service window appears in the Basic Detail mode. (For additional details, select either the More or Expert Detail modes.)
-
Choose the modem configuration from the Template menu that meets or most closely matches your modem service.
-
Select Other from the Baud Rate menu.
-
Enter a baud rate value from the /etc/ttydefs file that provides seven bit, even parity service and click on OK.
In this example, the 9600E baud rate was selected. This provides a service with a 9600 baud rate, seven bits, and even parity.
-
Change values of other template entries if desired.
Example of a Command-Line Equivalent for Adding a Modem
The following example is the equivalent of using Serial Port Manager to enable a modem (for use with UUCP) to port /dev/term/b.
# admserialmod -e -p bi -b 9600E b |
In this command,
|
-e |
Enables the port. |
|
-p bi |
Specifies the bidirectional template be used to configure the port. |
|
-b 9600E |
Specifies the baud rate. |
|
b |
Specifies the name of the port. |
How to Initialize a Port Without Configuring
-
Start Serial Port Manager from the Solstice Launcher, if not done already.
See the procedure on "How to Start Serial Port Manager" for information about starting Serial Port Manager.
-
Choose Modify from the Edit menu.
The Modify window appears in the Basic Detail mode. See the Reference online help for default values of the Basic, More, or Export Detail modes.
-
Choose Initialize Only - No Connection from the Template menu.
-
Click on OK to initialize the port.
Example of a Command-Line Equivalent for Initializing a Modem
The following example is the equivalent of using Serial Port Manager to initialize port /dev/term/b.
# admserialmod -e -p init b |
In this command,
|
-e |
Enables the port. |
|
-p init |
Specifies the port should only be initialized. |
|
b |
Specifies the name of the port. |
How to Disable a Port
Be careful that when disabling a port that you do not disable the port used for the console because when you reboot, no console would be available to you.
-
Start Serial Port Manager from the Solstice Launcher, if not done already.
See "How to Start Serial Port Manager" for information about starting Serial Port Manager.
-
Select the port or ports that you want to disable from the Serial Port Manager main window.
-
Choose Modify from the Edit menu.
-
Select the Service Enable item in the Modify window to disable the port.
The other items in the Modify window will turn gray when the port service is disabled.
-
Click on OK to disable the port.
Example of a Command-Line Equivalent for Disabling a Port
The following example is the equivalent of using Serial Port Manager to disable port /dev/term/b.
# admserialmod -d b |
How to Delete a Port Service
Be careful that when deleting a port that you do not delete the port used for the console because when you reboot, no console would be available to you.
-
Start Serial Port Manager from the Solstice Launcher, if not done already.
See the procedure on "How to Start Serial Port Manager" for information about starting Serial Port Manager.
-
Select the port or ports with a service you want to delete from the Serial Port Manager main window.
-
Choose Delete from the Edit menu. A window is displayed asking you to confirm that the service should be deleted.
Example of a Command-Line Equivalent for Deleting a Port Service
The following example is the equivalent of using Serial Port Manager to disable port /dev/term/b.
# admserialdel b |
- © 2010, Oracle Corporation and/or its affiliates
