Installing Software Usage Monitoring Toolkit
The software usage monitoring toolkit enables you to install software usage monitoring on clients or on multiple servers. For instance, you may be running software usage monitoring on multiple servers that share the software usage monitoring software among multiple hosts, or you could run software usage monitoring in a client/server environment. Each of these environments are set up differently; however, regardless of which environment you use software usage monitoring in, it operates basically the same.
Note -
If you have already installed software usage monitoring from a previous release of AdminSuite, you do not need to install it again.
The following procedure describes how to install the software usage monitoring toolkit.
How to Install the Software Usage Monitoring Toolkit
-
Log in as a member of the sysadmin group (group 14).
Note -If you are installing the software on a local system, you do not have to be a member of the sysadmin group; you can install the software as root.
-
Verify that you are a member of the sysadmin group.
$ groups
If the sysadmin group is listed in the output, proceed to the next step. If not, follow the instructions in "Becoming a Member of the sysadmin Group".
-
Change directories to the product directory on the CD.
$ cd /cdrom/solstice_sysmgt_2_3
-
Run the admin_install script in the product directory.
Help is available during the installation.
$ ./admin_install
The main installation window shown below appears.
Welcome to the Solstice Installation Program ...

To exit the installation process at any time, type 0
and press the Return key.

   1. Install AdminSuite 2.3 and AutoClient 2.1
   2. Install SunSoft Print Client (Solaris 2.3 - 2.5.1 only)
   3. Install Software Usage Monitoring Toolkit
   4. Set up systems to use AdminSuite and AutoClient
   5. Installation Help

Enter the number for one or more choices, separated by a space and
then press the Return key.

[default: 1]>>>
-
Choose the option 3: Install Software Usage Monitoring Toolkit.
This option enables you to choose the software usage monitoring system type from the following menu.
Software Usage Monitoring System Type

	1. Install Software Usage Monitoring Client
	2. Install Software Usage Monitoring Server
	3. Installation Help

Enter the number for one or more choices, separated by a space and
then press the Return key.
[default: 1]>>>
-
Choose option 1 or 2 depending upon the system type (client or server) you wish to install.
You will see an Installation Summary window similar to the following.
==== Installation Summary ====

Product(s):		Software Usage Monitoring Client software

Host(s):	lorna

Start Installation
------------------

Do you want to start the installation?

	1. Start installation
	2. Cancel installation

>>>
Note -For each client you wish to run software usage monitoring on, you will have to run the installation script for each client.
-
Alias the server you wish to be the host server to swusage_host.
Refer to "How to Set Up the Alias for swusage_host" for information about how to set the alias swusage_host to your server.
How to Set Up the Alias for swusage_host
-
Start the Database Manager provided with the Solstice Launcher.
Note -See the Solstice AdminSuite 2.3 Administration Guide for detailed information about how to use the Database Manager.
-
Select the name service used with your computer network.
You can chose NIS, NIS+, or none.
-
Check that the domain or host name is correct.
If not, type the domain or host name you need to access.
-
Select the Hosts file.
-
Click on OK.
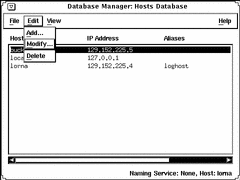
The Database Manager main window is displayed with the file contents displayed.
-
Select the host you wish to designate as the swusage_host.
-
From the Edit pull-down menu, choose Modify.
-
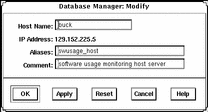
In the Database Manager Modify pop-up window, add swusage_host to the Aliases field.
-
Click on OK to save and apply the changes.
You should see that your addition is now listed in the aliases column for that host.
-
Verify that the swusage_host alias is set correctly.
$ ping swusage_host
swu_host is alive
The ping command may produce a different line specifying that a different workstation other than swusage_host is alive; for example, the line may read buck is alive.
Example of Using the Database Manager to Set Up the Host Alias for Software Usage Monitoring.
This example shows how to set up the host alias for software usage monitoring using the Solstice Database Manager. In this example, the host alias of swusage_host needs to be set to the machine named buck.
Within the Database Manager Hosts Database window, select the host buck and then choose Modify from the Edit menu. The Modify window is displayed.

Within the Aliases field, you would enter the name swusage_host to represent the software usage monitoring host server. To apply and save these entries, click on OK.

- © 2010, Oracle Corporation and/or its affiliates
