| C H A P T E R 5 |
|
Manage User Accounts |
ILOM supports up to 10 user accounts. One of these accounts is the preconfigured Administrator account, which provides read and write access to all ILOM features, functions, and commands. Using the ILOM web interface or command-line interface (CLI) you can add, modify, or delete user accounts.
This chapter includes the following sections:
Apply the following general guidelines when you manage user accounts:
User accounts have two defined roles. Each role grants certain privileges to the ILOM user. User roles and privileges include:
Preconfigured ILOM Administrator accounts, also known as fixed user accounts, include:
The user name, root, cannot be deleted or changed, other than resetting its password (changeme). This account offers built-in administrative privileges (read and write access) to all ILOM features, functions, and commands.
The first time you access ILOM, at the SP level or CMM level, you will need to log in as root with the default password changeme. After you have logged in to ILOM and established network connectivity to the system, you should consider resetting the password (changeme) associated with the ILOM root account to protect your system from unauthorized access. If you are using a blade server system, reset this password on each CMM and blade installed in the system chassis. For more information about resetting the ILOM root account password, see Change ILOM Root Account Password Using the Web Interface.
|
Follow these steps to change the password for the root account:
1. Open a web browser and type the IP address of a server SP or CMM.
The Login page for the ILOM web interface appears.
2. In the ILOM Login page, do the following:
a. Type the default user name (root) and password (changeme).
The ILOM web interface appears.
3. In the ILOM web interface, do the following:
4. In the ILOM web interface, click User Management --> User Accounts.
The User Account Settings page appears.
FIGURE 5-1 User Account Settings Page
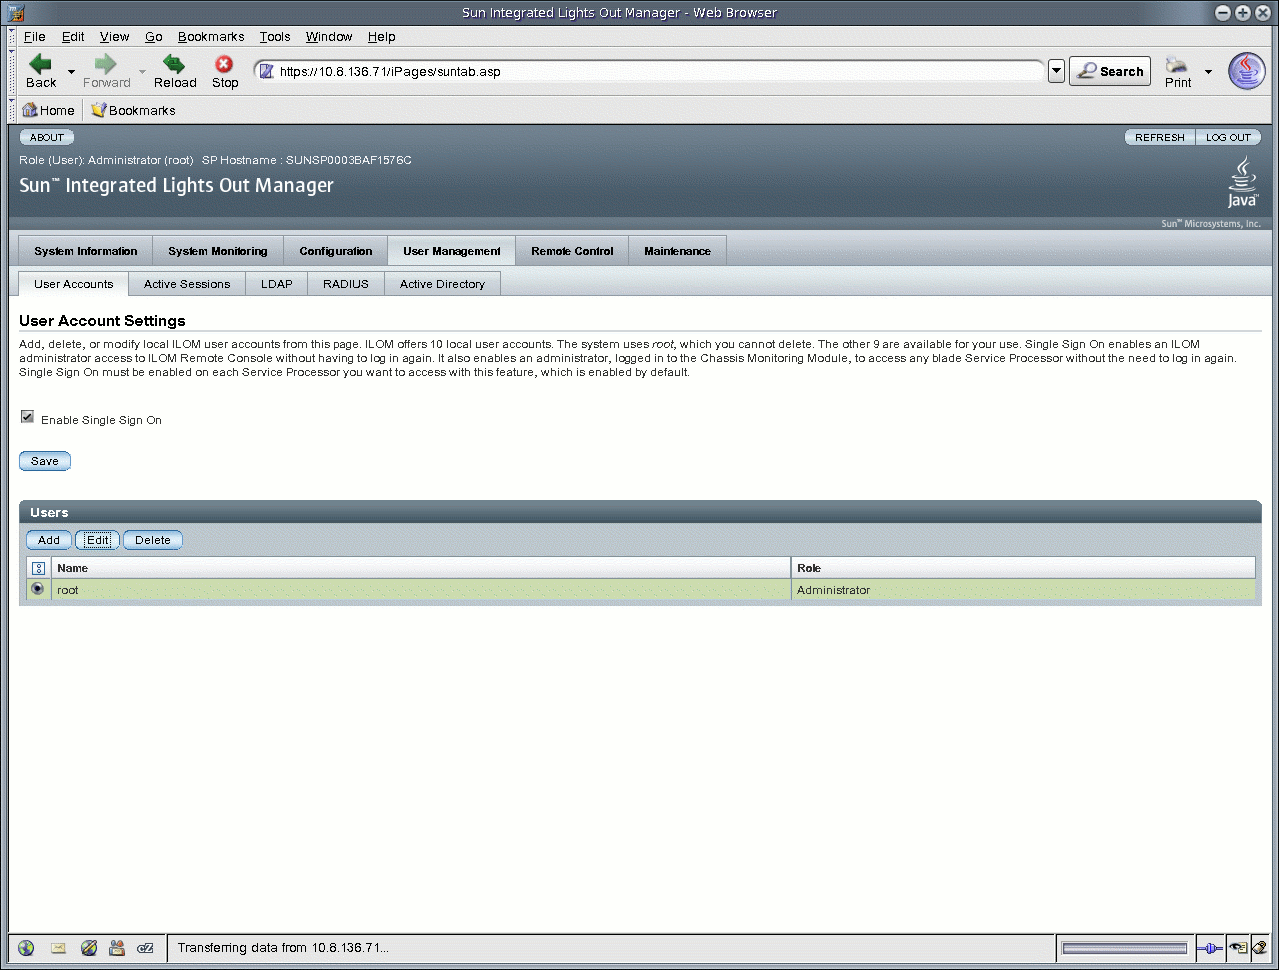
5. In the User Account Settings page, select the radio button next to root then click Edit.
6. Click OK to continue. The User Account Password dialog appears.
FIGURE 5-2 User Account Password Dialog
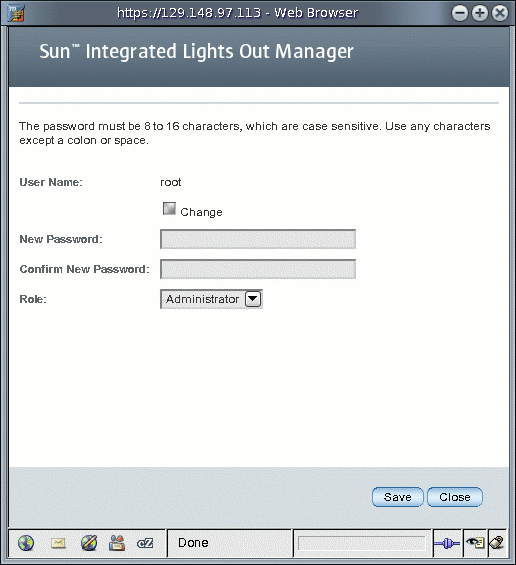
7. In the User Account password dialog, do the following:
a. Select the box next to Change.
b. In the New Password text box, type the new password.
c. In the Confirm Password text box, type the new password again.
The new password identified in Step 6b and Step 6c is activated for the root Administrator account.
8. If necessary, repeat Step 2 through Step 6d to change the password for each installed device.
|
 Type the following command to change the ILOM root account password:
-> set /SP/users/root password=password
-> set /SP/users/root password=password Changing password for user /SP/users/root... Enter new password again: ******** New password was successfully set for user /SP/users/root |
Single Sign On is a convenient authentication service that reduces the number of times you need to enter a password to gain access to ILOM. Single Sign On is enabled by default. As with any authentication service, authentication credentials are passed over the network. If this is not desirable, consider disabling the Single Sign On authentication service.
|
Only Administrators can disable or enable Single Sign On.
 Type the following command to enable or disable single sign on:
--> set /SP/services/sso state=disabled|enabled
|
Follow these steps to enable or disable Single Sign On:
1. Log in to the ILOM web interface as Administrator.
2. Select User Management --> User Accounts.
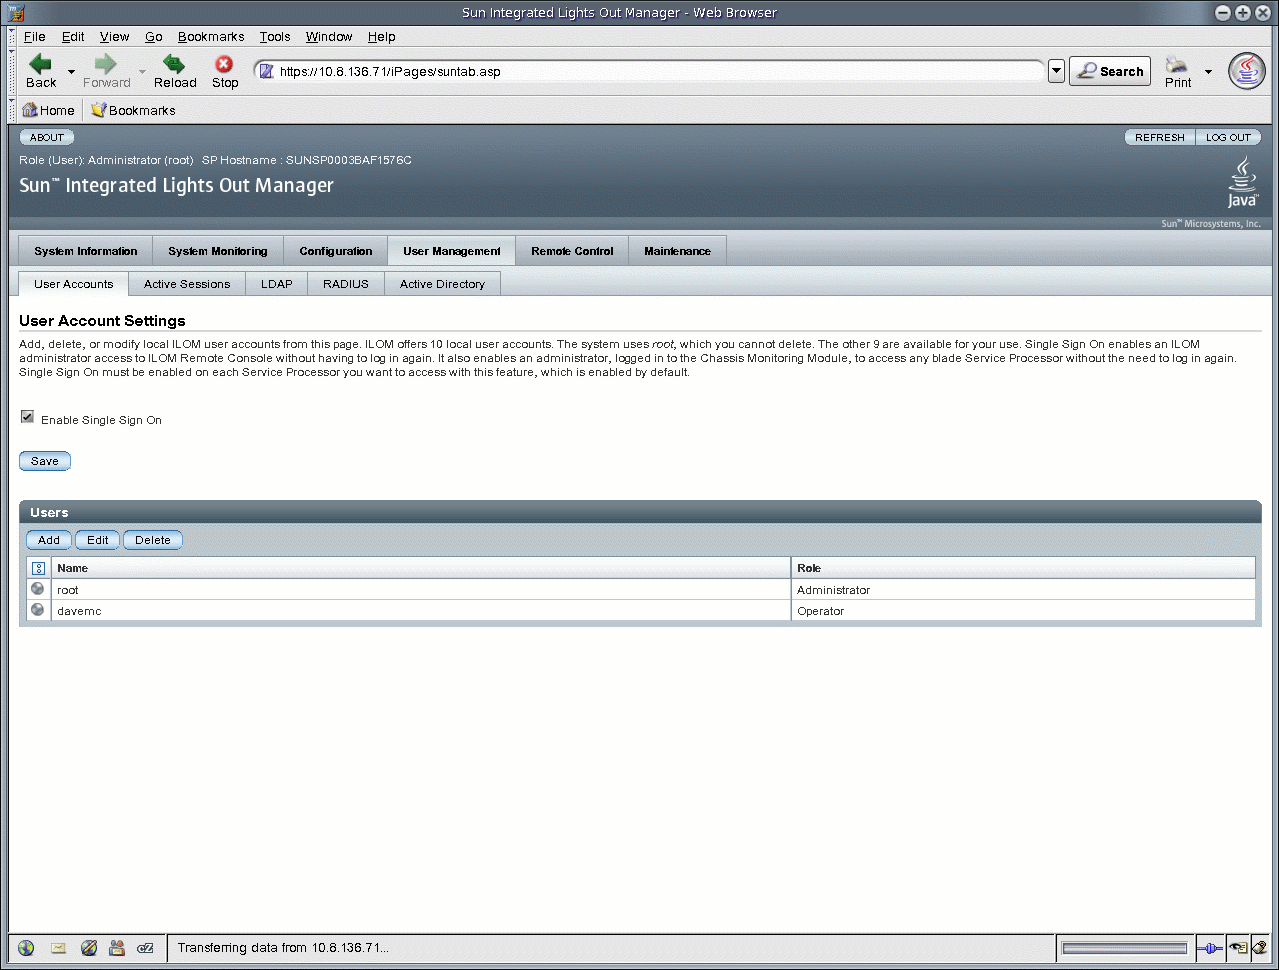
The User Account Settings page is displayed.
3. Click the check box next to Enable Single Sign On to enable the feature, or deselect the check box to disable the feature.
FIGURE 5-3 User Account Settings Page With Single Sign On Enabled
This section describes how to manage user accounts using the ILOM command-line interface (CLI).
|
 Type the following command to add a local user account:
--> create /SP/users/username password=password role=administrator|operator
-> create /SP/users/davemc Creating user... Enter new password: ******** Enter new password again: ******** Created /SP/users/davemc |
|
 Type the following command to modify a local user account:
--> set /SP/users/username password=password role=administrator|operator
|
1. Type the following command to delete a local user account:
--> delete /SP/users/username
Are you sure you want to delete /SP/users/davemc (y/n)?
2. Type y to delete, or n to cancel.
|
 Type the following command to display information about all local user accounts:
--> show -display targets /SP/users
|
 Type the following command to display information about one specific user account:
--> show /SP/users/username
-> show /SP/users/davemc /SP/users/davemc Targets: Properties: role = Operator password = ***** Commands: cd set show |
|
Use the set command to change targets, properties, passwords, and values for configured user accounts.
 Type the following command to configure a local user account:
--> set <target> [<property>=value]
The following targets, properties, and values are valid for local user accounts.
For example, to change the role for user1 from Administrator to Operator type:
--> set /SP/users/user1 role=operator
To change the password for user1, type:
| Note - You must have Administrator privileges to change user properties. |
|
 Type the following command to display information about all local user sessions:
--> show /SP/sessions
|
 Type the following command to display information about an individual user session:
--> show /SP/sessions/108
-> show /SP/sessions/108 /SP/sessions/108 Targets: Properties: username = root starttime = Tue Jun 5 10:04:05 2007 type = shell Commands: cd show |
This section describes how to add, modify, and delete user accounts using the web interface.
|
1. Log in to the ILOM web interface as a user with Administrator privileges.
Only accounts with Administrator privileges are allowed to add, modify, or delete user accounts. However, Operators can modify their own password.
If a new user is given Administrator privileges, those privileges are also automatically granted for the command-line interface (CLI) and Intelligent Platform Management Interface (IPMI) to ILOM.
2. Select User Management --> User Accounts.
The User Account Settings page appears.
3. In the Users table, click Add.
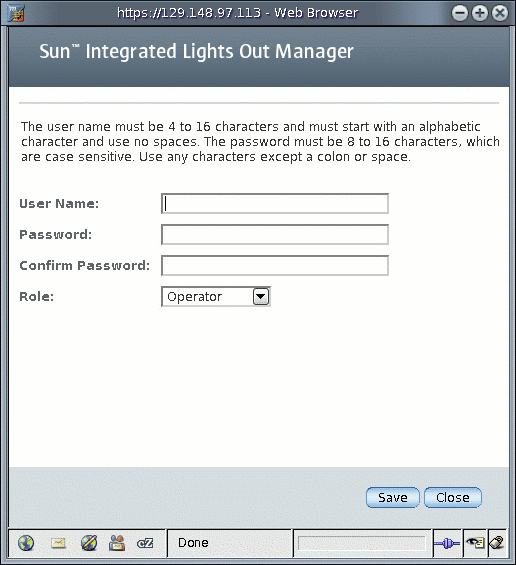
4. Complete the following information:
a. Type a user name in the User Name field.
b. Type a password in the Password field.
The password must be at least 8 characters and no more than 16 characters. The password is case-sensitive. Use alphabetical, numeric, and special characters for better security. You can use any character except a colon. Do not include spaces in passwords.
c. Retype the password in the Confirm Password field to confirm the password.
d. From the Role drop-down list, select Administrator or Operator.
FIGURE 5-5 Add User Dialog With Populated Fields
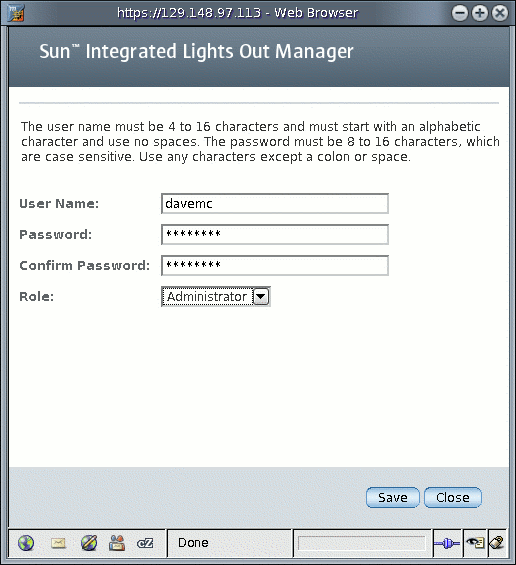
e. When you are done entering the new user’s information, click Save.
The User Account Settings page is redisplayed. The new user account and associated information is listed on the User Account Settings page.
FIGURE 5-6 User Account Settings Page Showing New User

|
This section describes how to modify an ILOM user account. Modifying a user account can change the user’s password, and their network and serial privileges.
| Note - Only accounts with Administrator privileges are allowed to add, modify, or delete user accounts. However, Operators can modify their own password. |
If a new user is given Administrator privileges, those privileges are also automatically granted to the user for the command-line interface (CLI) and Intelligent Platform Management Interface (IPMI) to ILOM.
1. Log in to ILOM as an Administrator to open the web interface.
2. Select User Management --> User Accounts.
The User Account Settings page appears.
FIGURE 5-7 User Account Settings Page
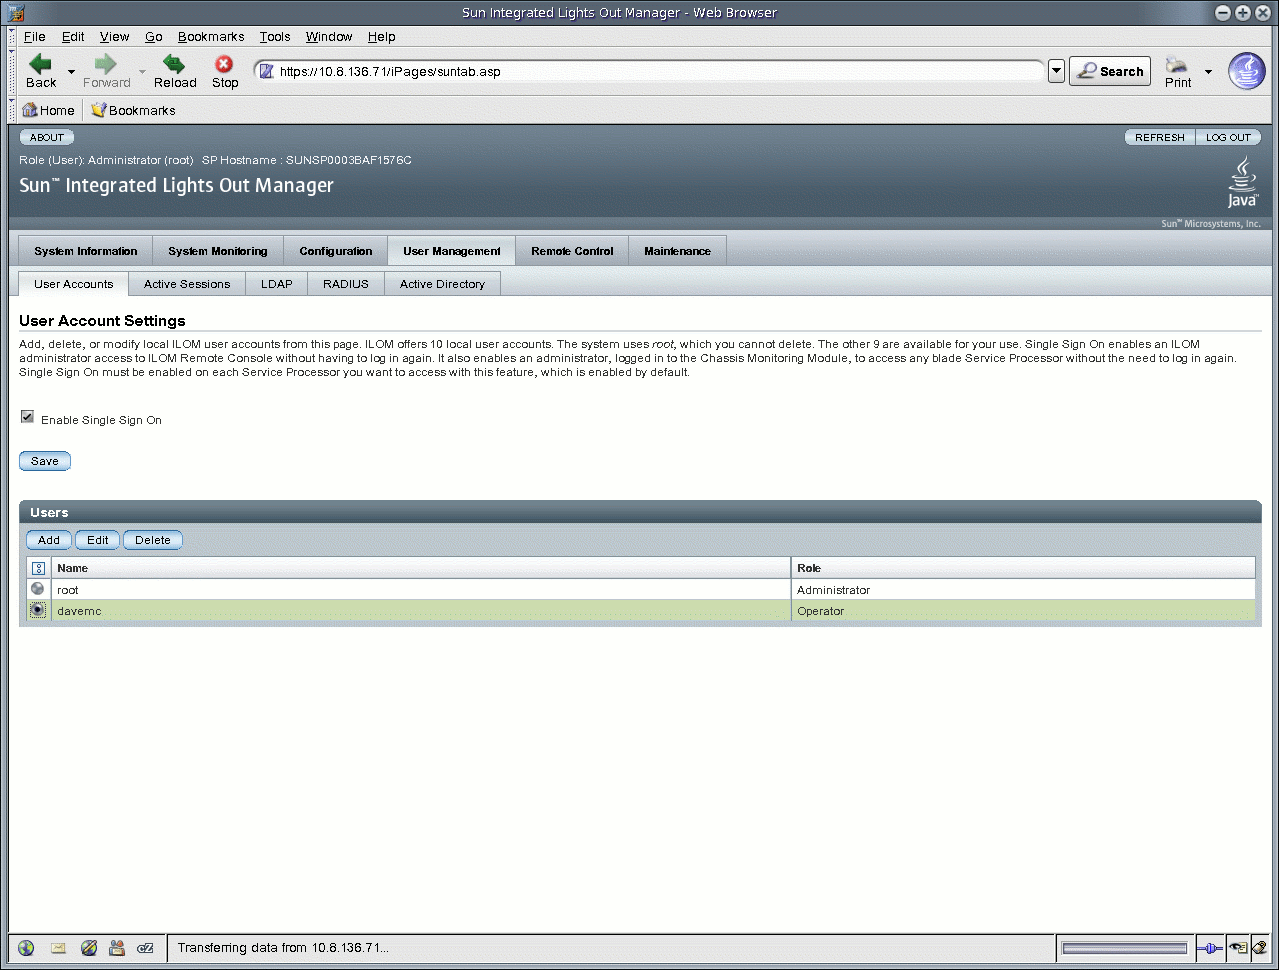
3. In the Users table, select a radio button next to the user account you want to modify.
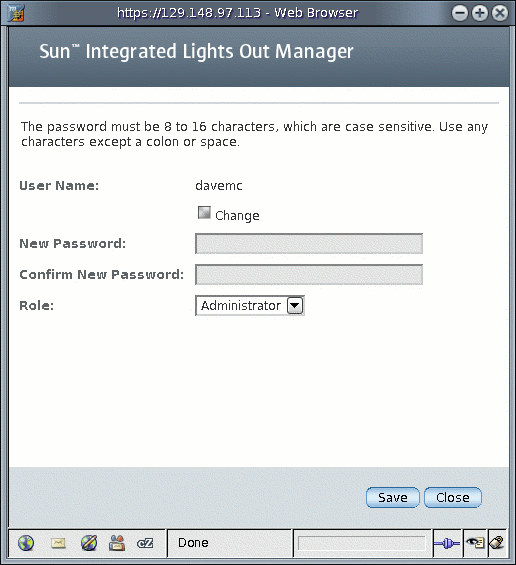
5. Modify the password if needed.
a. Select the Change check box if you want to change the user password. If you do not want to change the password, deselect the check box.
b. Type a new password in the New Password field.
The password must be between 8 and 16 characters. The password is case-sensitive. Use alphabetical, numeric, and special characters for better security. You can use any character except a colon. Do not include spaces in passwords.
c. Retype the password in the Confirm New Password field to confirm the password.
6. From the Role drop-down list, select Administrator or Operator.
7. After you have modified the account information, click Save for your changes to take effect, or click Close to return to the previous settings.
The User Account Settings page is redisplayed.
|
1. Log in to ILOM as an Administrator to open the web interface.
2. Select User Management --> User Accounts.
The User Account Settings page appears.
3. Select the radio button next to the user account you want to delete.
| Note - You cannot delete the root account. |
FIGURE 5-9 User Account Settings Page
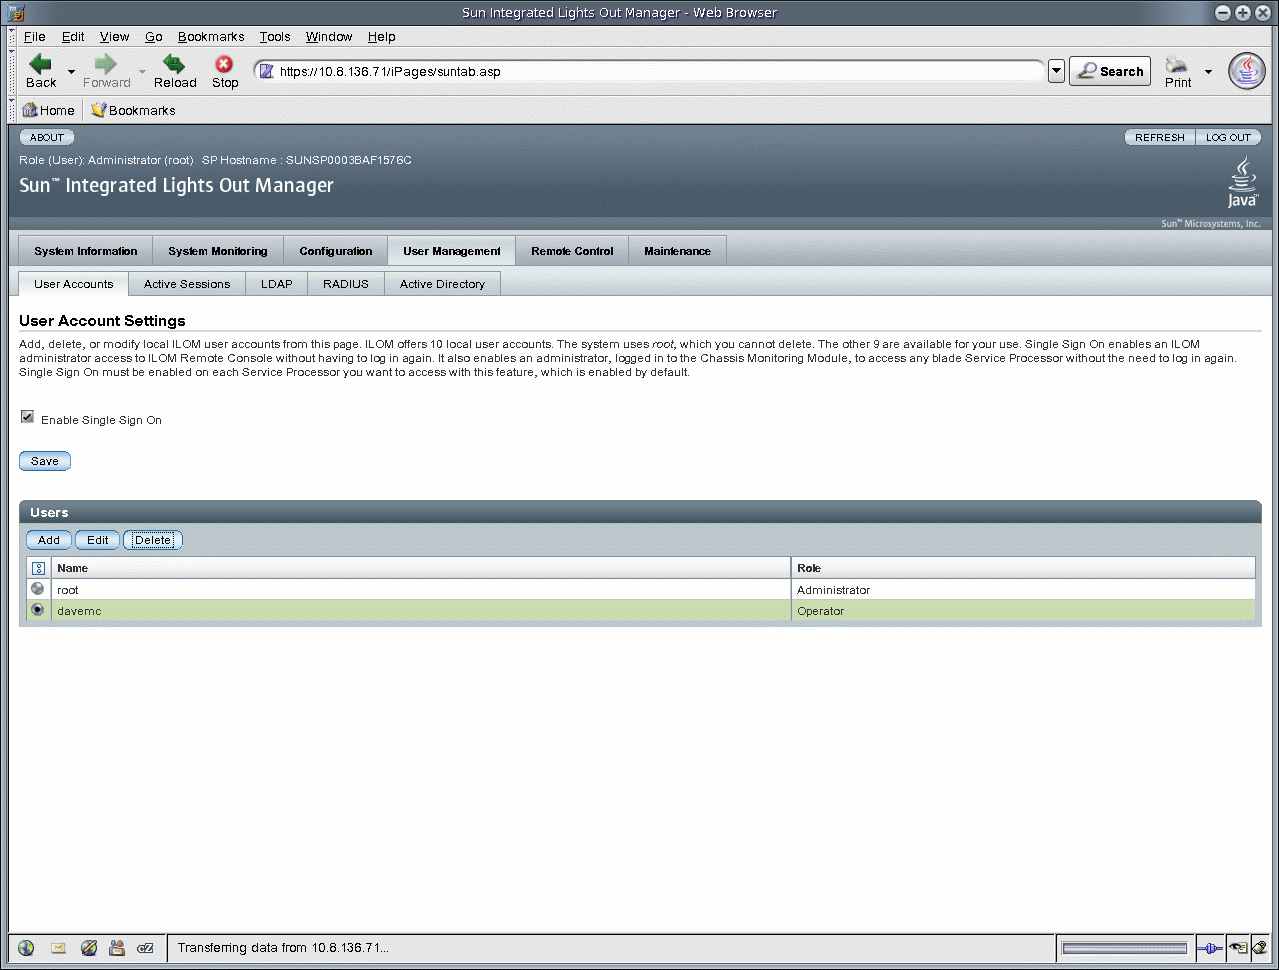
4. In the Users table, click Delete.
The confirmation dialog opens.
FIGURE 5-10 Delete User Configuration Dialog
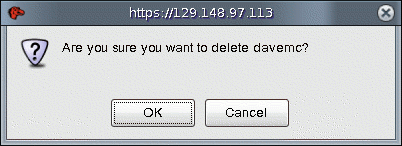
5. Click OK to delete the account or click Cancel to stop the process.
The User Account Settings page opens with the user account you deleted no longer listed.
|
1. Log in to the ILOM web interface.
2. Select User Management --> Active Sessions.
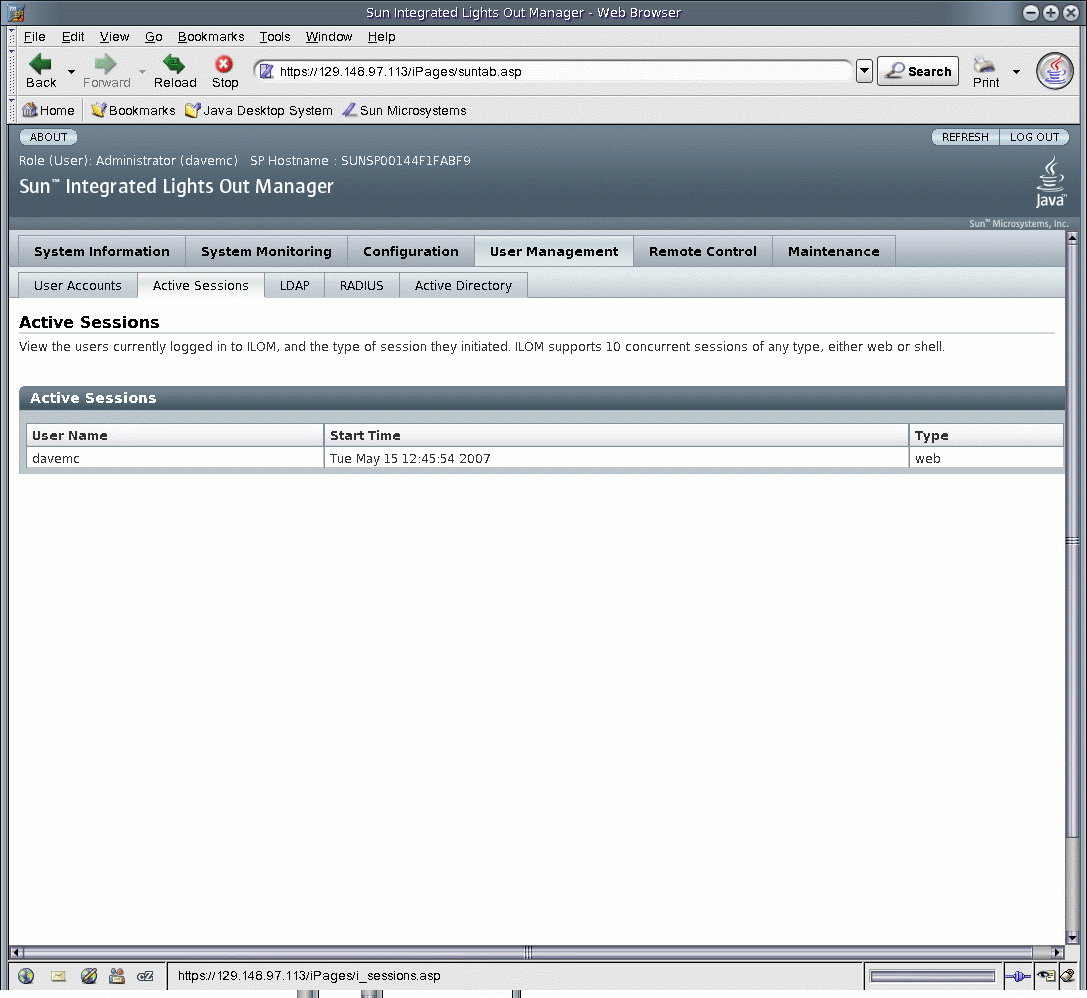
The Active Sessions page appears. You can find the user name, the date and time that the user initiated the session, and the types of session of the users currently logged in to ILOM.
FIGURE 5-11 Active Sessions Page
ILOM supports Active Directory, the distributed directory service included with Microsoft Windows Server 2003 and Microsoft Windows 2000 Server operating systems. Like an LDAP directory service implementation, Active Directory is used to authenticate user credentials. Using Active Directory, network administrators also can securely add, modify, and delete policies and software across an organization. In addition, Active Directory uses a centralized directory service database system, called a directory store, which enables administrators to locate information about users, devices, and resources on the network.
Active Directory provides both authentication of user credentials and authorization of user access levels to networked resources. Active Directory uses authentication to verify the identity of a user, a device, or other entity in a computer system, before that entity can access system resources. Active Directory uses authorization to grant specific access privileges to a user in order to control a user’s rights to access networked resources. User access levels are configured or learned from the server based on the user’s group membership in a network domain, which is a group of hosts identified by a specific Internet name. A user can belong to more than one domain. Active Directory authenticates users in the order in which the user’s domains were configured.
Once authenticated, the user’s authorization level can be determined in the following ways.
Active Directory is typically used for one of three purposes:
To configure Active Directory, you need to enter basic data (such as primary server, port number, and certificate mode) and optional data (such as alternate server or event or severity levels). You can enter this data using the Active Directory configuration page of the ILOM web interface or the CLI. FIGURE 5-12 shows a sample display of the Active Directory web interface.
FIGURE 5-12 Active Directory Web Interface
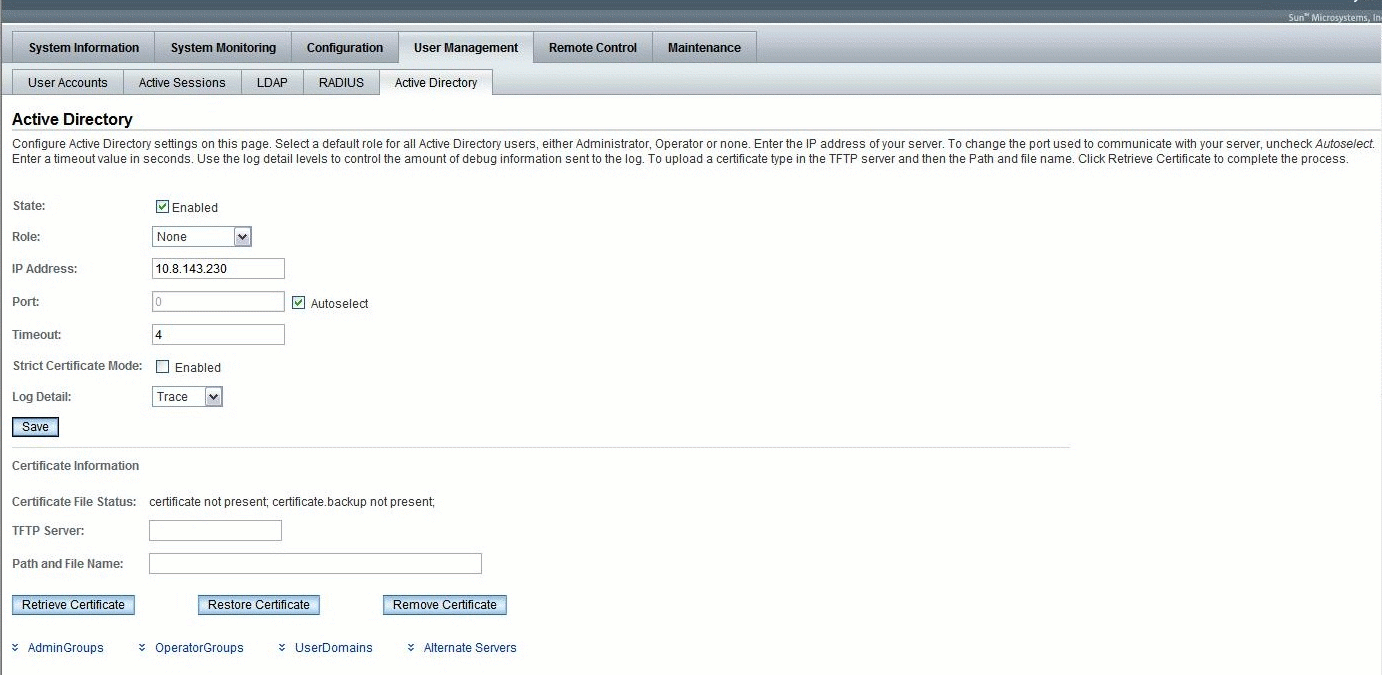
There are four tables at the bottom of the Active Directory page (see FIGURE 5-13) that represent the following configuration options:
See the section, Active Directory Tables for more information.
TABLE 5-2 describes the settings you must configure to use the Active Directory.
| Note - Certificate File Status is not a configurable parameter. |
Active Directory configured group information supports the standard Distinguished Name (DN) format as well as simple group names.
Group information can be configured in the following ways:
The four tables in the bottom half of the Active Directory web interface (FIGURE 5-13) are used to configure domains, groups, and alternate servers in order to authenticate and authorize users. These tables store information about:
The Administrator Groups and Operator Groups tables contain the names of the Microsoft Active Directory groups in the Distinguished Name (DN) format. If a user is a member of a particular group, then the user is granted access as either an Operator or an Administrator.
User Domains are the authentication domains used to authenticate a user. When the user logs in, the name used is formatted in the specific domain name format template that appears in the cell by default. User authentication is attempted based on the user domain data entered and the login name provided by the user.
In the following figures and tables, default data shows the expected format of the Active Directory data.
FIGURE 5-13 Active Directory Tables
TABLE 5-3 and TABLE 5-4 show samples of fully qualified Distinguished Names for the Administrator Groups and Operator Groups tables. For more information about the Distinguished Name format, see LDAP Servers Directory Organization..
|
CN=SpSuperAdmin,OU=Groups,DC=davidc,DC=example,DC=sun,DC=com |
|
TABLE 5-5 provides sample data for the User Domains table. The domain listed in entry 1 shows the principle format that is used in the first attempt to authenticate the user. Entry 2 shows the complete Distinguished Name, which Active Directory would use if the attempt to authenticate the first entry failed.
| Note - In the example below, <USERNAME> represents a user’s login name. |
The Alternate Servers table provides redundancy and authentication. The alternate servers have the same rules and requirements as the top-level certificate mode. Each server has its own certificate status, and its own certificate command to retrieve the certificate if it is needed.
In FIGURE 5-14, the top-level server is listed first, as ID 1.
FIGURE 5-14 Allternate Servers Table

|
Before you can use Active Directory you need to configure the settings on the Active Directory page.
1. Log in to ILOM as Administrator to open the web interface.
2. Select User Management --> Active Directory.
The Active Directory page appears. Active Directory configuration settings and the Active Directory tables are displayed. See FIGURE 5-15.
FIGURE 5-15 Active Directory Configuration Settings

3. Configure the Active Directory settings.
Refer to TABLE 5-2 for a description of each setting.
4. Click Save for your settings to take effect.
|
Follow this procedure to modify information for Administrator Groups, Operators Groups, User Domains, or Alternate Servers.
1. Log in to ILOM as Administrator to open the web interface.
2. Select User Management --> Active Directory.
The Active Directory page appears.
3. At the bottom of the Active Directory page, select the radio button next to the type of information you want to edit and click Edit.
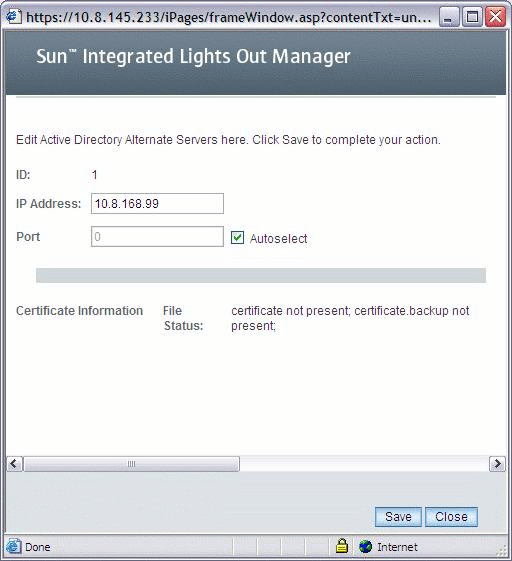
The appropriate page appears: Edit Active Directory Administrator Groups page (FIGURE 5-16), Edit Active Directory Operator Groups page (FIGURE 5-17), Edit Active Directory User Domains page (FIGURE 5-18), and Edit Active Directory Alternate Servers page (FIGURE 5-19). Each “Edit” page provides one or more fields for adding or editing information.
FIGURE 5-16 Active Directory Administrator Groups Edit Page
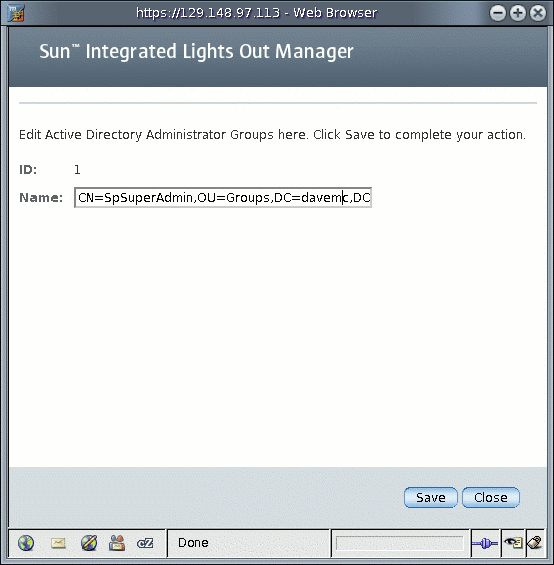
FIGURE 5-17 Active Directory Operator Groups Edit Page
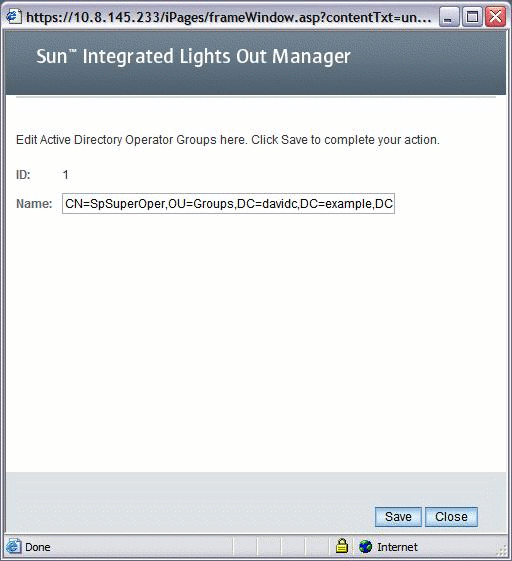
FIGURE 5-18 Active Directory User Domains Edit Page
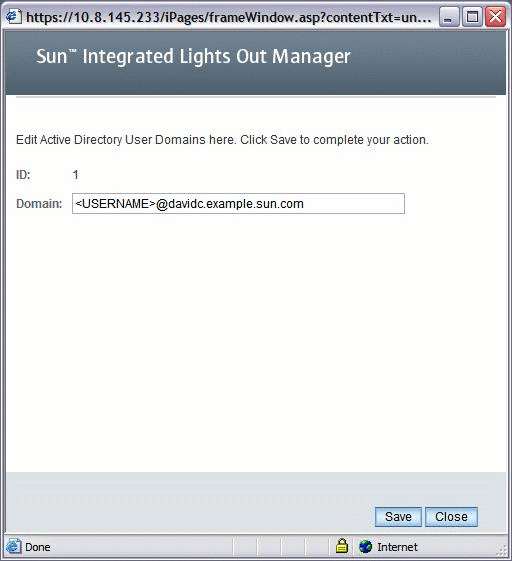
FIGURE 5-19 Active Directory Alternate Servers Edit Page
4. In the Edit page, add or edit the information you want to modify.
5. In the User Domains table, enter the information in the Name field as text. Use the <USERNAME> substitution marker to hold a place for the user’s name.
domain = <USERNAME>davemcdomain.example.sun.com
domain = CN=<USERNAME>,CN=Users,DC=davemcdomain,DC=example,DC=sun,
DC=com
The user would be allowed access to ILOM with either supplied name as the following examples show.
6. Click Save to have your changes take effect.
The Active Directory page reappears.
|
1. Log in to the ILOM CLI as Administrator or Operator.
2. Type the following command to display Administrator Groups:
-> show /SP/clients/activedirectory/admingroups
-> show /SP/clients/activedirectory/admingroups SP/clients/activedirectory/admingroups Targets: 1 2 3 4 5 Properties: |
3. Type the following command to display properties for a specific Administrator Group:
-> show /SP/clients/activedirectory/admingroups/1
|
-> show /SP/clients/activedirectory/admingroups/1 /SP/clients/activedirectory/admingroups/1 Properties: name = CN=SpSuperAdmin,OU=Groups,DC=davidc,DC=example,DC=sun,DC=com |
4. Use the set command to modify properties.
-> set name=CN=spSuperAdmin,OU=Groups,DC=davidc,DC=sun,DC=com Set 'name' to 'CN=spSuperAdmin,OU=Groups,DC=davidc,DC=sun,DC=com' |
|
Follow this procedure to edit information in the Operator Groups table using the ILOM CLI.
1. Log in to the ILOM CLI as Administrator or Operator.
2. Type the following command to display Operator Groups:
-> show /SP/clients/activedirectory/opergroups
-> show /SP/clients/activedirectory/opergroups /SP/clients/activedirectory/opergroups Targets: 1 2 3 4 5 Properties: |
3. Type the following command to display properties for a specific Operator Group:
-> show /SP/clients/activedirectory/opergroups/1
|
-> show /SP/clients/activedirectory/opergroups/1 /SP/clients/activedirectory/opergroups/1 Properties: name = CN=SpSuperOper,OU=Groups,DC=davidc,DC=example,DC=sun,DC=com |
4. Use the set command to modify properties.
-> set name=CN=spSuperOper,OU=Groups,DC=davidc,DC=sun,DC=com Set 'name' to 'CN=spSuperOper,OU=Groups,DC=davidc,DC=sun,DC=com' |
|
Follow this procedure to edit information in the User Domains table using the ILOM CLI.
1. Log in to the ILOM CLI as Administrator.
2. Type the following command to display User Domains:
-> show /SP/clients/activedirectory/userdomains
-> show /SP/clients/activedirectory/userdomains /SP/clients/activedirectory/userdomains Targets: 1 2 3 4 5 Properties: |
3. Type the following command to display properties for a specific User Domain:
-> show /SP/clients/activedirectory/userdomains/1
-> show /SP/clients/activedirectory/userdomains/1 /SP/clients/activedirectory/userdomains/1 Targets: Properties: domain = <USERNAME>@davidc.example.sun.com |
4. Use the set command to modify properties.
-> set domain=domaindavidc@davidc.example.sun.com Set 'domain' to 'domaindavidc@davidc.example.sun.com' |
|
Follow this procedure to edit information in the Alternate Servers table using the ILOM CLI.
1. Log in to the ILOM CLI as Administrator.
2. Type the following command to display Alternate Servers:
-> show /SP/clients/activedirectory/alternateservers
-> show /SP/clients/activedirectory/alternateservers /SP/clients/activedirectory/alternateservers Targets: 1 2 3 4 5 Properties: Commands: cd show set |
3. Type the following command to display properties for a specific Alternate Server:
-> show /SP/clients/activedirectory/alternateservers/1
4. Use the set command to modify properties.
There are nine Active Directory properties available in the CLI:
Server IP address of the Active Directory server.
-> show /SP/clients/activedirectory address /SP/clients/activedirectory Properties: address = 0.0.0.0 |
Possible values = administrator, operator, or none.
-> show /SP/clients/activedirectory defaultrole /SP/clients/activedirectory Properties: defaultrole = Administrator |
Debug event level for the Active Directory authentication module that controls how much information goes into the event log.
Possible values = none, high, medium, low, trace
-> show /SP/clients/activedirectory logdetail /SP/clients/activedirectory Properties: logdetail = trace |
TCP port of the Active Directory server (0-auto...65535)
Possible values: integer between 0 and 65535, where 0 = autoselect.
Administrative mode of Active Directory authentication module.
Possible values = enabled, disabled
Strict certificate validation requiring a local copy of the certificate before it can be enabled.
Possible values = enabled, disabled:
-> show /SP/clients/activedirectory strictcertmode /SP/clients/activedirectory Properties: strictcertmode = disabled |
Timeout value in seconds. Default is set to 4.
Number of seconds to wait for individual transactions to complete. The value does not represent the total time of all transactions because the number of transactions can differ depending on the configuration.
This property allows for tuning the time to wait when a server is not responding or is unreachable.
certfilestatus is a view-only property that should reflect the current certificate state, as well as a backup copy of the certificate. Neither is required to exist if strictcertmode is disabled. However, for the strictcertmode to be enabled, a certificate must be loaded. The backup certificate is always optional and is only stored when an existing certificate is about to be overwritten.
-> show /SP/clients/activedirectory certfilestatus -> show /SP/clients/activedirectory certfilestatus Properties: certfilestatus = certificate not present;certificate.backup not present; |
Use the set getcertfile command to upload, remove, or restore a certificate file if needed. For specific instructions see Upload, Remove, or Restore a Certificate Using the CLI.
You can view messages from the system event log to determine how user authentication and authorization was obtained. You can set the event log to capture the following detail levels:
|
You can configure Active Directory log detail from the top level by setting the logdetail variable to one of the desired event levels.
 Type the following command to configure the event log detail:
-> set /SP/clients/activedirectory logdetail=event_log_detail
Where event_log_detail is either none, high, medium, low, or trace. For example:
Set 'logdetail' to 'trace'
Summary information as well as detailed query information is displayed about user authentication and authorization information. The example below shows a detailed 'trace' level debug listing. The most recent events are at the top of the log.
|
1. Log in to ILOM as Administrator to open the web interface.
2. Select User Management --> Active Directory.
The Active Directory page appears.
3. Use the Log Detail drop-down list box to select the level of log detail you want to view.
Certificate validation enables the secure passing and protecting of data over the network. Certificate validation is optional depending on the security level that your system requires.
|
1. Log in as Administrator to the ILOM CLI.
2. Use these commands to upload, remove, or restore a certificate:
 To upload a certificate, type the following:
-> set getcertfile=tftp://IP address/file-path/filename
 To remove or restore a certificate, type the following:
-> set getcertfile=remove|restore
The existing certificate file that had been uploaded will be removed. The restore only works if a certificate file was overwritten. The intent is to save one backup file when a certificate is uploaded. If something goes wrong, the old file can be restored.
|
By default, strictcertmode is disabled. When this variable is disabled, the channel is secure, but limited validation of the certificate is performed. If strictcertmode is enabled, then the server’s certificate must have already been uploaded to the server so that the certificate signatures can be validated when the server certificate is presented.
1. Log in to the ILOM CLI as Administrator.
2. To enable strictcertmode, type the following:
|
1. Log in to the ILOM CLI as Administrator.
2. To check the status of the certificate, type the following:
-> show /SP/clients/activedirectory certfilestatus
-> show /SP/clients/activedirectory certfilestatus -> show /SP/clients/activedirectory certfilestatus Properties: certfilestatus = certificate not present;certificate.backup not present; |
The following procedures describe how to secure the Active Directory connection using the web interface.
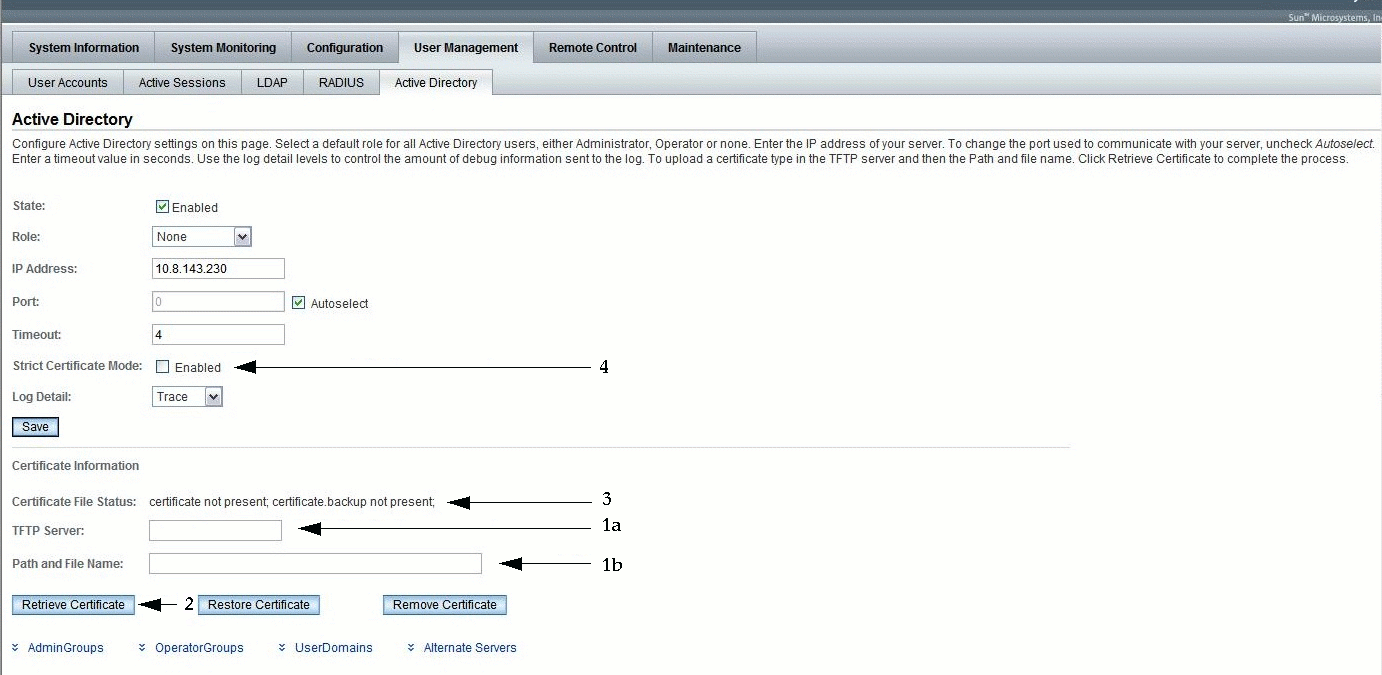
FIGURE 5-20 shows the security properties of Active Directory and the sequence in which data must be entered.
FIGURE 5-20 Security Properties of Active Directory and the Sequence of Data Entry
|
1. Log in to ILOM as Administrator to open the web interface.
2. Select User Management --> Active Directory.
The Active Directory page appears. FIGURE 5-20 illustrates the order in which to populate the security fields.
3. Enter the TFTP Server and Path and File Name. See FIGURE 5-20, items 1a and 1b.
4. Click the Retrieve Certificate button to initiate the transfer of the certificate.
See FIGURE 5-20, item 2.
| Note - The options to restore and remove are available as needed, and can be executed by clicking the Restore Certificate button or the Remove Certificate button. |
|
1. Log in to ILOM as Administrator to open the web interface.
2. Select User Management --> Active Directory.
The Active Directory page appears. See FIGURE 5-20, item 3.
3. Verify the Certificate File Status.
|
1. Log in to ILOM as Administrator to open the web interface.
2. Select User Management --> Active Directory.
The Active Directory page appears. See FIGURE 5-20, item 4.
3. Click the check box next to Enable to enable Strict Certificate Mode.
4. Click Save for your changes to take effect.
ILOM supports Lightweight Directory Access Protocol (LDAP) authentication for users, based on the OpenLDAP software. LDAP is a general-purpose directory service. A directory service is a centralized database for distributed applications designed to manage the entries in a directory. Thus, multiple applications can share a single user database. For more detailed information about LDAP, see http://www.openldap.org/.
LDAP is based on a client-server model. LDAP provides the directory, and the clients use the directory service to access entries. The data stored in a directory can be distributed among several LDAP servers.
Data in LDAP is organized hierarchically, starting at a root and branching down into individual entries. Entries at the top level of the hierarchy represent larger organizations, and under the larger organizations are entries for smaller organizations. At the bottom of the hierarchy are entries for individual people or resources.
In the LDAP client-server model, LDAP servers make information about people, organizations, and resources accessible to LDAP clients. Clients make changes to the LDAP database using a client utility, usually bundled with the LDAP server. When a change is made to the LDAP database, all client applications see the change immediately, so there is no need to update each distributed application.
For example, to update an entry in the directory, an LDAP client submits the Distinguished Name of the entry with updated attribute information to the LDAP server. The LDAP server uses the Distinguished Name (dn) to find the entry and performs a modify operation to update the entry in the directory. The updated information is immediately available to all the distributed applications using that LDAP server.
An LDAP client can perform the following operations, among others:
To perform any of these LDAP operations, an LDAP client needs to establish a connection with an LDAP server. LDAP specifies the use of TCP/IP port number 389, although servers may run on other ports.
Your Sun server can be a client of an LDAP server. In order to use LDAP authentication, you need to create a user on your LDAP server that your Sun server can authenticate, or bind to, so the client has permission to search the proper directory on the LDAP server.
Data in LDAP is organized hierarchically, as shown in FIGURE 5-21.
FIGURE 5-21 LDAP Directory Structure
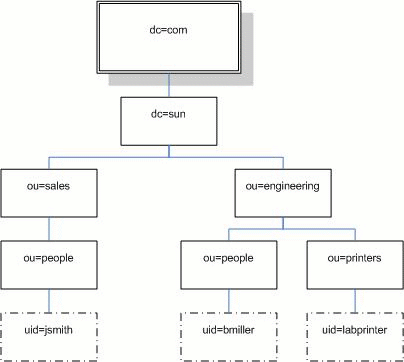
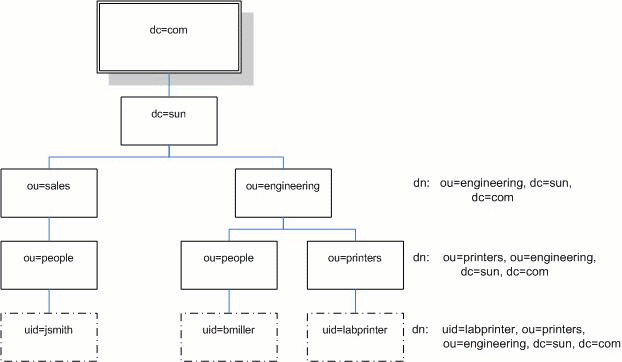
Each entry is uniquely identified by a Distinguished Name (dn). A DN consists of a name that uniquely identifies the entry at that hierarchical level and a path that traces the entry back to the root of the tree.
For example, the DN for jsmith is:
dn: uid=jsmith, ou=people, dc=sun.com
Here, uid represents the user ID of the entry, ou represents the organizational unit in which the entry belongs, and dc represents the larger organization in which the entry belongs. The following diagram shows how Distinguished Names are used to identify entries uniquely in the directory hierarchy.
FIGURE 5-22 LDAP Distinguished Names
To use LDAP, you must configure your LDAP server, according to your LDAP server's documentation. You must also configure your ILOM, using either the ILOM CLI or the web interface.
The following procedure requires detailed knowledge of your LDAP server configuration. Before you begin, gather basic network information about your LDAP server, including its IP address.
| Note - This task is similar to configuring LDAP as a name service for Linux or Solaris. |
|
1. Ensure that all users authenticating to ILOM have passwords stored in "crypt" format or the GNU extension to crypt, commonly referred to as "MD5 crypt."
userPassword: {CRYPT}ajCa2He4PJhNo
userPassword: {CRYPT}$1$pzKng1$du1Bf0NWBjh9t3FbUgf46.
ILOM only supports LDAP authentication for passwords stored in these two variations of the crypt format.
2. Add object classes posixAccount and shadowAccount, and populate the required property values for this schema (RFC 2307).
3. Provide ILOM access to user accounts on your LDAP server.
Either enable your LDAP server to accept anonymous binds, or create a proxy user on your LDAP server that has read-only access to all user accounts that will authenticate through ILOM.
See your LDAP server documentation for more details.
|
1. Enter the proxy user name and password. Type:
--> set /SP/clients/ldap binddn="cn=proxyuser, ou=people, ou=sales, dc=sun, dc=com" bindpw=password
2. Enter the IP address of the LDAP server. Type:
--> set /SP/clients/ldap ipaddress=ldapipaddress
3. Assign the port used to communicate with the LDAP server; the default port is 389. Type:
--> set /SP/clients/ldap port=ldapport
4. Enter the Distinguished Name of the branch of your LDAP tree that contains users and groups. Type:
--> set /SP/clients/ldap searchbase="ou=people, ou=sales, dc=sun, dc=com"
This is the location in your LDAP tree that you want to search for user authentication.
5. Set the state of the LDAP service to enabled. Type:
--> set /SP/clients/ldap state=enabled
6. To verify that LDAP authentication works, log in to ILOM using an LDAP user name and password.
| Note - ILOM searches local users before LDAP users. If an LDAP user name exists as a local user, ILOM uses the local account for authentication. |
|
1. Log in to ILOM as an Administrator to open the web interface.
2. Select User Management --> LDAP.
The LDAP Settings page appears.
FIGURE 5-23 LDAP Settings Page
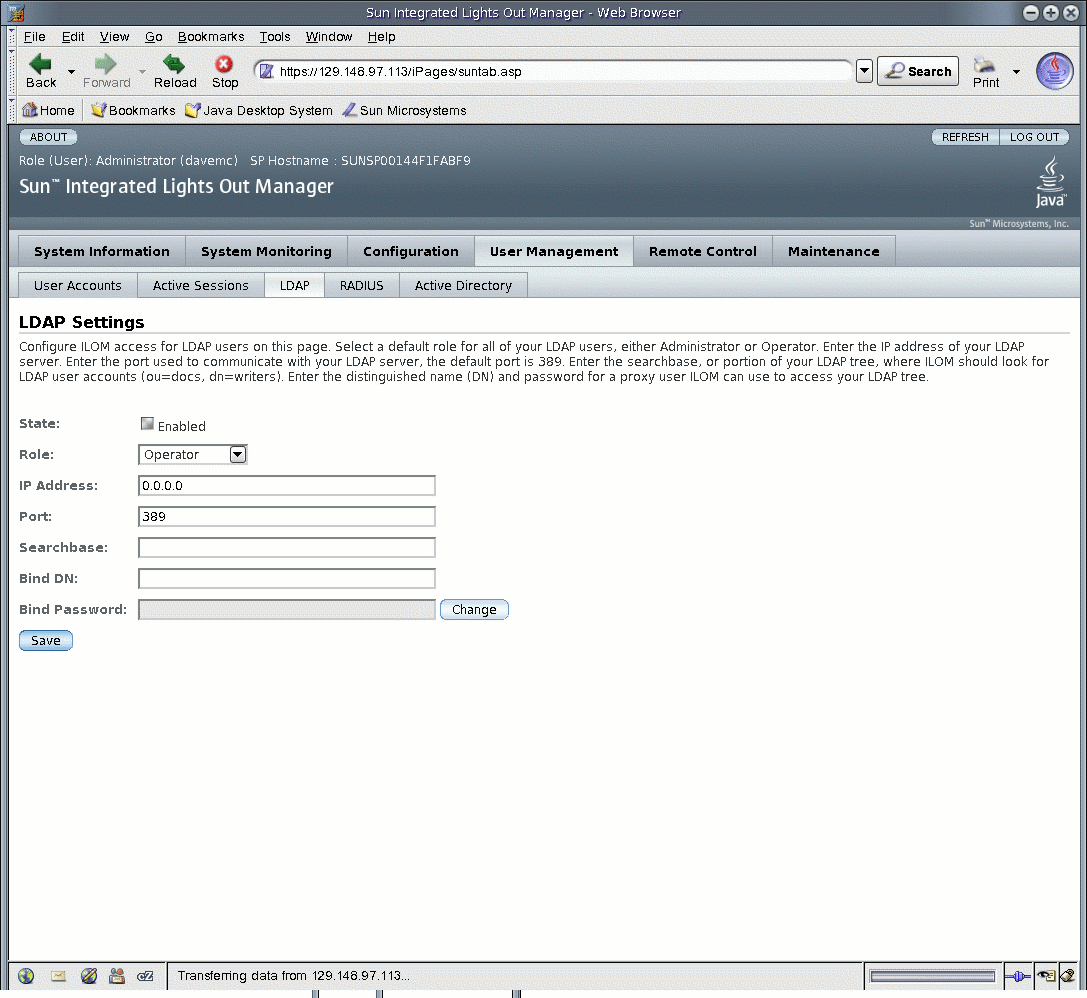
3. Enter the following values:
5. To verify that LDAP authentication works, log in to the ILOM using an LDAP user name and password.
| Note - The ILOM searches local users before LDAP users. If an LDAP user name exists as a local user, the ILOM uses the local account for authentication. |
ILOM supports Remote Authentication Dial-In User Service (RADIUS) authentication. RADIUS is an authentication protocol that facilitates centralized user administration. RADIUS provides many servers shared access to user data in a central database, providing better security and easier administration. A RADIUS server can work in conjunction with multiple RADIUS servers and other types of authentication servers.
RADIUS is based on a client-server model. The RADIUS server provides the user authentication data and can grant or deny access, and the clients send user data to the server and receive an accept or deny response. In the RADIUS client-server model, the client sends an Access-Request query to the RADIUS server. When the server receives an Access-Request message from a client, it searches the database for that user's authentication information. If the user's information is not found, the server sends an Access-Reject message and the user is denied access to the requested service. If the user's information is found, the server responds with an Access-Accept message. The Access-Accept message confirms the user's authentication data and grants the user access to the requested service.
All transactions between the RADIUS client and server are authenticated by the use of specific text string password known as a shared secret. The client and server must each know the secret because it is never passed over the network. You must know the shared secret to configure RADIUS authentication for ILOM.
In order to use RADIUS authentication with ILOM, you must configure ILOM as a RADIUS client.
TABLE 5-7 describes the RADIUS parameters for the web interface and the CLI.
If you need to provide ILOM access beyond the 10 local user accounts, and after the RADIUS server has been properly configured, you can configure ILOM to use RADIUS authentication.
Before completing this procedure, collect the appropriate information about your RADIUS environment, as described in Manage User Accounts.
|
1. Log in to the ILOM CLI as a user with Administrator privileges.
2. Navigate to /SP/clients/radius. See RADIUS Commands.
3. Set the parameters shown in TABLE 5-7.
|
1. Log in to the ILOM as Administrator to open the web interface.
2. Select User Management --> RADIUS.
The RADIUS Settings page appears.
FIGURE 5-24 RADIUS Settings Page
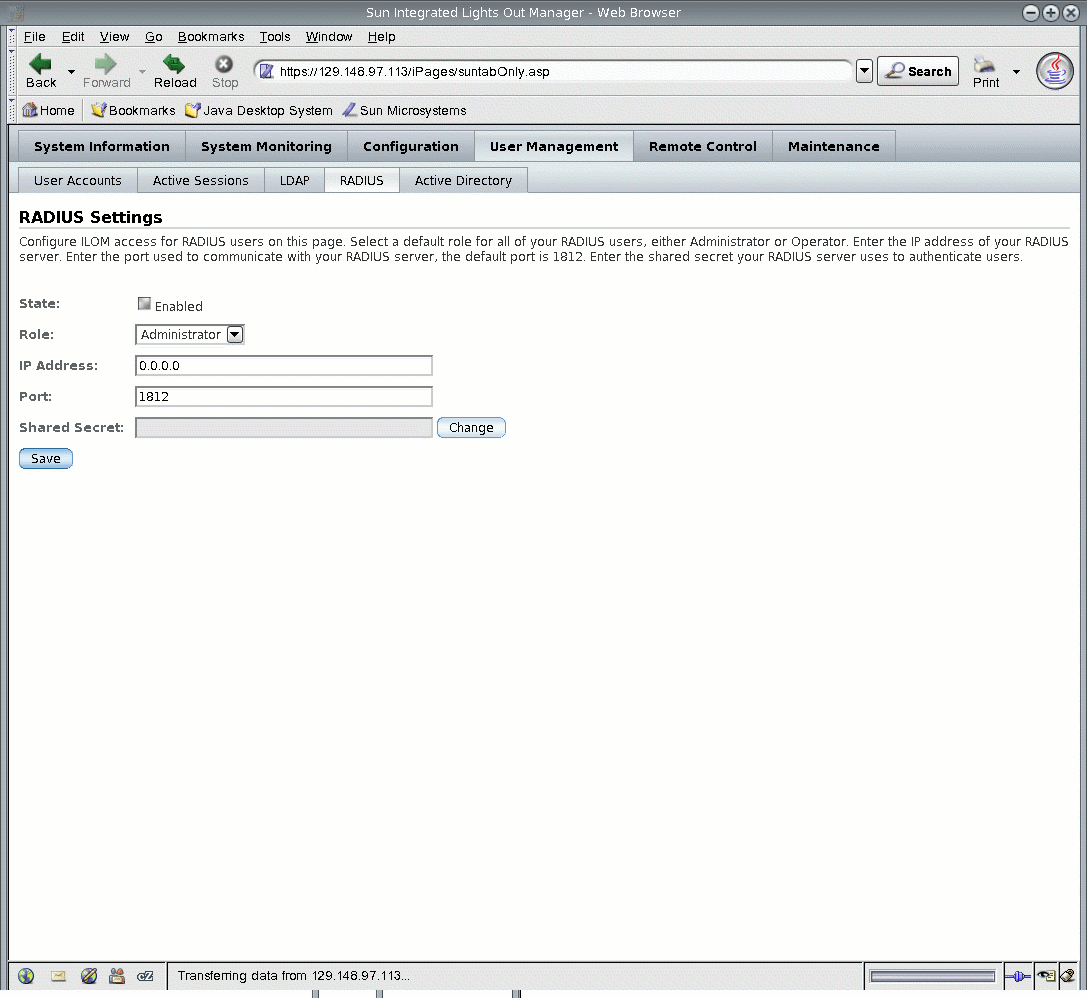
For details, see TABLE 5-7.
4. Click Save for your changes to take effect.
This section describes the RADIUS commands.
This command is available to Administrators and Operators.
Use this command to view the properties associated with RADIUS authentication.
defaultrole - This is the role assigned to all RADIUS users: Administrator or Operator.
ipaddress - IP address of your RADIUS server.
port - Port number used to communicate with your RADIUS server. The default port is 1812.
secret - This is the shared secret used to gain access to your RADIUS server.
state - This setting is enabled or disabled to allow or deny access to your RADIUS users.
-> show /SP/clients/radius /SP/clients/radius Targets: Properties: defaultrole = Operator ipaddress = 129.144.36.142 port = 1812 secret = (none) state = enabled Commands: cd set show -> |
This command is available to Administrators.
Use this command to configure the properties associated with RADIUS authentication on a service processor.
set /SP/clients/radius [defaultrole=[Administrator|Operator] ipaddress=radiusserverIP port=port# secret=radiussecret state=[enabled|disabled]]
-> set /SP/clients/radius state=enabled ipaddress=10.8.145.77 Set 'state' to 'enabled' Set 'ipaddress' to '10.8.145.77 |
This command is available to Administrators and Operators.
Use this command to view clients that can receive data from a service processor, including LDAP, NTP, RADIUS, and SYSLOG clients.
| Note - Users with Operator privileges can only view the ntp and syslog targets. The radius and ldap targets remain hidden. |
Copyright © 2008 Sun Microsystems, Inc. All Rights Reserved.