Configuring ILOM Communication Settings
|
|
Topics
|
|
|
Description
|
Links
|
|
Configure network settings
|
|
|
Configure Secure Shell settings
|
|
|
Configure the Local Interconnect Interface
|
|
|
Related Topics
|
|
|
|
For ILOM
|
Chapter or Section
|
Guide
|
|
|
- ILOM Network Configurations
|
Oracle Integrated Lights Out Manager (ILOM) 3.0 Concepts Guide (820-6410)
|
|
|
- Getting Started With ILOM
|
Oracle Integrated Lights Out Manager (ILOM) 3.0 Getting Started Guide (820-5523)
|
|
|
- Configuring ILOM Communication Settings
|
Oracle Integrated Lights Out Manager (ILOM) 3.0 CLI Procedures Guide (820-6412)
|
|
|
- Configuring ILOM Communication Settings
|
Oracle Integrated Lights Out Manager (ILOM) 3.0 Management Protocols Reference Guide (820-6413)
|
|
The ILOM 3.0 Documentation Collection is available at: http://docs.sun.com/app/docs/prod/int.lights.mgr30#hic
|
Configuring Network Settings
|
Topics
|
|
Description
|
Links
|
Platform Feature Support
|
|
Review the prerequisites
|
|
- x86 system server SP
- SPARC system server SP
- CMM
|
|
Configure network settings
|
|
|
|
|
Before You Begin
Review the following information before you view or configure ILOM network settings.
|
Network Environment
|
Before You Begin
|
|
IPv4 Network Settings
|
- To view network settings, you need the Read Only (o) role enabled. To configure network settings, you need the Admin (a) role enabled.
|
|
|
- Prior to configuring ILOM communication settings, ensure that the same IP address is always assigned to ILOM by either assigning a static IP address to ILOM after initial setup, or by configuring your DHCP server to always assign the same IP address to ILOM. This enables ILOM to be easily located on the network. By default, ILOM will attempt to obtain network settings using DHCP.
|
|
Dual-stack IPv4 and IPv6 Network Settings
|
- To view the network settings in ILOM , you need the Read Only (o) role enabled. To configure or test network settings, you need the Admin (a) role enabled.
|
|
|
- Verify that your server or CMM has ILOM firmware 3.0.12 or later installed.
Note - The dual-stack IPv4 and IPv6 settings cannot be edited at the CMM level in the ILOM web interface. To edit the dual-stack IPv4 and IPv6 properties at the CMM level, you must use the ILOM CLI. For details, see the Oracle Integrated Lights Out Manager (ILOM) 3.0 CLI Procedures Guides.
|
|
|
- Verify that support for the IPv6 configuration options in either your platform ILOM Supplement guide or platform Administration guide.
|
|
|
- Review the IPv6 enhancements identified in Chapter 2 of the Oracle Integrated Lights Out Manager (ILOM) 3.0 Concepts Guide (820-6410).
|
|
|
- ILOM supports a dual-mode TCP/IP stack and is shipped from the factory with both the IPv4 and IPv6 states enabled by default. If necessary, you can optionally disable the IPv6 network state. However, the IPv4 network state must always be enabled in order for ILOM to operate in an IPv4 network environment or in a dual-stack IPv4 and IPv6 network environment.
|
|
|
- ILOM supports static and DHCP network settings for both IPv4 and IPv6 network environments.
|
|
|
- For IPv6 Stateless auto-configurations, ILOM (3.0.12 or later) requires a network router to be configured for IPv6.
|
|
Dual-stack IPv4 and IPv6
|
- For DHCPv6 auto-configuration options, ILOM (3.0.14 or later) requires a network DHCPv6 server to provide the IPv6 address(es) and DNS information for the device.
Note - DHCP and DHCPv6 are separate protocols. In a dual-stack network environment, DHCP and DHCPv6 operate as follows: (1) the DHCPv6 server can provide IPv6 addresses to a network node and the network node always uses the IPv6 protocol to communicate with a DHCPv6 server; and (2) the DHCP server can provide IPv4 addresses to a network node and the network node will always use the IPv4 protocol to communicate with a DHCP server
|
|
|
- For DHCP and DHCPv6 auto-configurations, you should choose to receive the DNS information from either an IPv6 DHCP server or from an IPv4 DHCP server, but not from both.
You can manually configure the settings for the DNS Name Server in ILOM under the Network DNS target. For instructions on specifying DNS information, see View and Configure DNS Settings.
|
 View and Configure IPv4 Network Settings View and Configure IPv4 Network Settings
|
| Note - This procedure provides instructions for configuring ILOM to operate in an IPv4-only network environment, as is supported in ILOM 3.0.10 and earlier versions of ILOM. If you are configuring ILOM to operate in an dual-stack IPv4 and IPv6 network environment, see View and Configure Dual-Stack IPv4 and IPv6 Network Settings.
|
1. Log in to the ILOM SP web interface or the CMM ILOM web interface.
2. Select Configuration --> Network.
The Network Settings page appears. From the Network Settings page, you can view MAC addresses and configure network addresses for the server’s chassis monitoring module (CMM) and service processors (SP).
3. You can have DHCP assign IP addresses automatically, or you can choose to assign the addresses manually.
- To automatically obtain an IP address, click the radio button next to DHCP. See the following figure.

- To manually set a static IP address, complete the information in the Network Settings page; use the descriptions in the following table.
|
Item
|
Description
|
|
State
|
Click the check box to enable the network state.
|
|
MAC Address
|
The SP’s media access control (MAC) address is set at the factory. The MAC address is a hardware address that is unique to each networked device. The MAC address is provided on a label on the SP or CMM, on the Customer Information Sheet included in the ship kit, and in the BIOS Setup screen.
|
|
IP Discovery Mode
|
Click the radio button next to Static to manually assign an IP address, netmask, and gateway.
|
|
IP Address
|
Type the server’s IP address. The IP address is a unique name that identifies the system on a TCP/IP network.
|
|
Netmask
|
Type the subnet mask of the network on which the SP resides.
|
|
Gateway
|
Type SP’s gateway access address.
|
4. Click Save for your settings to take effect.
Settings are considered pending until you click Save. Changing the IP address will end your ILOM session.
You are prompted to close your web browser.
5. Log back in to ILOM using the new IP address.
| Note - If you changed the network settings, you might need to log back in with a new browser session.
|
 View and Configure Dual-Stack IPv4 and IPv6 Network Settings View and Configure Dual-Stack IPv4 and IPv6 Network Settings
|
| Note - This procedure provides instructions for configuring ILOM to operate in a dual-stack IPv4 and IPv6 network environment. If you are configuring ILOM to operate in an IPv4-only network environment, as is supported in ILOM 3.0.10 and earlier versions of ILOM, see View and Configure IPv4 Network Settings.
|
1. Log in to the ILOM SP web interface or the CMM ILOM web interface.
2. Navigate to the IPv4 and IPv6 network settings that are available on the Network tab.
For example:
- On a server SP, click Configuration --> Network.
- On a CMM, do the following:
- Select the blade SP (in the left pane), then (in the right pane) click Configuration --> Network.
| Note - The dual-stack IPv4 and IPv6 settings cannot be edited at the CMM level in the ILOM web interface. To edit the dual-stack IPv4 and IPv6 properties at the CMM level, you must use the ILOM CLI. For details, see the Oracle Integrated Lights Out Manager (ILOM) 3.0 CLI Procedures Guides.
|
The following illustration shows the ILOM SP network settings for IPv4 and IPv6.
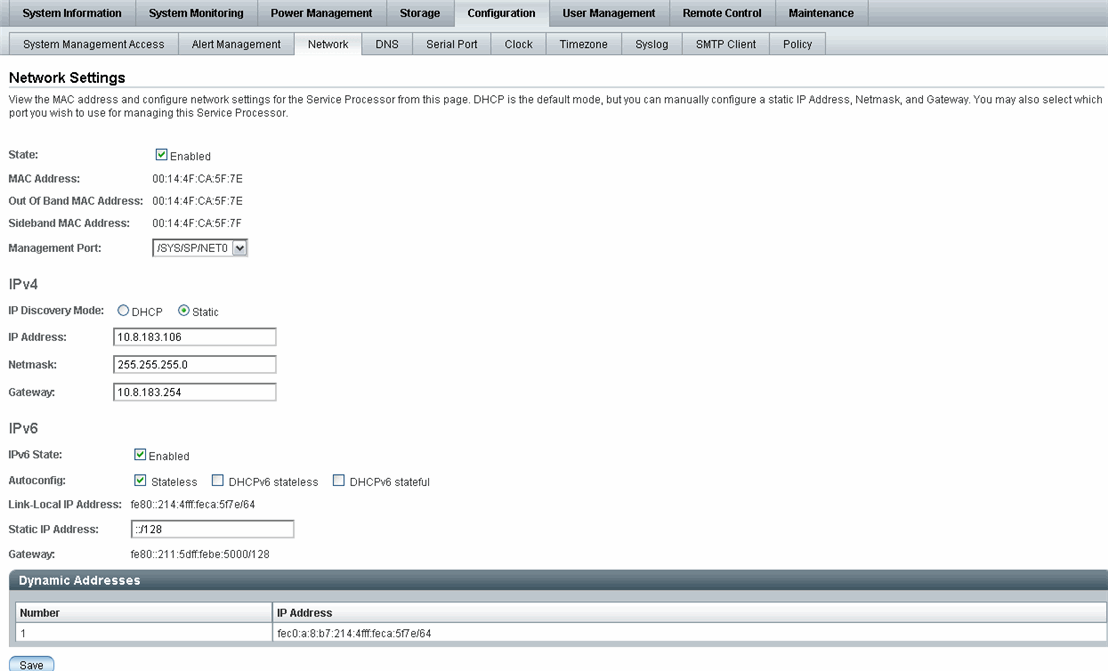
3. Verify that the network State is enabled.
| Note - The setting for network State is enabled by default for both IPv4 and IPv6. If necessary, you can optionally disable (unchecked) the network State for IPv6. However, the IPv4 network State must always be enabled in order for ILOM to operate in an IPv4 network environment or within a dual-stack IPv4 and IPv6 network environment.
|
4. Perform the network configuration instructions below that apply to your network environment.
- To manually configure a static IP, see the steps below for IPv4 and/or see the steps for IPv6.
- Steps to manually configure a static IPv4 address:
|
Steps
|
Description
|
|
a.
|
Enable the radio button for Static IP.
|
|
b.
|
Type the IP address for the device in the IP address text box.
|
|
c.
|
Type the subnet mask of the network on which the device resides.
|
|
d.
|
Type the device gateway access address.
|
- Steps to manually configure a static IPv6 address:
|
Step
|
Description
|
|
|
Type the IP address for the device in the IP address text box.
The input parameters for specifying the IPv6 static IP and netmask is:
<IPv6_address>/<subnet mask length in bits>
For example:
fec0:a:8:b7:214:4fff:feca:5f7e/64
Note - IPv6 supports the assignment of multiple IP addresses for a device. Therefore, you can manually configure a single static IPv6 address in ILOM, as well as enable one or more of the IPv6 auto-configuration options in ILOM if desired.
|
- To enable DHCP to automatically assign an IPv4 address, select the IPv4 DHCP radio button.
- To enable one or more of the IPv6 auto-configuration options, select the appropriate option(s) described below.
- Set IPv6 auto-configuration options.
|
IPv6 Auto-Configuration Option
|
Description
|
|
Stateless
(enabled by default)
|
When enabled, the Stateless auto-configuration option is run to learn the IPv6 Stateless address(es) for the device from the network IPv6 router.
|
|
DHCPv6 Stateless
|
When enabled, the DHCPv6 Stateless auto-configuration option is run to learn the DNS information for the device from the network DHCPv6 server.
Note - The DHCPv6 Stateless auto-configuration option is available in ILOM as of 3.0.14.
|
|
DHCPv6 Stateful
|
When enabled, the DHCPv6 Stateful auto-configuration option is run to learn the IPv6 address(es) and DNS information for the device from the network DHCPv6 server.
Note - The DHCPv6 Stateful auto-configuration option is available in ILOM as of 3.0.14.
|
| Note - As of ILOM 3.0.14 or later, you can enable the option for Stateless auto-configuration to run at the same time as when the option for DHCPv6 Stateless is enabled or as when the option for DHCPv6 Stateful is enabled. However, the auto-configuration options for DHCPv6 Stateless and DHCPv6 Stateful should not be enabled to run at the same time.
|
| Note - When you enable the auto-configuration for either DHCPv6 Stateful or DHCPv6 Stateless, ILOM will identify in the Network Settings page the DHCP Unique ID for the DHCPv6 server that was last used to retrieve the DHCP information.
|
5. Click Save to apply the changes made.
All changes to the network settings are considered pending within the ILOM session until you click Save.
| Note - Changing the static IP address on the device (SP or CMM) will end all active ILOM sessions to the device. A message will appear prompting you to close your browser session. You will need to log back in to ILOM using the newly assigned static IP address.
|
| Note - IPv6 addresses learned for the device from any of the IPv6 auto-configuration options will not affect any of the active ILOM sessions to the device. You can verify the newly learned auto-configured addresses on the Network tab.
|
6. To test the IPv4 or IPv6 network configuration from ILOM, use the Network Test Tools (Ping or Ping6). For details, see Test IPv4 or IPv6 Network Configuration.
 Test IPv4 or IPv6 Network Configuration Test IPv4 or IPv6 Network Configuration
|
1. Log in to the ILOM SP web interface or the CMM ILOM web interface.
2. In the web interface page, click Configuration --> Network.
3. In the Network Settings page, click the Tools button appearing at the bottom of the page.

The Test Tools dialog appears.
4. In the Test Tools dialog, specify the following information:
|
Field
|
Description
|
|
Test Type
|
- Select Ping to test the IPv4 network configuration.
or
- Select Ping6 to test the IPv6 network configuration.
|
|
Destination
|
Type the IP address of a device on your network (the test is sent to this destination on your network).
|
 Assign Host Name and System Identifier Assign Host Name and System Identifier
|
1. Log in to the ILOM SP web interface or the CMM ILOM web interface.
2. Select System Information --> Identification Information.
The Identification Information page appears.
3. In the SP host name field, type the SP host name.
The host name can contain up to 60 characters.
4. In the SP System Identifier field, type the text that you will use to identify the system.
The system identifier can consist of a text string using any standard keyboard keys except quotation marks.
5. In the SP System Contact field, type the name of a person you will contact.
The system contact can consist of a text string using any standard keyboard keys except quotation marks.
6. In the SP System Location field, type the text that describes the physical location of the system.
The system location can consist of a text string using any standard keyboard keys except quotation marks.
7. Click Save for your settings to take effect.
 View and Configure DNS Settings View and Configure DNS Settings
|
1. Log in to the ILOM SP web interface or the CMM ILOM web interface.
2. Select Configuration --> DNS.
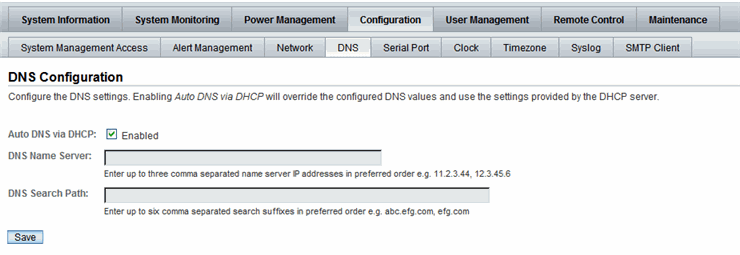
The DNS Configuration page appears.
3. You can have DHCP assign DNS Name Server and Search Path automatically, or you can choose to assign the addresses manually.
- To automatically assign the addresses, click the radio button next to Auto DNS via DHCP.
- To manually assign the addresses, complete the DNS Name Server and DNS Search Path text boxes. See the following figure.
 View and Configure Baud Rate for Serial Port View and Configure Baud Rate for Serial Port
|
1. Log in to the ILOM SP web interface or the CMM ILOM web interface.
2. Select Configuration --> Serial Port.
The Serial Port Settings page appears. See the following figure.
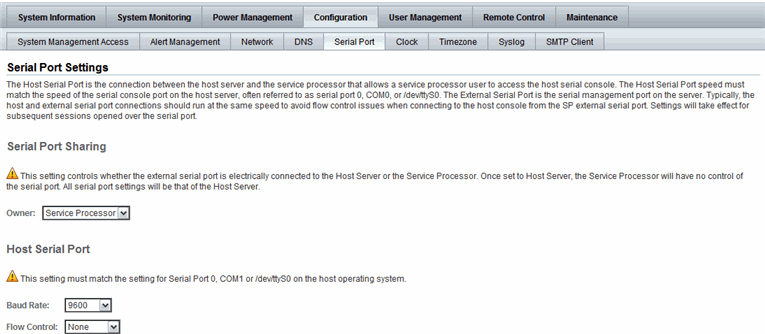
3. View the baud rate for the internal host serial port and the external serial port.
4. Select the baud rate for the internal serial port from the Host Serial Port Baud Rate drop-down list.
For x64 systems, this setting must match the setting for serial port 0, COM1, or /dev/ttyS0 on the host operating system.
The baud rate value must match the speed that was specified for the BIOS serial redirection feature (default is 9600 baud) and the speed used for the boot loader and operating system configuration.
To connect to the system console using ILOM, you must set the default host serial settings (9600 baud, 8N1 [eight data bits, no parity, one stop bit], no flow control).
5. Select the baud rate for the external serial port from the External Serial Port Baud Rate drop-down list.
This setting must match the baud rate on the RJ-45 serial port on the Oracle Sun server.
6. Click Save for your changes to take effect.
 Configure x86 Host Serial Port Sharing (Port Owner) Configure x86 Host Serial Port Sharing (Port Owner)
|
| Note - To determine whether serial port sharing is supported for your server, refer to the platform ILOM Supplement guide or Platform Administration guide provided for your server.
|

|
Caution - You should set up the network on the SP before attempting to switch the serial port owner to the host server. If a network is not set up, and you switch the serial port owner to the host server, you will be unable to connect using the CLI or web interface to change the serial port owner back to the SP. To return the serial port owner setting to the SP, you will need to restore access to the serial port on the server.For more details about restoring access to the server port on your server, see the platform documentation supplied with your server.
|
1. Log in to the ILOM SP web interface.
2. Select the Configuration --> Serial Port.
The Serial Port Settings page appears.
3. In the Serial Port Settings page, select Host Server as the serial port owner.
| Note - The serial port sharing setting by default is Service Processor.
|
4. Click Save for the changes to take effect.
| Note - Changing the "Serial Port Owner" and saving this change might result in the following benign error: Can not change serial settings - the serial console in use. This error occurs if there is an active session on the serial port. However, changes to the port owner, as well as any changes to the port speed will take effect in ILOM.
|
5. Use a dongle cable to connect the serial host to the server.
For details on how to use a dongle cable to attach devices to the server, see the platform documentation supplied with your server.
 Enable HTTP or HTTPS Web Access Enable HTTP or HTTPS Web Access
|
1. Log in to the ILOM SP web interface or the CMM ILOM web interface.
2. Select Configuration --> System Management Access --> Web Server.
The Web Server Settings page appears.
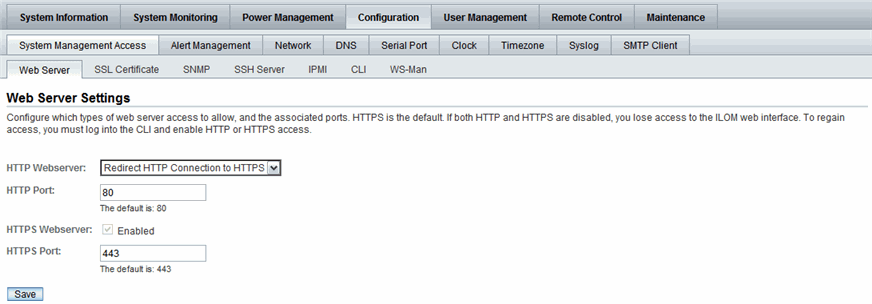
3. Select the HTTP or HTTPS web server.
- To enable HTTP - Select Enabled from the drop-down list. You can also select:
- Redirect HTTP Connection to HTTPS - HTTP connections are automatically redirected to HTTPS.
- Disabled - Turn HTTP off.
- To enable HTTPS - Select the HTTPS Web Server Enabled check box.
The HTTPS web server is enabled by default.
| Note - If you disable HTTP or select Redirect HTTP Connection to HTTPS, and then disable HTTPS, you will be unable to access the ILOM web interface. To restore access, use the CLI /SP/services/http or /SP/services/https commands, as described in “Enable HTTP or HTTPS Web Access“ in the Oracle Integrated Lights Out Manager (ILOM) 3.0 CLI Procedures Guide.
|
4. Assign an HTTP or HTTPS port number.
5. Click Save for your settings to take effect.
6. To edit IP addresses assigned to the SP interfaces, do the following:
a. Select Configuration --> Network to access the Network Settings page.
b. Select the radio button for Use the Following IP Address.
c. Enter values for IP Address, Subnet Mask, and Gateway in the text boxes.
d. Click Save for your new settings to take effect.
After assigning (or changing) an IP address, the connection made to ILOM using the former IP address will timeout. Use the newly assigned IP address to connect to ILOM.

 Upload the SSL Certificate Upload the SSL Certificate
|
| Note - ILOM provides a default SSL certificate and self-signed key for HTTPS access. Optionally, you can upload a different SSL certificate and matching private key. Ensure that you can access the new certificate and key through your network or local file system.
|
1. Log in to the ILOM SP web interface or the CMM ILOM web interface.
2. Select Configuration --> System Management Access --> SSL Certificate.
The SSL Certificate Upload page appears.
3. Type the file name of the new SSL certificate or click the Browse button to search for a new SSL certificate.
The file name has a .pem file extension. The service processor does not support pass-phrase encrypted certificates.
4. Click the Upload button to obtain the selected SSL certificate.
The SSL Certificate Upload Status dialog box appears.
5. Once you have uploaded the certificate and private key, click the OK button to reset the ILOM web server and begin using the new SSL certificate.
The ILOM web server must be reset for the new certificate to take effect.
Configuring Secure Shell Settings
|
Topics
|
|
Description
|
Links
|
Platform Feature Support
|
|
Configure Secure Shell settings
|
|
- x86 system server SP
- SPARC system server SP
- CMM
|
Before You Begin
- To configure Secure Shell (SSH) settings, you need the Admin (a) role enabled.
 Enable or Disable SSH Enable or Disable SSH
|
| Note - SSH is enabled by default in ILOM.
|
1. Log in to the ILOM SP web interface or the CMM ILOM web interface.
2. Select Configuration --> System Management Access --> SSH Server.
The SSH Server Settings page appears.
3. To enable the SSH server, click the Enabled check box next to State.
4. Click Save for your settings to take effect.
 Generate a New SSH Key Generate a New SSH Key
|
1. Log in to the ILOM SP web interface or the CMM ILOM web interface.
2. Select Configuration --> System Management Access --> SSH Server.
The SSH Server Settings page appears.
3. Select RSA by clicking the Generate RSA Key button, or select DSA by clicking the Generate DSA Key button.
Click OK or Cancel when you are prompted.
The new key will take effect immediately for new connections.
 Restart the SSH Server Restart the SSH Server
|
| Note - Restarting the SSH server will end any existing SSH connections.
|
Follow these steps to restart the SSH server:
1. Log in to the ILOM SP web interface or the CMM ILOM web interface.
2. Select Configuration --> System Management Access --> SSH Server.
The SSH Server Settings page appears.
3. Click the Restart button to restart the SSH Server.
Configuring the Local Interconnect Interface
|
Topics
|
|
Description
|
Links
|
Platform Feature Support
|
|
Review the prerequisites
|
|
- x86 system server SP
- SPARC system server SP
|
|
Configure the Local Interconnect Interface
|
|
Before You Begin
The following requirements must be met before performing the procedures described in this section for configuring the Local Interconnect Interface in ILOM.
- Review the concepts describing the use of a Local Interconnect Interface between the ILOM SP and the host OS. For details, see “Local Interconnect Interface: Local Connection To ILOM From Host Operating System” in the Oracle Integrated Lights Out Manager (ILOM) 3.0 Concepts Guide (820-6410).
- Review the ILOM descriptions for the Local Host Interconnect configuration settings. For details, see “Local Host Interconnect Configuration Settings in ILOM” in the Oracle Integrated Lights Out Manager (ILOM) 3.0 Concepts Guide (820-6410).
- Verify that your server is running ILOM 3.0.12 or a later version of ILOM.
- Verify that your platform supports the Local Interconnect Interface. Refer to your platform server ILOM Supplement guide or Administration guide.
| Note - The settings in ILOM for the Local Interconnect Interface are not supported on the CMM.
|
- Automatic configuration of the Local Interconnect Interface requires the Host Managed (hostmanaged) setting in ILOM to be enabled (set to True), as well as the installation of the Oracle Hardware Management Pack 2.1.0 or later software on the server. For more information about installing the Oracle Hardware Management Pack 2.1.0 software, see the Oracle Server Hardware Management Pack User’s Guide (821-1609).
- Manual configuration of the Local Interconnect Interface between the ILOM SP and the host operating system requires the Host Managed (hostmanaged) setting in ILOM to be disabled (set to False), as well as other configuration settings to be set on the host operating system.
For guidelines for configuring the host OS connection point on the Local Interconnect Interface, see Manual Host OS Configuration Guidelines for Local Interconnect Interface.
- The host operating system must support the internal USB Ethernet device that is presented from the ILOM SP. Therefore, prior to configuring the Local Interconnect Interface in ILOM, you should verify that an internal USB Ethernet device driver was included in the operating system distribution and installed on your server. If an internal USB Ethernet device driver was not installed by the operating system distribution, you can obtain the device driver for your operating system from the Oracle Hardware Management Pack 2.1.0 software. For more details, see the Oracle Server Hardware Management Pack User’s Guide (821-1609).
- Network parameter changes to the settings in ILOM for the Local Interconnect Interface are considered pending until you commit the changes in the ILOM. For example, in the ILOM CLI, you must issue the commitpending=true command to save the pendingipaddress and the pendingipnetmask under the network/interconnect target. In the ILOM web interface, network parameter changes entered on the Configure USB Ethernet Parameters dialog are committed after clicking Save.
- An ILOM user account with Administrator (a) role privileges is required in order to change any of the settings in ILOM for the Local Interconnect Interface.
- To determine the operating systems supported on your server, refer to the platform server installation guide or operating system guide(s).
 Configure the Local Interconnect Interface Configure the Local Interconnect Interface
|
1. Log in to the ILOM SP web interface.
2. In the web interface page, click Configuration --> Network.
3. In the Network Settings page, scroll down the page until you see the section labeled “Local Host Interconnect,” then click Configure.

The dialog to configure the USB Ethernet Parameters appears.
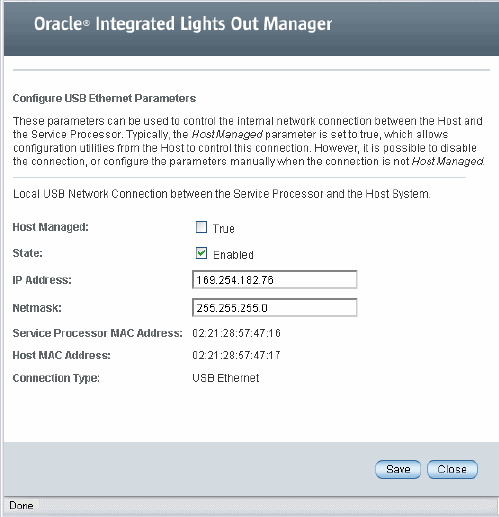
4. To configure the assignment of the non-routable IPv4 addresses to the connection points on the Local Interconnect Interface, you can choose to:
- Automatically assign non-routable IPv4 addresses to each connection point on the Local Interconnect Interface by clicking True in the Host Management checkbox to enable this setting.
When you enable the Host Managed property setting, you also must install the Oracle Hardware Management Pack 2.1.0 (or later) software on your server and accept the installation default for enabling Local ILOM Interconnect. For more information, see the section about configuring the Local ILOM Interconnect in the Oracle Server Hardware Management Pack User’s Guide (821-1609).
- or -
- Manually assign non-routable IPv4 addresses to each connection point on the Local Interconnect Interface by specifying the following properties in the Configure USB Ethernet Parameters dialog:
|
Field
|
Instructions and Description
|
|
Host Managed
|
Clear the checkbox for Host Managed to disable the host managed mode.
|
|
State
|
Click the checkbox for State to manually enable the local interconnect mode between the ILOM SP and the host OS.
The State is, by default, disabled.
|
|
IP Address
|
ILOM, by default, provides a default non-routable IPv4 address for the ILOM SP connection point on the Local Interconnect Interface.
This default IPv4 address (169.254.182.76) should not be changed unless a conflict exists in your network environment with this IPv4 address.
|
|
NetMask
|
ILOM, by default, provides a default IPv4 Netmask address for the ILOM SP connection point on the Local Interconnect Interface.
This default IPv4 Netmask (255.255.255.0) address should not be changed unless a conflict exists in your network environment with this address.
|
| Note - To prevent the Oracle Hardware Management Pack software from auto-configuring the Local Interconnect Interface between the ILOM SP and the host OS, the setting for Host Managed must be unchecked (disabled). To prevent the use of the Local Interconnect Interface between the ILOM SP and the host OS, both the settings for Host Managed and State must be unchecked (disabled).
|
5. To commit the changes entered on the Configure USB Ethernet Parameters dialog, click Save.
| Note - If you chose to manually configure the Local Interconnect Interface in ILOM without the use of the Oracle Hardware Management Pack 2.1.0 or later software, you will need to perform some additional configuration on the host operating system. For general details about these additional host OS configuration settings, see Manual Host OS Configuration Guidelines for Local Interconnect Interface.
|
| Oracle Integrated Lights Out Manager (ILOM) 3.0 Web Interface Procedures Guide
|
820-6411-12
|
   
|
Copyright © 2010, Oracle and/or its affiliates. All rights reserved.


