| C H A P T E R 6 |
|
Installing VMware |
This chapter explains the procedure to install VMware ESX Server 3 on a Sun Fire X4100, X4100 M2, X4200, or X4200 M2 server.
| Note - If you want to mirror your OS, you must create the RAID before you install the OS. See Configuring RAID for Any Operating System from the BIOS. |
Although you can install the VMware ESX Server 3 software from a local CD/DVD, a remote CD/DVD, or the network, you need to collect some information about your system and your network before you proceed with any of these installation methods.
You can find detailed information and procedures concerning VMware virtualization software at http://www.vmware.com/support/pubs.
The two most common methods to install VMware on your server are:
Before you begin installing VMware ESX Server 3 software on server, consult the following required documents for VMware ESX Server 3 install, at http://www.vmware.com/support/pubs/vi_pubs.html.
Consult the following table to determine which sections in this document are relevant to the installation tasks that you want to perform.
|
Begin installing the VMware ESX software using a local or network-attached CD or virtual CD drive. |
|
The Virtual Infrastructure service console and management interface is dependent on a network interface. The service console does not automatically use the first interface with a live connection. If you do not physically connect all network interfaces, a live interface must be associated with the service console for host management.
Refer to the Sun Fire X4100/X4100 M2 and X4200/X4200 M2 Servers Service Manual (819-1157) for detailed information concerning network interface cabling and the BIOS considerations of these interfaces.
By default, vmnic0 is assigned for service console communications.
The following procedure applies to installing VMware ESX Server 3 from a local CD-ROM, or a virtual CD-ROM redirected from Java Console.
|
From a network-connected system with CD-burning capabilities:
1. Download the ISO image at http://www.vmware.com/download/vi/eval.html.
a. Burn the image to a CD/DVD.
| Note - If Java Remote Console is used to redirect a CD drive or image, you can select “Host Device” as the device type. |
2. Install the ESX Server software on the Sun Fire X4100/X4200 system.
3. Update the ESX Server software if necessary. Updates are available at http://www.vmware.com/support/.
The process is detailed in the following sections.
Before you begin installing VMware ESX Server 3 and later on your Sun Fire X4100/X4200 server, you require:
|
1. Turn on the Sun Fire server.
2. Insert the media into CD/DVD drive. The server boots from the CD and display a boot prompt:
3. Choose the interface that you would like to work with:
4. Refer to the Installation and Upgrade Guide for VMware Infrastructure to guide you through the installation process. From your network-connected system go to http://www.vmware.com/support/pubs/vi_pubs.html.
5. Identify the Sun Fire-specific network interface.
In the service console window on the Sun Fire system, identify the available network configuration alternatives.
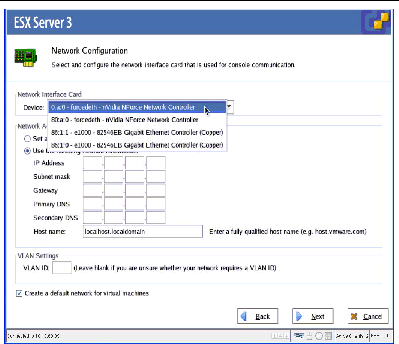
FIGURE 6-1 Example ESX Server Network Configuration Dialog Box (the listing may differ depending upon the NICs installed in the Sun Fire server)

During ESX Server install network configuration, the interfaces are shown as these adapters if no extra or optional network controllers are installed in the Sun Fire X4100/X4200:
Or, on some versions of the Sun Fire X4200/X4200 M2, two types of network interface cards are available:
6. Complete the VMware installation.
This is detailed in the Installation and Upgrade Guide for VMware Infrastructure available at http://www.vmware.com/support/pubs/vi_pubs.html.
VMware ESX Server image updates are available at: http://www.vmware.com/selfsupport/
When upgrading VMware ESX, note that previous network interface mapping is retained and newly detected Nvidia NForce ethernet ports is mapped by ascending order of pci bus enumeration.
Copyright © 2008 Sun Microsystems, Inc. All Rights Reserved.