| Sun Fire X4140, X4240, and X4440 Servers Linux, ESX, and Solaris OS Installation Guide |
| A P P E N D I X D |
|
Identifying Logical and Physical Network Interface Names for Solaris OS Installation |
While configuring an operating system for a networked server, it is necessary to provide the logical names (assigned by the OS) and the physical name (MAC address) of each network interface.
You should begin by finding and recording the MAC addresses of all your physical ports from their labels.
This appendix explains how to obtain the needed logical information in these situations:
Pre-installed Solaris OS are unconfigured.
Prior to configuring the OS, you use the procedure below to identify the network interfaces by their logical and physical names (MAC addresses). You record this information, which you need during configuration, and then return the OS to its unconfigured state before proceeding with the configuration.
1. Log in to the system as root and run ifconfig -a plumb in a command shell.
The command discovers all installed network interfaces. The shell prompt (#) appears when the discovery completes.
2. To output a list of all Solaris named interfaces along with their physical MAC addresses, type this command at the prompt (#):
A sample ifconfig-a output is as follows:
lo0: flags=2001000849<UP,LOOPBACK,RUNNING,MULTICAST,IPv4,VIRTUAL> mtu 8232 index 1
inet 127.0.0.1 netmask ff000000
e1000g0: flags=1000802<BROADCAST,MULTICAST,IPv4> mtu 1500 index 2
e1000g1: flags=1000802<BROADCAST,MULTICAST,IPv4> mtu 1500 index 3
e1000g2: flags=1000802<BROADCAST,MULTICAST,IPv4> mtu 1500 index 4
e1000g3: flags=1000802<BROADCAST,MULTICAST,IPv4> mtu 1500 index 5
e1000g4: flags=1000802<BROADCAST,MULTICAST,IPv4> mtu 1500 index 6
In the sample above, the Solaris named network interfaces appear as e1000g0, e1000g1, and so on. The MAC address for each network interface appears after the word ether. For example, the MAC address associated to the Solaris named network interface e1000g0 is 0:14:4f:c:a1:ee.
3. Record the Solaris network interface name for each MAC address previously recorded in the Configuration Worksheet list.
4. When you are done, type sys-unconfig(1M) at the command line.
This command restores the system configuration to the "as-manufactured" state.

|
Caution - The sys-unconfig(1M) command will halt the system |
This program will unconfigure your system. It will cause it
to revert to a "blank" system - it will not have a name or know about other systems or networks.
This program will also halt the system.
Do you want to continue (y/n) ?
You will be prompted with a series of configuration questions.
6. In the Network Connection screen, select Yes.
The Configure Multiple Network Interfaces screen appears.
7. In the Configure Multiple Network Interfaces screen, consult the list of network interface names recorded in Step 3, then select the appropriate network interfaces.
8. Continue the normal Solaris configuration.
When you are configuring the Solaris OS while installing it, you reach a point where you must enter the logical and physical names (MAC addresses) of the network interfaces.
This section explains how to launch a user shell during the Solaris OS configuration to obtain the logical and physical network interface names that you need to continue with the configuration.
|
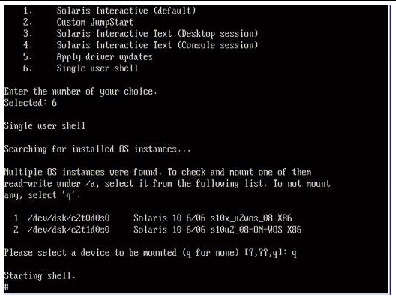
1. In the Install Type menu, select Option (6) Single User Shell and press Enter.
If a message appears about mounting an OS instance, select q. You should not mount any OS instance.
The message “Starting Shell” appears, see the following figure.
2. At the command prompt (#), type the following command to plumb all network interfaces.
| Note - The plumb process may take some time. |
3. At the command prompt, type the following command to output a list of all network interfaces by their Solaris logical name and physical MAC address name.
The output of Solaris named interfaces and MAC addresses appears. For an example, see the following sample output.
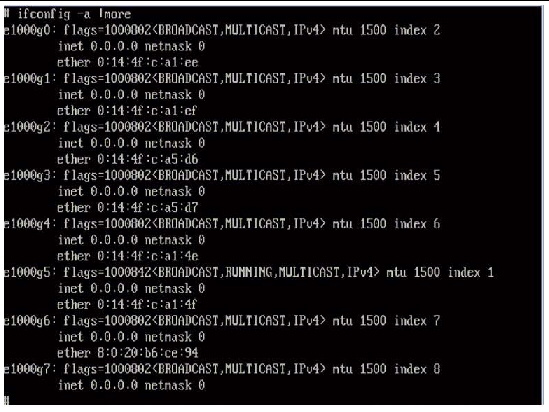
In the sample output above, the:
The physical MAC address for the Solaris named network interface e1000g0 is 0:14:4f:c:a1:ee.
4. Record the Solaris network interface name next to the physical port MAC address previously recorded (per the Configuration Worksheet).
5. When you are done, type exit at the command prompt.
The Solaris Installation program will resume where you last left off.
| Sun Fire X4140, X4240, and X4440 Servers Linux, ESX, and Solaris OS Installation Guide | 820-2397-15 |
Copyright © 2009 Sun Microsystems, Inc. All rights reserved.
 Launch User Shell and Identify Network Interfaces