Chapter 2 Installing SunVideo Plus
This chapter contains information for installing and setting environments for the SunVideo Plus hardware and software. It also describes how to connect video input devices to your Sun system through the SunVideo Plus board.
You must be able to become superuser to successfully install SunVideo Plus. If you do not know the root password of the system on which you are installing SunVideo Plus, contact your system administrator.
Installation Kit
The SunVideo Plus Installation Kit includes:
-
SunVideo Plus PCI card
-
SunVideo Plus CD
-
Antistatic wriststrap
-
SunVideo Plus for PCI Installation Guide
Installation Requirements
To successfully install SunVideo Plus, you need a SPARC(TM) system running Solaris 2.5.1 Hardware: 4/97 or later, Solaris 2.6 or Solaris 7.
Unpacking the SunVideo Plus Card
The SunVideo Plus board is packaged and shipped in an antistatic envelope that protects it from static electricity. Be sure to save this envelope and all shipping package materials; these materials must be used if re-shipment is necessary. When handling the board, use extreme care and avoid touching delicate electronic components. When unpacking the board, do the following:
-
Immediately inspect the shipping container for evidence of damage. If the carrier's agent is not present when the container is opened and the contents are found to be damaged, keep all contents packing materials for the agent's inspection.
-
If you find no evidence of damage, carefully remove the card from its container.
 Caution -
 Printed circuit boards, such asSunVideo Plus, are made of delicate electronic components that are extremely sensitive to static electricity. Ordinary amounts of static from your clothes or work environment can damage them. Handle these boards only by the non-conducting edges. Do not touch the components on the board or any metal parts. Wear a grounding strap when handling the board. Do not disconnect the power from your system power receptacle. This connection provides the ground path necessary so that you can safely remove and install the board and other components. Be sure that the system power is turned off.
Installing the SunVideo Plus Card
-
Install the SunVideo Plus card according to the installation procedures for PCI-bus cards provided with your Sun system.
-
After installing the SunVideo Plus card and securing your system enclosure, boot your system by typing:
hostname# reboot -- -r
SunVideo Plus Software Packages
Your SunVideo Plus subsystem includes software packages listed in the following table that you need to install:
Table 2-1 SunVideo Plus Software Packages|
Package Name |
Description |
Solaris support |
|---|---|---|
|
SUNWo1kpd.u |
Device driver |
Solaris 2.5.1 Hardware: 4/97, 8/97, 11/97, Solaris 2.6 and Solaris 7 |
|
SUNWo1kpu |
Runtime scripts |
|
|
SUNWsvpab |
SunVideo Plus AnswerBook |
|
|
SUNWvtsvp |
Validation Test Suite for SunVideo Plus |
|
|
SUNWo1kpx |
XIL1.2 Runtime pipeline for SunVideo Plus |
Solaris 2.5.1 |
|
SUNWo1kpx |
XIL1.3 Runtime pipeline for SunVideo Plus |
Solaris 2.6 and Solaris 7 |
Once installed, the SunVideo Plus software resides in /opt/SUNWo1kp. The XIL Runtime pipeline software resides in /usr/openwin.
Removing Previous Software Releases
You must remove any previous releases of the SunVideo Plus software before installing any new software packages.
-
Log in as superuser.
-
Uninstall the SunVideo Plus 1.0 or SunVideo Plus 1.1 software packages.
-
Remove SunVideo Plus 1.0 by typing:
hostname# /usr/sbin/pkgrm SUNWo1kpd SUNWo1kpu SUNWvtsvp SUNWsvpab
-
Installing the SunVideo Plus Software
The SunVideo Plus software is provided on the CD included with your SunVideo Plus installation kit.
-
Become superuser (root).
-
Insert the SunVideo Plus 1.2 CD into the CD-ROM drive connected to your system.
-
If your system is running Volume Manager, it should automatically mount the CD-ROM to the /cdrom/sunvideo_plus_1_2 directory.
-
-
Install the SunVideo Plus 1.1 software using swmtool:
-
For Solaris 2.5.1 Hardware: 4/97, 8/97 and 11/97 operating environment, type:
hostname# /usr/sbin/swmtool -d
/cdrom/sunvideo_plus_1_2/Sol_2.5.1
-
For Solaris 2.6 operating environment, type:
hostname# /usr/sbin/swmtool -d
/cdrom/sunvideo_plus_1_2/Sol_2.6
-
For Solaris 7 operating environment, type:
hostname# /usr/sbin/swmtool -d
/cdrom/sunvideo_plus_1_2/Sol_7
-
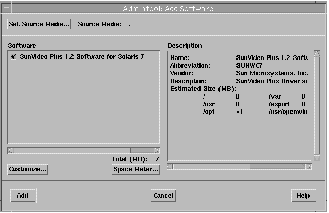
The Add Software window is displayed (this example shows user in Solaris 7 operating environment):
Figure 2-1 Add Software Window

-
Select SunVideo Plus 1.2 software.
-
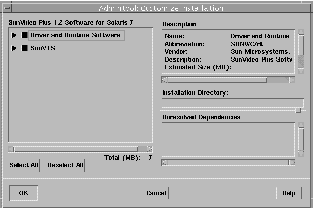
Click Customize... to choose the software options. The following window is displayed:
(This example shows user in Solaris 7 operating environment.)
Figure 2-2 Customize Installation Window

-
Click Select All to install SunVideo Plus driver runtime and Sun Validation Test Suite.
-
Click OK. The Add Software window is again displayed.
-
Click Add on the Add Software window, and answer y (yes) to all questions.
-
Run pkgadd to install SunVideo Plus 1.2 packages.
-
To install the software for Solaris 2.5.1 Hardware: 4/97, 8/97 and 11/97 operating environment, enter the following:
hostname# cd /cdrom/sunvideo_plus_1_2/Sol_2.5.1
hostname# /usr/sbin/pkgadd -d . SUNWo1kpd.u SUNWo1kpu SUNWsvpab SUNWvtsvp SUNWo1kpx
-
To install the software for Solaris 2.6 operating environment, enter the following:
hostname# cd /cdrom/sunvideo_plus_1_2/Sol_2.6
hostname# /usr/sbin/pkgadd -d . SUNWo1kpd.u SUNWo1kpx SUNWo1kpu SUNWsvpab SUNWvtsvp
-
-
After the software has been installed, unmount and eject the CD-ROM:
hostname# cd /
hostname# umount /cdrom/sunvideo_plus_1_2
hostname# eject cdrom
-
hostname# reboot -- -r
This enables the operating system to recognize the SunVideo Plus card.
Setting Your Environment
The demonstration applications that are shipped with SunVideo Plus are designed to search the /opt/SUNWo1kp/lib directory for the SunVideo Plus libraries. If the SunVideo Plus software has been installed in a location other than /opt/SUNWo1kp, or if you are using other SunVideo Plus applications which do not automatically search this default directory, you must include the path to the SunVideo Plus libraries libo1kusr and libotiaudio in your LD_LIBRARY_PATH pathname.
To change the path with the sh or ksh shell environment, type:
hostname% LD_LIBRARY_PATH=/opt/SUNWo1kp/lib:$LD_LIBRARY_PATH
hostname% export LD_LIBRARY_PATH
hostname% setenv LD_LIBRARY_PATH /opt/SUNWo1kp/lib:$LD_LIBRARY_PATH
Setting O1KHOME
The environment variable 01KHOME must also be set to the installation subdirectory. The default installation is shown below. If the SunVideo Plus software was installed in a different subdirectory, the O1KHOME value must be set to the path of that subdirectory.
Using sh or ksh environments, type:
hostname% O1KHOME=/opt/SUNWo1kp
hostname% export O1KHOME
hostname% setenv O1KHOME /opt/SUNWo1kp
Modifying the PATH Variable
For ease of operation, you may want to include thef path to the SunVideo Plus applications in your PATH environmental variable.
Using sh or ksh environments, type:
hostname% PATH=/opt/SUNWo1kp/bin:$PATH
hostname% export PATH
hostname% setenv PATH /opt/SUNWo1kp/bin:$PATH
Setting XIL Environment Variables
Examples that use the Sun XIL(TM) library require that certain XIL environment variables are set. The following entries show how to set these variables assuming XIL was installed in the default location and that the variables are not already set.
To set variables using the sh or ksh environments, type:
hostname% LD_LIBRARY_PATH=/opt/SUNWits/Graphics-sw/xil/lib:$LD_LIBRARY_PATH
hostname% export LD_LIBRARY_PATH
hostname% XILHOME=/opt/SUNWits/Graphics-sw/xil
hostname% export XILHOME
hostname% setenv LD_LIBRARY_PATH /opt/SUNWits/Graphics-sw/xil/lib: $LD_LIBRARY_PATH
hostname% setenv XILHOME /opt/SUNWits/Graphics-sw/xil
Assigning Device Numbers
The operating system assigns device numbers for cards based on the card type, as well as the order that the cards were placed into the PCI-bus slots. When the first SunVideo Plus card is installed into an open slot, the operating system identifies the card as device /dev/olk0. If a second card is placed in an open slot, it is assigned device number /dev/olk1, and so on.
The operating system remembers the order of slots and SunVideo Plus device numbers, even if a card is removed and later replaced. So if the first SunVideo Plus card is moved to another slot, then the operating system will then identify that card as /dev/olk2. If a new SunVideo Plus card is then placed into the same slot that the first SunVideo Plus card originally occupied, this new card will now be known as /dev/olk0. Once a slot is named as a SunVideo Plus card slot, it retains that same address, regardless of which card actually occupies the slot.
Installation Quick Test
To verify proper installation and operation of the SunVideo Plus card and software, do the following:
-
Complete the installation of the SunVideo Plus card and software, and ensure that the XIL environment variables are correctly set.
-
Connect a video source to the Composite Port 1 of the card.
Note -If your video source is an S-Video device, connect the S-Video cable to the SunVideo Plus S-Video connector.
-
Run the xil_display program to test the video capabilities of the card.
hostname% xil_display
This will display 99 frames, then it will exit.
If your video source is an S-Video device, type the following to use the S-Video source:
hostname% xil_display -I 0
-
Connect an audio line input device to the audio input jack and connect speakers to the audio line output jack.
-
Run the olk_audloop program to test the audio capabilities of the card.
hostname% o1k_audloop
Press Control-c when finished.
- © 2010, Oracle Corporation and/or its affiliates
