Chapter 4 SunVideo Plus Example Programs
This chapter includes SunVideo Plus programming tools and XIL program examples. Included with the SunVideo Plus software is the source code for several example programs. The following table lists and briefly describes each of these. Detailed descriptions of each syntax and related options are then provided. These programs also help verify proper operation of the SunVideo Plus card.
Table 4-1 SunVideo Plus Example Programs|
Example Program |
Description |
|---|---|
|
swmtool |
A tool for installing SunVideo Plus through a GUI. |
|
o1k_audrec |
A tool for recording audio to file. |
|
o1k_audplay |
A tool for playing audio files. |
|
o1k_audloop |
A tool for looping audio IN to audio OUT. |
|
soundtool |
A GUI tool for recording, playing and modifying u-law audio files. |
|
xil_compress |
An XIL example which captures and compresses video and saves compressed data to a file. |
|
xil_decompress |
An XIL example that reads compressed data from file, decompresses it, and displays the decompressed video. |
|
xil_display |
An XIL example that captures and displays video. |
|
xil_video_broadcast/xil_video_receiver |
These are two XIL examples: broadcast transmits over TCP captured and compressed video; receiver receives this video stream, decompresses and displays it. |
|
xil_video_broadcast/xil_video_receiver |
This performs the same functions as the previous example, but adds H.261 protocol to the list of compressed formats. |
|
o1k_conf |
A point-to-point audio/video conference example built using XIL and the SunVideo Plus audio library. |
|
o1k_ctl |
A audio and video controller used to alter inputs to SunVideo Plus. |
These programs also help verify proper operation of the SunVideo Plus card.
Audio Recording
The o1k_audrec program is a command-line driven tool for recording audio to a file.
The following shows the command-line syntax for the olk_audrec example:
hostname% o1k_audrec options -o filename
The following table describes command options and the default setting.
Table 4-2 o1k_audrec Options|
Options |
Description and Values |
Default |
|---|---|---|
|
-D device |
Device name |
/dev/o1k0 |
|
-f format |
Encoding format (0=ULAW, 1=ALAW, 2=PCM8, 3=PCM16, 4=G722) |
0 |
|
-r rate |
Sample rate (8000, 11025, 16000, 22050) |
8000 |
|
-c channel |
Channels (1, 2) |
1 |
|
-p port |
Input port (0=LINE, 1=MIC) |
0 |
|
-g gain |
Input gain (0 .. 1.0) |
.125 |
|
-m mgain |
Monitor gain (0 .. 1.0) |
0 |
|
-I information |
Audio file string information |
"" |
|
-b size |
Buffer size |
1000 |
|
-h amount |
Print hash marks after amount |
0 |
Audio Playing
The olk_audplay program is a command-line driven tool for playing audio files.
The following shows the command-line syntax for the olk_audplay example:
hostname% o1k_audplay options -i filename
The following table describes command options and the default setting.
Table 4-3 o1k_audplay Options|
Options |
Description and Values |
Default |
|---|---|---|
|
-D device |
Device name |
/dev/o1k0 |
|
-v gain |
Output gain (0 .. 1.0) |
1.0 |
|
-b size |
Buffer size |
1000 |
Audio Looping
The olk_audloop program is a command-line driven tool used to loop audio IN to audio OUT.
The following shows the command-line syntax for the olk_audloop example:
hostname% o1k_audloop options
The following table describes command options and the default setting.
Table 4-4 o1k_audloop Options|
Options |
Description and Values |
Default |
|---|---|---|
|
-D device |
Device name |
/dev/o1k0 |
|
-f format |
Encoding format (0=ULAW, 1=ALAW, 2=PCM8, 3=PCM16, 4=G722) |
0 |
|
-r rate |
Sample rate (8000, 11025, 16000, 22050) |
8000 |
|
-c channel |
Channels (1, 2) |
1 |
|
-p port |
Input port (0=LINE, 1=MIC) |
0 |
|
-g gain |
Input gain (0 .. 1.0) |
.125 |
|
-v gain |
Output gain (0 .. 1.0) |
1.0 |
|
-b size |
Buffer size |
1000 |
The soundtool Program
The soundtool program is a GUI tool for recording, playing and modifying u-law audio files (compressed audio files).
The following shows the command-line syntax for the soundtool example:
hostname% soundtool [-D device]
The following figure shows the soundtool demonstration program display.
Figure 4-1 soundtool Display
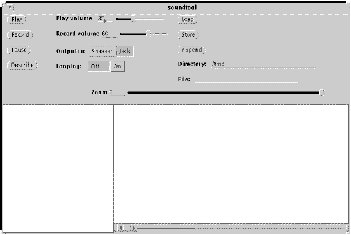
soundtool is one of the demonstration programs that is distributed in the SUNWaudmo package. It is typically installed into /usr/demo/SOUND/src/soundtool/. soundtool uses the libaudio audio library and a few system calls (such as open/close, read/write, ioctl and fcntl) to operate on Sun standard hardware and audio devices. The source for the soundtool demonstration distributed with SunVideo Plus software is installed in the example subdirectory of O1KHOME (usually /opt/SUNWo1kp/examples/soundtool).
Using the SunVideo Plus Control Panel
The SunVideo Plus control panel, olk_ctl, allows both static and dynamic changes to various audio/video attributes (such as video/audio input selections, audio volume/gain, video brightness, contrast, and so on) for each SunVideo Plus installed in your system.
The following figure shows the SunVideo Plus control panel.
Figure 4-2 SunVideo Plus Control Panel
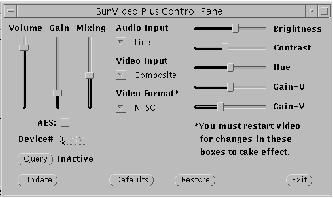
The settings for each SunVideo Plus device are kept in a database. When changes are made to the various attributes in the control panel, the database for the selected device is modified. Whenever a SunVideo Plus device is opened, the current settings in the database are used to configure the device. While a SunVideo Plus is opened, the control panel will also communicate with the process using the SunVideo Plus device to dynamically change settings.
There are a few settings in the control panel which cannot be dynamically changed and thus only take effect when a SunVideo Plus device is opened. These settings are marked with an asterisk (*) in the control panel.
The video format may be set to NTSC, PAL, or AUTO. If AUTO is selected, when the SunVideo Plus device is opened, the video format is auto detected. However, since this auto detection can take up to 1.5 seconds, if you know what video format you are using, it is best to set the video format manually.
The Query button is used to dynamically check if a selected SunVideo Plus device is currently opened by another process.
The various attributes on the control panel may also be changed programmatically by a user program. Since these changes can be made by another process while the control panel is opened, the attribute statuses may not always be correct. Clicking the Update button on the control panel updates the current status of the control panel settings.
Image Compression
This is a modified XIL example to which H.261 (video) compression was added. See source code notes for specific H.261 code changes. The SunVideo version of this demonstration program can be run under the SunVideo Binary Compatibility Mode without modification (the SunVideo version does not include H261). Note that the default shrink factor is 2 (-s 2) which results in CIF-sized image compression. To compress QCIF-sized images, use -s 4.
The following shows the command-line syntax for the xil_compress example:
hostname% xil_compress options -o filename
The following table describes command options and the default setting
Table 4-5 xil_compress Options|
Legal Options |
Description and Values |
Default |
|---|---|---|
|
-o %s |
Save bitstream in file |
NULL |
|
-C %s |
Compression type (CellB, JPEG, MPEG1, H261) |
CellB |
|
-s %d |
Shrink factor |
2 |
|
-I %d |
Select input channel |
1 |
|
-f %d |
Frames to capture |
100 |
|
-i %d |
Frames to skip between capture |
0 |
|
-D %s |
Name of device |
/dev/olk0 |
|
-B %d |
H261 bitrate, kbits/sec |
2000 |
|
-Q %d |
H261 max quantity |
10 |
|
-R %d |
H261 rate control (0=variable, 1=fixed) |
1 |
|
Legal Switches |
|
|
|
-E |
Exit on first error |
|
.
Example Usage
To compress a CIF CellB bitstream, type:
hostname% xil_compress -C CellB -o /tmp/t.clb
To compress a CIF JPEG bitstream, type:
hostname% xil_compress -C Jpeg -o /tmp/t.jpeg
To compress a CIF H261 bitstream, type:
hostname% xil_compress -C H261 -o /tmp/t.h261
To compress a QCIF H261 bitstream, type:
hostname% xil_compress -C H261 -s 4 -o /tmp/t.h261
Image Decompression
This is a modified XIL example to which H.261 was added. For H.261 decompression, the SunVideo Plus XIL molecules will by default use the first SunVideo Plus card installed in your system for hardware accelerated decode of H.261. If you want to use another SunVideo Plus device for decode, you must explicitly use the -D option.
The following shows the command-line syntax for the xil_decompress example:
hostname% xil_decompress options -i filename
The following table describes command options and the default setting,
Table 4-6 xil_decompress Options|
Options |
Description and Values |
Default |
|---|---|---|
|
-C |
Compression type (CellB, JPEG, H.261, Cell, MPEG1) |
CellB |
|
-s %d %d |
CellB width and height |
320, 240 |
|
-r %d |
Playback frame rate (0 = fast as possible) |
0 |
|
H261 Options |
|
|
|
-D |
Name of SunVideo Plus device for h/w decompression |
NULL |
Example Usage
To decompress a CellB bitstream, type:
hostname% xil_decompress -C CellB -s 320 240 -i /tmp/t.clb
To decompress a JPEG bitstream, type:
hostname% xil_decompress -C Jpeg -i tmp/t.jpeg
To decompress an H261 bitstream, type:
hostname% xil_decompress -C H261 -i tmp/t.h261
To decompress a H261 bitstream using the second SunVideo Plus card in your system, type:
hostname% xil_decompress -C H261 -i tmp/t.h261 -D /dev/o1k1
Video Display
This is a modified example of an XIL that captures video and displays it.
Changes to video attributes that affect the color of the image (brightness, contrast, hue, and so on) are also made to the database used by the control panel. Thus, the defaults for these settings depend on how they were last set. If you run this application once and set the brightness to a particular value, this value will be the default setting when you next run a video application.
The following shows the command-line syntax for the xil_display example:
hostname% xil_display options
The following table describes command options and the default setting.
Table 4-7 xil_display Options|
Legal Options |
Description and Values |
Default |
|---|---|---|
|
-s %d |
Shrink factor |
2 |
|
-I %d |
Select input channel |
1 |
|
-f %d |
Frames to capture |
100 |
|
-w %d |
Capture subimage width |
640 |
|
-h %d |
Capture subimage height |
480 |
|
-i %d |
Frames to skip between capture |
0 |
|
-m %d |
Maximum frames to buffer |
2 |
|
-x %d |
x window location |
(random) |
|
-y %d |
y window location |
(random) |
|
-D %s |
Name of device |
/dev/olk0 |
|
Legal Switches |
|
|
|
-g |
Enable grayscale mode |
|
|
-E |
Exit on first error |
|
|
-d |
Do not display result of capture |
|
|
Video Attributes |
|
|
|
-B %d |
Brightness |
none |
|
-C %d |
Contrast |
none |
|
-H %d |
Hue |
none |
|
-U %d |
Saturation/gain U component |
none |
|
-V %d |
Saturation/gain V component |
none |
|
-c %d |
Colormap version (0=XIL std, 1=XIL gamma corrected) |
1 |
The colormap version option does nothing if the current display depth is 24 bits. On 8-bit display depths, it affects which colormap is installed for the video window. The XIL versions cause the SunVideo Plus to capture 16-bit video data which is then dithered in software by the XIL molecules to 8 bits.
Example Usage
hostname% xil_display
Video Broadcast and Video Receiver
These two programs, xil_video_broadcast and xil_video_receiver, are modified XIL examples which run on the SunVideo Plus card. The SunVideo version of these demonstrations can be run under the SunVideo Binary Compatibility Mode without modification.
The xil_video_broadcast Program
The following shows the command-line syntax for the xil_video_broadcast example:
hostname% xil_video_broadcast options
The following table describes command options and the default setting.
Table 4-8 xil_video_broadcast Options|
Legal Options |
Description and Values |
Default |
|---|---|---|
|
-C %s |
Compression type (CellB, Jpeg, UYVY) |
CellB |
|
-H %s |
Destination hostname |
local subnet |
|
-c %d |
Broadcast channel (0-9) |
0 |
|
-F %s |
File of destination hostnames |
none |
|
-D %s |
Name of SunVideo Plus device |
/dev/olk0 |
|
-I %d |
Select input channel |
1 |
|
-P %d |
Delay x ms per transmit |
0 |
|
-d %s |
Save bitstream in file |
NULL |
|
-f %d |
Frames to broadcast |
18000 |
|
-i %d |
Frames to skip between capture |
0 |
|
-m %d |
Maximum frames to buffer |
2 |
|
-s %d |
Shrink factor |
2 |
|
-w %d |
Width of capture window |
NTSC: 640 PAL: 768 |
|
-h %d |
Height of capture window |
NTSC: 480 PAL: 576 |
|
-x %d |
x coordinate of display window |
(random) |
|
-y %d |
y coordinate of display window |
(random) |
|
Legal Switches |
|
|
|
-p |
Disable preview |
|
|
-b |
Enable display of partial CellB frames by receiver |
|
|
-t |
Disable transmission |
|
|
-E |
Exit on first error |
|
|
-v |
Print verbose messages |
|
The xil_video_receiver Program
The following shows the command-line syntax for the xil_video_receiver example:
hostname% xil_video_receiver options
The following table describes command options and the default setting.
Table 4-9 xil_video_receiver Options|
Legal Options |
Description and Values |
Default |
|---|---|---|
|
-C %s |
Compression type (CellB, Jpeg, UYVY) |
CellB |
|
-c %d |
Broadcast channel (0-9) |
0 |
|
-f %d |
Frames to broadcast |
18000 |
|
-x %d |
x coordinate of display window |
(random) |
|
-y %d |
y coordinate of display window |
(random) |
|
Legal Switches |
|
|
|
-b |
Enable display of partial CellB frames by receiver |
|
|
-E |
Exit on first error |
|
|
-v |
Print verbose messages |
|
Example Usage
To broadcast/receive video, type:
hostname% xil_video_receiver -C CellB
hostname% xil_video_broadcast -C CellB
Video Broadcast and Video Receiver for H.261
These two programs, xilh_video_broadcast and xilh_video_receiver, are modified XIL examples that run on the SunVideo Plus card and use H.261 compression.
The xilh_video_broadcast Program
The following shows the command-line syntax for the xil_video_broadcast example:
hostname% xilh_video_broadcast options
The following table describes command options and the default setting.
Table 4-10 xilh_video_broadcast Options|
Legal Options |
Description and Values |
Default |
|---|---|---|
|
-C %s |
Compression type (CellB, Jpeg, H261, UYVY) |
CellB |
|
-H %s |
Destination hostname |
local subnet |
|
-c %d |
Broadcast channel (0-9) |
0 |
|
-F %s |
File of destination hostnames |
none |
|
-D %s |
Name of SunVideo Plus device |
/dev/olk0 |
|
-I %d |
Select input channel |
1 |
|
-P %d |
Delay x ms per transmit |
0 |
|
-d %s |
Save bitstream in file |
NULL |
|
-f %d |
Frames to broadcast |
18000 |
|
-i %d |
Frames to skip between capture |
0 |
|
-m %d |
Maximum frames to buffer |
2 |
|
-s %d |
Shrink factor |
2 |
|
-w %d |
Width of capture window |
NTSC: 640 PAL: 768 |
|
-h %d |
Height of capture window |
NTSC: 480 PAL: 576 |
|
-x %d |
x coordinate of display window |
(random) |
|
-y %d |
y coordinate of display window |
(random) |
|
-B %d |
H261 bitrate |
256 |
|
-Q %d |
H261 maximum quantization |
10 |
|
Legal Switches |
|
|
|
-p |
Disable preview |
|
|
-b |
Enable display of partial CellB frames by receiver |
|
|
-t |
Disable transmission |
|
|
-E |
Exit on first error |
|
|
-v |
Print verbose messages |
|
The xilh_video_receiver Program
The following shows the command-line syntax for the xil_video_receiver example:
hostname% xilh_video_receiver options
The following table describes command options and the default setting.
Table 4-11 xilh_video_receiver Options|
Legal Options |
Description and Values |
Default |
|---|---|---|
|
-C %s |
Compression type (CellB, Jpeg, H261, UYVY) |
CellB |
|
-c %d |
Broadcast channel (0-9) |
0 |
|
-f %d |
Frames to broadcast |
18000 |
|
-x %d |
x coordinate of display window |
(random) |
|
-y %d |
y coordinate of display window |
(random) |
|
Legal Switches |
|
|
|
-b |
Enable display of partial CellB frames by receiver |
|
|
-E |
Exit on first error |
|
|
-v |
Print verbose messages |
|
Audio Video Conferencing
The example program o1k_conf is a point-to-point audio and video conference written in C++ using XIL and the SunVideo Plus audio API. It supports CellB, JPEG, and H261 video formats and various audio formats.
The o1k_conf Command
The following shows the command-line syntax for the o1k_conf example:
hostname% o1k_conf options
The following table describes command options and the default setting.
Table 4-12 o1k_conf Options|
Legal Options |
Description and Values |
Default |
|---|---|---|
|
-u %s |
user@host |
NULL |
|
-t |
Disables XIL molex (Sol;airs 2.6 only) |
|
|
-p |
For receiving PAL format. |
|
|
-D %s |
Name of SunVideo Plus device |
/dev/olk0 |
-
XIL 1.2 in Solaris 2.5.1 is not multithreading safe. The conference example uses multiple threads that access XIL. The threads lock out each other before they make XIL calls. This is not efficient, but required due to XIL 1.2. In Solaris 2.6, XIL 1.3 is multithreading safe. The -t option is used to disable the locking used by the conference application.
-
The -p option should be used if you know the call will be sent by PAL format. If you do not use this option if sending PAL formats, errors will occur.
The following figure shows the main conference panel:
Figure 4-3 o1k_conf Main Conference Panel
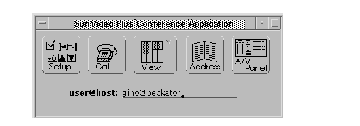
This allows for configuration of audio/video parameters and provides an address book for storing information about users you want to connect.
To open the address book, click the Address button. The following figure shows the Address Book.
Figure 4-4 Address Book
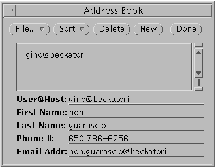
A user is added by selecting the New button. The most important information is the User@Host field. This is used to contact another person when placing a conference call. The other information in the Address Book is optional. After filling in the user information, click on the Add button (which is only displayed after the new button is selected). To save your address book, select Save in File menu. To select a user for a conference, select the user in the list, and then click the Done button. This closes this pop-up window and places the User@Host name in the Main Conference Panel (Figure 4-3).
Only the user calling the conference needs to configure the Main Conference Panel because when a conference is called, the far end is told of the caller's configuration. The default configuration for olk_conf is
-
Video: H261, QCIF, 10fps, 256 Kbits/sec
-
Audio: ulaw, 8 KHz, mono
To change the conference configuration, click Setup, and proceed through the menus and pop-up window directions.
When called by an another user, a pop-up window opens that informs you who is calling and the parameters of the call (see figure below). You may then decide if you care to join the conference.
Figure 4-5 Being Called Window
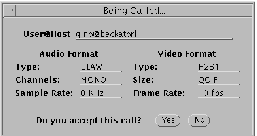
During the conference, you can monitor status information, like audio and video bit rates and frame rates and network packet activity, by View from the Main Conference Panel. Then select A/V Panel for audio and video parameters that you can change in the audio/video panel.
During a conference call, you will have two windows on your display, a Local View and a Far View (the person you are conferencing). The figure below shows these two windows.
Figure 4-6 Local View and Far View Windows
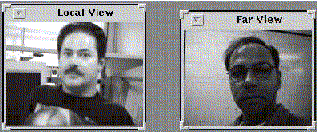
With H.261, a picture-in-a-picture is possible on the Far View window, with your view inlayed in the top-left corner. To reduce CPU use, you can switch your local view to an icon. This is advisable during an H261 conference.
When you have completed your conference call, click HangUp. The HangUp button is displayed on the Main Conference Panel after a call is placed.
- © 2010, Oracle Corporation and/or its affiliates
