| C H A P T E R 3 |
|
Installing the Sun XVR-1200 Graphics Accelerator Hardware |
This chapter provides Sun XVR-1200 graphics accelerator hardware installation information.
Refer to your system platform documentation for proper procedures on how to shut down the system safely before installing or removing any internal boards and how to reboot the system after installation. Access documentation at: http://www.sun.com/documentation
To find the most recent information on supported systems for the Sun XVR-1200 graphics accelerator, and additional specifications, go to:
http://www.sun.com/desktop/products/graphics/xvr1200/
|
Note - The Sun XVR-1200 graphics accelerator consumes 50 watts of system power. |
TABLE 3-1 lists the maximum number of Sun XVR-1200 graphics accelerators for each Sun system supported.
Refer to the platform documentation provided with your supported Sun system (TABLE 3-1) for detailed instructions on installing Sun PCI bus graphics boards.
This document includes procedures for the Sun Blade 2000 and Sun Fire 6800/6900 systems, however, refer to the following documentation provided with your Sun system for detailed instructions:
Access this documentation at: http://www.sun.com/documentation
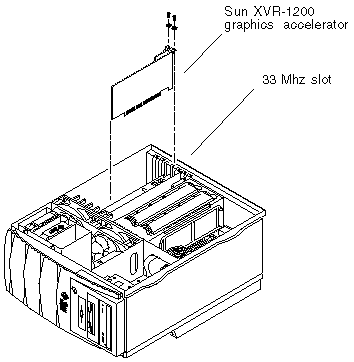
On Sun Blade 2000 systems, you can only install the Sun XVR-1200 graphics accelerator in a 33 Mhz slot (the board occupies two slots). Do not use the 66 Mhz slot; its location prohibits the use of a double wide graphics board.

|
Caution - The Sun XVR-1200 graphics accelerator is not hot-swappable. |
1. Shut down your system. attach the antistatic wrist strap.
2. Remove the Sun Blade 2000 access panel and lay the system on its side.
3. Attach the antistatic wrist strap and connect the ESD strap to the system.
4. Position the Sun XVR-1200 graphics accelerator in the chassis (FIGURE 3-1).
5. Guide the graphics board bracket tab into the chassis backpanel opening.

6. Holding the two upper corners of the graphics board, push the board straight down into the connector until the board is fully seated.
7. Replace the Phillips screw securing the bracket tab to the system chassis.
8. Replace the side access cover.
9. Connect the monitor cable, power on the system and reboot (boot -r) for reconfiguration.
10. For multiple graphics boards, modify the /etc/dt/config/Xservers file.
This file tells your system to run the X window system on each of the frame buffers listed in your Xservers file. If you remove graphics boards from your system, you also need to modify your Xservers file. See Chapter 4, "Configuring Multiple Frame Buffers."
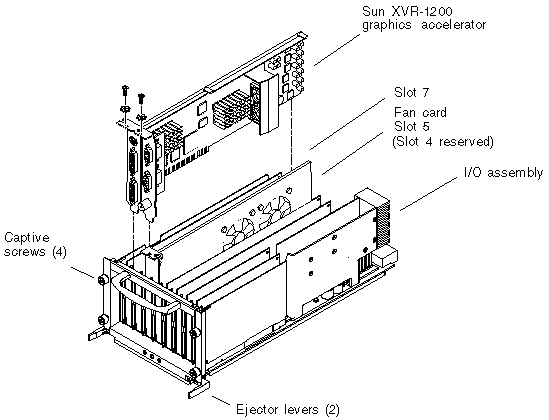
On Sun Fire 6800/6900 systems, you can only install the Sun XVR-1200 graphics accelerator in slot 7 (slot 6 must be empty since the board occupies two slots). The Sun XVR-1200 graphics accelerator requires a fan card, provided in the installation kit, in the adjacent slot (slot 5).

|
Caution - The Sun XVR-1200 graphics accelerator is not hot-swappable. |
1. Shut down your system and remove the Sun Fire 6800/6900 PCI I/O assembly.
Refer to the Sun Fire 6800/6900/4810/4800/3800 Systems Service Manual for details on removing and replacing PCI I/O assemblies.
a. Loosen the four I/O assembly captive phillips screws and pull the ejector levers outward (FIGURE 3-2).
b. Slide out the I/O assembly and place it on an ESD mat close to the system.
2. Attach the antistatic wrist strap and connect the ESD strap to the system.
3. Lay the I/O assembly on its side (FIGURE 3-2).
4. Position the Sun XVR-1200 graphics accelerator in the I/O assembly (FIGURE 3-2).
5. Guide the graphics board into I/O assembly slot 7 (FIGURE 3-2).
a. Insert the faceplate end of the graphics board into the appropriate opening in the I/O assembly back panel.
b. Guide the opposite end of the graphics board into the card slot.
c. Secure the faceplate to the I/O assembly with the two Phillips screws.
6. Position the fan card in the I/O assembly (FIGURE 3-2).
7. Guide the fan card into I/O assembly slot 5 (FIGURE 3-2).
a. Insert the faceplate end of the fan card into the appropriate opening in the I/O assembly back panel.
b. Guide the opposite end of the fan card into the card slot.
c. Secure the faceplate to the I/O assembly.

8. Insert and secure filler boards into any other open slots.
The Sun XVR-1200 graphics accelerator occupies two slots.
9. Replace the I/O assembly into the Sun Fire 6800/6900 chassis.
a. Line up the I/O assembly with the chassis I/O assembly opening and slide it into the chassis.
b. Simultaneously press the two ejector levers inward and tighten the four captive Phillips screws snugly by hand.
10. Connect the monitor cable, power on the system and reboot (boot -r) for reconfiguration.
11. For multiple graphics boards, modify the /etc/dt/config/Xservers file.
This file tells your system to run the X window system on each of the frame buffers listed in your Xservers file. See Chapter 4, "Configuring Multiple Frame Buffers" for specific Xservers file instructions for Sun Fire 6800/6900 systems.
Use the proper DVI-I monitor adapter cable that supports your monitor. Use a DVI-I to 13W3 cable (Sun part number 530-3170) for monitors that support 13W3 video displays. Use a DVI-I to HD15 cable (Sun part number 530-3171) for monitors that support HD15 video displays. You can order the DVI-I adapter cables through the Sun store (http://store.sun.com).
|
Note - The monitor must be connected to the Sun XVR-1200 graphics accelerator and powered on for it to configure to the initial monitor resolution. |
For most installations, the Sun XVR-1200 graphics accelerator device automatically configures itself to the screen resolution and refresh rate for your monitor. If it is not a Sun monitor, however, that is connected to the Sun XVR-1200 graphics accelerator device, the monitor might have the wrong screen resolution. To change the screen resolution, use the fbconfig utilities which is used for configuring all Sun graphics accelerators. SUNWjfb_config(1M) contains Sun XVR-1200 device-specific configuration information.
 To access the SUNWjfb_config man page, type:
Copyright © 2004, Sun Microsystems, Inc. All rights reserved.