| Sun Fire V880z Server and Sun XVR-4000 Graphics Accelerator Installation and User's Guide |
| Sun Fire V880z Server and Sun XVR-4000 Graphics Accelerator Installation and User's Guide |
| C H A P T E R 8 |
|
Genlocking Sun XVR-4000 Graphics Accelerators |
This chapter describes genlocking multiple Sun XVR-4000 graphics accelerators.
Genlock and framelock are different methods of accomplishing synchronization of video timing between two computer graphics systems. Framelock synchronizes two video streams by asynchronously resetting the slave device is vertical timing, and does not guarantee that pixels are aligned in the two streams. This situation could result in dropped video lines.
Genlock, on the other hand, generates its pixel clock from the master video timing signals, using phase locked loop (PLL) techniques, so they each produce pixels at precisely the same rate, even if the master timing changes over time. Genlock currently requires the video formats to be identical in resolution and frame rate.
When using genlock with framelock (Chapter 7), the vertical reset is always received on the same video line. The slave cannot gain or drop a line of video with respect to the master display device when genlocked.
Sun XVR-4000 graphics accelerators in different systems may be genlocked. Be sure to issue the appropriate commands, video formats, and so on, to each system graphics accelerator to be genlocked.
You may obtain a standard 13W3-BNC cable, BNC-BNC cables, BNC-T connectors, and 76-ohm terminators at your local computer or video supply store.
Cable the Sun XVR-4000 graphics accelerators to be genlocked before configuring your system for genlock (described in Enabling Genlocking for Graphics Accelerators). It is best to have the Sun XVR-4000 graphics accelerators cabled for both framelock (Chapter 7) and genlock for circumstances where both may be required. If framelock is not in use, it does no harm to keep the framelock cables installed.
To genlock your master Sun XVR-4000 graphics accelerator to a slave graphics accelerator, you need a 13W3-BNC cable, BNC-T connector, BNC-BNC cables (for genlocking more than one slave device), and a BNC 75-ohm terminator. The 75-ohm terminator is required even when genlocking a single slave device.
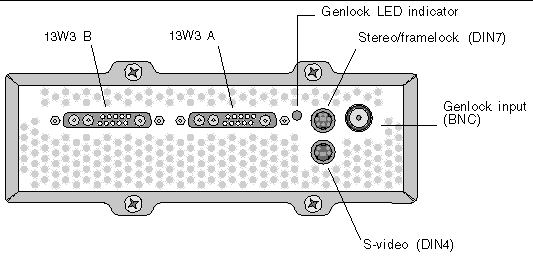
1. Locate the Sun XVR-4000 graphics accelerator I/O back panel on the rear of your Sun Fire V880z server and the 13W3 connector you will use as genlock master (FIGURE 8-1).
You may use either the 13W3A or 13W3B connector for genlocking slave graphics boards. Use one for the master display device (for example, projector or monitor) and the other for genlocking slave display devices.
 [ D ]
[ D ]
2. Connect the 13W3 connector end of the genlock cable to the Sun XVR-4000 graphics accelerator 13W3 monitor connector selected for genlocking (FIGURE 8-2).
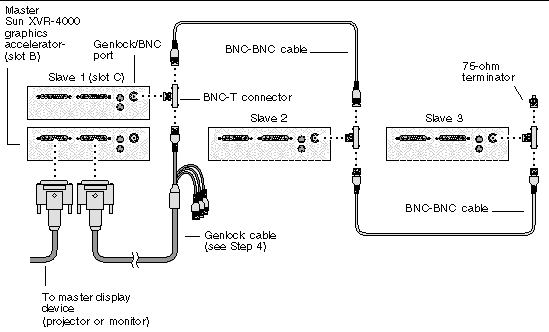
3. Attach a BNC-T connector to the slave back panel genlock/BNC connector of the Sun XVR-4000 graphics accelerator (FIGURE 8-2).
Repeat for each additional slave device to be genlocked.
4. Connect the proper BNC connector end of the genlock cable to one end of the BNC-T connector (FIGURE 8-2).
The composite (or horizontal) synchronization signal is normally used for genlock and is typically the BNC connector on the black wire. If the synchronization signal of the master video format uses the sync on green option, use the BNC connector on the green wire. (The genlock 13W3-BNC cable also has red, green, blue or white BNC wires.) See TABLE 8-1.
5. For multiple slave devices, connect a BNC-BNC cable from the open end of the
BNC-T connector on one graphics accelerator to the BNC-T connector of the next slave device.
6. Attach the 75-ohm terminator to the open BNC-T connector of the last slave device.
FIGURE 8-2 shows the master Sun XVR-4000 graphics accelerator in Slot B of the Sun Fire V880z server. The first slave Sun XVR-4000 graphics accelerator is in Slot C. The second and third slaves are on two additional Sun Fire V880z servers.
 [ D ]
[ D ]This example uses the Sun XVR-4000 graphics accelerator and the device names zulu0 and zulu1. When genlocking with other graphics accelerators, use the appropriated device names.
1. Designate a Sun XVR-4000 graphics accelerator as the master.
You may use the Sun XVR-4000 graphics accelerator that serves as the boot/console head for that system.
You may select any device (that is, zulu0, zulu1, ... and so on) to be the master Sun XVR-4000 graphics accelerator device. If both framelock and genlock are enabled, you must cable the same device to be master for both.
2. Make sure that each Sun XVR-4000 graphics accelerator installed is running a video format with frame refresh rate identical to the video format running on the Sun XVR-4000 accelerator in master mode.
a. Check the resolution of a Sun XVR-4000 graphics accelerator by using the fbconfig command.
host% fbconfig -dev zulu0 -prconf |
You must repeat this command for each Sun XVR-4000 graphics accelerator in the system or systems to be genlocked.
b. Change the resolution of a Sun XVR-4000 graphics accelerator using the fbconfig command.
If the resolution on each Sun XVR-4000 graphics accelerator is not the same, you must change it to match the Sun XVR-4000 graphics accelerator in master mode. You must configure each board separately (that is, for zulu0, zulu1, and so on). The resolution shown below is an example only, you can use different video formats such as SUNW_STD_1600x1000x66 (TABLE 8-1):
host% fbconfig -dev zulu0 -res SUNW_STD_1280x1024x76 host% fbconfig -dev zulu1 -res SUNW_STD_1280x1024x76 |
Log out of the X Window system, and then log back in for the resolutions to take effect. If you do not wish the genlock or bothlock synchronization to be repeated when the X Window system restarts, simply exit the window/desktop session instead of logging out or disable genlock (see Disabling Genlock).
3. Set the master and slave graphics boards.
You can enable genlock while the X Window system is running, however, you should first verify that the master device is initialized. (see Step 4).
In this example, zulu0 is the genlock master device, and zulu1 is the slave device.
host% fbconfig -dev zulu0 -master a -stream a -slave disable -outputs streamA host% fbconfig -dev zulu1 -stream a -slave enable genlock |
The -outputs streamA option directs the same video stream through both 13W3 device ports, sending the same stream simultaneously to a display device and to a slave graphics accelerator for genlocking. See Chapter 6, -outputs Port Mapping for more information.
4. Verify that the master device is initialized before the slave device is initialized.
If both devices are in the same system, the master device should appear before the slave device in the Xservers file. Where zulu0 is the master device in this example, you can verify that zulu0 is the first entry in the Xservers file Xsun command-line entry.
:0 Local local_uid@console root /usr/openwin/bin/Xsun -dev /dev/fbs/zulu0 -dev /dev/fbs/zulu1 |
If the master device is not initialized prior to the slave device in the Xservers file, then when the X Window system restarts on the slave device, the slave device genlock input connector will not recognize the master device. Therefore, the slave device attempt to genlock with the master device will fail.
If the slave device is initialized first, the slave device will start up but without enabling genlock. You can then enable genlock for the slave device through the fbconfig command:
host% fbconfig -dev zulu1 -stream a -slave enable genlock |
fbconfig -genlock hphase and vphase suboptions enable relative or absolute setting of horizontal and vertical phase, respectively. The horizontal phase allows a pixel offset between the external video format and the stream output. The vertical phase allows a scanline offset between the external video format and the stream output.
Refer to Man Pages to access detailed descriptions of the -genlock suboptions through the SUNWzulu_config man page. This section also describes how to invoke fbconfig -dev zulu0 -help. You can use other -genlock suboptions to adapt genlocking to special (non Sun) video formats whose timing exactly matches that of a Sun video format.
Using only genlock (rather than bothlock) enables vertical synchronization with the genlock master source only for composite synchronization video formats, with serrations, for pixel clocks less than 150 Mhz. (All Sun video formats with composite synchronization include serrations.) For other video formats, genlock alone synchronizes the pixel frequency and horizontal phase, but not the vertical phase. Using bothlock instead of genlock achieves both horizontal and vertical types of alignment.
Use bothlock to enable both genlock and framelock. Bothlock uses both genlock and framelock techniques and requires cabling for both (see Chapter 7 for framelocking).
Bothlock is the only way to achieve both vertical and horizontal synchronization for a high-speed video format (pixel clock at or above 150 Mhz), or for a video format with separate synchronization (see TABLE 8-1). Bothlock is also recommended for other video formats whenever a framelock signal is available (that is, when the source is a Sun graphics accelerator with a Sun framelock/stereo connector).
host% fbconfig -dev zulu0 -master a -stream a -slave disable -outputs streamA host% fbconfig -dev zulu1 -stream a -slave enable external bothlock |
On the Sun XVR-4000 graphics accelerator system, you do not need to run these last two commands, that is, setting each master and slave graphics board, each time you log into your X Window system.
TABLE 8-1 lists the proper synchronization attribute for each screen resolution. The table also lists the speed of the pixel clock for each resolution. For pixel clocks under 150 Mhz (indicated by "Slow" in the Pixel Clock Speed column of TABLE 8-1), genlock is sufficient for composite synchronization. For pixel clocks over 150 Mhz (indicated by "Fast" in TABLE 8-1), bothlock is recommended (see Bothlock). All Sun video formats with composite synchronization include serrations.
|
SUNW_STEREO_1280x1024x96
|
|||||
|
VESA_STD_1024x768x60
|
|||||
| Master and slave devices may not display to the same eye simultaneously using genlock alone because the 960 × 680 video formats do not use a feature called "vertical sync elongation" to enable the fields to be distinguished. Using framelock as well as genlock solves this limitation.
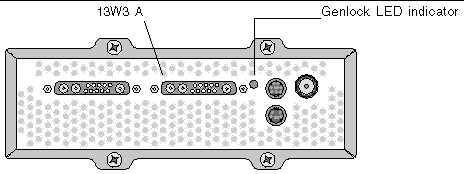
The genlock LED indicator is located between the 13W3A and stereo connectors. The LED illuminates when the genlock input is present and matches the expected horizontal rate.
 To disable genlock (and framelock, if using bothlock) from a device, type:
| Sun Fire V880z Server and Sun XVR-4000 Graphics Accelerator Installation and User's Guide | 817-2400-10 |
Copyright © 2003, Sun Microsystems, Inc. All rights reserved.