| C H A P T E R 2 |
|
AllStart Features |
This chapter explains the features and services available through the AllStart control module on the Sun Control Station.
You can add a file from a remote location or from a local directory on the control station.
To add a file from a remote location:
The AllStart Files table appears.
2. Click Add at the bottom right.
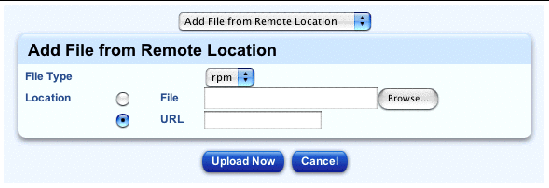
The Add File from Remote Location table appears; see FIGURE 2-1.
3. Choose the type of file from the pull-down menu: RPM or file.
4. Locate the file with one of the following methods:
The Task Progress dialog appears.
To add a file from a local filesystem on the control station:
|
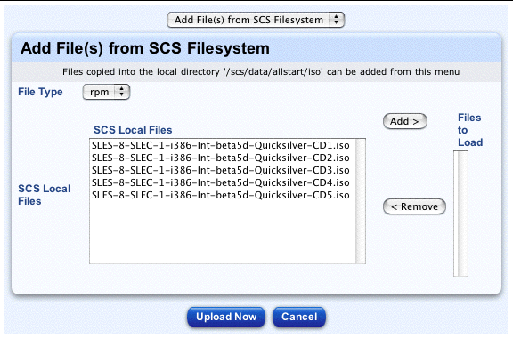
Note - To appear on this screen, the file(s) must be loaded into the directory /scs/data/allstart/iso/ on the control station. |
The AllStart Files table appears.
2. Click Add at the bottom right.
The Add File from Remote Location table appears.
3. From the pull-down menu above the table, select Add File(s) from Local Filesystem.
The Add File(s) from SCS Filesystem table appears; see FIGURE 2-2.
4. Choose the type of file from the pull-down menu: RPM or file.
5. In the SCS Local Files scrolling window, highlight the file(s) you want to load.
6. Click Add to move the file(s) to the Files to Load scrolling window.
7. When you have selected the file(s), click Upload Now.
The Task Progress dialog appears.
To delete a file from the AllStart Files table:
The AllStart Files table appears.
2. Click to highlight a file(s). You can also click Select All at the top to choose all files in the list.
3. Click Delete at the bottom right.
A dialog appears, asking you to confirm the deletion.
The Task Progress dialog appears.
You can add, modify or delete a distribution.
|
Note - You can use a customized kernel with a distribution. For more information, see Using a Customized Kernel. |
You can add a distribution from a CD-ROM or from a local directory.
To add a distribution from a CD-ROM:
1. Select AllStart > Distributions.
The AllStart Distributions table appears.
2. Click Add at the bottom right.
The Upload Distribution from CD-ROM table appears; see FIGURE 2-3.
3. Enter a description of the distribution.
|
Note - It is important to use a unique, descriptive name for each distribution. The system differentiates the distributions according to this description. |
4. The default path to the CD-ROM is /dev/cdrom.
You can modify this path if necessary.
The Task Progress dialog appears.

To add a distribution from a local directory on the control station:
1. Select AllStart > Distributions.
The AllStart Distributions table appears.
2. Click Add at the bottom right.
The Upload Distribution from CD-ROM table appears.
3. From the pull-down menu above the table, select Add Distribution from SCS ISOs.
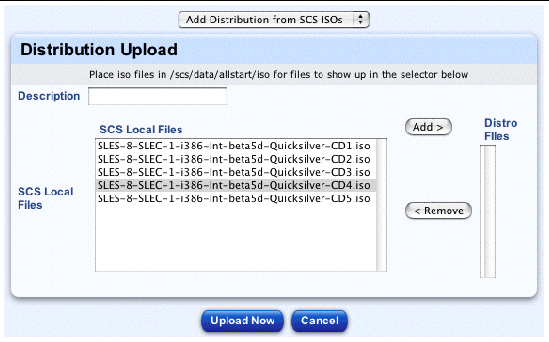
The Distribution Upload table appears; see FIGURE 2-4.
4. Enter a description of the distribution.
|
Note - It is important to use a unique, descriptive name for each distribution. The system differentiates the distributions according to this description. |
5. In the SCS Local Files scrolling window, highlight the file(s) you want to load.
6. Click Add to move the file(s) to the Distro Files scrolling window.
7. When you have selected the file(s), click Upload Now.
The Task Progress dialog appears.
|
Note - You cannot change the files associated to a distribution using the Modify option. To change the files, you have to create a new distribution. |
1. Select AllStart > Distributions.
The AllStart Distributions table appears.
2. Click to highlight a distribution.
3. Click Modify at the bottom right.
The Modify Distribution Info table.
4. You can modify the description of the distribution.
|
Note - It is important to use a unique, descriptive name for each distribution. The system differentiates the distributions according to this description. |
The Task Progress dialog appears.
To delete a distribution from the AllStart Distributions table:
|
Note - If a distribution is referenced to a payload, you cannot delete the distribution. You first need to modify or delete the payload in question. |
1. Select AllStart > Distributions.
The AllStart Distributions table appears.
2. Click to highlight a distribution(s). You can also click Select All at the top to choose all distributions in the list.
3. Click Delete at the bottom right.
If the distribution(s) is referenced to a payload, you cannot delete it.
If the distribution(s) is not referenced to a payload, a dialog appears, asking you to confirm the deletion.
The Task Progress dialog appears.
You can add, view, modify or delete a payload.
You can create a Sun Java Desktop System (JDS) payload or a Red Hat payload.
|
Note - If you select only one OS distribution to display in your AllStart preferences, then the Select System Type selector will not appear in the AllStart procedures. You will go directly into the procedure.
|
1. Select AllStart > Payloads.
The AllStart Payloads table appears.
The Select System Type table appears.
4. Click Continue at the bottom.
The Create AllStart Payload table appears.
5. Fill in the following fields:
|
Note - It is important to use a unique, descriptive name for each payload. The system differentiates the payloads according to this name. |
The AllStart Payload Distribution-Specific Options table for a Sun JDS payload appears; see FIGURE 2-5.
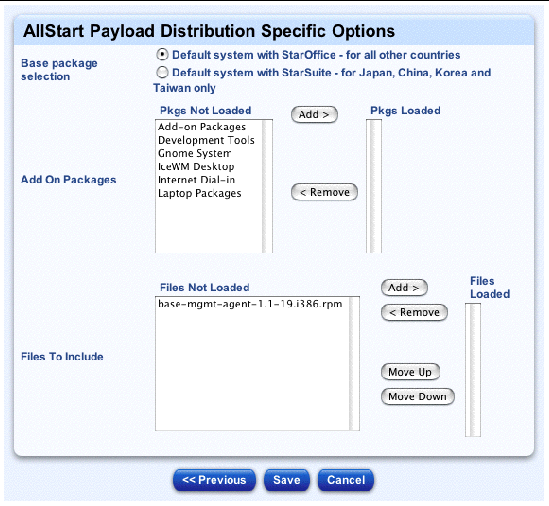
7. For Base Package Selection, click the radio button next to the option appropriate to your location:
8. In the Pkgs Not Loaded scrolling window, highlight the packages(s) that you want to load.
The Add-on Packages are the groups of RPMs that you want to load based on functionality (for example, Development Tools or Laptop Packages).
9. Click Add to move the package(s) to the Pkgs Loaded scrolling window.
10. In the Files Not Loaded scrolling window, highlight the file(s) that you want to load.
These are the individual files that will be loaded after the base distribution is loaded.
The base-mgmt-agent RPM is available in the Files Not Loaded scrolling window, but you have to move it to the Files Loaded scrolling window.
11. Click Add to move the file(s) to the Files Loaded scrolling window.
The Task Progress dialog appears.
13. When complete, the AllStart Payloads table appears. Verify that your payload appears in the summary table.
1. Select AllStart > Payloads.
The AllStart Payloads table appears.
The Select System Type table appears.
4. Click Continue at the bottom.
The Create AllStart Payload table appears.
5. Fill in the following fields:
|
Note - It is important to use a unique, descriptive name for each payload. The system differentiates the payloads according to this name. |
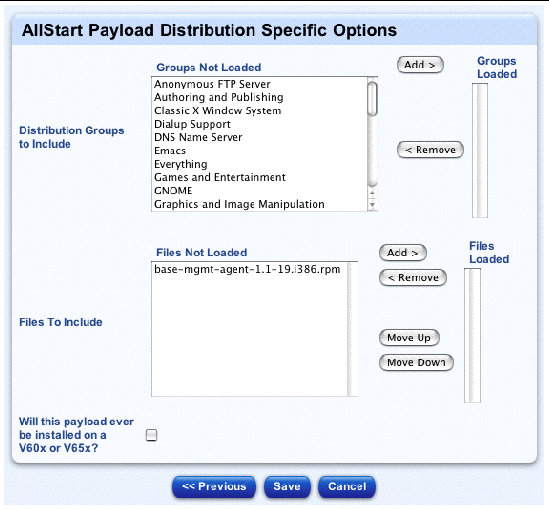
The AllStart Payload Distribution-Specific Options table for a Red Hat payload appears; see FIGURE 2-6.
7. In the Groups Not Loaded scrolling window, highlight the group(s) that you want to load.
The Distribution Groups are the groups of RPMs that you want to load based on functionality (for example, DNS server, Games and Entertainment support, Printing support, Emacs support).
If you select the entry "Everything", all RPMs in the distribution are added.
If you are not sure which groups to add, add all groups.
8. Click Add to move the group(s) to the Groups Loaded scrolling window.
9. In the Files Not Loaded scrolling window, highlight the file(s) that you want to load.
These are the individual files that will be loaded after the base distribution is loaded.
The base-mgmt-agent RPM is available in the Files Not Loaded scrolling window, but you have to move it to the Files Loaded scrolling window.
10. Click Add to move the file(s) to the Files Loaded scrolling window.
11. If this payload will be installed on a Sun Fire V60x or Sun Fire V65x server, click to enable the check box.
This option enables the client to load the SCSI drivers that are required before the Linux installation can take place.
The Task Progress dialog appears.
13. When complete, the AllStart Payloads table appears. Verify that your payload appears in the summary table.
To view the information on a payload:
1. Select AllStart > Payloads.
The AllStart Payloads table appears.
2. Click to highlight a payload.
The View AllStart Payload table appears, displaying the following information:
4. Click Done to return to the AllStart Payloads table.
1. Select AllStart > Payloads.
The AllStart Payloads table appears.
2. Click to highlight a payload.
3. Click Modify at the bottom.
The Modify AllStart Payload table appears.
4. Modify in the following fields as desired:
|
Note - It is important to use a unique, descriptive name for each payload. The system differentiates the payloads according to this name. |
The AllStart Payload Distribution-Specific Options table appears.
For more information about this table:
The Task Progress dialog appears.
7. When complete, the AllStart Payloads table appears. Verify that your payload appears in the summary table.
To delete a payload from the AllStart Payloads table:
|
Note - If a payload is referenced to a client, you cannot delete the payload. You first need to modify or delete the client in question. |
1. Select AllStart > Payloads.
The AllStart Payloads table appears.
2. Click to highlight a payload(s). You can also click Select All at the top to choose all payloads in the list.
3. Click Delete at the bottom right.
The Task Progress dialog appears.
You can add, view, modify or delete a profile.
You can create a Sun Java Desktop System (JDS) profile or a Red Hat profile.
|
Note - If you select only one OS distribution to display in your AllStart preferences, then the Select System Type selector will not appear in the AllStart procedures. You will go directly into the procedure.
|
|
Note - There are a large number of UI screens in this procedure with several parameters to configure on each screen. |
1. Select AllStart > Profiles.
The AllStart Profiles table appears.
The Select System Type table appears.
4. Click Continue at the bottom.
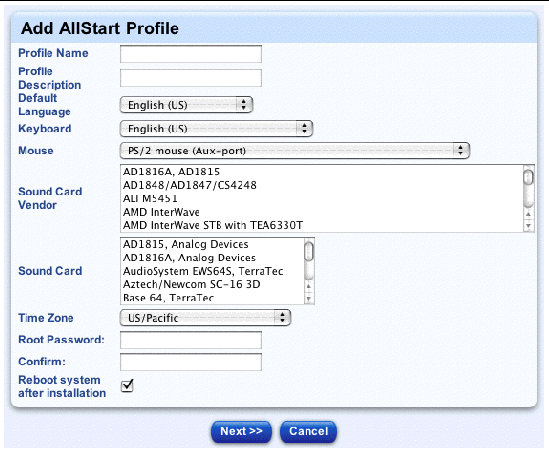
The Add AllStart Profile table appears; see FIGURE 2-7.
5. Configure the following parameters:
|
Note - It is important to use a unique, descriptive name for each profile. The system differentiates the profiles according to this name. |
6. Click Next below the table.
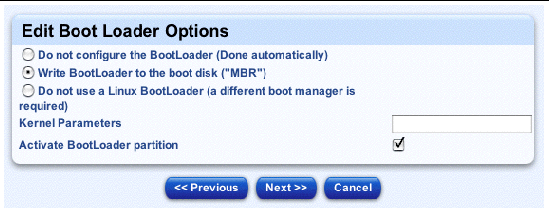
The Edit Boot Loader Options table appears; see FIGURE 2-8.
7. Configure the following parameters for the boot loader:
|
Note - If you are building a machine through a serial console and you select a boot loader, you should also add the corresponding Grub customized scripts at the end of this procedure. You do this in Step 23. |
8. Click Next below the table.
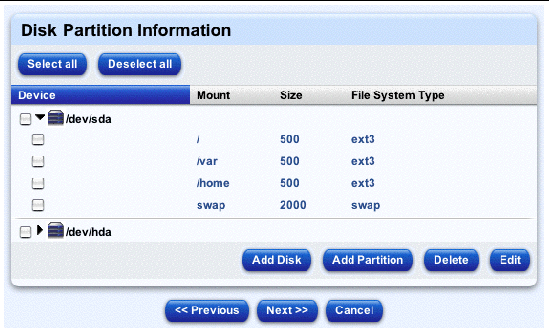
The Disk Partition Information table appears; see a sample in FIGURE 2-9.
9. Another selector window appears.
For each partition, the selector displays:
10. In the selector, you can add, edit or delete a hard disk drive or a partition.
|
Note - At a minimum, you must define the /root partition and at least one swap partition. |
a. To add a new hard disk drive, click Add Disk.
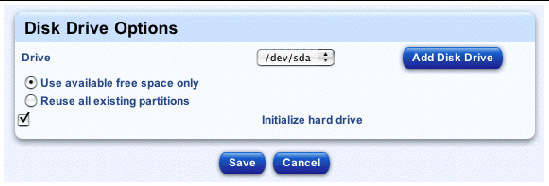
The Disk Drive Options table appears; see FIGURE 2-10. You can configure the following parameters:
To add a new hard disk drive to the pull-down menu, click Add Disk Drive on the right. The Define A New Disk Drive table appears. Enter the name for the new hard disk drive and click Save. The Disk Drive Options table reappears.
b. To add a new partition, highlight the hard disk drive in the table and then click Add Partition in the selector.
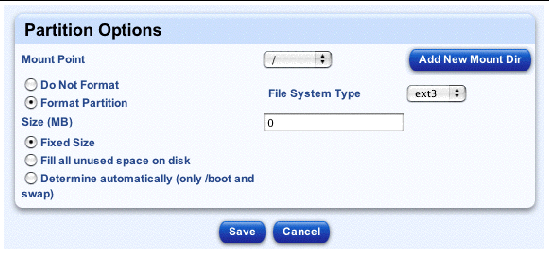
The Partition Options table appears; see FIGURE 2-11. You can configure the following parameters:
To add a new Mount directory to the pull-down menu, click Add New Mount Dir on the right. The Define A New Mount Point table appears. Enter the name for the new mount and click Save. The Partition Options table reappears, with the new mount point displayed.
c. To edit a hard disk drive, highlight the hard disk drive in the table and click Edit.
The Disk Drive Options table appears. You can configure the same parameters as those for adding a new drive. See the procedure in Step a.
d. To edit a partition, click the arrow next to the hard disk drive to display the partitions for that drive. Highlight the partition and click Edit.
The Partition Options table appears. You can configure the same parameters as those for adding a new partition. See the procedure in Step b.
e. To delete a hard disk drive(s) or a partition(s), highlight the drive or the particular partitions in the selector and click Delete.
The selector refreshes with the drive(s) or partition(s) removed from the list.
|
Note - There is no Confirm Deletion dialog for this task, so ensure that you choose the correct hard disk drive or partition to delete. |
11. Click Next below the table.
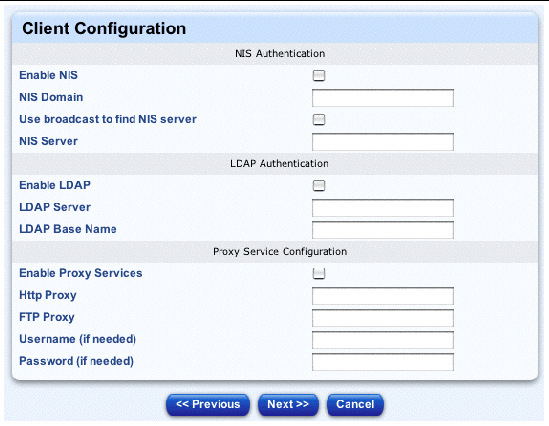
The Client Configuration table appears; see FIGURE 2-12.
12. You can configure the following parameters for the configuring the client.
|
Note - The Authentication options are discussed in the appropriate Sun JDS user documentation. |
c. Proxy Service Configuration
13. Click Next below the table.
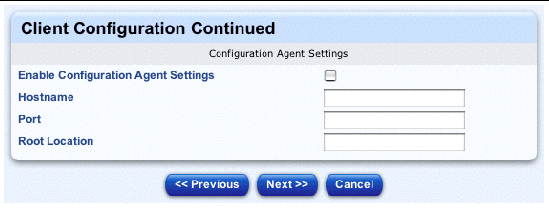
The Client Configuration Continued table appears; see FIGURE 2-13.
14. You can configure the following parameters.
a. Configuration Agent Settings
15. Click Next below the table.
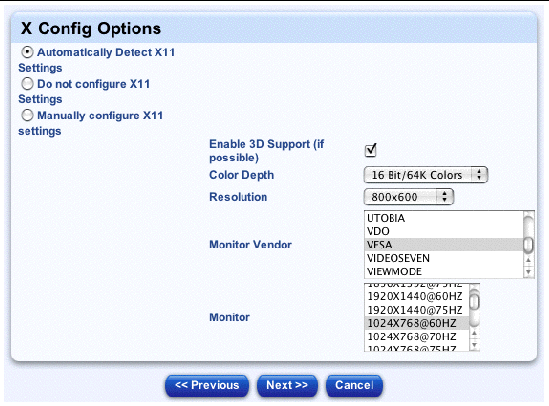
The X Config Options table appears, see FIGURE 2-14.
16. You can configure the following parameters:
|
Note - You configure the following settings only if you choose to configure the X11 settings manually. |
17. Click Next below the table.
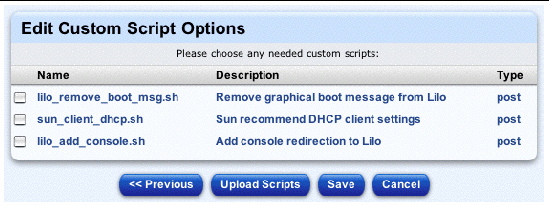
The Edit Custom Script Options table appears; see FIGURE 2-15.
The table contains a number of custom scripts that you can add to the profile.
|
Note - If you want to upload other custom scripts to this table, you must do so before you click Save at the bottom of the Edit Custom Script Options table. |
|
Note - The custom script sun_client_dhcp.sh sets the client's DHCP settings to certain set of defaults. |
If you do not want to upload a custom script, go to Click the check box(es) to select the custom script(s) you want to add to the profile..
To upload a custom script to the Edit Custom Script Options table:
The Upload User-defined Custom Scripts table appears.
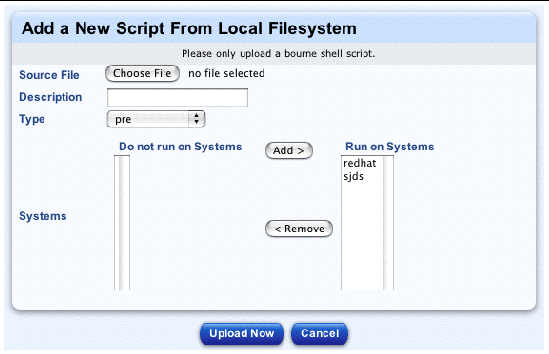
The Add a New Script From Local Filesystem table appears; see FIGURE 2-16.
20. Enter the following information:
The Task Progress dialog appears.
When finished uploading, the custom script appears in the Upload User-defined Custom Scripts table.
You can add another script, modify a script or delete a script from this table.
22. Click Previous to return to the Edit Custom Script Options table.
23. Click the check box(es) to select the custom script(s) you want to add to the profile.
|
Note - If you are building a machine through a serial console and you selected a boot loader in Step 7, you should now also add the corresponding Grub customized scripts.
|
The Task Progress dialog appears.
|
Note - There are a large number of UI screens in this procedure with several parameters to configure on each screen. |
1. Select AllStart > Profiles.
The AllStart Profiles table appears.
The Select System Type table appears.
4. Click Continue at the bottom.
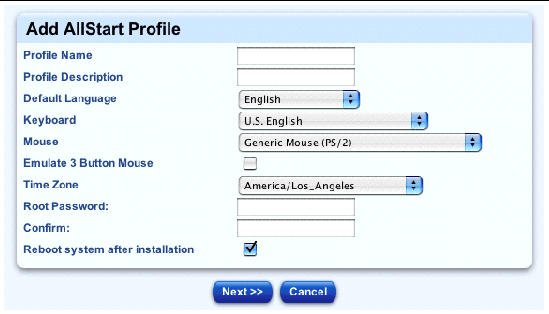
The Add AllStart Profile table appears; see FIGURE 2-17.
5. Configure the following parameters:
|
Note - It is important to use a unique, descriptive name for each profile. The system differentiates the profiles according to this name. |
6. Click Next below the table.
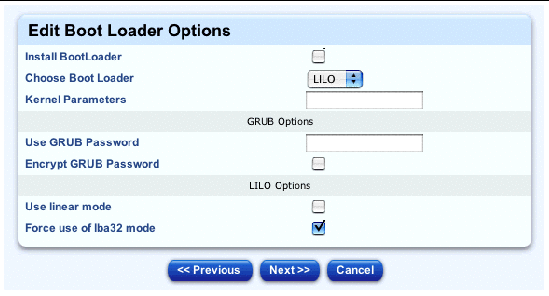
The Edit Boot Loader Options table appears; see FIGURE 2-18.
7. Configure the following parameters for the boot loader:
|
Note - If you are building a machine through a serial console and you select Grub or LILO as the boot loader, you should also add the corresponding Grub or LILO customized scripts at the end of this procedure. You do this in Step 23. |
8. Click Next below the table.
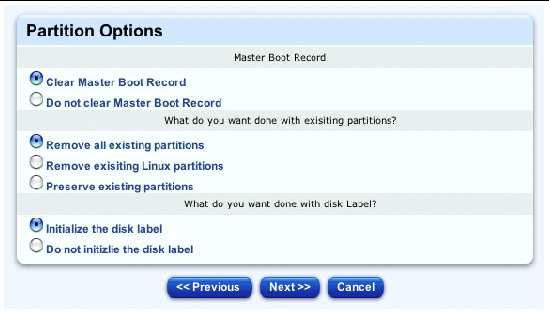
The Partitions table appears; see FIGURE 2-19.
9. Click the radio buttons to configure the settings in each of the three sections.
10. Click Next below the table.
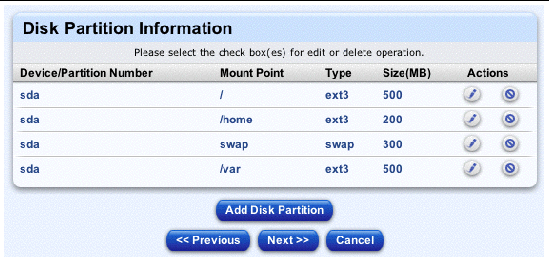
The Disk Partition Information table appears; see FIGURE 2-20.
11. Another selector window appears.
For each partition, the selector displays:
12. In the selector, you can add, edit or delete a partition.
|
Note - At a minimum, you must define the /root partition and at least one swap partition. |
a. To add a new partition, click Add Disk Partition below the selector.
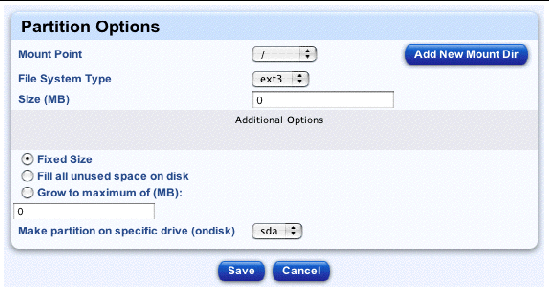
The Partition Options table appears; see a sample in FIGURE 2-21. You can configure the following parameters:
To add a new Mount directory to the pull-down menu, click Add New Mount Dir on the right. The Define A New Mount Point table appears. Enter the name for the new mount and click Save. The Partition Options table reappears, with the new mount point displayed.
You can also configure these additional options:
b. To edit a partition, click the pencil icon for the partition in the Actions column.
The Partition Options table appears. You can configure the same parameters as those for adding a new partition. See the procedure in Step a.
c. To delete a partition, click the delete icon for the partition in the Actions column.
The selector refreshes with the partition(s) removed from the list.
|
Note - There is no Confirm Deletion dialog for this task, so ensure that you choose the correct partition to delete. |
13. Click Next below the table.
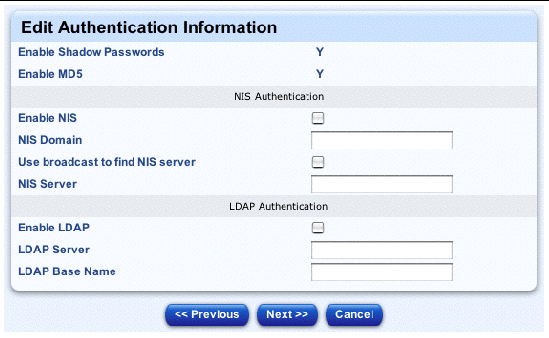
The Edit Authentication Information table appears; see FIGURE 2-22.
14. You can configure the following parameters for different types of authentication.
|
Note - All of these options are discussed in the appropriate Red Hat documentation. For more information, refer to http://www.redhat.com/docs/. |
a. Shadow passwords and MD5 checksums
15. Click Next below the table.
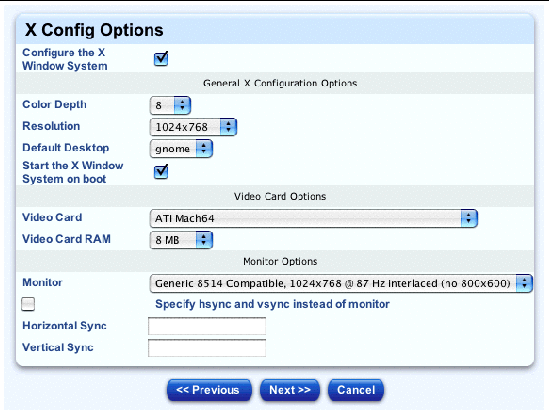
The X Config Options table appears, see FIGURE 2-23.
16. You can configure the following parameters:
|
Note - If the X Window System is not enabled, then all of the following parameters in this table are disabled. |
Click the check box to enable this option and enter the hsync and vsync values in the fields.
17. Click Next below the table.
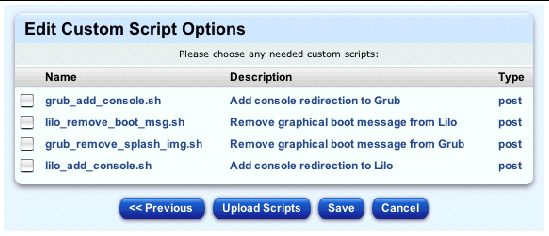
The Edit Custom Script Options table appears; see FIGURE 2-24.
The table contains a number of custom scripts that you can add to the profile.
|
Note - If you want to upload other custom scripts to this table, you must do so before you click Save at the bottom of the Edit Custom Script Options table. |
If you do not want to upload a custom script, go to Click the check box(es) to select the custom script(s) you want to add to the profile..
To upload a custom script to the Edit Custom Script Options table:
The Upload User-defined Custom Scripts table appears.
You can also edit or delete custom scripts that are displayed in this table.
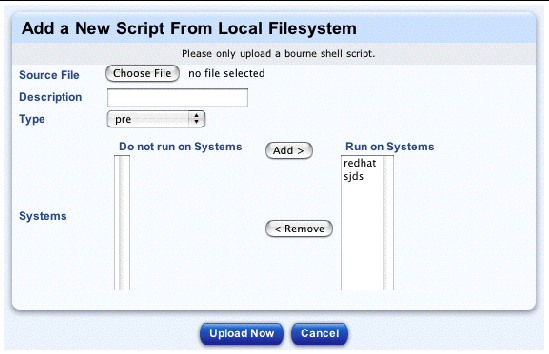
The Add a New Script From Local Filesystem table appears; see FIGURE 2-25.
20. Enter the following information:
The Task Progress dialog appears.
When finished uploading, the custom script appears in the Upload User-defined Custom Scripts table.
You can add another script, edit a script or delete a script from this table.
22. Click Previous to return to the Edit Custom Script Options table.
23. Click the check box(es) to select the custom script(s) you want to add to the profile.
|
Note - If you are building a machine through a serial console and you selected Grub or LILO as the boot loader in Step 7, you should now also add the corresponding Grub or LILO customized scripts.
|
The Task Progress dialog appears.
To view the information on a profile:
1. Select AllStart > Profiles.
The AllStart Profiles table appears.
2. Click to highlight a profile.
The Detailed Profile View table appears, showing all of the parameters for the profile.
4. Click Done to return to the AllStart Profiles table.
1. Select AllStart > Profiles.
The AllStart Profiles table appears.
2. Click to highlight a profile.
3. Click Modify at the bottom right.
The Modify AllStart Profiles table appears, and you then proceed through the same set of screens as for adding a profile.
For a Sun JDS profile, see Sun Java Desktop System profile.
For a Red Hat profile, see Red Hat profile.
To delete a profile from the AllStart Profiles table:
|
Note - If a profile is referenced to a client, you cannot delete the profile. You first need to modify or delete the client in question. |
1. Select AllStart > Profiles.
The AllStart Profiles table appears.
2. Click to highlight a profile(s). You can also click Select All at the top to choose all profiles in the list.
3. Click Delete at the bottom right.
The Task Progress dialog appears.
You can add, view, modify or delete a client. You can also enable or disable a client.
FIGURE 2-26 shows a sample of an AllStart Clients table. the coumns are Enabled, Client MAC address, Profile Name, Payload Name, Build Phase and Built Time.
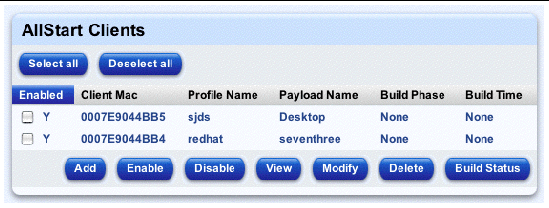
You can add a new client manually, add a new AutoDiscovery client, choose a new client from the list of managed hosts already in the Sun Control Station or import a list of clients in an XML-format file.
If you want to use this client or clients immediately, ensure that you enable each of the clients. You must also enable the DHCP settings; for more information, see Modifying the DCHP Settings.
|
Note - If you select only one OS distribution to display in your AllStart preferences, then the Select System Type selector will not appear in the AllStart procedures. You will go directly into the procedure.
|
The AllStart Clients table appears.
The Select System Type table appears.
3. Select the type: sjds or redhat.
4. Click Continue at the bottom.
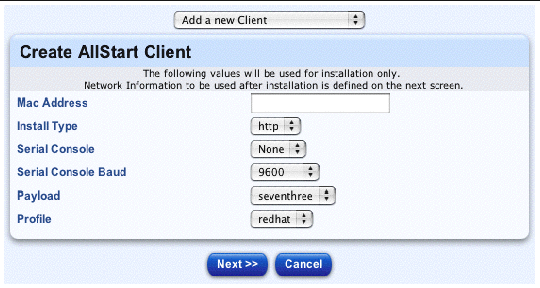
The Create AllStart Client table appears; see FIGURE 2-27.
5. Configure the following parameters:
|
Note - You need to enter the MAC address of the network interface card (NIC) over which the payload and profile will be installed. |
6. Click Next below the table.
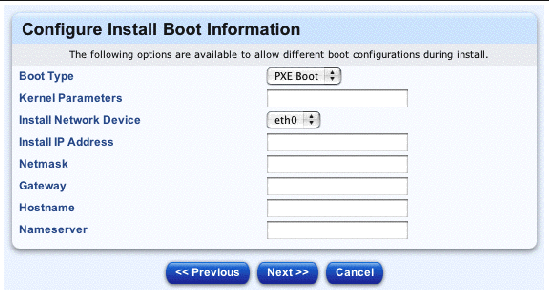
The Configure Install Boot Information table appears; see FIGURE 2-28.
These options to allow for different boot configurations during the installation.
7. Configure the following parameters:
|
Note - On a Sun Fire |
8. Click Next below the table.
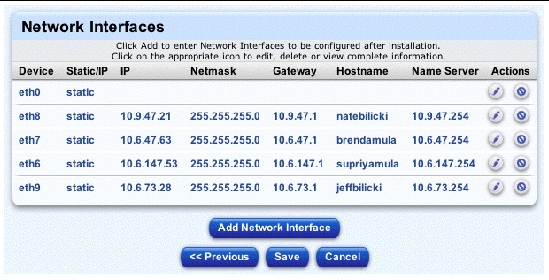
The Network Interfaces table appears; see FIGURE 2-29.
You can configure the information for the NICs in your client.
9. Click Add Network Interface at the bottom.
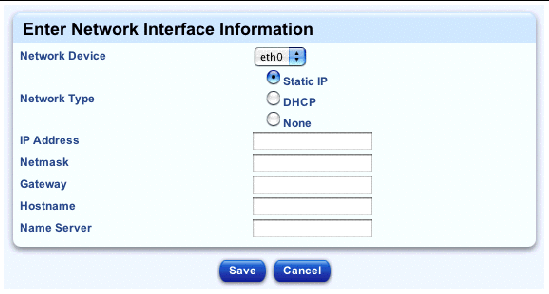
The Enter Network Interface Information table appears; see FIGURE 2-30.
10. Configure the following parameters:
11. Click Save below the table.
The Network Interfaces table refreshes with the new device added.
12. You can now add another device or perform other operations on an existing device.
|
Note - There is no Confirm Deletion dialog for this task, so ensure that you choose the correct device to delete. |
13. When you are finished configuring the network interfaces, click Save below the table.
The Task Progress dialog appears.
|
Note - This option works in conjunction with AutoDiscovery Function. Use that procedure to specify a range of IP addresses to be used by the AutoDiscovery client(s). |
The AutoDiscovery function allows a server to obtain an IP address from a DHCP server and retrieve a default payload for that IP address from the PXE boot server. This feature is most useful in the case where the MAC address of the client is not known.
For more information about setting up the AutoDiscovery function, see AutoDiscovery Function.
To add a new AutoDiscovery client:
The AllStart Clients table appears.
The Select System Type table appears.
3. Select the type: sjds or redhat.
4. Click Continue at the bottom.
The Create AllStart Client table appears.
5. From the pull-down menu above the table, select Add AutoDiscovery Client.
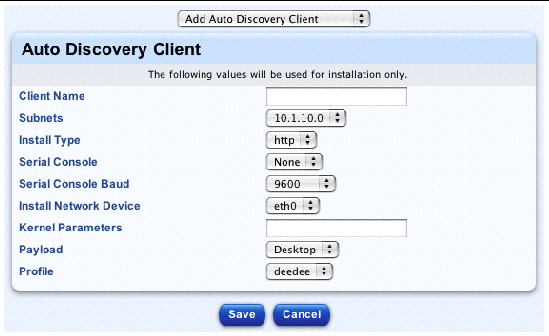
The AutoDiscovery Client table appears; see FIGURE 2-31.
6. Configure the following parameters:
|
Note - On a Sun Fire |
7. Click Save below the table.
The Task Progress dialog appears.
If you have already imported a host(s) into the Sun Control Station, you can select a managed host(s) to add as an AllStart client.
To add a managed host as a client:
The AllStart Clients table appears.
The Select System Type table appears.
3. Select the type: sjds or redhat.
4. Click Continue at the bottom.
The Create AllStart Client table appears.
5. From the pull-down menu above the table, select Add a Managed Host as a Client.
The Add AllStart Client from Managed Host table appears.
6. Click to highlight a managed host.
You can only add one managed host at a time.
7. Click Add at the bottom right.
The Create AllStart Client table appears.
8. Configure the following parameters:
|
Note - A managed host must be on the network and thus already has an IP address. The MAC address field is already populated. You cannot change these two parameters. |
9. Click Save below the table.
The Task Progress dialog appears.
You can also import a list of clients in an XML-format file. For the correct format, see XML Format for a List of Clients.
To import a list of clients file:
The AllStart Clients table appears.
The Select System Type table appears.
3. Select the type: sjds or redhat.
4. Click Continue at the bottom.
The Create AllStart Client table appears.
5. From the pull-down menu above the table, select Add Clients from a File.
The Local Client Definitions From A File table appears.
6. Enter the path and file name for the XML file, or click the button to locate it.
7. Click Create Clients below the table.
The Task Progress dialog appears.
The file containing the list of clients must be in the XML format shown in the following sample file.
The file must end with the .xml extension.
This sample file contains the information for two clients: the first client has two network devices, one on DHCP and the other on a static IP address; the second client has one network device on a static IP address.
<clients>
<client>
<mac value = "00:03:47:D5:74:7A"/>
<install_type value = "http"/>
<console value = "none"/>
<console_baud value = "9600"/>
<payload value = "sjds"/>
<profile value = "sjds"/>
<network>
<device value = "eth0"/>
<type value = "dhcp"/>
</network>
<network>
<device value = "eth1"/>
<bootproto value = "static"/>
<ip value = "192.168.0.3"/>
<netmask value = "255.255.255.0"/>
<gateway value = "192.168.0.1"/>
<hostname value = "bmula3.sfbay.sun.com"/>
<nameserver value = "192.168.0.1"/>
</network>
<boot>
<boottype value = "pxe"/>
<device value = "eth0"/>
<ip value = "192.168.0.3"/>
<netmask value = "255.255.255.0"/>
<kernel_params value = "acpi=off"/>
<hostname value = "bmula3.sfbay.sun.com"/>
<gateway value = "192.168.0.1"/>
</boot>
</client>
<client>
<mac value = "00:10:4B:0F:93:75"/>
<install_type value = "http"/>
<console value = "none"/>
<console_baud value = "9600"/>
<payload value = "sjds"/>
<profile value = "sjds"/>
<network>
<device value = "eth0"/>
<bootproto value = "static"/>
<ip value = "10.1.10.60"/>
<netmask value = "255.255.255.0"/>
<gateway value = "10.1.10.1"/>
<hostname value = "bmula6.sfbay.sun.com"/>
<nameserver value = "10.1.10.1"/>
</network>
<boot>
<boottype value = "pxe"/>
<device value = "eth0"/>
<ip value = "10.1.10.60"/>
<netmask value = "255.255.255.0"/>
<kernel_params value = "acpi=off"/>
<hostname value = "test.central.sun.com"/>
<gateway value = "10.1.10.1"/>
</boot>
</client>
</clients>
The first column in the AllStart Clients table is Enabled. If the client is enabled, there is an "Y" in this column; if it is not enabled, there is an "N".
To enable a client that is currently not enabled:
The AllStart Clients table appears.
2. Click to highlight a client(s). You can also click Select All at the top to choose all clients in the list.
3. Click Enable at the bottom.
The Task Progress dialog appears.
The AllStart Clients table now displays an "Y" in the Enabled column for this client(s).
The first column in the AllStart Clients table is Enabled. If the client is enabled, there is an "Y" in this column; if it is not enabled, there is an "N".
To disable a client that is currently enabled:
The AllStart Clients table appears.
2. Click to highlight a client(s). You can also click Select All at the top to choose all clients in the list.
3. Click Disable at the bottom.
The Task Progress dialog appears.
The AllStart Clients table now displays an "N" in the Enabled column for this client(s).
To view the information for a client:
The AllStart Clients table appears.
2. Click to highlight a client.
3. Click View at the bottom right.
The View AllStart Client table appears, displaying the following information:
4. Click Done at the bottom to return to the AllStart Clients table.
The AllStart Clients table appears.
2. Click to highlight a client.
3. Click Modify at the bottom right.
The tables particular to the type of client you added appear and can be modified.
For example, if you want to modify an AutoDiscovery client, the AutoDiscovery Client table appears. If you want to modify a client that was added as a single new client, the Modify AllStart Client table appears.
Proceed throught the screens as you would for adding a client. For explanations of the screens that appear, refer to the Adding a Client procedure that corresponds to the type of client that you want to modify.
See Adding a Client.
The AllStart Clients table appears.
2. Click to highlight a client(s). You can also click Select All at the top to choose all clients in the list.
3. Click Delete at the bottom right.
|
Note - If the client is currently enabled, it is automatically disabled. |
A dialog appears, asking you to confirm the deletion.
The Task Progress dialog appears.
The client is removed from the AllStart Clients table.
Once you have created a client and enabled it in the control-station UI, you are ready to install the payload and profile on the client.
|
Note - The client entry must be enabled in the AllStart Clients table for the build operation to succeed. |
1. Configure your client(s) to boot from the network.
This causes the client(s) to pull the payload and profile from the Sun Control Station.
You can view the status of a client that AllStart is currently building.
To view the build status of a client:
The AllStart Clients table appears.
2. Click to highlight a client(s). You can also click Select All at the top to choose all clients in the list.
3. Click Build Status at the bottom right.
The View AllStart Client table appears. For a client, the table shows the name of the payload, the phase in which the build is currently, a description of an error that might appear and the amount of time required for the build.
4. Click Done at the bottom to return to the AllStart Clients table.
You can view the settings for the following services:
NFS and HTTP must be enabled at all times. You cannot disable these two services.
You can modify the DHCP settings.
To view the current DHCP information:
1. Select AllStart > Services.
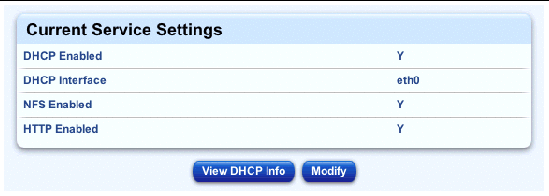
The Current Service Settings table appears; see FIGURE 2-32.
2. Click View DHCP Info below the table.
The Additional DHCP Settings table appears. For each entry, the table shows the network the network mask and the range of IP addresses.
3. Click to highlight an entry.
4. Click Details at the bottom right.
The Detailed DHCP Settings table appears. This table shows the following information:
5. Click Done to return to the Additional DHCP Settings table.
6. Click Previous to return to the Current Service Settings table.
1. Select AllStart > Services.
The Current Service Settings table appears.
2. Click Modify below the table.
The Modify Service Settings table appears.
3. You can configure the following settings.
4. If you want to modify the DHCP information, click Modify DHCP Info below the table.
The Modify DHCP Settings selector window appears. In this window, you can add new DHCP information, modify existing DHCP information or delete DHCP information.
|
Note - If you make changes to the DHCP information, you must click Save at the end; otherwise, your changes will not take effect. |
5. Click Add at the bottom right.
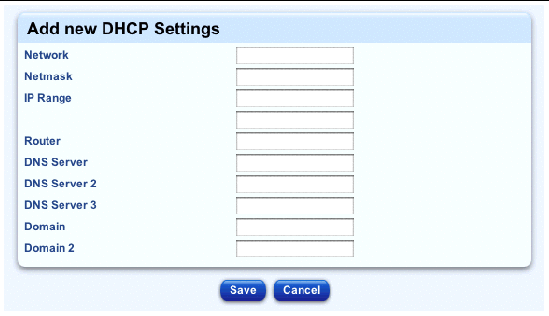
The Add New DHCP Settings table appears; see FIGURE 2-33. Fill in the following information.
The Modify DHCP Settings selector window appears, with an entry for the new DHCP information.
7. Click to highlight an entry in the table.
8. Click Edit at the bottom right.
|
Note - Refer to the under "Add New DHCP Information. |
The Modify DHCP Settings table appears. The Network and Netmask information is already populated.
Edit the following information.
The Modify DHCP Settings selector window appears.
10. Click to highlight an entry in the table.
11. Click Delete at the bottom right.
A dialog appears, asking you to confirm the deletion.
The Task Progress dialog appears.
The entry for the DHCP information is removed from the Modify DHCP Settings selector window.
13. Click Previous to return to the Modify Service Settings table.
14. If you have made any changes, click Save below the table.
|
Note - If you do not click Save at this stage, your changes to the DHCP information will not be saved and will not take effect. |
The Task Progress dialog appears.
|
Note - This function works in conjunction with Add a New AutoDiscovery Client. Use that procedure to create an AutoDiscovery client(s). |
The AutoDiscovery function in the AllStart control module allows a server to obtain an DHCP address from the Sun Control Station and retrieve a default payload and profile for that DHCP address from the PXE boot server. This feature is most useful in the case where the MAC address of the client is not known.
First, you first specify a range of IP addresses in the DHCP table. Second, you create an AutoDiscovery client and enable the client. Third, you netboot the host machine; the host then obtains its network information, payload and profile from the AllStart module.
|
Note - This procedure assumes that you have already configured a DHCP server and enabled the DHCP service under AllStart > Services.
|
To configure a client for AutoDiscovery:
1. Select AllStart > Services.
The Current Service Settings table appears.
2. Click Modify below the table.
The Modify Service Settings table appears.
3. Click the check box DHCP Enabled.
4. Select the DHCP Interface from the pull-down menu.
5. Click Modify DHCP Info below the table.
The Modify DHCP Settings selector window appears.
|
Note - If you make changes to the DHCP information, you must click Save at the end; otherwise, your changes will not take effect. |
6. Click to highlight an entry in the table.
7. Click Edit at the bottom right.
The Modify DHCP Settings table appears. The Network and Netmask information is already populated.
8. Enter the range of IP addresses to use for AutoDiscovery.
Enter the low IP address of the range in the first field; enter the high IP address of the range in the second field.
|
Note - You do not need to fill in the other fields in this table. |
The Modify DHCP Settings selector window appears.
10. Click Previous to return to the Modify Service Settings table.
11. If you have made any changes, click Save below the table.
|
Note - If you do not click Save at this stage, your changes to the DHCP information will not be saved and will not take effect. |
The Task Progress dialog appears.
12. You now need to create a client.
You can create more than one AutoDiscovery client.
When you create an AutoDiscovery client, the system automatically appends the prefix default- to the client name.
To create an AutoDiscovery client, see Add a New AutoDiscovery Client.
13. Once you have created the client, you must enable the client.
To enable a client, see Enabling a Client.
14. Netboot the host machine on the network.
The host machine will obtain its network information and payload through the AutoDiscovery client that you have just created.
Under the Advanced sub-menu item, you can:
To register your Sun JDS software:
1. Select AllStart > Advanced.
The Registration Information table appears.
2. Fill in the fields in this table.
The Registration Information table refreshes, indicating that the information was saved successfully.
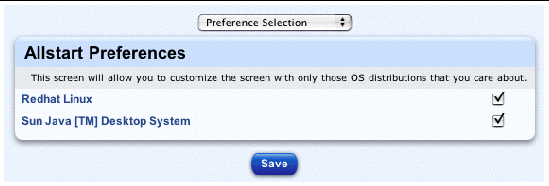
This screen allows you to customize the AllStart screens so that only those OS distributions that interest you are displayed.
|
Note - If you select only one OS distribution to display, then the Select System Type selector will not appear in the AllStart procedures. You will go directly into the procedure. |
To select your AllStart preferences:
1. Select AllStart > Advanced.
The Registration Information table appears.
2. From the pull-down menu above the table, selcet Preference Selection.
The AllStart Preferences table appears; see FIGURE 2-34.
3. Click to enable the OS distributions that you want to display in the AllStart screens.
The AllStart Preferences table refreshes, indicating that the information was saved successfully.
Copyright © 2004, Sun Microsystems, Inc. All rights reserved.