|
Inventory Module |
The Inventory control module on the Sun Control Station allows you to keep track of the hardware components in your managed hosts. This document explains the features and services available through the Inventory control module.
When you launch a task (for example, updating the inventory information for a managed host), a Task Progress dialog appears in the user interface (UI). This dialog has a Status field indicating the current status of the task and a progress bar. When the progress bar displays 100%, the task has completed.
If you want to perform another task in the UI while the current task is underway, you can put the Task Progress dialog in the background. Simply click the button labelled Run Task In Background below the progress bar.
To return to the Task Progress dialog, select Administration > Tasks on the left. The Task table appears. If the task is still underway, a status message is displayed in the Duration column. Click on the progress-bar icon in this column to re-display the Task Progress dialog for this task.
Once the task is complete and the progress bar displays 100%, two buttons appear below the Task Progress dialog: Done and View Events.
The Schedule feature (also referred to as the Scheduler) allows you to schedule a task or tasks to be performed at a later time.
If a task can be scheduled by the Sun Control Station, a button labelled Schedule appears in the table or selector window of the final step.
The Scheduler works in the same way for any task:
1. Fill in the necessary fields for the task.
The Schedule Settings For <Task> table appears.
3. Configure the schedule settings.
For some functions, you can set the frequency of the task with a pull-down menu above the table (for example, hourly or daily).
You can also enter an email address of the person who will be notified when the scheduled task begins or finishes, or both.
The scheduled task then appears in the Scheduled Tasks table under Administer > Schedule.
5. In this table, you can view details for, modify or delete a scheduled task.
To view the details of a scheduled task, click the magnifying-glass icon.
To modify a scheduled task, click the pencil icon.
To delete a scheduled task, click the delete icon.
When you click the Inventory menu item on the left, the sub-menu items allow you to view a summary of the inventory of hardware components or update the inventory of hardware components in selected managed hosts.
For more information on how the selector window works, see "Selector window" in Chapter 3 of the PDF Administrator Manual.
The Summary sub-menu item displays a summary of the inventory of hardware components in selected managed hosts.
When you click on the Summary sub-menu item, the selector appears, displaying the groups and the hosts within each group.
To view the inventory of hardware components in a managed host:
1. Select Inventory > Summary.
The selector appears, displaying the list of managed hosts.
2. Click to highlight a host(s). You can also click Select All at the top to choose all hosts in the list.
3. Click View Summary in the bottom right corner.
The Inventory Summary table appears; see FIGURE 1 for a sample.
4. This table contains the following columns:
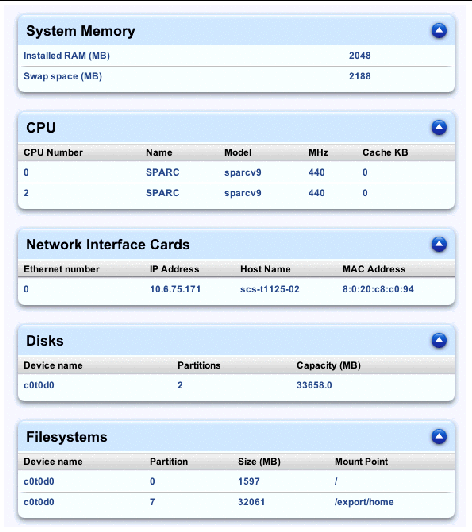
FIGURE 1 shows a sample of the Inventory Summary table; FIGURE 2 shows a sample of some of the Detailed Inventory tables.
When the Inventory Summary table is on the screen, you can update the inventory of hardware components in the host(s) displayed in the table by clicking the Update Now button below the table. See FIGURE 1.
For more information on the Update function, see Update.


The Update sub-menu item allows you to retrieve the most recent inventory data on hardware components from selected managed hosts.
When you click on the Update sub-menu item, the selector appears, displaying the groups and the hosts within each group.
To retrieve the most recent inventory data from a managed host:
The selector appears, displaying the list of managed hosts.
2. Click to highlight a host(s). You can also click Select All at the top to choose all hosts in the list.
3. Click Update Now in the bottom-right corner.
The Task Progress dialog appears.
|
Note - You can also schedule the updating of the inventory information for a later time. For more information, see Schedule. |
Copyright © 2003, Sun Microsystems, Inc. All rights reserved.