|
Software Management Module |
This document explains the features and services available through the Software Management control module on the Sun Control Station. This module allows you to:
When you click the Software Management menu item on the left, the sub-menu items appear:
For the Installed Software and Needed Software features, click the arrow beside the name of the managed host to view the list of package files installed on the managed host or needed for that host.
In the user manual, the term package file refers to:
 V60x server)
The following paragraphs explain the tasks that you can perform with a package file.
Upload allows you to load a package file to a local repository on the control station, from a location that is accessible from your computer. Once the package file is on the control station, if the package file is in the right format and contains the appropriate list data, it can be published or installed.
You can upload a single package file or you can add list of package files whose information is contained in a text file.
Download allows you to download the package file(s) from a remote repository to the local repository on the control station.
Publish allows you to make a package file available for download to external BlueLinQ-enabled servers. A package file can be published from a remote server or the local repository.
If the package file is located on a remote server and you select it to be published, the package file is first downloaded to the local repository on the control station and then made available.
To view the package files published on a Sun Control Station, configure the BlueLinQ settings on the BlueLinQ-enabled server to
http://<fully_qualified_domain_name_of_SCS>/packages/
Unpublish allows you to make a package file unavailable to a BlueLinQ-enabled server.
In this case, the package file is no longer visible to external BlueLinQ-enabled servers but it is still appears in the Packages table. The package file remains in the local repository on the control station.
Install allows you to install package files on selected managed hosts. You can install package files from either a local or remote repository.
If the package file is located on a remote server and you select it to be installed on a managed server, the package file is first downloaded to the local repository on the control station and then installed on the managed host.
Before installing a package file, the control station performs a dependency check and displays a confirmation screen. For more information, see Dependency Checking.
|
Caution - Uninstalling a package file from a host can adversely affect the functioning of the host. |
Uninstall allows you to uninstall a package file from selected managed hosts, if this feature is available for that package file.
When you uninstall a package file, the control station updates the list of installed package files immediately for those hosts.
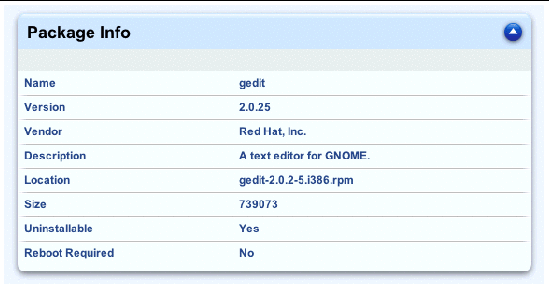
Package Info allows you to view detailed information for a package file, such as the vendor, a description of the package file, the size of the package file, whether the package file can be uninstalled once it is installed, whether the host needs to be rebooted after a package file is installed and the prerequisite packages for this package file.
Remove allows you to remove a package file from the list of available package files. If the package file is on a remote BlueLinQ server, the entry for that package file is removed from the list of available package files. If the package file is in the local repository on the control station, the entry for that package file is removed from the list of available package files and the package file is deleted from the repository.
If the package file has been "published" on your control station, the package is no longer available to BlueLinQ-enabled servers once you remove it.
If you use the refresh option, a package file located on a remote BlueLinQ server appears again.
|
Note - You cannot delete a package file from a remote BlueLinQ server with the Remove option. |
The Packages sub-menu item allows the user to manage the package files on the remote and local servers. The selector lists all of the software packages known by the Sun Control Station. The software packages can be located locally on the control station itself, on another control station or on a remote BlueLinQ server.
For an explanation of the tasks available under this menu item, see Tasks available in Software Management.
FIGURE 1 shows a sample of the Packages table.
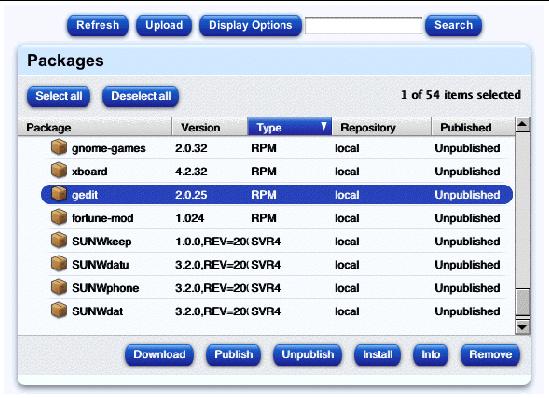
With the Refresh feature, you can force the control station to query the remote software server(s) immediately and update the list of package files in the Packages table.
The information for each package file is stored on the remote software server. If the same package appears on two different remote software servers, the Packages table displays the package file from the most recent server that the control station checked. The Repository column indicates where a package is found.
To refresh the list of available package files:
1. Select Software Management > Packages.
2. Click Refresh above the table.
The Task Progress dialog appears.
You can upload a single package file or several package files at a time.
To upload a single package file:
1. Select Software Management > Packages.
2. Click Upload above the table.
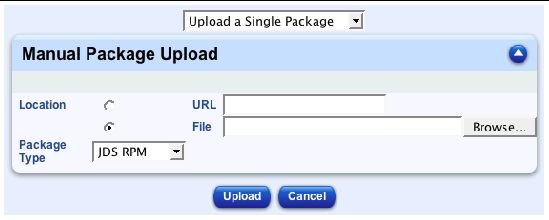
The Manual Package Upload table appears; see FIGURE 2.
3. Click one of the radio buttons and enter the location from which the package file is obtained.
4. From the Package Type pull-down menu, select the type of package that you are uploading (JDS RPM, RPM, SVR4 or Cobalt pkg).
The Task Progress dialog appears.
|
Note - The package files are not loaded on to the control station until you click Upload in the final step. |
|
Note - The package files referenced in a text file must all be of the same type, such as Solaris packages (SVR4) or Linux packages (RPM).
|
To upload several package files at a time:
1. Select Software Management > Packages.
2. Click Upload above the table.
3. Select Upload Multiple Packages from the pull-down menu above the table.
The Manual Package Upload table appears.
4. In the Source File field, enter the path and file name of a text file containing a list of package files to be uploaded, or click Browse... to locate it.
In this file, the location of a package can be entered as a directory path on the control station or as a URL (http:// or https://). The following lines show the package files in a sample file:
home/pkgs/packageA.pkg http://ftp.cobalt.sun.com/pub/packages/raq4/eng/RaQ4-All-Security-1.0.1-8061.pkg/tmp/packageB.pkg https://ftp.server.com/pub/package.pkg
5. From the Package Type pull-down menu, select the type of package that you are uploading (JDS RPM, RPM, SVR4, Cobalt pkg).
The Task Progress dialog appears.
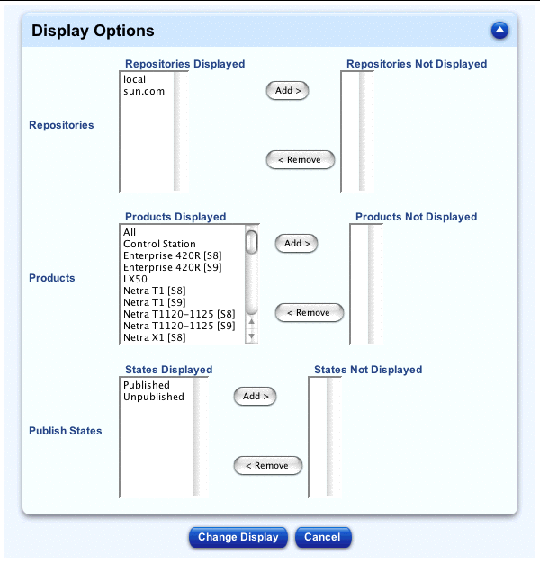
You can choose which package files to display in the Packages table, according to:
These display options remain in effect until you change them.
|
Note - These display options apply only to the Packages table. |
To configure the display options:
1. Select Software Management > Packages.
2. Click Display Options above the table.
The Display Options table appears; see FIGURE 3.
3. Configure the display options:
To move an item between the scrolling boxes, highlight the item in a list and click on the appropriate arrow.
The Packages table refreshes and shows the list of available package files according to the display options that you selected.
To search for a character string in the list of available package files:
1. Select Software Management > Packages.
2. In the Search field above the table, enter the character string for which you want to search in the list of available package files.
The search operates on the package-file name, the version number and the description fields in the table.
The Packages table refreshes, displaying the results of the search.
You can perform any of the other functions on the list of results; you can also perform another search on these results.
To return to the full list of package files, click Packages in the menu on the left.
To download a package file from a BlueLinQ server to the local repository on the control station:
1. Select Software Management > Packages.
2. Select the package file(s) in the list of available package files that you want to download.
3. Click Download at the bottom of the table.
The Task Progress dialog appears.
To publish a package file, so that it is available to external BlueLinQ-enabled servers:
1. Select Software Management > Packages.
2. Select the package file(s) in the list of available package files that you want to publish.
3. Click Publish at the bottom of the table.
The Task Progress dialog appears.
To unpublish a package file, so that it is no longer available to external BlueLinQ-enabled servers:
1. Select Software Management > Packages.
2. Select the package file(s) in the list of available package files that you want to unpublish.
3. Click Unpublish at the bottom of the table.
The Task Progress dialog appears.
|
Note - The Sun Control Station does not install a package file on a host until you click Install on the screen displaying the results of the dependency check. |
|
Note - After you have installed a package file, the system updates the list of installed package files immediately for those hosts. |
To install a package file on a managed host(s):
1. Select Software Management > Packages.
2. Select the package file(s) in the list of available package files that you want to install.
3. Click Install at the bottom of the table.
Another applet window opens in the UI, asking you to select the managed host(s) on which you want to install the package(s). You can also click Select All at the top to choose all hosts in the list.
Only those hosts eligible for the package file(s) that you selected in the previous screen appear.
4. Click Continue in the bottom right corner.
The Task Progress dialog appears.
At this point, the Sun Control Station performs dependency checks on the host(s) you selected to ensure that the selected package file(s) can be installed. For more information, see Dependency Checking.
5. Once the dependency checks are completed, click Done.
The results are displayed in the Patch Install Status and Install Information By Host tables.
Another Task Progress dialog appears.
|
Note - You can also schedule the installation of a package file for a later time. For more information, see Schedule. |
To view the detailed information for an available package file:
1. Select Software Management > Packages.
2. Select the package file(s) in the list of available package files for which you want to view the detailed information.
3. Click Info at the bottom of the table.
A Package Info table appears; see FIGURE 4.
If you choose more than one package, the information for each package appears in the table.
4. The Package Info table provides the following information:
5. Click the up-arrow icon in the top-right corner to return to the Packages table.
To remove a package file from the list of available package files:
|
Note - You cannot delete a package file from a remote BlueLinQ server with the Remove option. |
1. Select Software Management > Packages.
2. Select the package file(s) in the list of available package files that you want to remove from the list.
3. Click Remove at the bottom of the table.
A confirmation dialog appears, asking if you to confirm the removal.
The package is removed from the list and the Packages table refreshes.
The Installed Software sub-menu item provides a list of package files that are currently installed on the hosts selected by the user.
When you click on the Installed Software sub-menu item, the Choose Hosts... table appears; this table lists the managed hosts.
From this table, you can view the software package files currently installed on a managed host(s) or you can update the list of installed packages.
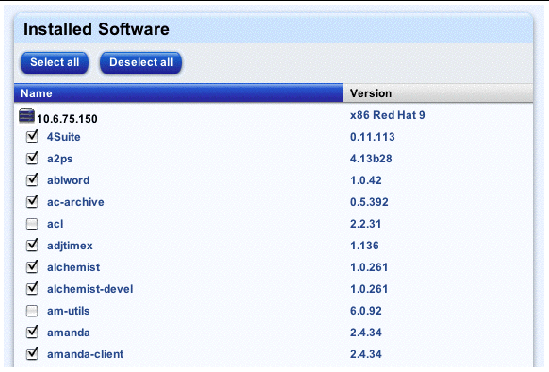
If you view the software package files for a host, the Installed Software table appears. Above this table, there is a pull-down menu; below the table is an Uninstall button and Info button.
FIGURE 5 shows a sample of the Installed Packages table.
|
Note - When you install or uninstall a package file, the system updates the list of installed package files immediately for those hosts. |
The Update task reads the list of installed software directly from the managed host.
To update the list of installed package files on the managed hosts:
1. Select Software Management > Installed Software.
The Choose Hosts... table appears, displaying the list of managed hosts.
2. Click to highlight a host(s). You can also click Select All at the top to choose all hosts in the list.
3. Click Update in the bottom-right corner.
The Task Progress dialog appears.
The View command reads the list of installed software for a managed host from the control station database, without contacting the host.
To view the list of installed software:
1. Select Software Management > Installed Software.
The Choose Hosts... table appears, displaying the list of managed hosts.
2. Click to highlight a host(s). You can also click Select All at the top to choose all hosts in the list.
3. Click View in the bottom-right corner.
The Installed Software table appears, displaying the managed hosts you selected.
4. Click the triangle next to a managed host to display the package files associated to that host.
From this table, you can view the detailed information for a package file or uninstall the package file. See FIGURE 5.
To view the detailed information for an installed package file:
1. Select Software Management > Installed Software.
The Choose Hosts... table appears, displaying the list of managed hosts.
2. Click to highlight a host(s). You can also click Select All at the top to choose all hosts in the list.
3. Click View in the bottom-right corner.
The Installed Software table appears, displaying the managed hosts you selected.
4. Click the triangle next to a managed host to display the package files associated to that host.
5. Click to highlight a package file(s). You can also click Select All at the top to choose all package files in the list.
6. Click Info in the bottom-right corner.
A Package Info table appears. For a sample, see FIGURE 4 for a sample.
If you choose more than one package, a separate table for each package appears.
7. The table provides the following information:
8. Click the up-arrow icon in the top-right corner to return to the Installed Software table.
Certain package files can be uninstalled from a host.
|
Caution - Uninstalling an package file from a host can adversely affect the functioning of the host. |


|
Note - When you uninstall a package file, the system updates the list of installed package files immediately for those hosts. |
1. Select Software Management > Installed Software.
The Choose Hosts... table appears, displaying the list of managed hosts.
2. Click to highlight a host(s). You can also click Select All at the top to choose all hosts in the list.
3. Click View in the bottom-right corner.
The Installed Software table appears, displaying the managed hosts you selected. See FIGURE 5.
4. Click the triangle next to a managed host to display the package files associated to that host.
5. Click to highlight a package file(s). You can also click Select All at the top to choose all package files in the list.
6. Click Uninstall in the bottom-right corner.
A confirmation dialog appears, asking if you to confirm the removal.
The package is removed from the list and the Installed Software table refreshes.
The Needed Software sub-menu item compares the set of installed package files on managed hosts with the package files listed in the Packages table. These package files can be located on the control station or on a remote software server.
The resulting report indicates, for each selected host, the package files that are not currently installed that host.
|
Note - To make this comparison as accurate as possible, Sun Microsystems |
When you click on the Needed Software sub-menu item, the Choose Hosts... table appears; this table lists the managed hosts.
From this table, you can view the needed software package files for a managed host(s) or you can update the list of needed package files.
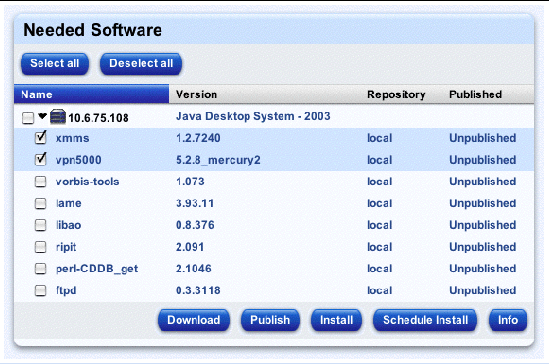
If you view the software package files for a host, the Needed Software table appears. Below the table are task buttons for Download, Publish, Install, Schedule Install and Info.
For an explanation of these tasks, see Tasks available in Software Management.
FIGURE 6 shows a sample of the Needed Packages table.
|
Note - When you install or uninstall a package file, the system updates the list of installed package files immediately for those hosts. |
The Update task allows the user to update the list of needed package files by comparing the installed package files on the selected hosts against the list of available package files in the Packages table.
To update the list of needed package files on the managed hosts:
1. Select Software Management > Needed Software.
The Choose Hosts... table appears, displaying the list of managed hosts.
2. Click to highlight a host(s). You can also click Select All at the top to choose all hosts in the list.
3. Click Update in the bottom-right corner.
The Task Progress dialog appears.
4. If you click Done, the Needed Software table appears, showing the selected host(s) for which you updated the list of needed package files.
See FIGURE 6 for a sample of the Needed Software table.
To download a package file from a remote software server to the local repository on the control station:
1. Select Software Management > Needed Software.
The Choose Hosts... table appears, displaying the list of managed hosts.
2. Click to highlight a host(s). You can also click Select All at the top to choose all hosts in the list.
3. Click View at the bottom of the table.
The Needed Software table appears, showing the managed hosts; see FIGURE 6. The needed package files for each host are listed under each entry.
4. Select the package file(s) in the list of available package files that you want to download.
5. Click Download at the bottom of the table.
The Task Progress dialog appears.
To publish a package file, so that it is available for downloading to remote software servers:
1. Select Software Management > Needed Software.
The Choose Hosts... table appears, displaying the list of managed hosts.
2. Click to highlight a host(s). You can also click Select All at the top to choose all hosts in the list.
3. Click View at the bottom of the table.
The Needed Software table appears, showing the managed hosts; see FIGURE 6. The needed package files for each host are listed under each entry.
4. Select the package file(s) in the list of available package files that you want to publish.
5. Click Publish at the bottom of the table.
The Task Progress dialog appears.
|
Note - The Sun Control Station does not install a package file on a host until you click Install. |
|
Note - When you install a package file, the system updates the list of installed package files immediately for those hosts. |
To install a package file on a managed host(s):
1. Select Software Management > Needed Software.
The Choose Hosts... table appears, displaying the list of managed hosts.
2. Click to highlight a host(s). You can also click Select All at the top to choose all hosts in the list.
3. Click View at the bottom of the table.
The Needed Software table appears, showing the managed hosts; see FIGURE 6. The needed package files for each host are listed under each entry.
4. Select the package file(s) in the list of available package files that you want to install.
5. Click Install at the bottom of the table.
The Task Progress dialog appears.
To schedule the installation of a needed package file:
1. Select Software Management > Needed Software.
The Choose Hosts... table appears, displaying the list of managed hosts.
2. Click to highlight a host(s). You can also click Select All at the top to choose all hosts in the list.
3. Click View at the bottom of the table.
The Needed Software table appears, showing the managed hosts; see FIGURE 6. The needed package files for each host are listed under each entry.
4. Select the package file(s) in the list of available package files that you want to install.
5. Click Schedule Install at the bottom of the table.
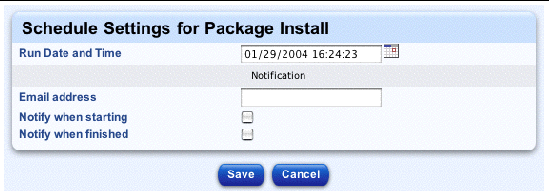
The Schedule Settings for Package Install table appears; see FIGURE 7.
6. Schedule the date and time for when you want to install the package file.
By default, the current date and time appear in the field Run Date and Time. You can also configure the following parameters:
7. To select a different date, click the calendar icon next to the field.
A seperate calendar window opens.
Scroll through calendar and select a new date. You can also enter a specific time of day for the scheduled install.
Once you click on a new date, the window closes and the new date and time appear in the field.
|
Note - If you want to change both the date and time, change the Time field first and then select a new Date from the calendar. |
8. Click Save below the table.
The Task Progress dialog appears.
|
Note - For more information of the Scheduler, see Schedule. |
To view the detailed information for a needed package file:
1. Select Software Management > Needed Software.
The Choose Hosts... table appears, displaying the list of managed hosts.
2. Click to highlight a host(s). You can also click Select All at the top to choose all hosts in the list.
3. Click View at the bottom of the table.
The Needed Software table appears, showing the managed hosts; see FIGURE 6. The needed package files for each host are listed under each entry.
4. Select the package file(s) in the list of available package files for which you want to view the detailed information.
5. Click Info at the bottom of the table.
A Package Info table appears. For a sample, see FIGURE 4.
If you choose more than one package, a separate table for each package appears.
6. The table provides the following information:
7. Click the up-arrow icon in the top-right corner to return to the Needed Packages table.
Through the Settings sub-menu item, you can add, modify or remove a remote software server for the Software Management module. The remote software server can be a BlueLinQ server or a YaST Online Update (YOU) server.
The Sun Control Station accesses the remote software servers and displays the available list of package files for the hosts that it manages.
|
Note - The remote software servers listed under this menu item contain software packages for the hosts managed by the Sun Control Station, and not for the control station itself. |
Your Sun Control Station can act as a BlueLinQ server. All BlueLinQ-enabled servers, including other Sun Control Stations, can see package files published on your control station. This allows the control stations to share and distribute the package files more efficiently, and to take full advantage of the "Publish" feature in the Software Management module.
The Sun BlueLinQ server updates.cobalt.com/packages/ provides a list of package files available for your Sun Cobalt server appliances.
To add this server to the list of remote software servers, see Adding a remote software server.
The YaST Online Updater (YOU) feature is the update and patching mechanism that is bundled in the Sun JDS software. The Sun Control Station can act as a mirror of a remote YOU server.
The Remote Software Servers table displays the remote software server(s) that you have configured in the Software Management module. The Software Management module displays all package files available from these servers.
|
Note - The host name of the remote software server(s) that you enter must be resolvable by a Domain Name System (DNS) server that your Sun Control Station accesses. |
The table has three columns; FIGURE 8 shows a sample of this table.

You can sort the list of remote software servers according to the name of the server or the URL address, in ascending or descending order.
Ascending order means from lowest value to the highest value (a-z or 1-9). Descending order means from highest value to the lowest value (z-a or 9-1). By default, the Remote Software Servers table is sorted by server name in ascending order.
In the heading of the column which has been sorted, a triangle icon points down (ascending order) or up (descending order).
Once a remote software server has been added, you can perform various operations on that server. These operations are found in the Actions column of the Remote Software Servers table and are explained further on.
To add a remote software server to the Software Management module:
1. Select Software Management > Settings.
The Remote Software Servers table appears.
2. Click Add Server below the table.
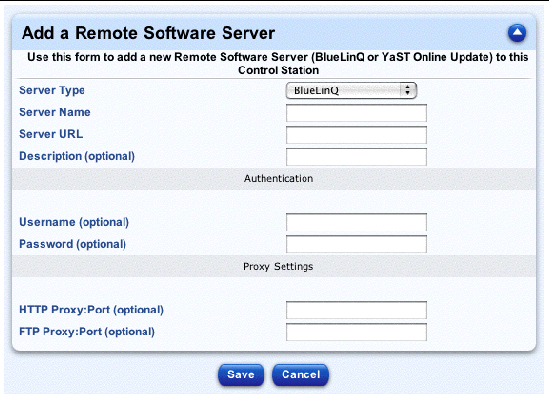
The Add A Remote Software Server table appears; see FIGURE 9.
3. Fill in the following fields:
|
Note - The User Name and Password fields apply only to a YaST Online Updater (YOU) server. |
For example, proxy.mycompany.com:8080 is a valid entry.
For example, proxy.mycompany.com:8080 is a valid entry.
The Remote Software Servers table refreshes with the new server added. The servers are sorted by server name in ascending order.
To view the package files available from the newly added remote software server, see Refreshing the list of packages.
To modify a remote software server:
1. Select Software Management > Settings.
The Remote Software Servers table appears.
2. Locate in the table the server that you want to modify.
3. Click the pencil icon in the Actions column.
The Edit Remote Software Server table appears.
4. You can modify the server type, the server name, the URL for the server, the description for the server, the user name and password (for a YOU server), the HTTP Proxy:Port or the FTP Proxy:Port.
The Description, HTTP Proxy:Port and FTP Proxy:Port fields are optional.
The Remote Software Servers table appears; if you changed the server name or the URL, the modified information is displayed.
If you remove a remote software server from the Software Management module, all package files available from that server are immediately removed from the Packages table.
Package files that have been downloaded from this server to the local repository are still available and displayed in the list.
To remove a remote software server:
1. Select Software Management > Settings.
The Remote Software Servers table appears.
2. Locate in the table the server that you want to remove.
3. Click the delete icon in the Actions column.
A confirmation dialog appears, asking if you to confirm the removal.
The Remote Software Servers table appears with the server removed.
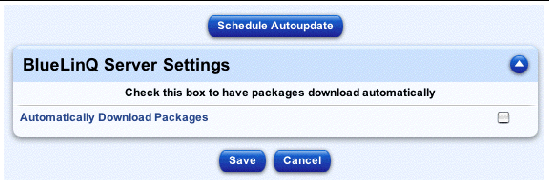
The Server Settings table allows you to configure certain settings for the BlueLinQ server(s) that you add. See FIGURE 10.
|
Note - The settings configured on this screen apply to all of the BlueLinQ servers listed in the BlueLinQ Settings table. |
|
Note - This feature does not apply to a YaST Online Updater (YOU) server. |
The BlueLinQ Server Settings table displays the following field:
From this screen, you can also create a scheduled task so that the control station automatically checks for new package files on the BlueLinQ servers. Simply click Schedule Autoupdate above the table.
When you schedule an automatic update, you can also specify an email address(es) to which notifications of new software or errors in queries for software update are sent.
To configure the settings for the BlueLinQ server(s):
1. Select Software Management > Settings.
The Remote Software Servers table appears.
2. Click Server Settings below the table.
The BlueLinQ Server Settings table appears; see FIGURE 10.
3. Enable or disable the check box Automatically Download Packages.
The BlueLinQ Server Settings table appears. A message appears above the table stating that the server configuration was saved successfully.
You can also create a scheduled task so that the control station automatically checks for new package files on the BlueLinQ servers.
To create a scheduled update task:
1. Select Software Management > Settings.
The Remote Software Servers table appears.
2. Click Server Settings below the table.
The BlueLinQ Server Settings table appears; see FIGURE 10.
3. Click Schedule Autoupdate above the table.
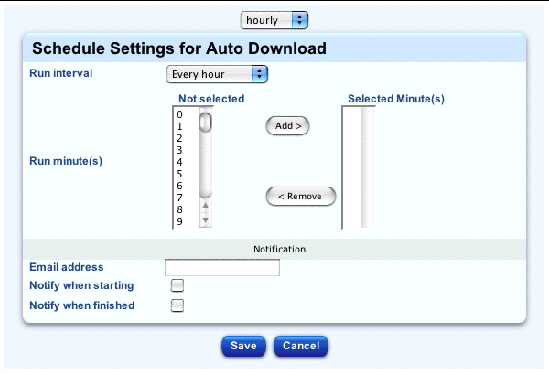
The Schedule Settings for Auto Update table appears.
For more information, see Schedule.
When you launch a task (for example, when installing a package file on a host or publishing a new package file), a Task Progress dialog appears in the user interface (UI). This dialog has a Status field indicating the current status of the task and a progress bar. When the progress bar displays 100%, the task has completed.
If you want to perform another task in the UI while the current task is underway, you can put the Task Progress dialog in the background. Simply click the button labelled Run Task In Background below the progress bar.
To return to the Task Progress dialog, select Administration > Tasks on the left. The Task table appears. If the task is still underway, a status message is displayed in the Duration column. Click on the progress-bar icon in this column to re-display the Task Progress dialog for this task.
Once the task is complete and the progress bar displays 100%, two buttons appear below the Task Progress dialog: Done and View Events.
The Schedule feature (also referred to as the Scheduler) allows you to schedule a task or tasks to be performed at a later time.
Many of the tasks on the Sun Control Station can be scheduled. In this case, a button labelled Schedule appears in the table or selector window of the final step.
For complete information on how the Schedule function works, refer to "Schedule" in Chapter 1 in the PDF Administrator Manual.
The Scheduler works in the same way for any task:
1. Fill in the necessary fields for the task.
The Schedule Settings For <Task> appears.
3. The following settings are available for any scheduled task:
4. For some functions, you can set the frequency of the task with a pull-down menu above the table (for example, hourly or daily).
If you click Cancel, the scheduled task is not saved. The Scheduled Tasks table appears, but without the task you just cancelled.
If you click Save, the scheduled task is added to the list of scheduled tasks. The Scheduled Tasks table appears with the new task.
6. In this table, you can view details for, modify or delete a scheduled task.
To view the details of a scheduled task, click the magnifying-glass icon.
To modify a scheduled task, click the pencil icon.
To delete a scheduled task, click the delete icon.
FIGURE 11 shows a sample of a Scheduler table.
When you launch an Install A Package File task, the Sun Control Station first performs dependency checks on the host you selected to ensure that the selected package file(s) can be installed. This operation verifies three things:
If yes, and if these required package files are available to the control station, they are installed in the correct order; the selected package file is installed afterward.
The control station displays a confirmation screen for you to confirm or cancel the install task.
The install task is an all-or-nothing operation, meaning that all package files are installed on the appropriate host(s) in one operation. If there are any package-file dependencies that cannot be resolved by the Sun Control Station (a red status), the entire install task cannot proceed.
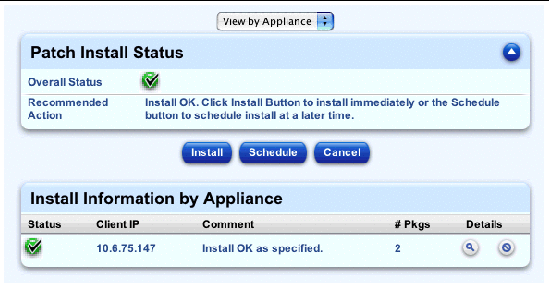
On the confirmation screen, the Patch Install Status table appears at the top.
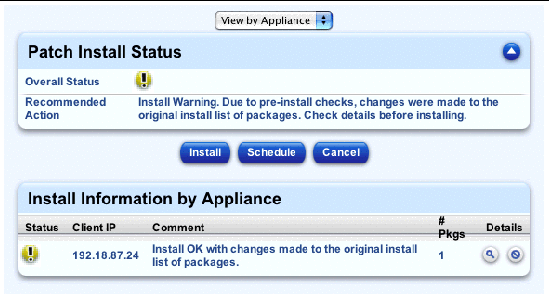
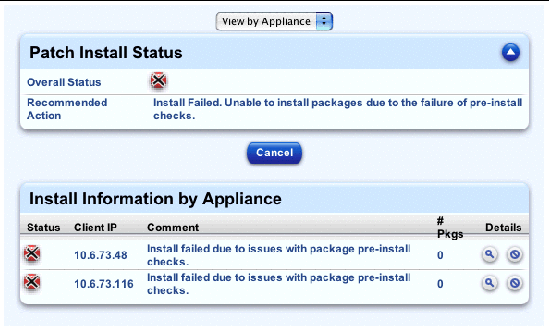
This table displays the overall status of the install task as a colored circle and icon. If any component in the install task has yellow status, the overall status of the install task is displayed as yellow; if any component has red status, the overall status is red.
 Green with checkmark: There are no dependency issues and you can install the package file(s) on the host(s).
 Yellow with exclamation mark: There is at least one dependency issue that can be resolved for the package file(s) that you want to install on the host(s). You can proceed with the install task. The control station will first install the necessary package file(s) to resolve the dependency issue(s) on the host(s), and then install the selected package files.
 Red with X: There is at least one dependency issue for the selected package file(s) that cannot be resolved by the control station. You cannot proceed with the install task if the status is red.
For a yellow or red status, always view the details in the Install Information by Appliance or Install Information by Patch table that appears below the Patch Install Status table.
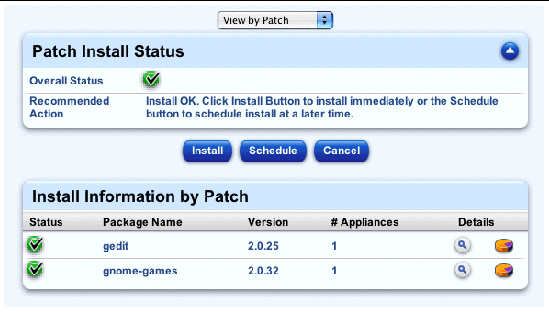
FIGURE 12, FIGURE 13, FIGURE 14 and FIGURE 15 show different samples of the dependency-check results on the confirmation screen.
The Install Information by Host table appears by default; FIGURE 12 shows a sample table. The table has the following five columns:
When you view the package files to be installed, a second table of information appears. In this table, you can click on another icon to view all of the information about a package file.
If one of the managed hosts shows a red status, meaning it has dependency issues that the control station cannot resolve, you can remove the host so that the rest of the install task can proceed.
To view the Install Information by Patch table, use the pull-down menu at the top to select View by Patches. FIGURE 13 shows a sample table. The table has the following five columns:
If you notice that all of the selected host(s) display a red status, this table can help identify whether it is a single package file that is causing dependency problems on all of the hosts.
If you can proceed with the install task, you can choose to install the package file(s) immediately or to schedule the installation for a later time.
Copyright © 2004, Sun Microsystems, Inc. All rights reserved.