| Sun Ultra 20 Workstation Setup Guide
|
    |
This chapter includes information about the following topics:
Safety and Compliance Information
Refer to the following documents for safety information regarding the
Sun Ultra 20 Workstation:
- Important Safety Information for Sun Hardware Systems, 816-7190 (included with the workstation ship kit).
- Sun Ultra 20 Workstation Safety and Compliance Guide, 819-2149 (available at the Sun Ultra 20 documentation site. See Sun Ultra 20 Workstation Documentation).
Planning the Installation Process
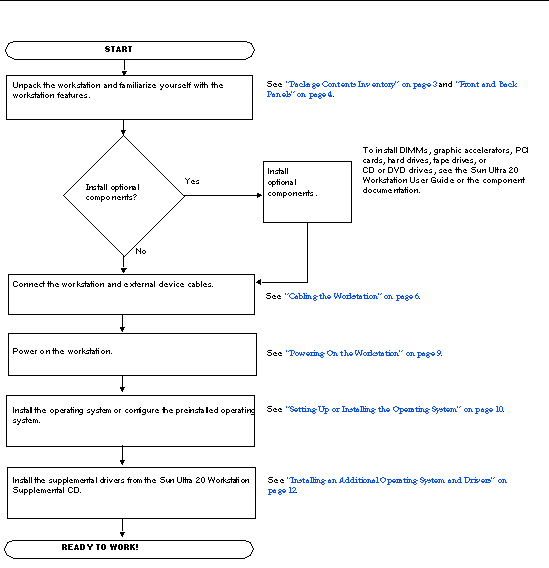
Use the following flowchart as a process tool to assist you with installation of the Sun Ultra 20 Workstation.
Flowchart showing the installation process that is documented in this guide.
FIGURE 1-1 Process for Setting Up the Sun Ultra 20 Workstation
Package Contents Inventory
Carefully unpack all workstation components from the packing cartons. The following items should be packaged with the Sun Ultra 20 Workstation:
|
|
Description
|
|
Hardware
|
- DMS 59 cable (if the workstation has a NVS280 or NVS285 video card installed)
- Keyboard, mouse and power cord (in separate county kits)
|
|
Media
|
- Sun Ultra 20 Workstation Supplemental CD (includes drivers and diagnostics software)
|
|
Documentation
|
- Sun Ultra 20 Workstation Setup Guide
- Sun Ultra 20 Workstation Release Notes
- Where to Find Sun Ultra 20 Workstation Documentation
- Additional safety and license documentation
|
FIGURE 1-2 Sun Ultra 20 Workstation Ship Kit Contents

Front and Back Panels
.
FIGURE 1-3 Front Panel

TABLE 1-1 Front Panel
|
Label
|
Button/LED/Port
|
Label
|
Button/LED/port
|
|
1
|
Power button
|
4
|
2 USB ports
|
|
2
|
Power LED
|
5
|
Microphone-in jack
|
|
3
|
2 1394 (firewire) ports
|
6
|
Headphone-out jack
|
FIGURE 1-4 Rear Panel
 [ D ]
[ D ]
TABLE 1-2 Rear Panel
[ D ]
[ D ]
|
Label
|
Connector/Slot
|
Label
|
Connector/Slot
|
|
1
|
Power connector
|
7
|
Ethernet connector
|
|
2
|
Power switch
|
8
|
4 USB connectors
|
|
3
|
Onboard HDI15 video connector
|
9
|
PCI Express x16 graphics slot
|
|
4
|
Microphone jack
|
10
|
4 PCI slots
|
|
5
|
Line-in jack
|
11
|
2 PCI Express x1 slots
|
|
6
|
Line-out jack
|
|
|
Cabling the Workstation
FIGURE 1-5 Cable Connections
 [ D ]
[ D ]
Connect the workstation and external devices in this order (See FIGURE 1-5):
1. Connect the workstation power cord to a grounded electrical outlet.
2. Connect the keyboard and mouse to the USB connectors on the rear of the panel.
3. Connect an Ethernet cable to the Ethernet connector on the Sun Ultra 20 Workstation and connect the other end to an Ethernet RJ45 jack.
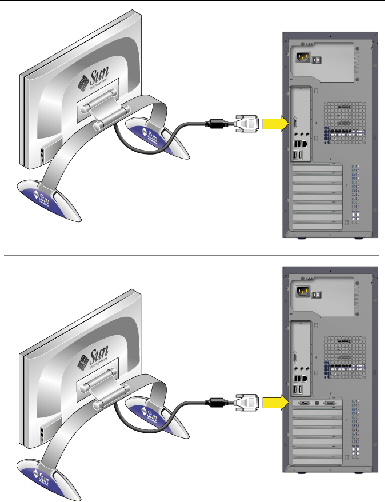
4. Connect the monitor cable as follows:
- If a x16 PCI Express graphics card is not installed in the top PCI slot, connect the monitor to the onboard video connector. See the top pane of FIGURE 1-6.
- If a x16 PCI Express graphics card is installed in the top PCI slot, connect the monitor to the graphics card connector. See the bottom pane of FIGURE 1-6.
You might need a DVI connector to attach the monitor to the graphics card. A DMS59 cable is included for systems that have an NVS280 or NVS285 card installed.
|
Note - The onboard video connector is disabled by default if a graphics card is installed. If you want to enable the onboard ATI connector, follow the instructions in the Sun Ultra 20 Workstation User Guide, Appendix B.
|
5. Connect any additional external devices to the workstation's other connectors.
FIGURE 1-6 Connecting the Monitor
Powering On the Workstation
|
Tip - If you are installing optional internal components such as additional DIMMs, PCI cards, optical drives, or hard drives, install those components before you power on the workstation. If you are not installing optional components, you are ready to power on the workstation.
|
1. Turn on power to the monitor and to all external devices.
2. Turn the power switch on the rear of the workstation to the On ( | ) position.
See FIGURE 1-4 for the location of the power switch.
3. Press and release the workstation Power button on the front panel (FIGURE 1-7).
FIGURE 1-7 Powering on the Workstation
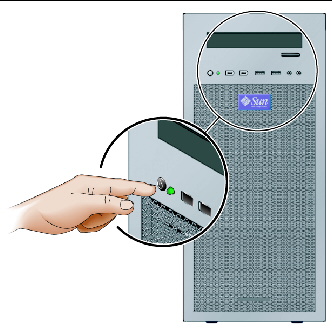
4. After several seconds, verify that the platform power LED next to the Power button lights.
The platform power LED lights after the workstation begins the internal booting process. See FIGURE 1-3 for location of the platform power LED.
5. If you are powering on the workstation for the first time, you will need to install the operating system or configure the preinstalled operating system after the system is finished booting.
See Setting Up or Installing the Operating System.
Setting Up or Installing the Operating System
Your workstation will have the Solaris 10 Operating System preinstalled and the following software also preinstalled: Sun Studio, Sun Java Studio Enterprise and Sun Java Studio Creator, and NetBeans IDE.
Setting Up the Preinstalled Software
Further information on preinstalled software can be found in the Sun Ultra 20 Workstation Getting Started Guide, 819-2148.
The preinstalled software applications are also available for download. See Downloading Deverloper Software Applications.
To configure the preinstalled operating system: Use TABLE 1-3 to collect the information that you need, then follow the system prompts to configure the operating system.
TABLE 1-3 Information for Preinstalled Solaris 10 Setup
|
Setup Window
|
Explanation and Notes
|
Your Information
|
|
Select Language and Locale
|
Native language and locale to use for the workstation.
|
|
|
Host Name
|
A name to give the workstation.
|
|
|
Network Connectivity
(IP Address)
|
Network or stand-alone workstation protocols. A system administrator might be required to complete this section.
Note: Depending on how you answer and what information is provided by your network, you might also be prompted for the workstation's IP address.
|
|
|
IPv6
|
Enable IPv6 on the workstation.
|
|
|
Security Settings
|
Security settings and protocols.
|
|
|
Name Service
|
Name service to use: NIS+, NIS, DNS, LDAP, or None.
Note: This window is not displayed if the workstation is not connected to a network.
|
|
|
Domain Name
|
NIS or NIS+ domain for this workstation.
Note: This window is not displayed if the workstation is not using the NIS or NIS+ service.
|
|
|
Name Server/
Subnet/
Subnet Mask
|
Name server (specify the server or have the workstation find one on a local subnet).
Note: This window is not displayed if the workstation is not connected to a network.
Note: Depending on how you answer and what information is provided by your network, you might also be prompted for:
- The subnet for the workstation
- The subnet mask for the workstation
|
|
|
Time Zone
|
Local time zone (select by geographic region, GMT offset, or a time zone file).
|
|
|
Date and Time
|
Current date and time (accept the default or enter the current date and time).
|
|
|
Root Password
|
Root (superuser) password for the workstation.
|
|
|
Proxy Server Configuration
|
Workstation connection: direct to the Internet or through a proxy server.
|
|
Installing an Additional Operating System and Drivers
The Solaris 10 Operating System is preinstalled on your workstation. If you plan to install an additional operating system, install it at this time. You might need to remove the Solaris 10 Operating System in order to do this.
The following sources of information can help you with installing additional operating systems on the Sun Ultra 20 Workstation:
- Overview instructions for installing the drivers can be found in the following section: Overview Instructions for Additional Operating Systems and Drivers.
- Detailed information on removing the existing operating system, installing additional drivers, and installing another operating system is in the Sun Ultra 20 Workstation Getting Started Guide, available at:
http://www.sun.com/products-n-solutions/hardware/docs
/Workstation_Products/Workstations/ultra_20/index.html
- Drivers for supported operating systems are available on the Sun Ultra 20 Workstation Supplemental CD included with your system and can also be downloaded from the download link at:
http://www.sun.com/desktop/workstation/ultra20/downloads.html
- The most recent list of operating systems supported for Sun Ultra 20 Workstation can be found on the product web site at:
http://sun.com/ultra20
Overview Instructions for Additional Operating Systems and Drivers
If you want detailed instructions on installing drivers, see the Sun Ultra 20 Workstation Getting Started Guide. If you want to install using overview instructions only, refer to the following procedures.
Installing the Operating System
Follow these directions for installing a supported operating system (OS) on the Sun Ultra 20 Workstation.
1. Power on the Sun Ultra 20 Workstation.
2. Do one of the following:
- If you are installing a Windows XP or the Solaris 10 Operating System, and the BIOS Installed O/S option has not been changed from the default, proceed to
Step 3.
- If you are installing a Linux OS, make the following change to the BIOS settings:
a. Select the Advanced tab and change the Installed O/S option to Linux.
b. Press the F10 key to save your changes and exit the BIOS Setup Utility.
3. Install the operating system, following the instructions that come with the software.
|
Note - If you need to install RAID drivers for Windows XP, you will need to create a new Windows CD before installing the Windows XP OS. See the Sun Ultra 20 Workstation Getting Started Guide for further information.
|
4. After installing the operating system, install the appropriate drivers from the Sun Ultra 20 Workstation Supplemental CD, using one of the following procedures.
Installing the Drivers for a Linux OS
To install the drivers from the Supplemental CD for supported Red Hat and SUSE operating systems:
a. If you have installed Red Hat Enterprise Linux, run the up2date utility.
b. If the CD does not automount, manually mount the CD.
c. Change to the following directory: /mountpoint/drivers/linux/operating_system
Where mountpoint is the directory the CD is mounted to, and operating_system is the operating system installed (red_hat or suse).
d. Run ./install.sh
Installing the Drivers for a Windows XP OS
To install the drivers from the Supplemental CD for Windows XP 32-bit or 64-bit:
a. Change to the following directory: D:\drivers\windows\OS\chipset
Where OS is XP32 or XP64.
b. Double-click on the executable file.
c. Follow the instructions in the installation software.
d. Repeat the above instructions for the video drivers in the following directory:
D:\drivers\windows\OS\video
Where OS is XP32 or XP64.
Installing the Drivers for the Solaris 10 OS
If you are using the preinstalled version of Solaris, the drivers are already installed. To install the drivers from the Supplemental CD if you have reinstalled the Solaris 10 Operating System:
a. Change to the following directory: /cdrom/cdrom0/drivers/sx86
b. Run ./install.sh
| Sun Ultra 20 Workstation Setup Guide
|
819-2150-12
|
|
Copyright © 2006, Sun Microsystems, Inc. All Rights Reserved.