Removing and Installing DIMMs
This section contains instructions for removing and installing a dual inline memory module (DIMM).
DIMMs are very sensitive to ESD. Be especially careful to follow ESD precautions when changing DIMMs (see Observing Electrostatic Discharge (ESD) Precautions).
 To Remove DIMMs
-
Power off the workstation using the procedures described in the section, To Power Off the Workstation.
-
Remove the left-side access panel using the procedure described in the section, To Remove the Left-Side Access Panel.
-
Gently lay the system on its right side on a stable, nonslip surface.
-
Identify the location from which you will remove a DIMM.
-
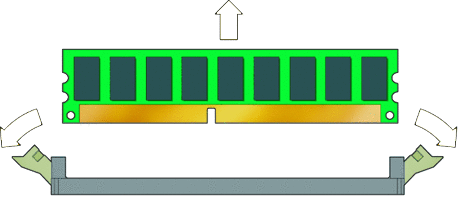
To remove a DIMM press down on the ejector levers at both ends of the DIMM socket (see Figure 3–16).
This action ejects the DIMM from the socket.
Figure 3–16 Removing a DIMM

-
Lift the DIMM and set it aside on an antistatic surface.
-
Choose the next step.
-
If you are installing a new DIMM, see the next section, To Install DIMMs.
-
If you are finished, close the workstation and prepare it for operation using the procedures described in the section, Closing the Workstation and Preparing for Operation.
-
Memory Population Rules
The workstation contains six DIMM slots divided into three channels (two slots per channel). The slots are color-coded (three blue and three black) and are numbered from DIMM 0 (closest to the CPU) to DIMM 5 (farthest from the CPU).
Populate the slots according to the following rules:
-
The workstation requires DDR3-1066/1333, unbuffered, ECC DIMMs.
-
Supported sizes and frequencies: 1 GB and 2 GB 1066 MHz and 1333 MHz DIMMs (see the Sun Ultra 27 Workstation Product Notes for supported hardware and other workstation-related issues.)
Note –The DDR3 interface can support up to six DDR3–1066 DIMMs running at full speed.
-
DIMMs must be installed in groups of three except the single DIMM configuration.
-
Three 1333 MHz DIMMs will run at 1333 MHz. Six 1333 MHz DIMMs will run at 1066 MHz.
-
Populate DIMMs according to the supported memory configurations listed in the following section.
Supported Memory Configurations
The following is a list of supported memory configurations for the Sun Ultra 27 workstation. Only these configurations in combination the supported DIMMs are valid:
-
One DIMM in slot 1
-
DIMMs in slots 1, 3, 5 only (black-colored slots only)
-
All DIMM slots populated
 To Install DIMMs
This procedure describes the correct procedure for installing DIMMs.
Before You Begin
Review the following sections:
-
Power off the workstation using the procedure described in the section, To Power Off the Workstation.
-
Remove the left-side access panel using the procedure described in the section, To Remove the Left-Side Access Panel.
-
Gently lay the system on its right side on a stable, nonslip surface.
-
Identify the location into which you will install a DIMM.
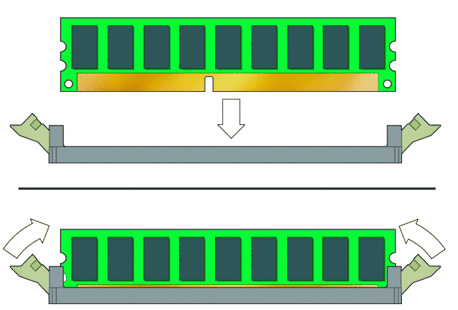
Ensure that the locking tabs are rotated to the open position.
-
Align the DIMM with the proper slot.
Note –Be sure to align the notch in the DIMM with the notch in the connector.
-
Press both ends of the DIMM downward into the slot until both locking levers click into place (see Figure 3–17).
This action locks the DIMM in the slot.
Figure 3–17 Installing a DIMM

-
Ensure that both locking levers are in the fully upright and locked position.
-
Repeat the above steps for each DIMM that you want to replace.
-
To close the system, perform the steps in the section, Closing the Workstation and Preparing for Operation.
-
Boot the workstation and watch the boot messages on the monitor.
Note –The memory check shows the amount of the currently installed memory.
Watch the monitor for the prompt that instructs you to press F2 to enter the BIOS Setup utility.
-
When the BIOS prompt appears press F2.
The BIOS Setup utility main menu appears.
-
Use the Memory Configuration screen to verify that the total amount of memory installed in the workstation is seen by the system.
- © 2010, Oracle Corporation and/or its affiliates
