| C H A P T E R 1 |
|
System Setup |
This chapter includes information about the following topics:
Use the following flowchart as a process tool to assist you with installation of the Sun Ultra 40 M2 Workstation.

FIGURE 1-1 Process for Setting Up the Sun Ultra 40 M2 Workstation
Carefully unpack all Sun Ultra 40 M2 workstation components from the packing cartons. TABLE 1-1 lists the items that are packaged with the Sun Ultra 40 M2 Workstation:
If you ordered an optional country kit, the kit ships in a separate package and includes a power cable, keyboard, and mouse.
| Note - The workstation is packaged with the stand in place, as shown in FIGURE 1-2. This stand must be positioned as shown when the system is upright. |

FIGURE 1-2 Workstation in Upright Position
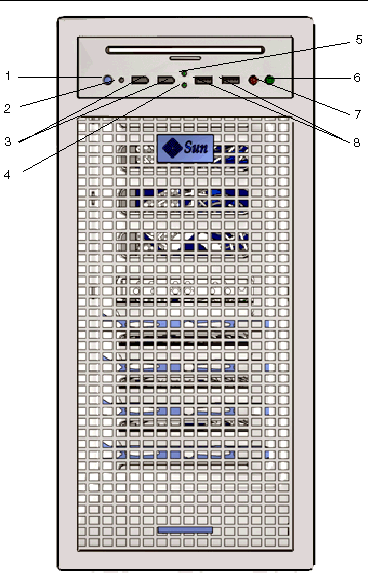
FIGURE 1-3 and TABLE 1-2 show the workstation front panel.
This section shows and describes the features of the front and back panel, and the side cover of the Sun Ultra 40 M2 Workstation.

FIGURE 1-3 Workstation Front Panel
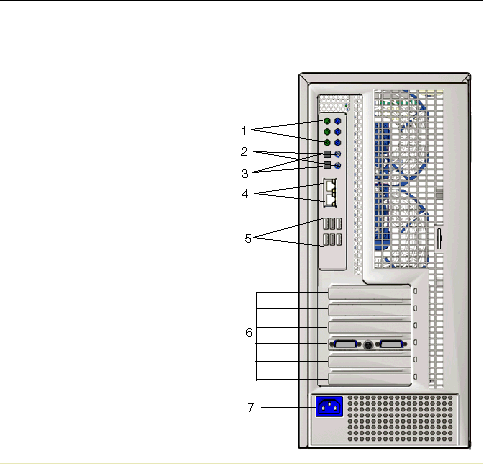
FIGURE 1-4 and TABLE 1-3 show the workstation back panel.

FIGURE 1-4 Workstation Back Panel)
|
PCI slots (see TABLE 1-4for descriptions) |
|||

|
Caution - Always power off the workstation before removing the side cover. |


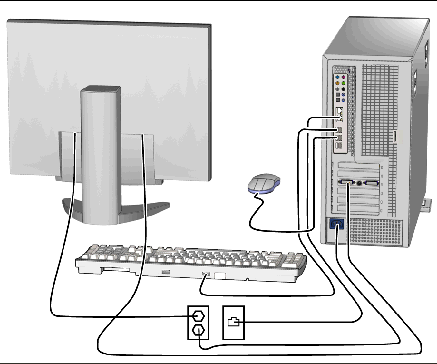
1. Connect the workstation power cord to a grounded electrical outlet.
2. Connect the keyboard and mouse to the USB connectors on the back panel.
3. Connect the monitor cable to a graphics card video connector installed in a PCI- Express graphics slot.
4. Connect an Ethernet cable to one of the Ethernet connectors on the Sun Ultra 40 M2 Workstation, and connect the other end of the cable to an Ethernet RJ-45 jack.
5. Connect any additional external devices to the workstation’s other connectors.
This section describes how to power on the workstation.
1. Turn on power to the monitor and to all external devices.
2. Press and release the workstation Power button on the front panel.
See FIGURE 1-3 (1).
3. After several seconds, verify that the platform power LED next to the Power button lights.
The platform power LED lights after the workstation begins the internal booting process. See FIGURE 1-3 (2) for the location of the platform power LED.
4. If you are powering on the workstation for the first time, configure the preinstalled operating system or install another operating system after the workstation has finished booting. See Setting Up the Operating System and Drivers.
This section describes how to power off the workstation.
1. Save your data and close any open applications.
2. Read all of the following power-off options before powering off the workstation.
In most cases, either action powers down the operating system and then turns off the power to the workstation.
This action initiates an orderly shutdown of the operating system and powers off the workstation.

|
Caution - To avoid data loss, use the preceding two options whenever possible. |
This action immediately shuts down the power to the workstation without operating system intervention. This method could result in data loss.
If the preceding options fail to power off the workstation, see the Sun Ultra 40 Workstation Service Manual (820-0123) for additional troubleshooting information.
| Note - After powering off the workstation, wait at least four seconds before powering on the workstation again. |
This section describes how to set up the operating system. You can set up the preinstalled Solaris 10 operating system or install an additional operating system and drivers.
For information on setting up the operating system and software:
This section describes how to set up the preinstalled Solaris 10 Operating System.
Use TABLE 1-6 to collect the information that you need, and then follow the system prompts to configure the operating system. When you have successfully configured the Preinstalled Solaris 10 operating system, the desktop will display.
The Solaris 10 Operating System is preinstalled on your workstation. If you plan to install an additional operating system, install it at this time. You might need to remove the Solaris 10 Operating System in order to do this.
The following sources of information can help you with installing additional operating systems:
http://www.sun.com/products-n-solutions/hardware/docs
/Workstation_Products/Workstations/ultra_40/index.html
For detailed instructions on installing drivers, see the Sun Ultra 40 M2 Operating System Installation Guide, 819-7577.
This section includes the basic instructions for installing an additional operating system and drivers.
The section describes how to install the Linux, Windows, or Solaris operating system.
To install the operating system:
a. Select the Advanced tab and change the Installed O/S option to Win2K/XP.
b. Press the F10 key to save your changes and exit the BIO Setup Utility.
3. Install the operating system, following the instructions that come with the software.
4. After installing the operating system, install the appropriate drivers from the Sun Ultra 40 M2 Workstation Tools and Drivers CD, using one of the following procedures.
To install the drivers from the Tools and Drivers CD for supported Red Hat and SUSE operating systems:
1. If you have installed Red Hat Enterprise Linux, run the up2date utility.
2. If the CD does not automount, manually mount the CD.
3. Change to the following directory: /mountpoint/drivers/linux/operating_system
Where mountpoint is the directory the CD is mounted to, and operating_system is the operating system installed (red_hat or suse).
To install the drivers from the Tools and Drivers CD for Windows XP 32-bit or 64-bit:
1. Change to the following directory: D:\drivers\windows\OS\chipset
2. Double-click the executable file.
3. Follow the instructions in the installation software.
4. Repeat the above instructions for the video drivers in the following directory:
If you are using the preinstalled version of Solaris, the drivers are already installed. To install the drivers from the Tools and Drivers CD for the reinstalled Solaris 10 Operating System:
1. Change to the /cdrom/cdrom0/drivers/sx86 directory.
The following minimum versions of Sun’s developer software are preinstalled or preloaded onto your Sun Ultra 40 M2 Workstation. An overview of each developer software package is presented in the following sections.
 IDE 5.0 (NetBeans IDE)
Your system might have later versions of this software preinstalled.
In addition, two fully licensed RTUs for Sun's N1 Grid Engine are also included with the workstation. To purchase support, no additional licenses are required. These RTUs can only be used with the Ultra 40 M2 Workstation with which they came. The RTUs are non-transferable and cannot be used on other hardware.
You can download the Sun N1 Grid Engine by clicking the “Get the Software” button at the following URL:
See the Sun Ultra 40 M2 Workstation Operating System Installation Guide, 819-7577, for more information on the preinstalled software and CD media. This, and other Sun Ultra 40 M2 Workstation documentation can be found at:
http://www.sun.com/products-n-solutions/hardware/docs/
Workstation_Products/Workstations/ultra_40/index.html
Sun Studio software provides a comprehensive, productive environment for developing reliable, scalable, high-performance applications using C, C++, and FORTRAN for the Solaris OS. The software package includes compilers, performance analysis tools, and a powerful debugger, as well as an integrated development environment (IDE).
The Sun Studio IDE provides modules for creating, editing, building, debugging, and analyzing the performance of C, C++, or FORTRAN applications. It includes a set of basic Java language support modules that can be enabled if needed for Java Native Interface (JNI) development.
The Sun Studio software consists of two major components:
For more information regarding the Sun Studio software, see the product documentation at:
http://developers.sun.com/sunstudio
The Sun Java Studio Creator development environment (formerly “Project Rave”) is the next-generation tool for Java application development. This product combines the power of 100% Java standards with simplified visual development techniques to give developers the most effective, most productive way to build applications in Java.
The Java Studio Creator environment was designed and tested to meet the needs of skilled developers whose primary concern is rapid turnaround of business-critical applications. Java Studio Creator enables these developers to leverage the power of the Java platform to solve business problems, without forcing them to give up the highly-productive, visual style to which they are accustomed.
For additional information about Sun Java Studio Creator, see the product documentation at:
http://developers.sun.com/jscreator
Sun Java Studio Enterprise is a complete, cost-effective, unified platform of tools, support, and services designed to fully integrate with the capabilities of the Sun Java Enterprise System. Java Studio Enterprise enables you to develop applications in an environment carefully designed to:
For additional information about Sun Java Studio Enterprise, see the product documentation at:
http://developers.sun.com/jsenterprise
The NetBeans IDE 5.0 includes Java 2 Platform, Enterprise Edition (J2EE) development capabilities. This new release enables developers to not only develop applications in the web tier, but also includes Enterprise JavaBeans (EJBs) and web service development capabilities.
The NetBeans IDE is a single platform with out-of-the-box development capabilities and support for enterprise (J2EE 1.4) applications and web services, mobile/wireless Java 2 Platform, Micro Edition (J2ME) applications and services, and desktop Java 2 Platform, Standard Edition (J2SE) applications. The robust open source Java IDE, has everything that Java software developers need to develop cross-platform desktop, web, and mobile applications straight out of the box.
For more information about the NetBeans IDE, go to the following website:
The lower PCI-Express x16 slot (PCI-E 1) is the primary graphics slot. The BIOS is set up for displaying video from a graphics card installed in this slot by default. This card is powered by the 6-pin to 6-pin GFX1_PWR_OUT supplemental power connector.
To use the secondary PCI-Express x16 graphics slot (the top-most
PCI-E 3 slot), you must do the following to set it up:
See the Sun Ultra 40 M2 Workstation Service, Diagnostics, and Troubleshooting Manual for more information on connecting the power connector.
| Note - Attempting to use the wrong supplemental power cable for the wrong graphics card could result in the machine not powering up. |
To set up the secondary PCI-E x16 graphics card slot:
1. Boot the workstation with the video display connected to the primary graphics card slot.
2. When you see the Sun logo screen displayed, press F2 to enter the BIOS Setup Utility.
The entry PCI-E X16 VGA CARD SELECT defines which slot is the primary graphics slot. POST and BOOT information will be displayed to this card only.
4. Select PCI Express Slot 3 (i.e. PCI-E 3) to enable the PCI-E 3 graphics slot.
5. Press the F10 key to save your changes and exit the BIOS.
Copyright © 2008, Sun Microsystems, Inc. All Rights Reserved.