| Sun Flash PROM Guide for Workstations and Workgroup Servers
|
    |
Changing Flash PROM Jumpers
|
This document accompanies the standalone CD-ROM containing the new firmware code for updating your system's flash PROM. This document is intended for:
- Network administrators
- System administrators
- Network and system service providers
- Advanced system users
This chapter describes the procedure for manually changing flash PROM jumper settings (or front panel keyswitch settings) in your system.
|
Note - The procedures in this document apply to the so-called "Standalone Flash PROM Utility." This utility is what you typically use to perform a firmware update from CD-ROM or a downloaded image. These procedures do not apply to the flash PROM utility that is bundled with the Solaris™ Operating System.
|
1.1 Introduction
Sun Ultra™, Sun Enterprise™, Ultra Enterprise™, Sun Blade™, Sun Fire™, and Sun Netra™ systems that conform to the Sun4U™ architecture use flash programmable read-only memory (PROM). Flash PROMs enable you to:
- Reprogram specific code blocks
- Remotely reprogram the PROM chip over a local area network (LAN)
1.2 Changing Flash PROM Jumpers
The Sun Ultra, Sun Enterprise, Ultra Enterprise, Sun Blade, Sun Fire, and Sun Netra systems are equipped with flash PROM jumpers. These flash PROM jumpers are usually located on the motherboard, though this varies from system to system. These jumpers enable you to:
- Select or deselect the flash PROM
- Enable or disable updating of the flash PROM
- Select the location of the flash PROM code for system booting
1.2.1 Changing Jumper or Keyswitch Settings
Before updating the flash PROM, use this procedure to change the write-protect/write-enable jumper or keyswitch setting.
1. Halt the system by typing init 0 at the superuser prompt.
2. Power off the system.

|
Caution - Use proper grounding procedures, such as wearing an antistatic wrist strap to avoid electrostatically damaging system components.
|
3. If necessary, remove the system cover from the Sun Enterprise 250, Ultra Enterprise 450, Sun Fire V240, Sun Netra 240, Sun Fire 280R, Sun Netra T4, Sun Fire V440, Sun Fire V480, Sun Fire V490, Sun Fire V880, or Sun Fire V890 system (see the following note).
|
Note - Sun Enterprise 250, Ultra Enterprise 450, Sun Fire V240, Sun Netra 240, Sun Fire 280R, Sun Netra T4, Sun Fire V440, Sun Fire V480, Sun Fire V490, Sun Fire V880, or Sun Fire V890 servers: The default position for the write-protect/write-enable jumper on the motherboard is write-enable. Therefore, unless you have reset the jumper to the write-protect position at an earlier time, it is not necessary to remove the system cover before updating the flash PROM. Instead, set the front panel keyswitch to Power-On () and continue with the procedure in Chapter 2.
|
|
Note - Sun Blade 1000 and Sun Fire V210: The default position for the write-protect/write-enable jumper on the motherboard is in the write-enable position. Therefore, unless you reset the jumper to the write-protect position at an earlier time, it is not necessary to remove the access panel before updating the flash PROM.
|
4. Locate the flash PROM jumpers on the motherboard or system board in your system.
Refer to the table below to find the appropriate diagram for your system.
5. Compare your system's existing jumper settings with the settings and functions described in "Invalid Cross-Reference Format".
6. If an installed plug-in card in your system covers the flash PROM jumpers, remove the card from the system before changing the desired jumpers.
Refer to your system's service or reference manual for instructions.
7. Use a pair of small needlenose pliers to move the jumper to the desired pins.
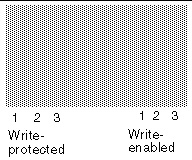
For systemss covered in this guide, you set the write-protect/write-enable jumper to write-enable by moving the jumper to pins 2 and 3 (see FIGURE 1-1).
FIGURE 1-1 Setting the Write-Protect/Write-Enable Jumper to the Write-Enable Position
|
Note - Sun Fire V210, Sun Fire V240, and Sun Netra 240 servers use a two pin jumper. When the jumper is fitted, it is in the write-protected position. When the jumper is not fitted, it is in the write-enabled position.
|
|
Note - When you are finished updating the flash PROM, return the flash PROM write-protect/write-enable jumper to the write-protect position to ensure system security. If your system is a Sun Enterprise 250, Ultra Enterprise 450, Sun Fire V240, Sun Netra 240, Sun Fire 280R, Sun Fire V440, Sun Fire V480, Sun Fire V490, Sun Fire V880, or Sun Fire V890, do not change the jumper; instead, return the front panel keyswitch to the Locked position ().
|
8. If you removed a plug-in card from the system before changing the jumper, replace the card now.
Refer to your system's service or reference manual for instructions.
9. Remove your wrist strap and if necessary, replace the system cover.
1.3 Flash PROM Jumper Locations and Settings
This section provides figures that illustrate the locations of flash PROM jumpers and a table that describes the settings for those jumpers on various Sun systems.
1.3.1 Flash PROM Jumper Locations
The following figures depict the locations of flash PROM jumpers on various Sun systems.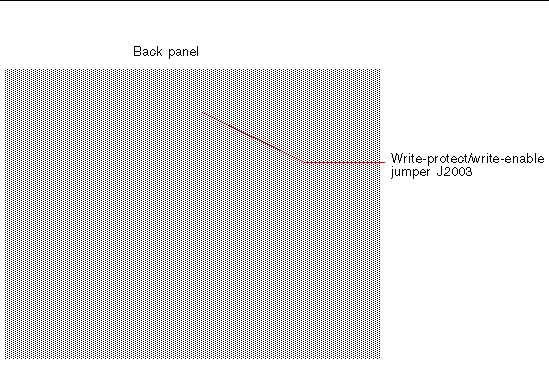
FIGURE 1-2 Sun Ultra 1/Ultra 1 Creator Flash PROM Jumper Location on Motherboard
FIGURE 1-3 Sun Ultra 2 Flash PROM Jumper Location on Motherboard

FIGURE 1-4 Sun Ultra 5/Ultra 10 Flash PROM Jumper Location on Motherboard
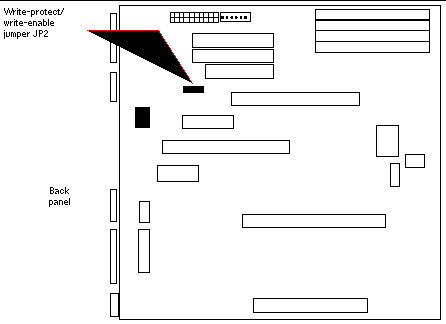
FIGURE 1-5 Sun Ultra 30 Flash PROM Jumper Location on Motherboard
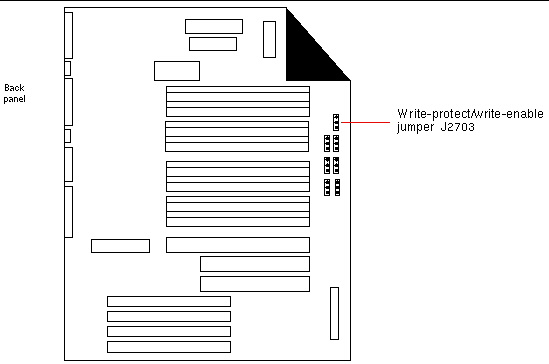
FIGURE 1-6 Sun Ultra 60/Sun Enterprise 220R Flash PROM Jumper Location on Motherboard
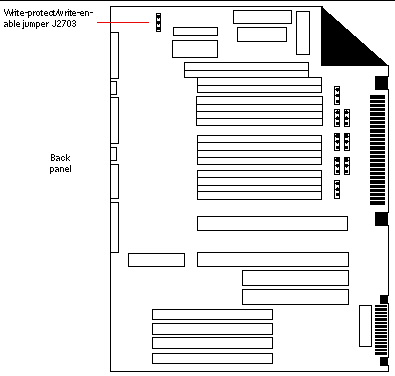
FIGURE 1-7 Sun Ultra 80/Sun Enterprise 420R Flash PROM Jumper Location on Motherboard
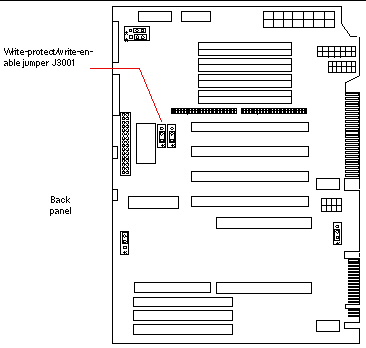
FIGURE 1-8 Sun Enterprise 250 Flash PROM Jumper Location on Motherboard
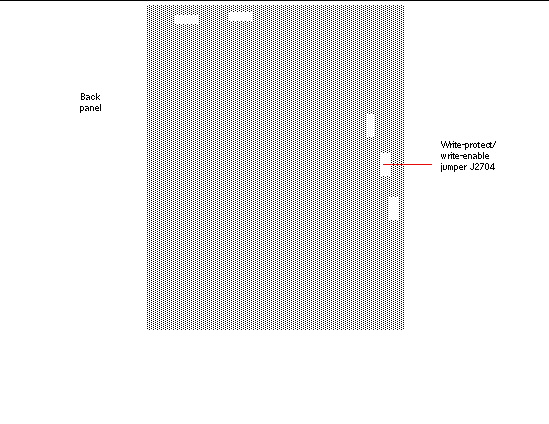
FIGURE 1-9 Ultra Enterprise 450 Flash PROM Jumper Location on Motherboard


FIGURE 1-10 Sun Blade 100 Flash PROM Jumper Location on Motherboard
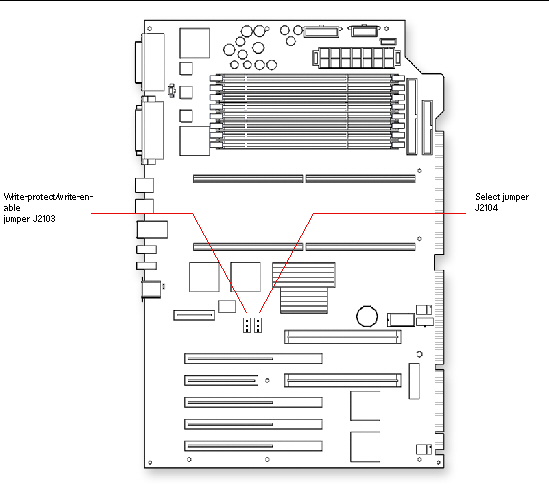
FIGURE 1-11 Sun Blade 1000/Sun Fire 280R/Sun Netra T4 Flash PROM Jumper Location on Motherboard
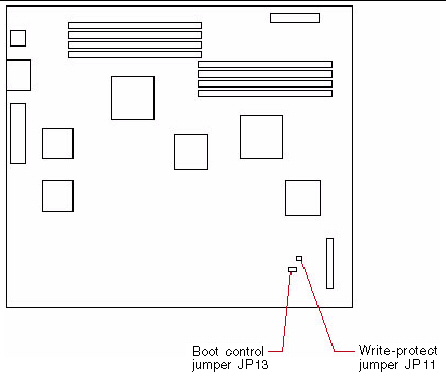
FIGURE 1-12 Sun Fire V210/V240/Sun Netra 240 Flash PROM Jumper Location on Motherboard

FIGURE 1-13 Sun Fire V440 Flash PROM Jumper Location on Motherboard
FIGURE 1-14 Sun Fire V480V490 Flash PROM Jumper Location on the PCI Riser Board

FIGURE 1-15 Sun Fire V880 and Sun Fire V890 Flash PROM Jumper Locations on the System I/O Board 1.3.2 Flash PROM Jumper Settings
TABLE 1-2 describes the flash PROM jumper settings for various Sun systems.
TABLE 1-2 Flash PROM Jumper Settings for Various Sun Systems
|
System(s)
|
Jumper
|
Name
|
Pins 1 + 2 Select
|
Pins 2 + 3 Select
|
Default Jumper
on Pins
|
|
Ultra 1, Ultra 1 Creator, and Ultra 2
|
J2003
|
Write-protect/
write-enable
|
Write-protect
|
Write-enable
|
1 + 2
|
|
J2204
|
Boot control
|
High-half booting
|
Normal booting
|
2 + 3
(see note below)
|
|
Do not change the position of jumper J2204 unless directed to do so by the instructions in Appendix . The position of jumper J2204 does not need to be changed unless the programming sequence is interrupted.
|
|
Ultra 5 and Ultra 10
|
JP2
|
Write-protect/
write-enable
|
Write-protect
|
Write-enable
|
1 + 2
|
|
Ultra 30 and Ultra 60/Enterprise 220R
|
J2703
|
Write-protect/
write-enable
|
Write-protect
|
Write-enable
|
1 + 2
|
|
J2804
|
Boot control
|
High-half booting
|
Normal booting
|
2 + 3
(see note below)
|
|
Do not change the position of jumper J2804 unless directed to do so by the instructions in Appendix . The position of jumper J2804 does not need to be changed unless the programming sequence is interrupted.
|
|
Ultra 80/Enterprise 420R
|
J3001
|
Write-protect/
write-enable
|
Write-protect
|
Write-enable
|
1 + 2
|
|
J3102
|
Boot control
|
High-half booting
|
Normal booting
|
2 + 3
(see note below)
|
|
Do not change the position of jumper J3102 unless directed to do so by the instructions in Appendix . The position of jumper J3102 does not need to be changed unless the programming sequence is interrupted.
|
|
Enterprise 250
|
J2704
|
Write-protect/
write-enable
|
Write-protect
|
Write-enable
|
2 + 3
(see note* below)
|
|
J2804
|
Boot control
|
High-half booting
|
Normal booting
|
2 + 3
(see note** below)
|
*Jumper J2704 is factory-set so that the flash PROM is write-enabled. You use the keyswitch located on the front panel to write-protect the flash PROM. When the switch is set to the Locked position ( ), the flash PROM is write-protected. When the switch is set to the Power-On position ( ), the flash PROM is write-protected. When the switch is set to the Power-On position ( ) or to the Diagnostics position ( ) or to the Diagnostics position ( ), the flash PROM is write-enabled. ), the flash PROM is write-enabled.
**Do not change the position of jumper J2804 unless directed to do so by the instructions in Appendix . The position of jumper J2804 does not need to be changed unless the programming sequence is interrupted.
|
|
Ultra Enterprise 450
|
J3103
|
Write-protect/
write-enable
|
Write-protect
|
Write-enable
|
2 + 3
(see note* below)
|
|
J5501
|
Boot control
|
High-half booting
|
Normal booting
|
2 + 3
(see note** below)
|
*Jumper J3103 is factory-set so that the flash PROM is write-enabled. You use the keyswitch located on the front panel to write-protect the flash PROM. When the switch is set to the Locked position ( ), the flash PROM is write-protected. When the switch is set to the Power-On position ( ), the flash PROM is write-protected. When the switch is set to the Power-On position ( ) or to the Diagnostics position ( ) or to the Diagnostics position ( ), the flash PROM is write-enabled. ), the flash PROM is write-enabled.
**Do not change the position of jumper J5501 unless directed to do so by the instructions in Appendix . The position of jumper J5501 does not need to be changed unless the programming sequence is interrupted.
|
|
Sun Blade 100
|
JP2
|
Write-protect/write-enable
|
Write-protect
|
Write-enable
|
1 + 2
|
|
Sun Fire V210/V240/Sun Netra 240
|
JP11
|
Write-protect/
write-enable
|
Write-protect
|
n/a
|
1 + 2
(see note* below)
|
|
JP13
|
Boot control
|
Normal booting
|
High-half booting
|
1 + 2
(see note** below)
|
*Jumper JP11 is factory-set so that the flash PROM is write-enabled. You use the keyswitch located on the front panel to write-protect the flash PROM. When the switch is set to the Locked position ( ), the flash PROM is write-protected. When the switch is set to the Power-On position ( ), the flash PROM is write-protected. When the switch is set to the Power-On position ( ) or to the Diagnostics position ( ) or to the Diagnostics position ( ), the flash PROM is write-enabled. ), the flash PROM is write-enabled.
**Do not change the position of jumper JP13 unless directed to do so by the instructions in Appendix . The position of jumper JP31 does not need to be changed unless the programming sequence is interrupted.
|
|
Sun Fire V440
|
J4205
|
Write-protect/
write-enable
|
Write-protect
|
Write-enable
|
2 + 3
(see note* below)
|
|
J4207
|
Boot control
|
High-half booting
|
Normal booting
|
2 + 3
(see note** below)
|
*Jumper J4205 is factory-set so that the flash PROM is write-enabled. You use the keyswitch located on the front panel to write-protect the flash PROM. When the switch is set to the Locked position ( ), the flash PROM is write-protected. When the switch is set to the Power-On position ( ), the flash PROM is write-protected. When the switch is set to the Power-On position ( ) or to the Diagnostics position ( ) or to the Diagnostics position ( ), the flash PROM is write-enabled. ), the flash PROM is write-enabled.
**Do not change the position of jumper J4207 unless directed to do so by the instructions in Appendix . The position of jumper J4207 does not need to be changed unless the programming sequence is interrupted.
|
|
Sun Fire V480/V490
|
J1104
|
Write-protect/
write-enable
|
Write-protect
|
Write-enable
|
2 + 3
(see note below)
|
Jumper J1104 is factory-set so that the flash PROM is write-enabled. You use the keyswitch located on the front panel to write-protect the flash PROM. When the switch is set to the Locked position ( ), the flash PROM is write-protected. When the switch is set to the Power-On position ( ), the flash PROM is write-protected. When the switch is set to the Power-On position ( ) or to the Diagnostics position ( ) or to the Diagnostics position ( ), the flash PROM is write-enabled. ), the flash PROM is write-enabled.
|
|
Sun Fire V880 and Sun Fire V890 - System I/O Board
|
J3003
|
Write-protect/
write-enable
|
Write-protect
|
Write-enable
|
2 + 3
(see note* below)
|
|
J3002
|
Boot control
|
High-half booting
|
Normal booting
|
2 + 3
(see note** below)
|
*Jumper J3003 is factory-set so that the flash PROM is write-enabled. You use the keyswitch located on the front panel to write-protect the flash PROM. When the switch is set to the Locked position ( ), the flash PROM is write-protected. When the switch is set to the Power-On position ( ), the flash PROM is write-protected. When the switch is set to the Power-On position ( ) or to the Diagnostics position ( ) or to the Diagnostics position ( ), the flash PROM is write-enabled. ), the flash PROM is write-enabled.
**Do not change the position of jumper J3002 unless directed to do so by the instructions in Appendix . The position of jumper J3002 does not need to be changed unless the programming sequence is interrupted.
|
|
Sun Blade 1000/Sun Fire 280R and Sun Netra T4
|
J2103
|
Write-protect
|
Write-enable
|
2 + 3
|
Flash PROM program enable
|
|
J2104
|
Select
|
No Select
|
2 + 3
|
X or Logic Set
|
| Sun Flash PROM Guide for Workstations and Workgroup Servers
|
802-3233-27
|
|
Copyright © 2004, Sun Microsystems, Inc. All Rights Reserved.