|
|
| Sun ONE Meta-Directory 5.1 Configuration and Administration Guide |
Chapter 20 Managing Servers and Permissions
In order to access Directory Server or an Oracle database through the Meta-Directory interface, it needs to be configured as part of Meta-Directory's navigation tree. As well, access permissions need to be set or modified. This chapter contains the following sections:
Configuring Data Servers
Meta-Directory has the ability to connect to a number of servers for a number of functions. These servers can be added as external data sources or to hold LDAP-configured connector views or meta views. Installing a Directory Server or an Oracle database as an addition to the Meta-Directory navigation tree is accomplished from the Data Servers panel. Typically, you would choose the server type and then configure it.
Accessing the Data Servers Window
- From the Meta-Directory console, choose the Configuration tab.
- Select Meta-Directory in the navigation tree.
- Click the Data Servers tab.
The Data Servers window appears.

To Add a New Data Server
- In the Data Servers window, click New.
The Data Server Type dialog box appears.
- Select the type of server (Directory Server or Oracle) you want to add and click OK.
The server appears in the list box and, by default, it is selected. Depending on the type of server being added, either four (Directory Server) or five (Oracle) additional tabs appear at the bottom of the panel. These tabs enable you to name and configure the new server.
Note If you choose Oracle in Step 2, go to "Configuring the Database Connector" to continue configuring your server. If you choose Netscape Directory Server in Step 2, continue with Step 3.
- On the General tab, provide values or change the defaults as needed for the following fields:
- Click Save.
The name of the new server appears under the Name column in the top window of the panel.
- Select the new server, and click Test to test the connection.
A Test Connect Succeeded message appears if the connection was successful. If the test was unsuccessful, make sure the connection information is correct.
- From the Tuning tab, provide values or change the defaults as needed for the following operational fields:
- Click the Data Change Notification System (DCNS) Schedule tab. This option allows you to schedule when the join engine will look for changes in the change log. Provide values or change the defaults for the following fields:
You can use either a single number as just described or an expression as follows:
- On the Binary Attribute window, check the binary list and, if necessary, make changes to specify which binaries you want the join engine to recognize. These are the changes you can make:
To create a new attribute, click New. A blank field appears at the bottom of the drop-down list. Type in the name of the attribute in this field.
To edit an attribute, select the attribute from the drop-down list and type over the name.
To delete an attribute, select the attribute from the drop-down list and click Delete.
- Click Save to save the configuration.
To Test a Data Server Connection
- In the Data Servers window, select the data server whose connection you want to test.
- Click Test.
If the connection was successful, a message confirming this appears. If the connection was unsuccessful, check your server's host information and re-test.
To Delete a Data Server
- In the Data Servers window, select the data server you want to delete.
- Click Delete.
The data server and its associated configuration disappear from the list box.
Setting Access Permissions
From Sun ONE Console, access permissions can be set for individual servers.
To Set Access Permissions
- From Sun ONE Console, select a Meta-Directory component or server, and right-click.
A context menu appears.
- Choose Set Access Permissions.
The Set Permission Dialog appears with a list of the names of users and groups who currently have access permissions for the selected object. By default, the Configuration Administrators group has unrestricted access to all servers (but not to user data), although its name does not appear on this list.
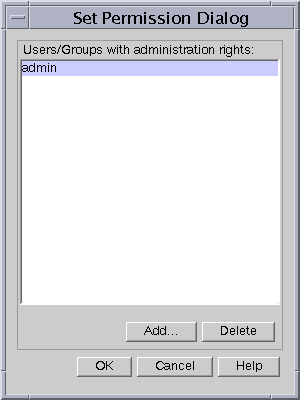
- Edit access permission as needed:
To allow access permission to additional users or groups, select the user or group name, then click Add User.
To deny access permission to a user or group in the list, select the user or group name, then click Delete User.
- When you have finished adding and deleting users, click OK.