| C H A P T E R 3 |
|
Installing and Connecting the SAS HBA |
This chapter describes how to install the Sun StorageTek PCI Express SAS 8-Channel HBA. The chapter contains the following sections:

|
Caution - Damage to the SAS HBA can occur as the result of careless handling or electrostatic discharge. Always handle the SAS HBA with care to avoid damage to electrostatic sensitive components. |
To minimize the possibility of electrostatic discharge-related damage, Sun strongly recommends using both a workstation antistatic mat and an antistatic wrist strap. You can get an antistatic wrist strap from an electronics store or from Sun as part number 250-1007. Observe the following precautions to avoid electrostatic discharge-related problems:

|
Caution - Refer to the service manual for your server or workstation for exact instructions on installing your HBA. Only generalized instructions for a typical server are provided here: |
|
1. Unpack the box containing the SAS HBA and inspect it for damage.
| Note - Leave the SAS HBA in the protective bag until you are ready to install it. |
2. Turn off the system’s power and physically remove the power cord(s) from the system.
3. Remove the cover from the system’s chassis.
4. Disconnect the system from any networks.
| Note - If you intend to boot from a disk in a volume managed by this HBA, make sure that the card is in PCIe slot 0. For X4150 and X4250, it should be in slot 1. |
Refer to the system’s hardware documentation for information about mounting details, such as mounting holes, standoff locking or unlocking, and screws to secure the card.
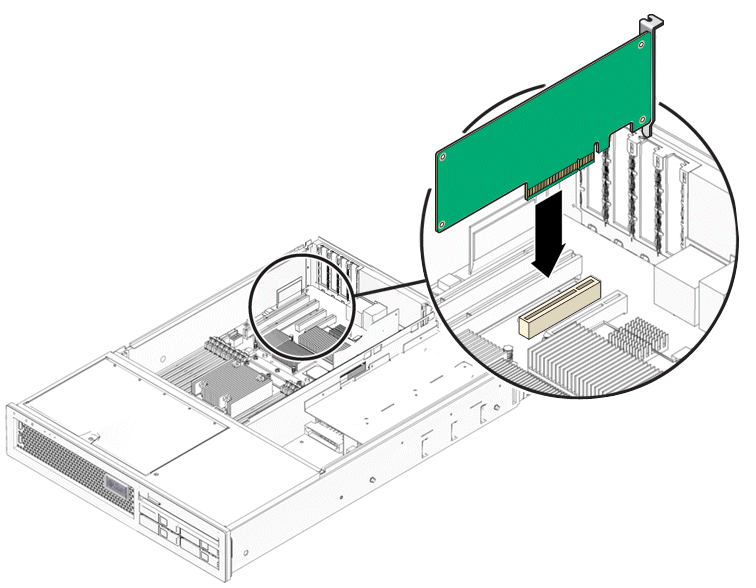
6. Align the SAS HBA to a PCIe slot and press down gently but firmly to seat the SAS HBA in the slot.
FIGURE 3-1 illustrates how to insert the SAS HBA in a PCIe slot in a typical server.
FIGURE 3-1 Installing the SAS HBA into a PCIe Slot

7. Install the bracket screw, when present, or engage the system’s retention mechanism to secure the SAS HBA to the system’s chassis.
8. Connect the mini-SAS cables between the SAS HBA and the internal disks.
9. Replace the system’s cover, and reconnect the power cords and any network cables.
The SAS HBA hardware installation is complete.
The SAS HBA contains two mini-SAS connectors. Each connector contains four PHYs enabling eight SAS lanes to connect to storage.
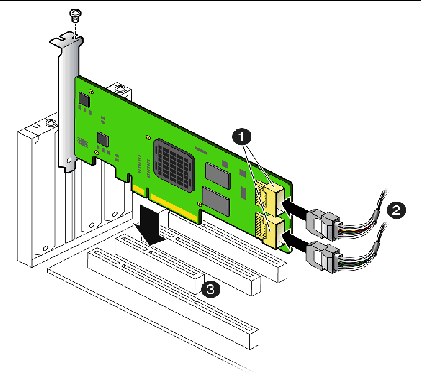
FIGURE 3-2 shows the location of the connectors on the SAS HBA.
FIGURE 3-2 Connecting the Mini-SAS Cable to the SAS HBA Connector

|
Mini-SAS x4 (SFF-8087) internal connectors with shell. The lower connector in FIGURE 3-2, the one closest to the gold fingers, is labeled “Port 0, 0-3.” The other connector in FIGURE 3-2 is labeled “Port 1, 4-7.” |
|

|
Caution - Refer to the service manual for your server or workstation for exact instructions on connecting your HDDs. Only generalized instructions for a typical server are provided here: |
Most eight-disk servers come with two Mini-SAS x4 cables already attached to the HDD backplane. The unattached ends of both cables are free to attach to the SAS HBA. In some cases, the two x4 cables are bundled together, with the individual ends free.
1. Orient the server so that it is right-side up and you are looking at its front, where the disk slots are.
2. Open the top cover of the server.
3. Take the free end of the cable that is attached to the disk backplane on the left-hand side (disks 0-3) and connect it to the Mini-SAS x4 connector labeled
“Port 0, 0-3” in FIGURE 3-2.
4. Take the free end of the cable that is attached to the disk backplane on the right-hand side (disks 4-7) and connect it to the Mini-SAS x4 connector labeled “Port 1, 4-7” in FIGURE 3-2.
| Note - When the SAS HBA is plugged into a PCI Express x8 slot, the Mini-SAS x4 cables cross over one another if they are connected correctly. |
Most sixteen-disk servers come with two Mini-SAS x4 cables bundled together. One is already attached to a SAS expander on the HDD backplane. The unattached end of that cable is free to attach to the SAS HBA.
A second cable is present, but it is tied down and should not be used for connecting to this LSI SAS HBA. It can be used for Intel Adaptec controllers, however.
To connect the free cable to the SAS HBA:
1. Orient the server so that it is right-side up and you are looking at its front, where the disk slots are.
2. Open the top cover of the server.
3. Take the free end of the cable that is attached to the disk backplane and is not tied down and connect it to either of the Mini-SAS x4 connectors shown in FIGURE 3-2.
All 16 disks are available for RAID volumes. As explained in Performance, there can be no more than 14 disks in RAID volumes. Therefore, at least two of the 16 disks will not be in volumes. The BIOS and OS will see them, however, whether or not they are in volumes.
| Note - To unplug a Mini-SAS x4 cable, squeeze the clip on the plug, then push the plug in before pulling it out. |
Copyright © 2009 Sun Microsystems, Inc. All rights reserved.