| Sun StorEdge 3000 Family Installation, Operation, and Service Manual |
| A P P E N D I X D |
|
Configuring a Solaris Server |
This appendix provides the following Solaris-specific information:
This section provides information on redefining the baud rate for the serial port connection, and using the tip command to access the array remotely. For more information about the baud rate and other communication settings, see Section 4.11.2, Configuring the RS-232 Serial Port Connection.
| Note - You can also monitor and configure a RAID array over an IP network using the firmware application or the Sun StorEdge Configuration Service program after you assign an IP address to the array. For details, see Section 4.12, Setting Up Out-of-Band Management Over Ethernet or refer to the Sun StorEdge 3000 Family Configuration Service User’s Guide. |
You can specify the baud rate of 38,400 when you type the tip command.
1. Connect the RAID array COM port to a serial port of a Solaris workstation (see FIGURE D-1).

FIGURE D-1 RAID Array COM Port Connected Locally to the COM Port of a Workstation or Computer Terminal
2. Use the tip command to access the array locally.
where n is the COM port identifier. For instance, if you have connected the array to the COM port identified as ttyb, use this command:
3. Refresh your screen by holding down the Control key on your keyboard (this is abbreviated Ctrl on some keyboards) and pressing the letter L key on your keyboard.
Edit the /kernel/drv/sd.conf file to add more targets and LUNs, up to 128 LUNs, which can be used in a single Sun StorEdge 3320 SCSI array. Then reboot the host.
You might want to allow a few extra LUNs for flexibility over the coming months, but generally most administrators minimize the number of unused LUNs because each LUN causes a seven-second delay when you reboot the host.
| Note - The maximum number of LUNs per target is 32. |

|
Caution - After you editsd.conf, you must reboot the host to enable the new LUN assignments. |
The following example file sets up targets 1 and 3 with a total of 41 LUNs (LUNs 0 through 31 on target 0, and LUNs 0 through 8 on target 3). Default LUNs are listed first, followed by new LUNs.
By default, a Solaris host is configured for one host LUN per SCSI target, which is not enough LUNs for a Sun StorEdge 3320 SCSI array. You must edit the appropriate onboard HBA driver configuration file to add more targets and LUNs, up to 32 LUNs per logical drive, and a maximum of 128 LUNs per Sun StorEdge 3320 SCSI array.
Driver configuration files include /kernel/drv/qus.conf and /kernel/drv/glm.conf. You can determine whether the qus or glm driver is loaded on your Solaris host via the modinfo command. For example:
# modinfo | grep -i scsi 17 11ae745 22a23 32 1 sd (SCSI Disk Driver 1.408) 18 11cf130 8b91 - 1 scsi (SCSI Bus Utility Routines) 22 11f52ea 100bb 50 1 glm (GLM SCSI HBA Driver 1.182.) |
In the preceding example, the glm driver is loaded on the host.
Edit the .conf file that is appropriate for your HBA.
|
|
Caution - Do not edit the/etc/systemfile to accomplish the same purpose. While this can have the desired effect, it can also cause interference with other storage devices attached to the same host. |
| Note - Refer to the driver.conf(4) man page for information and syntax to use. Refer to your HBA release notes and your HBA installation guide for specific configuration information. |
Once you have edited the configuration file, reboot the host for the changes to take effect.
1. Edit the /kernel/drv/qus.conf or /kernel/drv/glm.conf file (whichever is appropriate to your HBA) to add more targets and LUNs (up to 32 LUNs per logical drive, and a maximum of 128 LUNs per Sun StorEdge 3320 array).
| Note - If the file does not exist, create it using the format in the example below. Allow five blank spaces between “Sun” and “StorEdge” on the first line. |
In an environment where only Sun StorEdge 3320 SCSI devices are used, an example of text to add to /kernel/drv/qus.conf or /kernel/drv/glm.conf is:
device-type-scsi-options-list = “SUN StorEdge 3320”, “SE3320-scsi-options”; SE3320-scsi-options = hexadecimal address; |
In an environment where both Sun StorEdge 3310 and Sun StorEdge 3320 SCSI devices are used, an example of text to add to /kernel/drv/qus.conf or /kernel/drv/glm.conf is:
device-type-scsi-options-list = "SUN StorEdge 3310", "SE33x0-scsi-options", "SUN StorEdge 3320", "SE33x0-scsi-options"; SE33x0-scsi-options = hexadecimal address; |
For more information about multiple device types, refer to the scsi_get_device_type_scsi_options(9F) man page.
2. Reboot the host to implement the file changes.
The Solaris 8 OS requires a reconfiguration reboot to create device files and implement sd.conf changes but you do not need a reconfiguration reboot for the Solaris 9 or 10 OS.
For the Solaris 9 or 10 OS, use the following commands to create device files after you have edited sd.conf. No reboot is necessary with this command:
The new LUNs are displayed when you perform the format command.
3. To display the new LUNs, perform the following command:
For the Solaris OS to recognize a volume, it must be labeled with the format command. Whenever you create a volume, label it using the following procedure. For more information on the format command, see the format(1M) man page.
To label a volume, perform the following steps.
1. On the data host, type format at the root prompt.
2. Specify the disk number when prompted.
In this example, the array is shown as disk number 3. You can identify it by the SUN-StorEdge3320-412D label.
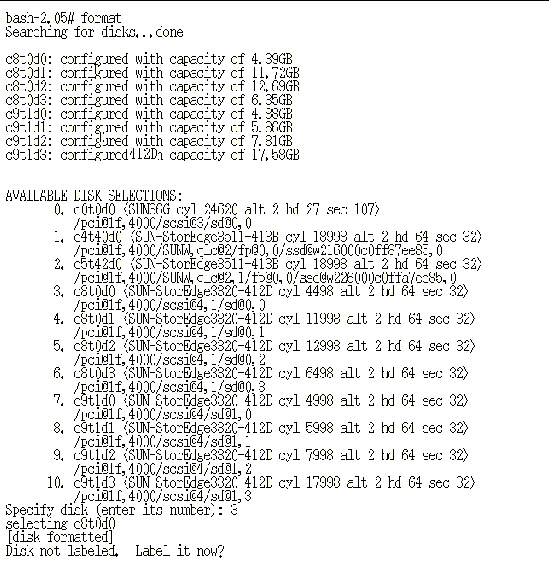
If the volume had not been labeled previously using the format command, the following confirmation prompt is displayed:
3. (Optional) If you see this confirmation prompt, type y and press Return to display the FORMAT MENU.
4. Type type to select a drive type:
5. Type 0 to choose the Auto configure option.
Select the Auto configure option regardless of which drive types are displayed by the type option.
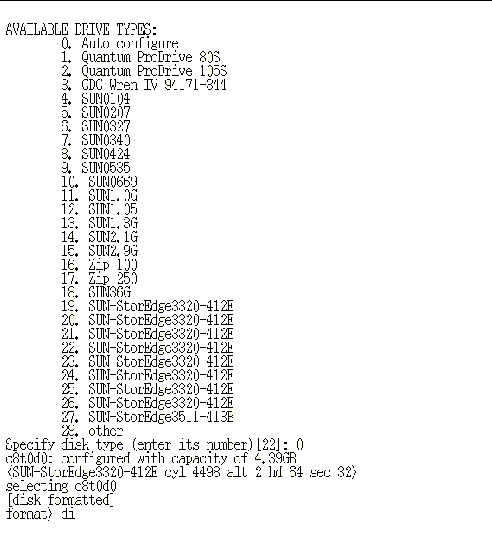
6. Type label and answer y when prompted to continue.
| Note - For further information on partitioning, see the Solaris format(1M) man page. |
If the JBOD cabling is correct and the drives are still not visible, run the devfsadm utility to rescan the drives. The new disks can be seen when you perform the format command.
If the drives are still not visible, reboot the host(s) with the reboot -- -r command so that the drives are visible to the host.
| Sun StorEdge 3000 Family Installation, Operation, and Service Manual | 819-1274-14 |
Copyright © 2009 Sun Microsystems, Inc. All rights reserved.