| Sun SPARC Enterprise M8000/M9000 Servers Product Notes for XCP 1081 |
|
Information About Hardware |
This section describes the special instructions and the issues about the SPARC Enterprise M8000/M9000 server hardware.
For servers that have the B-type plug, confirm that a 30A overcurrent protection device is available outside the server. If one is not available, prepare an external 30A overcurrent protection that can be achieved by means of no-fuse breakers (NFBs) or fuses. The B-type plug refers to plugs other than grounding-type ones with two parallel blades, such as the NEMA L6-30, L6-20, L6-15, and L5-15.
The Solaris cfgadm(1M) command does not always unconfigure a DVD drive from a domain on SPARC Enterprise M8000/M9000 servers.
Disable the Volume Management Daemon (vold) before unconfiguring a DVD drive with the cfgadm(1M) command. To disable vold, stop the daemon by issuing the command /etc/init.d/volmgt stop. After the device has been removed or inserted, restart the daemon by issuing the command /etc/init.d/volmgt start.
If you are not using the correct version of the Sun Crypto Accelerator (SCA) 6000 card driver, hot-plug operations on SCA 6000 cards can cause SPARC Enterprise M8000/M9000 servers to panic or hang. Version 1.1 of the SCA6000 driver and firmware supports hot-plug operations after the required bootstrap firmware upgrade has been performed. Version 1.0 of the SCA6000 driver does not support hot-plug and should not be used.
This section contains late-breaking hardware information and corrections that became known after the documentation set was published.
TABLE 3 lists known documentation updates.
The following information supersedes the information in the SPARC Enterprise M8000/M9000 Servers Site Planning Guide.
The table here corrects TABLE 3-1, "Ambient Environmental Requirements," in Section 3.1.1, "Ambient Environmental Requirements".
|
humidity[1] |
|||
|
restriction[2] |
|||
|
5 to 32 (41 to 89.6) at an installation altitude ranging from 0 to less than 1500 m (4921 feet) above sea level 5 to 30 (41 to 86) at an installation altitude ranging from 1500 m (4921 feet) to less than 2000 m (6562 feet) above sea level 5 to 28 (41 to 82.4) at an installation altitude ranging from 2000 m (6562 feet) to less than 2500 m (8202 feet) above sea level 5 to 26 (41 to 78.8) at an installation altitude ranging from 2500 m (8202 feet) to 3000 m (9843 feet) above sea level |
The following information supersedes the information in the SPARC Enterprise M8000/M9000 Servers Overview Guide.
The table here corrects TABLE 1-4, "Ambient Environmental Requirements," in Section 1.2.3, "Ambient Environmental Requirements".
|
humidity[3] |
|||
|
restriction[4] |
|||
|
5 to 32 (41 to 89.6) at an installation altitude ranging from 0 to less than 1500 m (4921 feet) above sea level 5 to 30 (41 to 86) at an installation altitude ranging from 1500 m (4921 feet) to less than 2000 m (6562 feet) above sea level 5 to 28 (41 to 82.4) at an installation altitude ranging from 2000 m (6562 feet) to less than 2500 m (8202 feet) above sea level 5 to 26 (41 to 78.8) at an installation altitude ranging from 2500 m (8202 feet) to 3000 m (9843 feet) above sea level |
The following information supersedes the information in the SPARC Enterprise M8000/M9000 Servers Service Manual.
The table here corrects TABLE 1-1, “Maintenance Tools,” in Section 1.4, “Required Maintenance Tools”, page 1-10.
The description here corrects "From the Maintenance Terminal" in Section 1.4.4, "Powering the Server Off".
1. Notify users that the server is going down.
2. Back up the system files and data as necessary.
3. Log into the XSCF Shell and type the poweroff command
The following activities occur when the poweroff command is used:
For details of the command, see the XSCF Reference Manual for your server.
4. Switch off all main line switches of the AC section.

|
Caution - There is an electrical hazard if the power cords are not disconnected. All power cords must be disconnected to completely remove power from the server. |
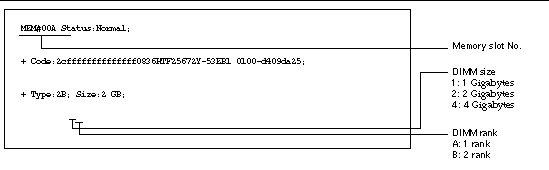
The figure here corrects FIGURE 6-20, “Explanation of DIMM Information,” on page 6-31 in Section 6.4.2.1, “Confirmation of DIMM Information.” The corrected figure is as follows.
FIGURE 6-20 shows an example of how to read the DIMM information displayed in the Type field.
FIGURE 6-20 Example of DIMM Information
The description here corrects step 9 on page 13-10 in Section 13.2, “Active Replacement,” of Chapter 13, “PCI Slot Device Replacement.”
9. Mount the replacement PCI card on the PCI cassette. (Perform this work on the conductive mat.)
FIGURE 13-6 shows card positioning post and card positioning tab.
FIGURE 13-6 Card positioning post and card positioning tab
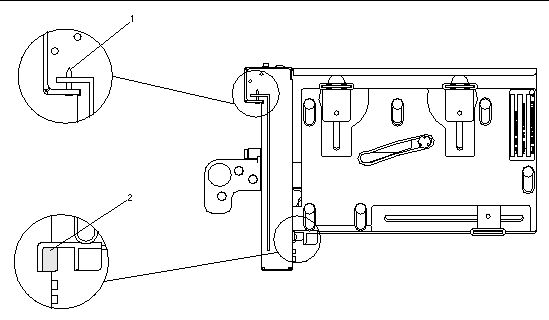
The post (item 1 in FIGURE 13-6) is seated in the notch of the bracket of the PCI card. If the post is not properly seated in the notch, the mounting bracket of the card may be bent and the card may end up being affixed in an inclined position on the PCI cassette. If a card is affixed in an inclined position, it will not be in proper electric contact with the socket on the IOU.
The tab (item 2 in FIGURE 13-6) fits in the notch on the lower part of the PCI card. This tab is helpful in positioning the card when it is mounted on the PCI cassette (however, some types of cards do not have the notch).
| Note - When the PCI cassette is removed from the IOU, the tab raises the front of the card from the card connector. |
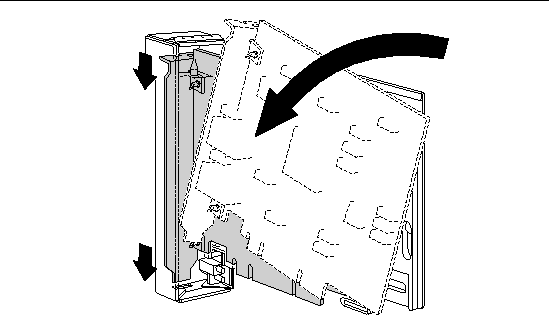
a. Move the PCI card in the direction of the arrow, and mount it on the PCI cassette by inserting the part projecting out at the bottom of the bracket of the PCI card into the hole at the bottom of the front panel of the PCI cassette and inserting the pin of the PCI cassette into the oval hole at the top of the bracket of the PCI card.
FIGURE 13-7 Mounting the PCI Card
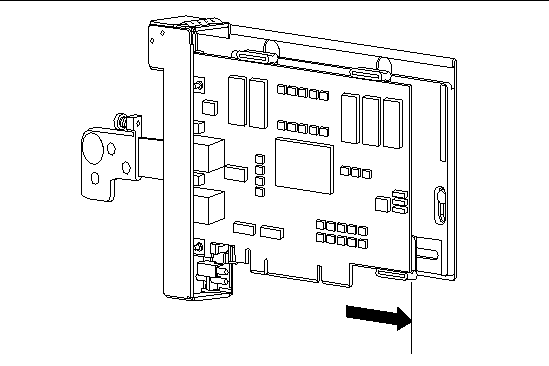
b. Push the PCI card until the notched part on the base plate of the PCI card touches the card-positioning tab from the PCI cassette.
| Note - When fixing the PCI card in position after aligning it with the card positioning tab, do so while pulling the lever about 2 cm from the frame. |
c. Align the PCI card with the center part of the lower latch of the cassette. Then, while pressing the PCI card against the center part of each of the upper latches of the cassette, tighten the fixing screws in the sequence shown in FIGURE 13- 8 to fix the card in position.
FIGURE 13-8 Sequence of Fixing the PCI Card in Position

|
|
Caution - If the card is short, move the screw at the bottom of the cassette as required. In such cases, place the latches as close as possible to the far end of the card. |
FIGURE 13-9 Latch Positions at the Bottom of the Cassette
| Sun SPARC Enterprise M8000/M9000 Servers Product Notes for XCP 1081 | 820-7236-11 |
Copyright © 2009 Sun Microsystems, Inc. All rights reserved.