Sun™ ONE Integration Server, B2B Edition (ECXpert and TradingXpert)
Release Notes
Version 3.6.3
Part Number 817-5778-10
February 2004
These Release Notes contain important information available at the time of release of Version 3.6.3 of Sun™ Open Net Environment (Sun ONE), Integration Server B2B Edition (ECXpert and TradingXpert). New features and enhancements, known issues and limitations, and other information are addressed here. Read this document before you begin using ECXpert and TradingXpert 3.6.3.
The most up-to-date version of these release notes can be found at the Sun ONE documentation web site: http://docs.sun.com/coll/S1_IntegrationServer_B2B_363. Check the web site prior to installing and setting up your software and then periodically thereafter to view the most up-to-date release notes and manuals.
These release notes contain the following sections:
Third-party URLs are referenced in this document and provide additional, related information.
Release Notes Revision History
| Date |
Description of Changes |
|---|---|
| February 13, 2004 |
Initial release of these release notes |
ECXpert and TradingXpert 3.6.3 CD-ROM Set
The ECXpert and TradingXpert 3.6.3 product can be downloaded from the web or from a CD set whose contents are described in .
| CD Title |
Contents—Top Level |
Description and Notes |
|---|---|---|
| Sun ONE Integration Server B2B Edition (Solaris™) |
ECXpert 3.6.3 TradingXpert 3.6.3 PartnerAgent-Client Message Queue 3.5 Directory Server 5.2 Web Server 6.1 |
This CD contains the basic files needed for installing ECXpert and TradingXpert 3.6.3 on the Solaris platform. |
| Sun ONE Integration Server B2B Edition (Windows) |
ECXpert 3.6.3 TradingXpert 3.6.3 Message Queue 3.5 Directory Server 5.2 Web Server 6.1 |
This CD contains the basic files needed for installing ECXpert and TradingXpert 3.6.3 on the Windows platform. |
| Mercator Design Studio 6.7.1 |
Windows only |
The server side of Mercator is installed as part of the installation process on Solaris and Windows. This CD contains the design tool to develop Mercator maps. |
| Sun ONE Messaging Server 5.2 SP1 |
Solaris version Windows version |
Used with TradingXpert and the new WebMail solution. |
| Sun ONE Application Server 7.0 |
Solaris version Windows version |
Used with TradingXpert and the new WebMail solution. |
| Sun ONE Integration Server Secure Trading Agent 1.0.1 |
Solaris version Windows version |
If you are using Secure Trading Agent 1.0 with ECXpert and TradingXpert 3.6.2, you must uninstall Secure Trading Agent 1.0 and upgrade to Secure Trading Agent 1.0.1. See Compatibility Issues for more information. |
Installing from CD-ROM
This section is not a substitute for the ECXpert Installation Guide. Please refer to that guide for complete installation instructions. The information in this section is given to help you locate the executable file for the installer.
If you are installing ECXpert and TradingXpert over a previous version, make sure that you follow the recommended procedure for deleting older versions and backing up data files, described in Upgrading to Integration Server, B2B Edition, 3.6.3 of these Release Notes.
Note that if you are upgrading from a version earlier than 3.6.2, you must successively upgrade through intermediate versions, rather than upgrading directly to the latest version. For example, if you are upgrading from ECXpert 3.6.1, you must first upgrade to 3.6.2, and then you must upgrade to 3.6.3.
About ECXpert and TradingXpert, Version 3.6.3
This section includes:
What’s New in This Release
New features in ECXpert and TradingXpert 3.6.3 include:
Support for Creating Custom Java Communications Agents
This release of ECXpert includes support for creating custom Java Communications Agents. Using a new Java framework, you can implement your own Communications Agents based on the provided Java Framework for sending and receiving documents with ECXpert.
This release includes example plug-in Java SMTP Send and Receive agents. Use these agents to create your own custom Java Communications Agents. These example agents are not to be used in production, but have been created to illustrate the functionality of the feature.
A new document, ECXpert Support for Custom Java Communications Agents, describes how to define and implement your own custom Java communications agents.
Common Installation Program for ECXpert and TradingXpert
This release of ECXpert 3.6.3 includes a common installation program that installs ECXpert and TradingXpert at the same time. The installation of AS2 Communications Agents is also integrated into the common installer. The ECXpert Installation Guide provides instructions for installing ECXpert and TradingXpert using the new installation program.
If you are upgrading from a previous version of Integration Server, see Upgrading to Integration Server, B2B Edition, 3.6.3 in these Release Notes before installing ECXpert and TradingXpert 3.6.3.
ECXpert Support for WebMail
WebMail is a document exchange solution that incorporates the portal functionality of Sun ONE Application Server and Sun ONE Messaging Server to allow greater scalability than TradingXpert when processing documents. WebMail uses the ECXpert WebMail Communications Agent to process and submit documents.
Unlike TradingXpert, which uses ECXpert’s document store to retrieve processed and unprocessed documents, WebMail uses Messaging Server to view document headers, and retrieve processed and unprocessed documents.
WebMail users can configure the number of document headers to view at any given time. User’s can also order and navigate to different sets of document headers using the folder view provided by Messaging Server. This model ensures that the Messaging Server load for a particular user is constant and is not a function of his mail inbox size.
A new document ECXpert Support for WebMail, describes how to set up and use the WebMail feature.
Changes to AS2 Support
The AS2 feature, formerly delivered as a plug-in that was installed separately, has been integrated into the ECXpert installation program. ECXpert supports the AS2 protocol as Send and Receive Communications Agents, similar to ECXpert Communications Agents for other protocols.
The following changes have been made to AS2 on ECXpert.
- You must create an HTTP/AS2 web server listener instance before you install ECXpert. This step is covered in the “Pre-Installation Tasks” chapter of the ECXpert Installation Guide.
- The as2server start | stop command no longer exists. Use the ECXpert Administration interface to start and stop the AS2 Communications Agents instead.
- The configuration for AS2 has changed. The inbound and outbound servers now have their own configuration settings in the ecx.ini file, and some settings no longer exist.
- Some Partnership Protocol information has changed in the ECXpert Support interface.
- ECXpert’s Member Address interface has been updated to include a built-in AS2 qualifier setting.
The updated ECXpert Support for AS2 Messaging document reflects the changes in this release.
Support for pkcs12 Certificates
This release of ECXpert 3.6.3 supports import and export of pkcs12 certificates using the ECXpert Support interface. You can also import pkcs7 and pkcs 12 format certificates using the importCertificates command line utility.
After installing ECXpert, you must configure the ecximport.properties file to support the pkcs12 certificate format
To configure ECXpert for pkcs12 certificates:
- Open the $BDGHOME/NS-apps/ECXpert/Certificates/ecximport.properties file in a text editor.
- Locate the [ORACLESERVERNAME] placeholder.
- Replace the placeholder with the name of the machine where your Oracle server is running.
$BDGHOME is the ECXpert installation directory.
For example, if your machine was lucky, you would replace [ORACLESERVERNAME] with lucky
This Oracle URL is used by the Java code to communicate with the database when importing/exporting pkcs12 certificates.
New Certificate Options in the ECXpert Import Certificates Dialog
The ECXpert Support interface provides new options to support import of pkcs12 certificates. Figure 1 shows the Import Certificates dialog.
Figure 1 ECXpert Support interface Import Certificates dialog
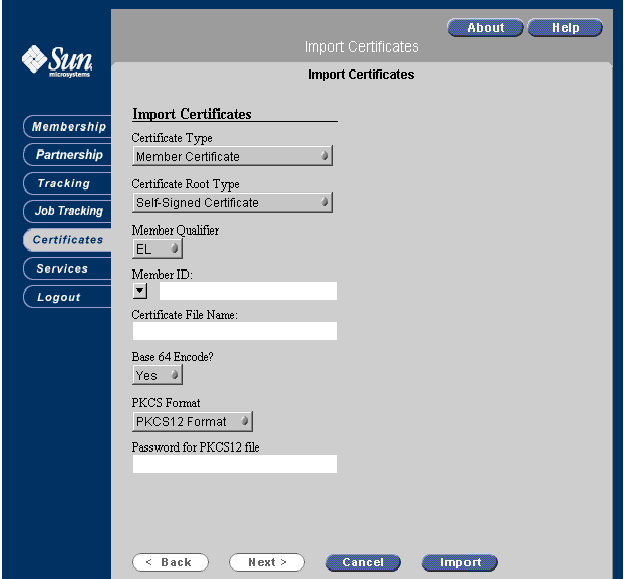
Table 3 describes the options that have been added to the Import Certificates dialog to support import of PKCS12 certificates. For information on the other options available from the Import Certificates dialog, refer to the chapter “Working With Certificates,” in the ECXpert Administrator’s Guide.
New Options in the ECXpert Export Certificates Dialog
The ECXpert Support interface provides new options to support export of pkcs12 certificates. Figure 2 shows the Export Certificates dialog.
Figure 2 ECXpert Support interface Export Certificates dialog
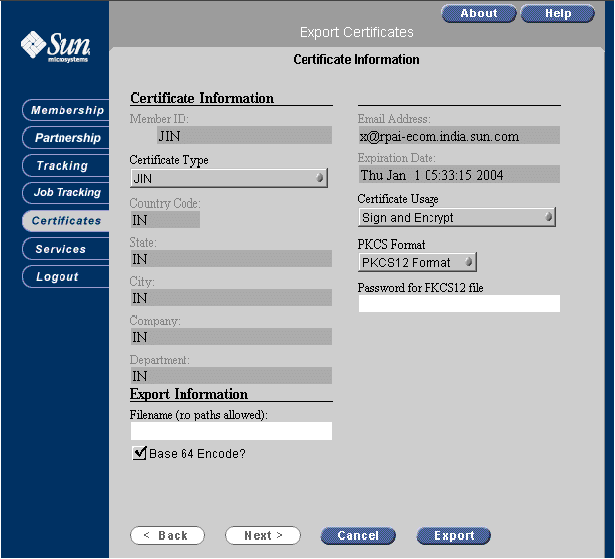
Table 4 describes the options that have been added to the Export Certificates dialog to support export of PKCS12 certificates. For information on the other options available from the Export Certificates dialog, refer to the chapter “Working With Certificates,” in the ECXpert Administrator’s Guide.
New Parameters for importCertificate Command Line Utility
The importCertificate command line utility can take two more arguments. These arguments provide support for importing pkcs12 certificates. Table 5 describes these arguments.
For information on using the importCertificate command line utility, refer to the chapter “Working with Certificates,” in the ECXpert Administrator’s Guide.
Updated ECXpert Password Utility
ECXpert provides the bdgsetpassword utility to encrypt passwords specified in the ECXpert ecx.ini file. This utility is necessary to configure passwords such as the mail_userpwd parameter in the commjava-receive section.
The bdgsetpassword utility is at the following location:
ECX_HOME/NS-apps/ECXpert/bin
ECX_HOME is the directory in which you installed ECXpert.
Usage
When you run the bdgsetpasswd utility, you must specify which password you are generating, as indicated below:
bdgsetpasswd -i path/ecx.ini -s <section_name> -param <parameter_name> -v <value>
path: ECX_HOME/NS-apps/ECXpert/config
where value is the password you want to encrypt in the configuration file.
The utility automatically updates the ecx.ini file. After running this utility, you must restart the associated agent for the changes to take effect.
New Error Logging in ECXpert
The debug_flag entry in the ecx.ini file now has more possible settings than yes and no. Depending upon the section, the no value has a new meaning. The total possible values that can be assigned to debug_flag in the Dispatcher, SMTP Send and SMTP Receive sections in the ecx.ini file are listed in Table 6.
With these new options, there are no 'silent' errors missed when debug is not turned on, and the user/admin can control the level of information provided in the log through the ecx.ini file setting on a server-by-server basis.
New restricted_login=yes | no Parameter for FTP Server
A new parameter, restricted_login=yes |no is available for the server section in the ecxftp-server.ini file.
When set to yes, the ECXpert FTP server does not allow more than one login session from the same user/machine combination.
When set to no, the ECXpert FTP server allows any number of login sessions from the same user/machine combination.
New redirect_stdout and redirect_stderr Flags in ECXpert Configuration File
Two new flags have been added to the ecx.ini configuration file. These parameters are helpful when a particular ECXpert component is having problems and the Event Log and Debug Trace do not give enough information to determine the cause. Turning the flags on gives additional information for debugging. lists the new parameters.
Changes to the TradingXpert Configuration File (FXproperties > TXproperties)
With this release of TradingXpert, the TradingXpert FXproperties configuration file name has changed. The new name of the new TradingXpert configuration file is TXproperties. This file also contains new entries to support the TradingXpert WebMail feature. All entries in the file that formerly began with FX have been changed to refer to a new TX namespace. Be aware of these changes when referencing TradingXpert documentation on the FXproperties configuration file.
A migrateconfig utility is available to help existing TradingXpert customers migrate their configuration values which used the old FX namespace to the new TX namespace. For more information, see Upgrading to TradingXpert 3.6.3.
ECXpert Documentation Updates
The ECXpert 3.6.3 product includes the following updated documents:
Both documents are available in both Acrobat (.pdf) and HTML formats. In addition, you can obtain an ASCII formatted version by contacting your technical support representative.
The following documents are new to this release of ECXpert 3.6.3:
All new documents are available in both Acrobat (.pdf) and HTML formats. In addition, you can obtain an ASCII formatted version by contacting your technical support representative.
The following documents have not been updated for this release.
These documents are available in Acrobat (.pdf) format. In addition, you can obtain an ASCII formatted version by contacting your technical support representative.
All of the documents listed above can be found at the Sun ONE documentation web site:
http://docs.sun.com/coll/S1_IntegrationServer_B2B_363
Bugs Fixed in This Release
The table below describes the bugs fixed in ECXpert and TradingXpert 3.6.3:
Important Information
This section contains the latest information that is not contained in the core product documentation. This section covers the following topics:
Upgrading to Integration Server, B2B Edition, 3.6.3
Follow the instructions in the ECXpert 3.6.3 Install Guide for upgrading/migrating from Integration Server B2B Edition, 3.6.2 to version 3.6.3. The ECXpert 3.6.3 installation program has been enhanced to include installation of TradingXpert 3.6.3 for Application Server 7.0. If you are not sure if you should upgrade to Application Server 7.0, see Upgrading to TradingXpert 3.6.3.
Upgrading to ECXpert 3.6.3
The following upgrade scenarios are allowed with ECXpert 3.6.3:
Integration Server B2B 3.6.3 does not allow migration or upgrade from any release earlier than 3.6.2. If you are running a release earlier than 3.6.2, you must first incrementally migrate to 3.6.2 to migrate to 3.6.3. For information on upgrading to 3.6.2, refer to the ECXpert 3.6.2 Install Guide.
Before you upgrade to ECXpert 3.6.3, refer to the chapter "Pre-Installation Tasks" in the ECXpert 3.6.3 Install Guide. This chapter will prepare you for installing ECXpert 3.6.3.
To upgrade, refer to the chapter "Upgrading to ECXpert 3.6.3" in the ECXpert 3.6.3 Install Guide.
Keep Oracle 8.1.7, with no upgrade of database:
- Shut down ECXpert services.
- Shut down Sun ONE Web Server.
- Back up your Oracle database.
- Back up your LDAP data.
- Back up ECXpert files.
- Upgrade/Install all required software:
- Sun ONE Web Server 6.1
- Sun ONE Messaging Server 5.2
- Sun ONE Integration Server, Secure Trading Agent 1.0.1
- Sun ONE Application Server 7
- Install ECXpert 3.6.3, skipping Drop Existing Database Tables screen.
- Follow all post-installation tasks in the ECXpert Install Guide and Release Notes.
- Run the required ECXpert 3.6.3 Oracle sql migration scripts against the Oracle 8.1.7 database.
- Confirm that the new ECXpert installation is successful in a production environment.
- Remove saved ECXpert files.
Create a separate HTTP listener web server instance for the AS2 or AIAG protocols.
For more information, refer to “Pre-Installation Tasks”, in the ECXpert Install Guide, and the documentation for each product.
These scripts are located in the following directory:
ECX_HOME/NS-apps/ECXpert/dbadmin/oracle/migration/36.2_to_36.3
ECX_HOME is the root directory where ECXpert is installed.
Migrate Oracle 8.1.7 to Oracle 9i
- Shut Down ECXpert services
- Shut down Sun ONE Web Server.
- Back up your database
- Back up your LDAP data
- Back up ECXpert files
- Upgrade/Install all required software:
- Sun ONE Web Server 6.1
- Sun ONE Messaging Server 5.2
- Sun ONE Integration Server, Secure Trading Agent 1.0.1
- Sun ONE Application Server 7
- Create same User/Password in new Oracle 9i database.
- Run the Oracle Migration Utility on your Oracle 8.1.7 database to upgrade it to Oracle 9i.
- Install ECXpert 3.6.3, using the new Oracle 9i database.
- Follow all post-installation tasks in the ECXpert Install Guide and Release Notes.
- Run the required ECXpert 3.6.3 Oracle sql migration scripts against the Oracle 9i database.
- Confirm that the new ECXpert installation is successful in a production environment.
- Remove saved ECXpert files
Create a separate HTTP listener web server instance for the AS2 or AIAG protocols.
For more information, refer to “Pre-Installation Tasks”, in the ECXpert Install Guide.
Make sure to skip Drop Existing Database Tables screen.
These scripts are located in the following directory:
ECX_HOME/NS-apps/ECXpert/dbadmin/oracle/migration/36.2_to_36.3
ECX_HOME is the root directory where ECXpert is installed.
Upgrading to TradingXpert 3.6.3
There are two versions of TradingXpert 3.6.3 bundled with Integration Server B2B Editon, 3.6.3.
Upgrading to TradingXpert 3.6.3 for use with Application Server 7
This version of the TradingXpert product is part of the unified installer located on the Integration Server, B2B Edition 3.6.3 CD. You must update your TradingXpert HTML templates if you want to use this version of TradingXpert. For more information, see Migrating From a TradingXpert Application Server 6.5 Environment to Application Server 7.0.
To upgrade TradingXpert 3.6.2 for use with Application Server 7.0
- Shut down all ECXpert services.
- Back up the following files from your TradingXpert 3.6.2 installation
- If you are upgrading from TradingXpert 3.6.2 on an Application Server 6.5 environment to an Application Server 7.0 environment, update on your TradingXpert forms and templates as described in Migrating From a TradingXpert Application Server 6.5 Environment to Application Server 7.0.
- Install TradingXpert 3.6.3 using the unified installer on the Integration Server B2B 3.6.3 installation CD.
- Place customized forms and templates, the properties file, and the users directory into their respective locations in the TradingXpert or ECXpert directory structure.
- Migrate the old TradingXpert FXproperties configuration file to the newer format TXproperties configuration file using the migrateconfig utility. This utility is located in the <TX_HOME>/bin directory.
- Open and update the TXproperties file to reflect the new TradingXpert home and ECXpert home if they have been changed.
- Ensure TradingXpert 3.6.3 works in a production environment.
If you are upgrading from TradingXpert 3.6.2 on an Application Server 7.0 environment to TradingXpert 3.6.3 on an Application Server 7.0, you do not need to update your TradingXpert forms and templates.
The format and naming conventions used in the FXproperties file have changed since the 3.6.2 release. This migration utility converts the old format to the newer TXproperties format.
The migrateconfig utility expects a single command line argument; the location of the directory containing the Fxproperties file.
Upgrading to TradingXpert 3.6.3 for use with Application Server 6.5
If you have specialized HTML templates that prohibit you from upgrading your TradingXpert application to Application Server 7, you must install TradingXpert 3.6.3 for Application Server 6.5 separately.
Before upgrading to TradingXpert 3.6.3 for Application Server 6.5, you must upgrade Sun ONE Application Server 6.5 to the latest version.
Location of Application Server 6.5 SP1 and Maintenance Update 4 (MU4) Bits
The Application Server 6.5 SP1 dowload bits are located here: http://wwws.sun.com/software/download/products/3e3afb89.html
After downloading the Application Server 6.5 SP1 bits and installing them, download and install the lateset Maintenance Update for Application Server 6.5 SP1 (MU4)
http://wwws.sun.com/software/download/products/3ffc8fad.html
Location of TradingXpert 3.6.3 for Application Server 6.5 installer
The TradingXpert 3.6.3 for Application Server 6.5 installer is located in the following path on the Integration Server, B2B Edition 3.6.3 CD
Use the instructions for installing TradingXpert on Application Server 6.5 in the TradingXpert 3.6.2 Install Guide, available in the following location:
http://docs.sun.com/db/doc/816-6721-10.
To upgrade TradingXpert 3.6.2 for use with Application Server 6.5
- Shut down all ECXpert services.
- Back up the following files from your TradingXpert 3.6.2 installation
- Install TradingXpert 3.6.3 using the installer in the following location.
- Solaris:
IS-B2B3.6.3/install-bits/TXbits_for_appserver65/ - Windows:
IS-B2B3.6.3\install-bits\dist\TX65\ - Place customized forms and templates, the properties file, and the users directory into their respective locations in the TradingXpert or ECXpert directory structure.
- Migrate the old FXproperties to the newer format TXproperties file using the migrateconfig utility. This utility is located in the <TX_HOME>/bin directory.
- Open and update the TXproperties file to reflect the new TradingXpert home and ECXpert home if they have been changed.
- Ensure TradingXpert 3.6.3 works in a production environment.
Use the instructions for installing TradingXpert on Application Server 6.5 in the TradingXpert 3.6.2 Install Guide, available in the following location:
http://docs.sun.com/db/doc/816-6721-10.
The format and naming conventions used in the FXproperties file have changed since the 3.6.2 release. This migration utility converts the old format to the newer TXproperties format.
The migrateconfig utility expects a single command line argument; the location of the directory containing the Fxproperties file.
Migrating From a TradingXpert Application Server 6.5 Environment to Application Server 7.0
If you are running TradingXpert in an Application Server 6.5 environment and want to migrate to an Application Server 7.0 environment, you will have to modify any customized HTML templates in your TradingXpert system. The modifications replace the GX tags used in the Application Server 6.5 environment with the XSL instruction set required for the Application Server 7.0 environment.
In addition, the template file markup must consist of well-formed HTML. Normally, this requires you to clean up badly-formed HTML markup to ensure it complies with the well-formed standards of the XSL instruction set.
The following paragraphs provide guidelines for:
Cleaning up HTML
You must clean up badly-formed HTML by doing the following:
- Close all elements. This is commonly an issue for the following tags:
- Quote attribute names and eliminate white space between declarations.
- Define entity declaration references appropriately
- Make sure closing element tags match opening element tags in case and name.
For example:
Replace <input type=text name = var1/>
with <input type="text" name="var1"/>
For example
Replace
with  
For example:
Replace <b> some text </B>
with <b> some text </b>
Replacing GX tags with XSL
After you clean up your templates to conform to well-formed HTML, you must convert GS tags to an XSL instruction set in all your customized HTML templates.
To migrate GX-tagged templates to XSL
- Add the following lines to the top of the template file.
- Add the following to the bottom of the template file.
- Map atomic variables to XSL.
- Map atomic variables within attributes. (The general XSL format is:{variable_name}).
- Map stand-alone atomic variables.
- Map conditional variables to XSL.
- declare a local variable to hold the 'key' value
- create a list of conditional mappings for each key you want to map
- Map looping sequences to XSL.
<?xml version="1.0"?>
<xsl:stylesheet xmlns:xsl="http://www.w3.org/1999/XSL/Transform" version="1.0">
<xsl:output method="html" />
<xsl:template match="/TxTemplate">
</xsl:template>
</xsl:stylesheet>
(Atomic variables represent source data in the input template.)
Conversion example:
replace <BASE HREF="%gx type=cell id=BASEHREF%%/gx%">
with <BASE HREF="{BASEHREF}"/>
(The general XSL format is: <xsl:value-of select="variable_name"/>).
Conversion example:
Replace %GX type=cell id=DocumentContent.BFR_1_3%%/GX%
with <xsl:value-of select="DocumentContent/BIG_1_3"/>
Conditional variables depend on data in the input template. These are commonly used to provide expanded text for a set of input codes. For example, YR -> year, MN -> minute.
The general XSL format is:
Conversion example:
Replace
With the following:
|
Loop sequences allow for the repetition of a set of values within a TradingXpert template.
The following example represents PO Acknowledgment line item information that has been excerpted from a ECXpert and TradingXpert data file. (Note that the PO1 element loops twice (PO1_1, PO1_2.)
|
The conversion of an HTML representation of the above data to XSL is shown below. Note that while the syntax is quite different in both cases, the structure of the HTML is similar.
Conversion example:
Replace
|
with the following:
|
Installation Notes
Stop and Start the Application Server after TradingXpert Installation
After you install ECXpert and TradingXpert, do not use the restart option to restart the Application Server. Use the stop and start buttons to restart the Application Server from the Application Server Administration screen.
Ownership of Files
[4984996] On Solaris, when ECXpert is installed for a user other than the user that runs the installer, you must change ownership of the files in the <ECXPERT_INSTALL_DIR>/NS-apps directory after completing the installation.
Example:
- The root user, who belongs to group other, invokes the installer.
- The root user enters ecxuser, who belongs to group staff, as the ECXpert User ID.
- As root user, call the following command:
chown -R ecxuser:staff <ECX_HOME>/NS-apps
Some of the files created during the ECXpert installation will have the userid set to root instead of ecxuser.
The root user must change the ownership of the files in <ECX_HOME>/NS-apps for ecxuser.
Compatibility Issues
The following are known compatibility issues with Integration Server, B2B Edition 3.6.3:
Sun ONE Integration Server, Secure Trading Agent 1.0.1 Upgrade Required
Sun ONE Integration Server, Secure Trading Agent (STA) 1.0 is not compatible with the JRE installed with ECXpert 3.6.3. If you want to use the ECXpert 3.6.3 ebXML Communications Agent to trade with STA, you must uninstall STA 1.0 and then install STA 1.0.1 before installing ECXpert 3.6.3.
To upgrade to Secure Trading Agent 1.0.1:
- Export all active CPA's and messages.
- Uninstall Secure Trading Agent 1.0.
- Install Secure Trading Agent 1.0.1
- Import your CPA's to the new Secure Trading Agent 1.0.1 installation.
You will later import your CPA’s to the new Secure Trading Agent installation.
|
| |
| Note |
You cannot import STA 1.0 messages into STA 1.0.1. Save all messages to a directory outside the STA 1.0 installed directory before uninstalling STA 1.0. |
|
| |
Use the Secure Trading Agent Install Guide on the STA 1.0.1 CD for instructions.
Use the Secure Trading Agent Install Guide on the STA 1.0.1 CD.
Connecting to IBM MQSeries 3.5 on Windows 2000
When upgrading ECXpert from 3.6.2 to 3.6.3, it is possible to run into connection errors when using IBM MQSeries 5.3 as your JMS service provider with ECXpert. If you upgraded ECXpert by copying the JMS Send and Receive Communications Agents properties from the previous ecx.ini to your new one, you might have to add/append the path to connector.jar.
If you start both JMSSend and JMSReceive Communications Agents and send a request using Document submission, and the following error appears in the tracking events log:
'JNI call to ECX JMS Sender java class failed', follow the instructions in the workaround below.
Workaround:
When using IBM MQSeries 5.3 as your service provider and upgrading to ECXpert 3.6.3, you must add/append the path to the connector.jar in the jmsvendor_classpath parameter in the ECXpert configuration file (ecx.ini) after installation.
Document Types Supported by WebMail
When you use WebMail to create new documents from scratch, the list of supported documents is determined from the TX.fromScratchDocTypes parameter in the TXproperties file.
The default value is "860;850;810;214"
This means that you can create new documents from scratch for only these document types. You can however, send responses from WebMail or TradingXpert for a superset of document types.
This set of document types is determined from TX.outboundDocTypes parameter in the TXproperties file. By default, the value is "862,860,856,855,850,810,214,ORDERS,INVOIC"
WebMail users can view the following document types, controlled by the TX.viewableDocTypes parameter in the TXproperties file. By default, the value is "862,860,856,855,850,843,840,830,810,214,ORDERS,INVOIC"
4060 Support in ECXpert 3.6.3
The ANSI 4060 standard introduces a new delimiter used to separate repeating data elements. To support this delimiter, the standards body decided to 'overload' the Interchange Control Standard ID in the ISA segment. This is the ISA 11, which prior to 4060, used to be 1 character alphanumeric. Since delimiter characters are beyond the scope of the alphanumeric check, ECXpert 3.6.3 has removed the alphanumeric restriction, permitting delimiter values such as | or ^. It is your responsibility to place all valid characters which are to be accepted in the appropriate ISA11 section of the parser.res file, found in the ../ECXpert/maps directory, along with the 'U' character already defined there for pre-4060 envelope checking.
Note that this permits acceptance by the ECXpert parser of a broader range of characters in the ISA11 position. It is still the responsibility of the map being used to process the data to know how to deal with any specified delimiter. Further, to construct and send outgoing 4060 EDI messages, the Mercator map must build the envelope with the correct ISA11 field. The administrator must select option 4 ('use optional elements from data but ECX generates Ctrl/Msg Ref#') in the EDI Envelope dropdown in the Output EDI tab in Partnership administration. ECXpert is not capable of generating the EDI envelopes for 4060 at this time, so the map must take responsibility for this generation, with the assistence of ECXpert to replace the correct control numbers.
Oracle 8.1.7 JDBC drivers incompatible for use with Oracle 9i
If you plan to use the AS2 protocol with ECXpert 3.6.3 and you are running Oracle 8.1.7 JDBC drivers with Oracle 9i, you must update your Oracle JDBC drivers.
ECXpert 3.6.3 and AS2 work with all variants of Oracle 9i JDBC drivers. However if you are planning to use Oracle 8.1.7 JDBC drivers, you must apply a patch from Oracle to avoid JDBC-related connection problems. This patch fixes a compatibility problem that shows up when using the 8.1.7.0 and 8.1.7.1 JDBC Thin drivers to connect to the 9i databases.
When you install ECXpert 3.6.3 and AS2, the installed Oracle JDBC drivers work best on the following platforms:
However, to avoid any JDBC driver compatibility issues, Sun recommends you get the latest classes12.zip file that matches the version of your Oracle installation.
You can download the Oracle JDBC drivers classes12.zip from the Oracle Technology Network website. The Oracle Technology Network website is located at the following URL:
http://otn.oracle.com/software/tech/java/sqlj_jdbc/index.html
To replace the JDBC drivers:
- Download the JDBC drivers classes12.zip file to a temporary directory tmp from the following URL:
http://otn.oracle.com/software/tech/java/sqlj_jdbc/index.html - Stop All ECXpert services.
- Rename the existing classes12.zip file in the AS2 library directory, and replace it with the new one.
- Restart all ECXpert services.
On Solaris:
cd $BDGHOME/http_as2/lib
mv classes12.zip classes12.9201_zip
cp /tmp/classes12.zip classes12.zip
On Windows:
cd %BDGHOME%\http_as2\lib
ren classes12.zip classes12.9201_zip
cp /tmp/classes12.zip classes12.zip
Documentation Updates for ECXpert and TradingXpert 3.6.3
Undocumented trackingID Parameter for LogEvent ( ) Method of EcxLog
On page 249 of the ECXpert Developer’s Guide, the EcxLog LogEvent( ) method is missing an optional parameter, trackingID. When logging custom Events errors, use the trackingID parameter to write the tracking ID to the Events log.
LogEvent ( )
Adds an entry to the event log.
Syntax:
EcxLog& LogEvent(long errnum, int severity, const char * message, int trackingID);
Parameters:
The LogEvent() method has the following parameters:
| Parameter |
Description |
|---|---|
| errnum |
A long integer that specifies the error number you want to associate with the entry. |
| severity |
An integer that specifies the kind of entry. |
| message |
A pointer to a character string that specifies the message to write to the log. |
| trackingID |
An integer that specifies the tracking ID. If not specified, the tracking ID written to the log is 0. |
Known Issues and Limitations
This section contains a list of the known problems and issues with ECXpert and TradingXpert 3.6.3. The following product areas are covered:
Uninstallation Problems
The uninstallation program does not remove ECXpert if TradingXpert is installed separately into the same directory [#4963470]
When you install ECXpert, the install creates an uninstaller class file that has all the necessary information for locating ECXpert and TradingXpert during the uninstall process.
If you install ECXpert and TradingXpert separately into the same location, the original uninstaller class file is overwritten by the class file created during the TradingXpert installation. This new file only contains the information for locating TradingXpert during the uninstallation process. Because this happens, you are unable to remove ECXpert using the uninstaller.
Workaround:
This problem only occurs when ECXpert and TradingXpert are installed separately in the same directory. This problem does not occur if they are installed together using the unified installer, or if they are installed in separate locations.
Install ECXpert and TradingXpert together using the unified installer. If you must install the products separately, install them in separate locations.
Sun ONE Messaging Server files are not deleted during the uninstall process if web server is running. [#4965276]
Workaround:
This happens only when using the WebMail feature. You must shut down Sun ONE Messaging Server before you uninstall ECXpert. If you do not shut down the messaging server, any files that may be locked will not be deleted during the uninstall process.
To shut down the Messaging Server on Solaris:
In a terminal window, enter the following commands, replacing machine_name with the name of your ECXpert host machine:
# cd <MSG_HOME>/msg-<hostname>
#./stop-msg
To shut down the Messaging Server on Windows:
Shut down the Sun ONE Messaging Server by navigating to the server’s home directory and issuing the stop command.
Configuration Problems and Other Issues
Partner Agent Attempts to Delete Non-existent Files [4960169]
When you run import to delete member details, errors are displayed about deleting non-existent directories.
Workaround:
This is a known problem of the import utility in Partner Agent. The utility does not test for the existence of a directory before attempting the delete function. Deleting of members causes this harmless display from the rmdir system call.
|
Service List Can Be Executed More Than Once [4670006]
Under the Dispatcher's process-pending=yes state, a service list for one of the pending jobs is getting executed more than once. This is random, and only occurs in the process-pending state.
Workaround:
If you want to perform process-pending jobs:
- Set the process_pending parameter to yes in the ecx.ini file’s TCP/IP Connector [tcpip-connector] section.
- Set the max_request_queued parameter to 0, or a very large value in the exc.ini file’s TCP/IP Connector [tcpip-connector] section to process all records from the database.
- Set the process_pending parameter to no in the ecx.ini file’s Dispatcher [dispatcher] section.
Memory corruption may occur when a Partnership is set up with a specified outbound protocol of FTP [4986997]
A partnership table can sometimes encounter garbage instead of expected values of "NONE". This only occurs when the specified protocol is FTP.
Workaround:
Update the Partnership information in the Support interface to update the tables in the ECXpert database.
Oracle table that holds absolute path to ecx.ini file has been expanded [4927199]
The JBEXECCFGFILE field of the Job table used to store 60 chars. This field is used to store the absolute path to the ecx.ini file and it can easily go above 60 chars.
In the 3.6.3 the size of this field has been increased to 512 and a migration script has been provided to update the existing Job table in older versions.
Workaround
If you are migrating from ECXpert 3.6.2 to ECXpert 3.6.3, you must run the update_job_363.sql scripts located in the following location:
ECX_HOME/NS-apps/ECXpert/dbadmin/oracle/migration/36.2_to_36.3
ECX_HOME is the root directory of your ECXpert installation.
Run this script only when migrating from a previous version of ECXpert. This script increases the database JBEXECCFGFILE table field of your previous database to 512 characters.
BDGHOME is sometimes not recognized when using TradingXpert's WebMail feature on Windows
When using the WebMail feature on Windows, the Application Server hosting TradingXpert sometimes fails to recognize the BDGHOME environment variable if it has been defined using mixed case. If you see the error “Cannot open config file” in the Application Server error log, try changing the environment variable definition for BDGHOME to all uppercase.
Workaround
Set the BDGHOME environment variable on the Windows machine hosting TradingXpert to all uppercase.
For example: If the BDGHOME is D:\my_ecxpert_dir\NS-apps\ECXpert, try setting the BDGHOME environment variable to D:\MY_ECXPERT_DIR\NS-APPS\ECXPERT.
How to Report Problems and Provide Feedback
If you have problems with Sun ONE ECXpert and TradingXpert, contact Sun customer support using one of the following mechanisms:
- Sun Software Support services online at
http://www.sun.com/service/sunone/software - The telephone dispatch number associated with your maintenance contract
This site has links to the Knowledge Base, Online Support Center, and ProductTracker, as well as to maintenance programs and support contact numbers.
So that we can best assist you in resolving problems, please have the following information available when you contact support:
- Description of the problem, including the situation where the problem occurs and its impact on your operation
- Machine type, operating system version, and product version, including any patches and other software that might be affecting the problem
- Detailed steps on the methods you have used to reproduce the problem
- Any error logs or core dumps
Sun Welcomes Your Comments
Sun is interested in improving its documentation and welcomes your comments and suggestions. Use the web-based form to provide feedback to Sun:
Please provide the full document title and part number in the appropriate fields. The part number is a seven-digit or nine-digit number that can be found on the title page of the book or at the top of the document. For example, the part number of these Release Notes document is 817-5778-10.
Additional Sun Resources
Useful Sun ONE information can be found at the following Internet locations:
- Sun ONE Documentation
http://docs.sun.com/prod/sunone - Sun ONE Professional Services
http://www.sun.com/service/sunps/sunone - Sun ONE Software Products and Service
http://www.sun.com/software - Sun ONE Software Support Services
http://www.sun.com/service/sunone/software - Sun ONE Support and Knowledge Base
http://www.sun.com/service/support/software - Sun Support and Training Services
http://training.sun.com - Sun ONE Consulting and Professional Services
http://www.sun.com/service/sunps/sunone - Sun ONE Developer Information
http://sunonedev.sun.com - Sun Developer Support Services
http://www.sun.com/developers/support - Sun ONE Software Training
http://www.sun.com/software/training - Sun Software Data Sheets
http://wwws.sun.com/software
Copyright © 2004 Sun Microsystems, Inc. All rights reserved.
U.S. Government Rights - Commercial software. Government users are subject to the Sun Microsystems, Inc. standard license agreement and applicable provisions of the FAR and its supplements. Use is subject to license terms.
This distribution may include materials developed by third parties.Sun, Sun Microsystems, the Sun logo, Java, and Solaris are trademarks or registered trademarks of Sun Microsystems, Inc. in the U.S. and other countries. All SPARC trademarks are used under license and are trademarks or registered trademarks of SPARC International, Inc. in the U.S. and other countries. UNIX is a registered trademark in the U.S. and other countries, exclusively licensed through X/Open Company, Ltd.
Copyright © 2004 Sun Microsystems, Inc. Tous droits réservés.
L'utilisation est soumise aux termes du contrat de licence.
Cette distribution peut comprendre des composants développés par des tierces parties.Sun, Sun Microsystems, le logo Sun, Java, and Solaris sont des marques de fabrique ou des marques déposées de Sun Microsystems, Inc. aux Etats-Unis et dans d'autres pays.Toutes les marques SPARC sont utilisées sous licence et sont des marques de fabrique ou des marques déposées de SPARC International, Inc. aux Etats-Unis et dans d'autres pays.UNIX est une marque déposée aux Etats-Unis et dans d'autres pays et licenciée exlusivement par X/Open Company, Ltd.