| Sun StorageTek NAS OS Administration Guide |
| Sun StorageTek NAS OS Administration Guide |
| C H A P T E R 12 |

This chapter provides replacement procedures for customer-replaceable units (CRUs). It includes the following sections:
|
Tools and Supplies Needed |
The NAS server can be serviced with the following items:
|
Powering Off |
1. Choose a method for shutting down the appliance from main power mode to standby power mode.
A. Network ConfigB. Shutdown Server
Select Shutdown Server and then select Power Off.

|
Caution - Do not use the power button to shut down the system. Always use the LCD display or remote shutdown procedure. Improper shutdown can result in a loss of data. |

2. When main power is off, the Power/OK LED on the front panel flashes, indicating that the appliance is in standby power mode.

3. Unplug both power cords from the appliance's power supplies.
4. Turn off all peripheral devices connected to the system.
5. Label any peripheral cables and/or telecommunication lines that you must disconnect in order to remove and replace a specific component.
|
Removing the Covers |
Caution:Before handling components, attach an electrostatic discharge (ESD) wrist strap to the grounding post that is built into the back of the chassis. The system's printed circuit boards and hard disk drives contain components that are extremely sensitive to static electricity. 
1. Press down on the cover release and, using the indent for leverage, slide the main cover toward the back of the chassis, approximately 0.5 inch (12 mm). See FIGURE 12-2.
2. Grasp the cover by its back edge and lift it straight up from the chassis.
Note: When you remove any cover, the intrusion switch that is on the front I/O board automatically powers down the system to standby mode.

FIGURE 12-3 shows the procedure for a Sun StorageTek 5320 appliance. The Sun StorageTek 5220 Appliance has the same fan bay door and captive screw.
Remove the bezel from the front of the chassis by following these steps.
1. Open the fan bay door and use a No. 2 Phillips screwdriver to unfasten the captive screw that locks the bezel in place. See FIGURE 12-3.
2. Grasp the outer edges of the bezel and gradually ease the bezel away 1 inch (2.4 cm) from the chassis.
Caution:A 3-inch USB cable is attached to the LCD on the back side of the bezel. Be careful not to force the bezel from the chassis. 
3. Disconnect the cable from the chassis USB connector.

Caution:When the front bezel is removed, the flash disk is accessible. Never remove the flash disk while the server is powered on. The flash disk must be replaced by Sun field service, it is not a customer-replaceable unit. 
1. Open the door to the fan bay. See FIGURE 12-4.
2. While holding the fan bay door open, slide the front cover toward the front of the chassis approximately 0.25 inch (6 mm).
3. Raise the back edge of the cover and then lift it off of the chassis.
Note: When you replace the front cover, place the front edge on the chassis first, then set it down into the keyed slots on the chassis sides before sliding it back.
Note: When you remove any cover, the intrusion switch that is on the front I/O board automatically powers down the system to standby power mode.

|
Locations of Customer-Replaceable Units |
FIGURE 12-5shows the locations of the customer-replaceable units (CRUs) that are documented in this section.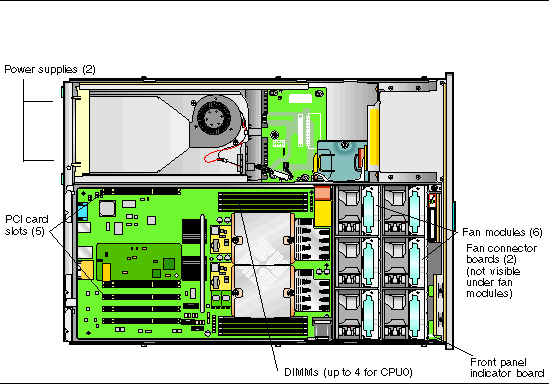
|
Replacing Components |
This section describes removal and replacement procedures for CRUs. Field-replaceable units (FRUs) must be replaced only by trained service technicians. Contact Sun Services for assistance with FRU replacements.
This section contains procedures for replacing the following CRUs:
Perform the following steps to remove and replace a fan connector board. There is one supported fan connector board, part number 501-6917.
Note: Supported part numbers are subject to change.
1. Power off the server as described in Powering Off.
2. If the server is in a rack, slide it far enough out of the rack so that you can open the fan bay door.
If you cannot safely view and access the component in this way, remove the server completely from the rack.
3. Open the fan bay door and hold it open. See FIGURE 12-6.
Caution: When you open the fan bay door, be careful to hold it open with one hand so that it does not spring shut and injure your fingers. Do not hold the fan bay door open for more than 60 seconds while the server is running to avoid overheating the server.

4. Remove the three fan modules that are connected to the fan connector board that you are replacing.
Grasp each fan module by its plastic strap and lift it straight up out of the fan bay.
5. Remove the single screw that secures the fan connector board to the chassis, referring to FIGURE 12-7. In that figure, the server is shown from the back with the front cover off and all fans removed to provide visibility. Do not remove the covers for this procedure.

6. Slide the fan connector board toward the center of the chassis to disconnect it from the front I/O board and to release it from the two locating tabs on the chassis. See FIGURE 12-8. In that figure, the server is shown from the back with the front cover off and all fans removed to provide visibility. Do not remove the covers for this procedure.

7. Lift the board straight up to remove it from the system.
8. Reverse the above steps to install a replacement fan connector board.
Perform the following steps to remove and replace a front panel indicator board. There is one supported front panel indicator board, part number 501-6916.
Note: Supported part numbers are subject to change.
1. Power off the server as described in Powering Off.
2. If the server is in a rack, slide it far enough out of the rack so that you can remove the main cover and front cover.
If you cannot safely view and access the component in this way, remove the server completely from the rack.
3. Remove the main cover as described in Removing the Main Cover.
4. Remove the front bezel as described in Removing the Front Bezel.
Note: Always unfasten the bezel's securing screw before removing the bezel.
5. Remove the front cover as described in Removing the Front Cover.
6. Remove the two screws that secure the front panel indicator board to the chassis.

7. While supporting the indicator board with your right hand, use your left hand to gently push the indicator board toward the center of the chassis to disconnect it from the front I/O board. See FIGURE 12-10.

8. Remove the front panel indicator board from the chassis.
9. Reverse the above steps to install a replacement board.
Perform the following steps to remove and replace a power supply. There is one supported power supply, part number 300-1757 (non-RoHS model) or 300-1945 (RoHS-compliant model).
Note: Supported part numbers are subject to change.
The internal system software designations of the two power supplies in the server are shown in FIGURE 12-11.

1. Identify which power supply you will replace.
Each power supply has three LEDs that you can view from the back of the server:
2. Disconnect the AC power cord from the power supply that you are replacing.
The power supplies are hot-swappable, so you do not have to shut down the server or disconnect the second power supply.
Note: The Service Action Required LEDs on the front panel and back panel blink when a power supply is unplugged. See Status Indicator LEDs for the LED descriptions.
a. Grasp the power supply handle and push the thumb latch toward the center of the power supply. See FIGURE 12-12.
b. While continuing to push on the latch, use the handle to remove the power supply from the chassis.

4. Reverse the above steps to install a replacement power supply. Press the new power supply into the bay until the thumb latch clicks, indicating that it is locked.
Perform the steps detailed below to remove and replace the server's dual inline memory modules (DIMMs). There is one supported DIMM, part number 540-6453.
Note: Supported part numbers are subject to change.
The DIMM ejector LED can indicate a faulty DIMM. To view the fault LEDs in the ejector levers of the DIMM slots, put the server in standby power mode with the AC power cords attached. See Powering Off. If the DIMM ejector LED is:
1. Review the following list of memory configuration guidelines before you remove or install any DIMMs:
2. Power off the server as described in Powering Off.
3. If the server is in a rack, slide it far enough from out of the rack so that you can remove the main cover.
If you cannot safely view and access the component in this way, remove the server completely from the rack.
4. Remove the main cover as described in Removing the Main Cover.
5. Locate the DIMM slot on the motherboard in which you will install or replace a DIMM. The internal system software designations of the DIMM slots are shown in FIGURE 12-13.

a. Rotate both DIMM slot ejectors outward as far as they will go. The DIMM is partially ejected from the socket. See FIGURE 12-14.
b. Carefully lift the DIMM straight up to remove it from the socket.

a. Ensure that the DIMM slot ejectors at both ends of the memory socket are fully open (rotated outward) to accept the new DIMM.
b. Align the notch in the bottom edge of the DIMM with the key in the DIMM socket. See FIGURE 12-14.
c. Press down evenly on both top corners of the DIMM until the ejectors snap over the cutouts at the left and right edges of the DIMM.
Perform the following steps to remove and replace an individual fan module. There is one supported fan tray module, part number 541-0269.
Note: Supported part numbers are subject to change.
Caution:The fans are hot-swappable and can be removed and replaced while the system is running. Do not hold the fan bay door open for more than 60 seconds at a time to avoid overheating the server. Remove and replace only one fan at a time.
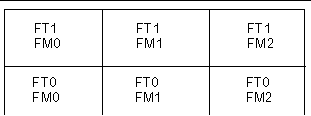
The internal system software designations of the fan connector boards, or fan trays (FTs), and fan modules (FMs) are shown in FIGURE 12-15.
1. If the server is in a rack, slide it far enough out of the rack so that you can open the fan bay door.
If you cannot safely view and access the component in this way, remove the server completely from the rack.
2. Open the door to the fan bay and identify the defective fan modules by inspecting the LEDs.
Caution:When you open the fan bay door, be careful to hold it open with one hand so that it does not spring shut and injure your fingers. Do not hold the fan bay door open for more than 60 seconds while the server is running to avoid overheating the server.
3. While holding the fan bay door open, grasp the faulty fan module by its plastic strap and lift it straight up out of the fan bay. See FIGURE 12-16.

4. Reverse the above steps to install a replacement fan module assembly.
Perform the following steps to remove and replace the rear fan tray (blower tray). There is one supported blower tray, part number 541-0645.
Note: Supported part numbers are subject to change.
1. Working from the back of the server, unfasten the two captive thumbscrews on the face of the rear fan tray. See FIGURE 12-17.
The internal system software designation of the rear fan tray is I/O FAN. The rear fan tray has one fault LED on its face, indicating the following:
2. Remove the rear fan tray from the chassis.
The fan tray cable connector disengages from the internal connector on the chassis, as illustrated in FIGURE 12-17. In that figure, the server is shown with the cover in order to make the component visible; do not remove the cover for this procedure.

3. Reverse the above steps to install a replacement rear fan tray. Make sure the metal guides on the fan tray sides (see FIGURE 12-17) engage the plastic rails inside the chassis bay evenly.
Perform the following steps to remove and replace a PCI card.
TABLE 12-1 lists the supported part numbers for this component.
Note: Supported part numbers are subject to change.
1. Power off the server as described in Powering Off.
2. If the server is in a rack, slide it far enough out of the rack so that you can remove the main cover.
If you cannot safely view and access the component in this way, remove the server completely from the rack.
3. Remove the main cover as described in Removing the Main Cover.
4. Locate the PCI card slot in which you will install or replace a PCI card.
The internal system software designations and the speeds of the five PCI slots are shown in FIGURE 12-18. The slots for the PCI-X cards are detected by the system BIOS during bootup in this order: 0, 2, 3, 4, 1.
Note: Before you install a card, consult the manufacturer's documentation for system requirements and configuration information for your specific PCI card.

5. Remove any existing PCI card from the slot:
a. Disconnect any external cables that are attached to the PCI card.
b. Working from the back of the chassis, pivot open the PCI card latch that covers the PCI card's back connector panel. See FIGURE 12-19.

c. Pull the PCI card out of the PCI slot. Ensure that the PCI card's back connector panel is released from the tab on the chassis back panel.
6. If there is no PCI card in the slot, remove the PCI-card filler panel from the chassis back panel. See FIGURE 12-20.

a. Working from the back of the chassis, pivot the PCI card latch for the slot open to receive the new PCI card. See FIGURE 12-19.
b. Insert the PCI card into the PCI card slot. Ensure that the PCI card's back connector panel engages the tab in the chassis back panel. See FIGURE 12-21.

c. Pivot the PCI card latch closed over the back connector panel of the PCI card until it locks. See FIGURE 12-21.
| Sun StorageTek NAS OS Administration Guide | 819-4284-11 |
Copyright © 2007, Sun Microsystems, Inc. All Rights Reserved.
