Using Basic Authentication with the HTTP Binding Component
Basic authentication enables you to require credentials, in the form of a username and password, to make a transaction. These credentials are transmitted as plain text. The username and password are encoded as a sequence of base-64 characters before transmission to ensure privacy. So, for example, the user name “Fred” and password “Dinosaur” are combined as “Fred:Dinosaur.” When encoded in base-64, these characters are equivalent to “RnJlZDpEaW5vc2F1cg0K”.
For a Provider web service, a request message from a client contains the user name and password fields in the request header.
For a Consumer web service invoking a web service with basic authentication enabled, the user name and password are appended to the request headers for authentication.
For more information on basic authentication protocol see RFC 1945 (Hypertext Transfer Protocol HTTP/1.0), RFC 2616 (Hypertext Transfer Protocol HTTP/1.1), and RFC 2617 (HTTP Authentication: Basic and Digest Access Authentication).
Basic Authentication Supported Features
Basic authentication is supported by specifying a policy in the WSDL. A basic authentication policy can be added to the WSDL either manually or by using the WS-Policy Attachment window accessed from CASA and provided through Tango (WSIT). A basic authentication policy is specified at the root level of the WSDL and a reference to the policy is made in the WSDL Port type section, binding the policy to the endpoint.
To support basic authentication, the HTTP Binding Component defines the following WSDL elements:
-
MustSupportBasicAuthentication: This element has an attribute called on which can be used to turn authentication on or off. This attribute accepts the values true or false. The MustSupportBasicAuthentication element within a policy is required to enable basic authentication in the endpoint.
-
UsernameToken: This element specifies the user name and password fields for one of the following actions:
-
Authenticate the request when the endpoint is a provider
-
Invoke a web service with basic authentication enabled when the configured endpoint is a consumer
The user name and password fields can be specified either as plain text in the WSDL, or as tokens in the WSDL and configured at runtime.
-
Authentication Mechanisms for Consumer Endpoints
Four types of authentication mechanisms are supported for web service consumer endpoints.
A consumer endpoint can be configured to use one of these mechanisms by adding it as a child element to the MustSupportBasicAuthentication element of the endpoints Policy.
-
WssTokenCompare Username/Password Authentication: Compares the username and password extracted from the HTTP Authorization request header with the username and password specified in the Policy's WssUsernameToken10 and WssPassword elements.
-
Using the Access Manager for Authentication and Authorization: Configures the consuming endpoint to use the Sun Access Manager to authenticate the HTTP client's credentials.
-
Using the OpenSSO Web Services Security (WSS) Agent for Authentication and Authorization: Configures the consuming endpoint to use the OpenSSO Web Services Security Agent to authenticate the HTTP client's credentials.
-
Using the GlassFish Realm Security to Authenticate the HTTP Client Credentials: Configures the consuming endpoint to use the Sun Realm security to authenticate the HTTP client's credentials.
The following sections describe these mechanisms in more detail.
WssTokenCompare Username/Password Authentication
To use the WssTokenCompare feature, the Policy element must be present, and specify the username and password that are used for authentication. The username and password extracted from the HTTP Authorization request header are compared with the username and password specified in the Policy's WssUsernameToken10 and WssPassword elements.
The following sample WSDL contains the policy and its reference to use WssTokenCompare. Note that an application variable token is used for the password so that the password is not exposed in the WSDL. The value of the password can be specified in the component's Application Variable property in NetBeans.
<wsdl:service name="echoService">
    <wsdl:port name="echoPort" binding="tns:echoBinding">
        <soap:address location="http://pponnala-tecra-xp.stc.com:18181/
         echoService/echoPort"/>
        <wsp:PolicyReference URI="#HttpBasicAuthBindingBindingPolicy"/>
    </wsdl:port>
</wsdl:service>

<wsp:Policy wsu:Id="HttpBasicAuthBindingBindingPolicy">
    <mysp:MustSupportBasicAuthentication on="true">
        <mysp:BasicAuthenticationDetail>
           <mysp:WssTokenCompare/>
        </mysp:BasicAuthenticationDetail>
    </mysp:MustSupportBasicAuthentication>
    <mysp:UsernameToken mysp:IncludeToken="http://schemas.xmlsoap.org/ws/
     2005/07/securitypolicy/IncludeToken/AlwaysToRecipient">
       <wsp:Policy>
            <sp:WssUsernameToken10>wilma</sp:WssUsernameToken10>
            <sp:WssPassword>${pass_token}</sp:WssPassword>
       </wsp:Policy>
  </mysp:UsernameToken>
</wsp:Policy>
|
Note –
The code displayed above is wrapped for display purposes.
Using the Access Manager for Authentication and Authorization
To use Access Manager to configure access-level authorization, you configure the consuming endpoint to use the Sun Access Manager to authenticate the client's credentials. The HTTP Binding Component SOAP binding integrates seamlessly with Sun Access Manager to authenticate the HTTP client's credentials (the username and password extracted from the HTTP Authorization header) against the user's credentials in the Sun Access Manager database.
Installing the Access Manager Add-on
Access Manager is installed as an GlassFish add-on which includes the Access Manager Server and JAR files. To install Access Manager, do the following:
-
Download the standalone (15 MB) Sun Java System Access Manager 7.1 Patch 1.
-
Extract the access_manager-7_1–p01–rr.zip file to the following directory: /GlassFishESBv21/glassfish/bin/accessmanager
-
Install the Access Manager add-on to GlassFish using the following asadmin command from your CLI: /GlassFishESBv21/glassfish/bin/asadmin install-addon /accessmanager/am_installer.jar
Access Manager is extracted into /GlassFishESBv21/glassfish/addons/accessmanager with the necessary JAR files and AMConfig.properties.
-
Restart the GlassFish server. Upon restart the post-configuration is done automatically for Access Manager
Installing Access Manager with JavaTM Application Platform SDK
You can also download Access Manager as part of the Java Application Platform SDK installation, following the SDK Update 7 Installation Instructions. Upon installation, the Access Manager is available in the SDK install directory in the addons/accessmanager directory.
To configure and deploy the Access Manager instance that is installed with the SDK package from GlassFish ESB, modify the server.policy file of GlassFish from GlassFish ESB as follows:
-
Copy (cp) /GlassFishESB21/glassfish/domains/domain1/config/server.policy to /GlassFishESB21/glassfish/domains/domain1/config/server.policy.Orig
-
Cat /~<SDK_location>/addons/accessmanager/as9.0_serverpolicy to /GlassFishESB21/glassfish/domains/domain1/config/server.policy.
-
Autodeploy amserver.war.
Copy (cp) /~<SDK_location>/addons/accessmanager/amserver.war to /GlassFishESB21/glassfish/domains/domain1/autodeploy
-
Restart GlassFish
/GlassFishESB21/stop_glassfish_domain1
/GlassFishESB21/start_glassfish_domain1
From the Command Line:
Configure the HTTP Binding Component to use Access Manager
-
Access the HTTP Binding Component Properties from the NetBeans Services window. Right-click sun-http-binding under Servers -> GlassFish -> JBI -> Binding Components, and choose Properties from the pop-up menu.
-
Configure the Sun Access Manager Configuration Directory property to specify the location of the Sun Access Manager's AMConfig.properties file. For example: C:/GlassFishESBv21/glassfish/addons/accessmanager
Configure the Sun Access Manager Configuration Directory property to point to the directory that contains the the AMConfig.properties file. For example: C:/GlassFishESBv21/glassfish/addons/accessmanager
-
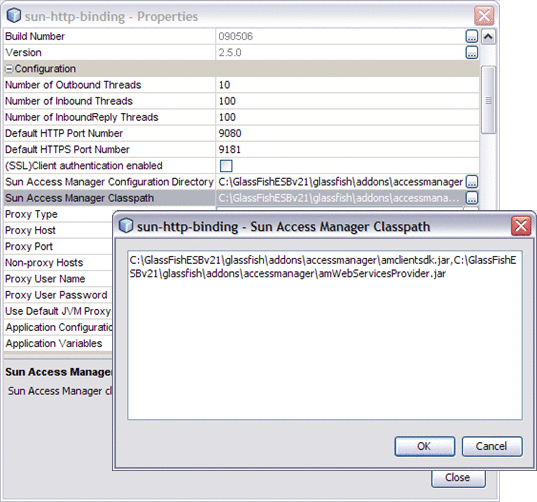
Configure the Sun Access Manager Classpath property to point to the following JAR files extracted to the /GlassFishESBv21/glassfish/addons/accessmanager directory:
-
amclientsdk.jar
-
amWebServicesProvider.jar
Note that the two files must be separated by a comma.

-
-
Modify the AMConfig.properties file as needed to connect to Access Manager. At a minimum, the following properties must be configured:
com.iplanet.am.naming.url=@PROTOCOL@:
   //@SERVER_HOST@:@SERVER_PORT@/@DEPLOY_URI@/namingservice
com.sun.identity.agents.app.username=@APPLICATION_USER@
com.iplanet.am.service.password=@APPLICATION_PASSWD@
am.encryption.pwd=@ENCRYPTION_KEY@
com.iplanet.am.server.protocol=@SERVER_PROTOCOL@
com.iplanet.am.server.host=@SERVER_HOST@
com.iplanet.am.server.port=@SERVER_PORT@
com.iplanet.am.services.deploymentDescriptor=@DEPLOY_URI@
com.sun.identity.loginurl=@SERVER_PROTOCOL@://@SERVER_HOST@:
   @SERVER_PORT@/@DEPLOY_URI@/UI/Login
com.sun.identity.liberty.authnsvc.url=@SERVER_PROTOCOL@://
   @SERVER_HOST@:@SERVER_PORT@/@DEPLOY_URI@/Liberty/authnsvc
-
Configure the policy in the WSDL to enable Authorization by changing the Access Manager authorization attribute to true (note the attribute authorization="true" in the example below). This attribute is optional and the default value is false.
To configure the Sun Access Manager Configuration Directory, do the following:
The following sample WSDL contains the policy and its reference to use Access Manager.
<service name="AuthAMService">
    <port name="AuthAMPort" binding="tns:AuthAMBinding">
        <soap:address location="http://localhost:${HttpDefaultPort}/AuthAMService
/AuthAMPort"/>
        <wsp:PolicyReference URI="#HttpAuthorizationBindingAMPolicy"/>
    </port>
</service>
<wsp:Policy wsu:Id="HttpAuthorizationBindingAMPolicy">
    <mysp:MustSupportBasicAuthentication on="true">
        <!-- authenticationType is one of simple, am, or realm -->
        <mysp:BasicAuthenticationDetail>
            <mysp:AccessManager authorization="true"/>
        </mysp:BasicAuthenticationDetail>
    </mysp:MustSupportBasicAuthentication>
</wsp:Policy>
|
For more information on HTTP Binding Component authorization using Sun Access Manager, and Access Manager Classpath configuration, see: HTTP BC Access Manager Authorization.
Note –
When OpenSSO Enterprise Server is running on an HTTPS port, the certificates on the OpenSSO Enterprise server must be installed on the client side in order for the HTTP Binding Component to access the server. Certificates should be installed in the GlassFish domain config directory. For example: \GlassFishESBv21\glassfish\domains\domain1\config.
Using the OpenSSO Web Services Security (WSS) Agent for Authentication and Authorization
To configure access-level authorization using OpenSSO Web Services Security Agent, you configure the consuming endpoint to use OpenSSO WSS Agent to authenticate the client's credentials (the username and password extracted from the HTTP Authorization header) against the user's credentials in the WSS Agent database. OpenSSO Web Services Security Agent allows the HTTP Binding Component to talk to OpenSSO Enterprise Server 8 installed on a remote or local computer.
Install OpenSSO Enterprise Server
To use the OpenSSO Web Services Security Agent, first download and install OpenSSO Enterprise Server following the directions and requirements presented in the Installing and Configuring a Single OpenSSO Enterprise Instance document.
Configure the HTTP Binding Component to use OpenSSO Web Service Security
With OpenSSO Enterprise Server installed, you can now configure the HTTP Binding Component to use the OpenSSO WSS Agent. The OpenSSO WSS Agent file contains the client configuration AMConfig.properties, and OpenSSO ClientSDK, that allow web service providers and clients to easily integrate, to validate and secure web service communications.
-
Download openssowssproviders.zip. This file is available from http://download.java.net/general/opensso/stable/opensso-build6/openssowssproviders.zip, or you can go to the OpenSSO Downloadpage and click WSS Agent to download the zip file.
-
Create a directory, such as /GlassFishESB/WSSAgent_OpenSSO/, and extract the contents of the openssowssproviders.zip file into it.
-
From the NetBeans Services window, make sure that the GlassFish server is started. If not, right-click GlassFish and choose Start from the pop-up menu.
-
Open the HTTP Binding Component Properties. To do this, expand Servers -> GlassFish -> JBI -> Binding Components in the Services window, right-click sun-http-binding and select Properties from the pop-up menu.
The HTTP Binding Component Properties Editor appears.
-
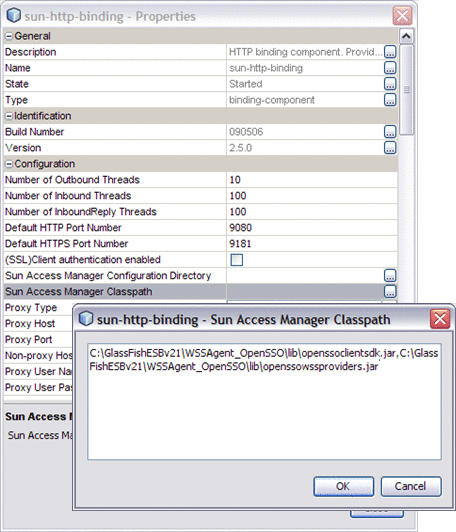
Configure the Sun Access Manager Classpath property to point to the following JAR files that you extracted to the WSSAgent_OpenSSO directory:
-
openssoclientsdk.jar
-
openssowssproviders.jar
Note that the two files must be separated by a comma.

-
-
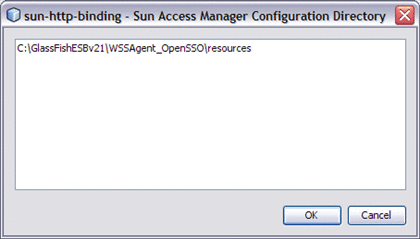
Configure the Sun Access Manager Configuration Directory property to point to the directory that contains the the AMConfig.properties file. This is located in the ./resources directory extracted to the WSSAgent_OpenSSO directory.

-
Modify the AMConfig.properties file as needed to connect to OpenSSO Enterprise Server. At a minimum, the following properties must be configured:
com.iplanet.am.naming.url=@PROTOCOL@:
   //@SERVER_HOST@:@SERVER_PORT@/@DEPLOY_URI@/namingservice
com.sun.identity.agents.app.username=@APPLICATION_USER@
com.iplanet.am.service.password=@APPLICATION_PASSWD@
am.encryption.pwd=@ENCRYPTION_KEY@
com.iplanet.am.server.protocol=@SERVER_PROTOCOL@
com.iplanet.am.server.host=@SERVER_HOST@
com.iplanet.am.server.port=@SERVER_PORT@
com.iplanet.am.services.deploymentDescriptor=@DEPLOY_URI@
com.sun.identity.loginurl=@SERVER_PROTOCOL@://@SERVER_HOST@:
   @SERVER_PORT@/@DEPLOY_URI@/UI/Login
com.sun.identity.liberty.authnsvc.url=@SERVER_PROTOCOL@://
   @SERVER_HOST@:@SERVER_PORT@/@DEPLOY_URI@/Liberty/authnsvc
-
Restart GlassFish and HTTP BC and test the modifications.
Using the GlassFish Realm Security to Authenticate the HTTP Client Credentials
The HTTP Binding Component can integrate with GlassFish Application Server, out of the box, to provide authentication of requesting clients by authenticating the client against the credentials in a "realm". To take advantage of this security feature, the HTTP/SOAP Binding Component's consuming endpoint needs to be properly configured in the WSDL.
To configure an HTTP/SOAP endpoint to use Realm security configure the PolicyReference element which belongs in the namespace, http://schemas.xmlsoap.org/ws/2004/09/policy. The PolicyReference identifies the Policy, which also belongs in the namespace, http://schemas.xmlsoap.org/ws/2004/09/policy, that provides the details for configuring Realm security.
This is an example of an endpoint with an associated PolicyReference element.
<port name="SoapBasicAuthPortRealm" binding="tns:SoapBasicAuthRealmBinding">
    <soap:address location="http://localhost:12081/SoapBasicAuthService
/SoapBasicAuthRealmPort"/>
    <wsp:PolicyReference URI="#HttpBasicAuthBindingBindingRealmPolicy"/>
</port>
|
The PolicyReference element contains an attribute called URI. The value of the URI consists of a '#' character followed by the name of the policy defined somewhere else in the WSDL. Taking this example further, the example below defines the Policy that the PolicyReference references. In the following example, ignore the UsernameToken. This is used by the "outbound" endpoint for sending the username/password credential when it sends a request. You don't need to have this element for "inbound" (consuming) endpoints, but it's included here to illustrate the bi-directionality of an endpoint.
<wsp:Policy wsu:Id="HttpBasicAuthBindingBindingRealmPolicy">
    <mysp:MustSupportBasicAuthentication on="true">
        <mysp:BasicAuthenticationDetail>
           <mysp:Realm realmName="file" />
        </mysp:BasicAuthenticationDetail>
    </mysp:MustSupportBasicAuthentication>
    <mysp:UsernameToken mysp:IncludeToken="http://schemas.xmlsoap.org/ws/2005
/07/securitypolicy/IncludeToken/AlwaysToRecipient">
       <wsp:Policy>
            <sp:WssUsernameToken10>wilma</sp:WssUsernameToken10>
            <sp:WssPassword>pebbles</sp:WssPassword>
       </wsp:Policy>
    </mysp:UsernameToken>
 </wsp:Policy>
|
Note –
The code above has been wrapped for display purposes
The PolicyReference and Policy elements are used above simply to ensure that we adhere to the standard for SOAP binding. There are no Tango WS-Policy Attachments involved and the WS-Policy Attachment "runtime" will ignore the child element MustSupportBasicAuthentication which is specific to the HTTP Soap BC. MustSupportBasicAuthentication is in the namespace, http://sun.com/ws/httpbc/security/BasicauthSecurityPolicy.
For example, your GlassFish installation comes with a preconfigured file realm which is essentially a file-based user database. See the GlassFish documentation on Realm security, or for a demonstration of how Realm security is configured for a SOAP endpoint see Securing Communication using GlassFish Realm Security.
- © 2010, Oracle Corporation and/or its affiliates
