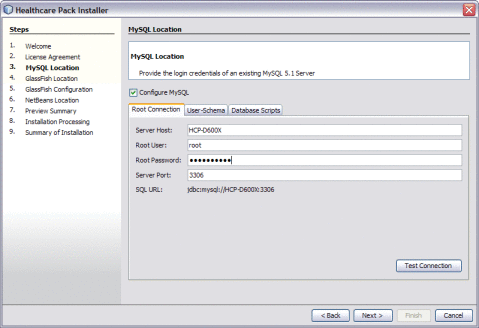
 To Configure MySQL
You can configure the installer to automatically create the database tables for the healthcare projects. You can also configure the user passwords and schema names for the databases, and view the scripts that will be run.
Tip –
If you do not want to create the MySQL database, deselect Configure MySQL. If you already have an existing MySQL schema named midm or arrdb, they will be overwritten unless you deselect Configure MySQL.
-
Complete the steps under To Begin the Installation.
-
On the MySQL Location window, either deselect Configure MySQL, or perform the following steps.
If Configure MySQL is not selected, the required databases for the PIX/PDQ are not automatically created.

-
On the Root Connection tab, verify or update the Server Host, Root User, and Server Port fields, and enter the root password for MySQL.
The default MySQL port number is 3306.
-
Click Test Connection to make sure the information is valid and MySQL is running.
-
Click the User-Schema tab.
The User-Schema page defines one user, mdm, for the Master Index and PIX/PDQ database, and another user, arr, for the Audit database. The default passwords are the same as the user names.

-
Accept the default user passwords and schema for each database, or do any of the following:
-
In the User field, select mdm, and then modify the Password and Schema name for the Master Index and PIX/PDQ database.
-
In the User field, select arr, and then modify the Password and Schema name for the Audit database.
Note –Make a note of any changes you make here, because you will need to update the JDBC connection pool information accordingly.
-
-
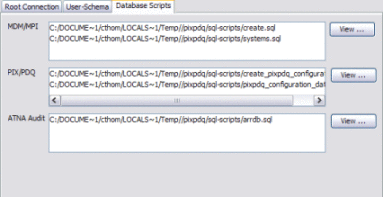
To view the database scripts that will be run to create the required databases, do the following:
-
Click the Database Scripts tab.

-
Select a script from any of the three boxes, and then click View next to that box.
The script appears in read-only view.
Note –The MDM/MPI scripts create the core master index tables. The PIX/PDQ scripts create tables specific to the PIX/PDQ solution. The ATNA Audit scripts create the Audit database.
-
-
Click Next.
A warning dialog appears to verify that your MySQL root user has the required privileges.

-
Do one of the following:
-
Continue to To Specify the GlassFish Location.
- © 2010, Oracle Corporation and/or its affiliates
