|
| |
| Sun Java System Portal Server 6 2005Q1 Administration Guide | |
Chapter 6
Administering Authentication, Users, and ServicesThis chapter describes how to use Sun Java™ System Access Manager to administer authentication, users, and services. This chapter does not attempt to explain all aspects of Access Manager. Instead, it focuses on those aspects that pertain to Sun Java™ System Portal Server. See the Access Manager documentation for more information.
This chapter contains these sections:
Overview of Sun Java System Access ManagerIn Sun Java System Portal Server (formerly Sun™ ONE Portal Server) implementations, you administer authentication methods, create domains, roles and users, and manage other data, such as profile attributes and logs, through the product itself. You also use the iPlanet Portal Server 3.0 APIs to develop custom applications.
Now, with Portal Server 6 product, you use Access Manager administrative capabilities and APIs formerly found within iPlanet Portal Server 3.0 itself. Access Manager is a set of tools that leverage the management and security potential of Sun Java™ System Directory Server. The goal of Access Manager is to provide an interface for managing user objects, policies, and services for organizations using the Sun Java System Directory Server.
Access Manager enables:
- Sun Java System Directory Server to perform user authentication and single sign-on, increasing data security.
- Administrators to initiate user entry management based on roles, an entry grouping mechanism which appears as an attribute in a user entry.
- Developers to define and manage the configuration parameters of a multitude of default and custom-made services.
You access all three of these functions through a graphical user interface, the web-based Access Manager admin console. In addition, the command-line interface, amadmin, enables you to perform batch administrative tasks on the directory server. For example, you can create, add, and activate new services; and create, delete, and read (get) organizations, people containers, groups, roles, and users.
Summary of Access Manager Features
Access Manager provides the following management components. Previously, these components resided within the Portal Server 3.0 framework itself.
- User Management—Creates and manages user-related objects (user, role, group, people container, organization, suborganization, and organizational unit objects). These can be defined, modified, or deleted using either the Access Manager console or the command-line interface.
- Authentication—Provides a plug-in solution for user authentication. The criteria needed to authenticate a particular user is based on the authentication service configured for each organization in the Portal Server enterprise. Before being allowed access to a Portal Server session, a user must pass through authentication successfully.
- Single Sign-On—Once the user is authenticated, the Access Manager API for Single Sign-On (SSO) takes over. Each time the authenticated user tries to access a protected page, the SSO API determines whether the user has the permissions required based on their authentication credentials. If the user is valid, access to the page is given without additional authentication. If not, the user will be prompted to authenticate again.
- Service Management—Specifies configuration parameters for default and custom-made services, including those for the Portal Server product itself (Portal Desktop, Rewriter, Search, and NetMail).
- Policy Management—Defines, modifies, or removes the rules that control access to business resources. Collectively, these rules are referred to as policy. Policies can be role-based or organization-based and can offer privileges or define constraints.
Comparison: Portal Server 3.0 and Portal Server 6.2
Table 6-1 provides an overview to the major changes that have taken place to the Portal Server product. Many functions and features that previously were part of the Sun ONE Portal Server 3.0 (formerly iPlanet Portal Server 3.0) product are now part of Access Manager. In the table, the first column lists a concept or term, the second column defines the function or feature for that term in the Portal Server 3.0 product, the third column describes the corresponding feature or function in the Portal Server 6.2 product.
Note
These changes were shipped with the Sun Java System 2003Q4 product and this information is retained for users of that product.
Table 6-1 Portal Server 3.0 to Portal Server 6.2 Comparison
Concept or Term
Portal Server 3.0
Portal Server 6.2
Role tree
A hierarchy you configure within Portal Server 3.0 to organize users and applications. The four levels of the role tree are:
Concept of role tree no longer applies.
Instead, because Access Manager leverages the capability of Sun Java System Directory Server, you use the Directory Information Tree (DIT) to organize your users, organizations, suborganizations, and so on.
Domain/
OrganizationA top-level grouping of users with common interests, such as employees or customers. Note that this is not a DNS domain, but a means that Portal Server 3.0 uses to group users into logical communities.
Concept of domain no longer applies. Instead, the Access Manager organization represents the top level of a hierarchical structure used by an enterprise to manage its departments and resources.
Upon installation, Access Manager asks for the root suffix, and the default is derived from the domain name (for example, for the domain sun.com, the default is dc=sun, dc=com). Additional organizations can be created after installation to manage separate enterprises. All created organizations fall beneath the top-level organization. Within these sub organizations other suborganizations can be nested. There is no limitation on the depth to the nested structure.
Role
Divides the members of a domain according to function. The role contains a set of attributes and policies that define a user’s Desktop policy.
Contains a privilege or set of privileges that can be granted to a user or users. This includes access and management of identity information stored in Sun Java System Directory Server and access to privileges protected by the Access Manager policy module. A Access Manager role also has associated with it a profile, which is stored in the class-of-service template.
Role is defined differently in Access Manager and it includes the ability for a single user to have multiple roles, which was previously not supported.
The privileges for a role are defined in access control instructions (ACIs). The Access Manager includes several predefined roles. The Access Manager Console allows you to edit a role’s ACI to assign access privileges within the Directory Information Tree.
Attribute
Supports two types of attributes: global and user-configurable. Global attributes apply to the entire platform and are configured only by the Super Administrator. User-configurable attributes apply to underlying levels of the role tree, as described in the following sections. A delegated Domain Administrator can configure these attributes for the domain, parent role, child role, and user levels. At the user level of the role tree, some attributes can be customized for each user, as needed.
Makes use of Access Manager attributes, which can be one of the following types:
- Global— The values applied to the global attributes are applied across the Access Manager configuration and are inherited by every configured organization.
- Dynamic—A dynamic attribute can be assigned to an Access Manager configured role or organization. When the role is assigned to a user or a user is created in an organization, the dynamic attribute then becomes a characteristic of the user.
- Organization—These attributes are assigned to organizations only. In that respect, they work as dynamic attributes. They differ from dynamic attributes, though, as they are not inherited by entries in the subtrees.
- User—These attributes are assigned directly to each user. They are not inherited from a role or an organization and, typically, are different for each user.
- Policy—Policy attributes are privilege attributes. Once a policy is configured, they may be assigned to roles or organizations. That is the only difference between dynamic and policy attributes; dynamic attributes are assigned directly to a role or an organization and policy attributes are used to configure policies and then applied to a role or an organization.
Policy
Configures portal access policies to applications, the Desktop, NetFile, Netlet, and so on.
Rules that define who can do what to which resource. The Access Manager Policy Service allows an organization to set up these rules or policies. In general, policy is created at the organization (or suborganization) level to be used throughout the organization’s tree. In order to create a named policy, the specific policy service must first be added to the organization under which the policy will be created.
In Sun Java System Identity Server 6.2, the policy service consists only of lists of URLs that are allowed or denied. This is not sufficient for Portal Server to build a policy-based Desktop for content. This is why policy for channel access is built into the display profile for the Desktop. The Portal Server 6 Desktop supports a display profile that allows list of channels to be merged from several roles. If, for example, you have 25 roles, each with a handful of channels associated with that role, users can be configured to have any number of those roles, and the Desktop they get will then provide the aggregation of all those roles. Merge semantics control how channels from the various roles are aggregated or merged. For the purpose of merging display profiles, a hierarchical ordering is imposed on the roles in the Portal Server. The merge begins with the lowest priority document (lowest number) and proceeds in increasing priority number, until it arrives at the user (base), the highest priority profile. See Chapter 10, "Administering the Display Profile" for information on merging display profiles.
Component/
ServiceThe four major components of Portal Server 3.0 are the server itself, the profile server, the gateway, and the firewall.
Component has been replaced by Access Manager service, which is group of attributes defined under a common name. The attributes define the parameters that the service provides to an organization. Access Manager is the service framework.
Portal Server 6 relies on Access Manager to provide core services, such as authentication, user management, and policy management, as well as for the framework to run Portal Server specific services (Desktop, NetMail, Rewriter, and Search).
Administrative interfaces
Provides its own admin console to administer only Portal Server 3.0 components.
The command-line interface is ipsadmin.
Uses the Access Manager admin console to administer Access Manager services, users, and policy, as well as Portal Server specific services (Desktop, NetMail, Rewriter, and Search.)
The command-line interfaces that replace ipsadmin are amadmin, dpadmin, and rwadmin.
Comparison: Portal Server 6.0 and Portal Server 6.2
Table 6-2 provides an overview to the changes that have taken place between the Portal Server 6.0 product and Portal Server 6.2 product. In the table, the first column lists a concept or term, the second column defines the function or feature for that term in the Portal Server 6.0 product, the third column describes the corresponding feature or function in the Portal Server 6.2 product.
Note
These changes were shipped with the Sun Java System 2003Q4 product and this information is retained for users of that product.
Table 6-2 Portal Server 6.0 to Portal Server 6 Comparison
Concept or Term
Sun Java System Portal Server 6.0
Portal Server 6
Policy
Assign a policy to users. Once a policy has been named and created, it can be assigned to the organization or role. Assigning a policy at the organization level makes its attributes available to all entries in the organization. Assigning policy to a role makes its attributes available to all users who contain the role attribute.
Delegate an organization’s policy definitions and decisions to another organization. (Alternately, policy decisions for a resource can be delegated to other policy products.) A referral policy controls this policy delegation for both policy creation and evaluation.
Create a normal policy to define access permissions. A normal policy can consist of multiple rules, subjects, and conditions.
Authentication menu
The authentication menu configuration feature provided by the Sun ONE Identity Server 5.1 administration console supports a menu of authentication modules selected by the user.
If you need to configure a selectable list of valid authentication modules, use the Sun Java System Identity Server administration console to set each authentication module with the same value in the authentication level attribute. Refer to Chapter 6, "Administering Authentication, Users, and Services" for information on configuring authentication modules.
Access Manager Constraints
When using Access Manager, the following constraints apply:
- The predefined Access Manager roles cannot span multiple parallel organizations; however, a role can be assigned to a user who resides in a child organization of the organization that the role is associated with. In addition, access to resources in multiple domains can also be enabled by creating a custom role and defining the necessary Access Control Instructions (ACIs) to grant the role the privileges required.
- A user must belong to an organization and can only belong to that organization.
- Hierarchical roles are not supported. For example, you cannot create role C as equal to the sum of role A and role B, and have a user with role C have access to the resources in Role A, without being explicitly assigned to role A.
- The access permission for the RoleAdministratorRole can only be configured through editing corresponding ACIs directly.
- When role administrators (delegated administrators) log in to the Access Manager admin console, they can see all the roles and their associated services and properties under the same organization even if the role administrators don’t have the permission to modify them.
Access Manager Interfaces
Access Manager Admin Console
This browser-based console provides a graphical user interface to manage the Access Manager enterprise, including Portal Server services. The admin console has default administrators with varying degrees of privileges used to create and manage the services, policies and users. (Additional delegated administrators can be created based on roles.) See Chapter 7, "Configuring Delegated Administration" for more information.
The Access Manager admin console is divided into three sections: the location pane, the Navigation pane and the Data pane. By using all three panes you navigate the directory, perform user and service configurations, and create policies.
See Chapter 1, "Introduction to Administering the Sun Java System Portal Server" for more information.
Access Manager Command-Line
The Access Manager command-line interface is amadmin, to administer the server. amadmin is also used to load XML service files into the directory server and perform batch administrative tasks on the directory tree.The iPlanet™ Portal Server 3.0 command-line interfaces, ipsadmin and ipsserver are no longer used.
For more information on amadmin, see the Access Manager documentation.
Logging In to the Access Manager Admin ConsoleYou can log in to the Access Manager console in two ways:
When you log in to the admin console, the capabilities that are presented to you depend on your access permissions. Access permissions are determined based on the ACIs or roles assigned to you. For example, the superuser sees all of the admin console’s functionality; a delegated administrator might only see a subset of this functionality, perhaps for a suborganization; end users see only the user attributes pertaining to their particular user ID.
Currently, there are two URLs available for logging in to the admin console:
The /amconsole URL explicitly requests the HTML pages for the Access Manager admin console. If you log in using /amconsole, it brings up the admin console and then you’ll see the URL change to /amserver/UI/login so the user can authenticate. Regardless of the configuration, this URL can be used to access the admin console.
The /amserver URL requests the HTML pages for the Access Manager service. Although the default set up when Portal Server is installed is to redirect this URL to log in to the admin console, because the /amserver URL accesses the Access Manager service this URL can be used to make other services besides the console available. For example,
- If a user accesses an application with an invalid session, an application may redirect the /amserver URL request to amserver/UI/login with the goto parameter. For example, the Portal Server Desktop does this as well as the Access Manager agent.
- A customer may direct users to amserver/UI/login as their starting point into some application or portal. Their default redirect URL could then be some portal application or custom application.
- A custom application could directly call the amserver/UI/login to authenticate.
To log in to the Access Manager admin console
Configuring Log in to the Admin Console Using an IP Address
You cannot log in to the Access Manager admin console by using the server’s IP address. This is because of the cookie domain settings in Access Manager.
However, you can add the local host’s IP address to the list of Cookie Domains on the admin console.
You should now be able to access the admin console with IP address, rather than the domain name.
Viewing Basic InformationA script is available to enable you to display basic information about the product such as the version, build date of the Portal Server as well as the version and build date for the jar file. The version script is installed in PortalServer-base/SUNWps/bin directory where PortalServer-base is the base directory in which you installed the Portal Server. The default is /opt.
To view product information:
Starting and Stopping Portal ServerThis section describes how to stop and start Portal Server. You need to restart the each web container instance using the script for that web container. For example:
These instructions may vary with the web container. See your web container documentation for more information.
The Portal Server supports various platform locales. To start the Portal Server with a value other than the installed default see the Sun Java System Portal Server 6 2005Q1 Developer’s Guide.
Managing Access Manager ServicesThis section provides an introduction to Access Manager services used by Portal Server. See the Access Manager documentation for complete information.
Installation and Sun Java System Web Server Packaging
- The Portal Server installer executes the Access Manager installer if the Access Manager has not previously been installed.
- Portal Server shares the web container with Access Manager. The web container specifies a runtime environment for Web components including concurrency, deployment, life cycle management, security, transaction, and other services.
- Portal Server uses the JVM™ and other components that Access Manager provides.
User Management
- Portal Server stores its profile information in Access Manager using the Access Manager APIs.
- Portal Server leverages multi-role support in Access Manager.
- Portal Server uses open and non-proprietary standard schema attributes, for example, givenName.
- Access Manager provides direct access to the LDAP directory.
Single Sign-On/Authentication
Service Management
Portal Server 6 defines the following Access Manager services:
- Desktop—Provides the portal front-end and is the primary end user interface to the portal.See Chapter 8, "Administering the Portal Desktop Service" for information on setting up and administering the Portal Desktop.
- NetMail—Accesses the IMAP and SMTP mail servers in the Internet and allows users to access mail through the portal. See Chapter 11, "Administering the NetMail Service" for information on setting up and administering NetMail.
- Rewriter—Implements rules set up by the administrator to rewrite URLs to provide appropriate access. See Chapter 12, "Administering the Rewriter Service" for information on setting up and administering the Rewriter.
- Search—Provides a search capability for the Portal Server including basic and advanced search channels of the available documents. See Chapter 13, "Administering the Search Engine Service" for information on setting up and administering the Search service.
Managing Portal Server UsersThe Directory Information Tree (DIT) organizes your users, organizations, suborganizations, and so on into a logical or hierarchical structure that enables you to efficiently administer and assign appropriate access to the users assuming those roles or contained within those organizations. This section provides information to help you plan the directory structure or tree underlying your portal server implementation by providing information about the functions and capabilities of organizations, suborganizations, and roles, and also providing procedures for creating and managing organizations, roles, and users.
Note
Portal Server 6 supports organizations; previously, Portal Server 3.0 used the concept of domains.
The top of the organization tree in Access Manager is specified at install time. Additional organizations can be created after installation to manage separate enterprises. All created organizations fall beneath the top-level organization. Within these suborganizations other suborganizations can be nested. There is no limitation on the depth to the nested structure.
Note
The top of the tree does not have to be called isp. It can be called anything. But with a tree organized with a generic top, for example, isp, then organizations within the tree can share roles.
Roles are a new grouping mechanism that are designed to be more efficient and easier to use for applications. Each role has members, or entries that possess the role. As with groups, you can specify role members either explicitly or dynamically. The roles mechanism automatically generates the nsRole attribute containing the DN of all role definitions in which the entry is a member. Each role contains a privilege or set of privileges that can be granted to a user or users. In Portal Server 6, multiple roles can be assigned to a single user. The privileges for a role are defined in Access Control Instructions (ACIs). The Portal Server includes several predefined roles. The Access Manager console allows you to edit a role’s ACI to assign access privileges within the Directory Information Tree. Built-in examples include Top-level Admin Role and Top-level Help Desk Admin Role. You can create other roles that can be shared across organizations.
Planning Organizations, Suborganizations, and Roles
As you plan your DIT structure, you need to decide whether to use a hierarchical or flat tree structure. As a general rule, you should strive to make your tree as flat as possible. However, as the size of your organization grows, a certain amount of hierarchy is important to facilitate granting and managing user access. The three key structural entities in Access Manager for building your DIT structure are organizations (or suborganizations), roles, and users. Before you plan your structure, you should understand the functions, characteristics, and interrelationships of each of these entities.
Organizations and Suborganizations
- Allow creation of hierarchical relationships that can represent or model your enterprise or organization’s hierarchy.
- Can contain users created by its corresponding admin. This provides a method of grouping users together for administration and access control purposes. It is typically easier to administer and control access if users with similar needs are grouped together.
- Can be easily created or removed by an admin in a parent organization or suborganization via the admin console. However, when removed, all subordinate organizations and users are also removed, so not suitable when names or structure likely to change.
Roles
- Allow assignment of a privilege or set of privileges to a user or users. Within an organization, multiple roles can be defined to provide specific privilege sets to users.
- Define permissions via Access Control Instructions (ACI), which must be directly edited. Once defined, can be easily assigned or unassigned to an organization, a suborganization or a user. Unassigning a role from one entity only applies to that entity. Roles will still exist and remain assigned and be available for reassignment to other entities, so are more suited for organizations in which access changes will be frequently required.
- Can control visibility of channels and user’s ability to overwrite channels. Settings within the XML Display Profile can make channels in the XML document visible or invisible by default. In addition, the default channels in the XML document can be prevented from being overridden.
Users
- Represent the identity of a person. Can be created within an organization or suborganization by its admin.
- Can be associated with multiple roles, but user must be within the roles’ scope. In addition users inherit attributes from the suborganization.
- Belong to only one organization or suborganization; however, users can be easily moved from one organization to another if the admin has the privilege to do it.
- Can personalize visibility of channels.
Scenario 1: Hierarchical Structure with Suborganizations and Roles
Although you should strive for as flat a structure as possible, some hierarchy is useful to provide necessary groupings. The high-level steps to create a hierarchical structure are:
- Creating a top-level organization.
- Identifying all the functional or organizational groupings of users in your enterprise and determine for which ones you want to create a DIT structural entity, that is, ones that need to have specific privileges. Typically this should be only the largest subdivisions in your enterprise and the administrators for managing them. Use names that are generic or functional, so reorganizations and name changes will not be problematic.
- For each DIT entity that has some affiliation with the top-level organization, creating either a suborganization (that is, an organization under another organization in the Access Manager world) or a role for that entity.
Use the following guidelines to decide whether to use a suborganization or role:
- Define a suborganization for entities that contain groupings of users with similar access needs. Typically this will be broad functional or organizational entities for which a single set of permissions could be assigned.
- Define a role if it is possible that users in the child organizations need to have this role. All users belong to an organization or suborganization. If they do not have any roles assigned to them, they inherit their permissions from the organization in which they reside. Therefore, if you want a user to have attributes from both the organization they reside in and any parent organizations, you must use the role mechanism and assign them multiple roles.
- For each role, defining a RoleAdministratorRole to manage the role. Then set the ACIs appropriately (management privileges: add or delete users, modify role attributes, and so on.)
- Defining the users who will access your enterprise. If users are inheriting their privileges from their organization, place them in the appropriate organization. If users are receiving their privileges through role assignments, they must be placed so that they are within the role’s scope, that is, within the organization or a child of the organization in which the role is defined.
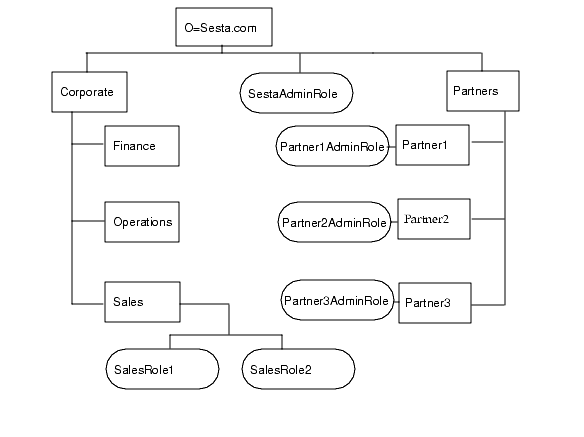
Figure 6-1 illustrates a hierarchical directory structure. In this figure, the top-level organization is Sesta.com. Directly beneath the top-level is the SestaAdminRole to administer the organization and the Corporate and Partners suborganizations. The Corporate organization has three suborganizations: Finance, Operations, and Sales. Because there are multiple types of users within the Sales organization, two roles for are defined: SalesRole1 and SalesRole2. Within the Partners organization there are three suborganizations: Partner1, Partner2, and Partner3. Each of these organizations, requires its own administrator, so three roles are defined and each one is associated with the appropriate organization.The partner roles are PartnerAdmin1, PartnerAdmin2, and PartnerAdmin3.
Figure 6-1 Hierarchical Directory Structure
Scenario 2: Flat Tree Structure
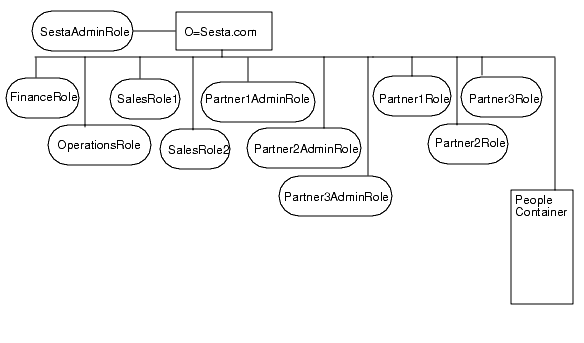
If your organization changes often, a flatter or even totally flat tree structure may be appropriate. A structure with one organization, with one People container, and roles all at the same level is often useful if your enterprise changes frequently. With one organization, enterprise changes will not impact your DIT. All access privileges will be defined using roles and since all users are in the single People container and all roles are at the same level, any user can be assigned any role.
Figure 6-2 illustrates a flat directory structure. In this figure, the top-level and only organization is Sesta.com. All entities are defined directly beneath this top-level organization. They include the SestaAdminRole to administer the organization, four roles for the various corporate functions needed by the Finance, Operations, Sales1 and Sales2 users, and six roles for the user functions required by the partners: Partner1Role, Partner2Role, Partner3Role, Partner1AdminRole, Partner2AdminRole and Partner3AdminRole.
Figure 6-2 Flat Directory Structure
Creating New Organizations and Suborganizations
Organizations and suborganizations allow you to structure and group users for administration and access control purposes. Once you have determined the hierarchy or structure for your enterprise you must create the necessary organizations and suborganizations to implement it. By default, when you create a new organization or suborganization, there are no services, policies, users, or roles defined for it. Therefore, whenever you create a new organization or suborganization, you need to perform the following high-level steps to configure it:
- Adding all the services you want available to the organization. See To Add a Service for information. Typically, at a minimum you will want to add the following services:
- Authentication. The Core authentication service and any authentication service with which users in the organization will use to authenticate (LDAP, anonymous). See Configuring Authentication for further information.
- URL Policy Agent.
- User.
- Portal Server Configuration. Any Portal Server services you want to enable for users in the organization (Portal Desktop and NetMail).
- Creating templates for each of the added services. See To Create a Template for a Service for more information.
- Creating the policies needed to grant users within the organization access privileges. See Overview of How Portal Server Uses Policy Management for more information on using policies.
- Adding users to the organization. See To Add a New User for information.
- Creating and assigning any roles you want in the organization. See To Create a New Role and To Assign a Role to a User for information.
- Configuring the services enabled for your organization. To configure the Desktop, see Chapter 8, "Administering the Portal Desktop Service" for information. To configure NetMail, see Chapter 11, "Administering the NetMail Service".
For a quickstart procedure to create a new organization and configure it to use portal, see Creating a New Portal Organization Quick Start.
To Create a New Organization or Suborganization
See Planning Organizations, Suborganizations, and Roles for recommendations on how to plan your organizations and suborganizations for use with Portal Server.
Note
For current and complete information on the Access Manager admin console, refer to the Sun Java System Access Manager 2005Q1 Administration Guide.
- Log in to the Sun Java System Access Management Server administration console as administrator.
By default, Identity Management is selected in the location pane and All created organizations are displayed in the navigation pane.
- If you are creating a suborganization, use the navigation pane to select the organization where the suborganization will be created.
- Click New in the navigation pane.
The New Organization page displays in the data pane.
- Type a value for the name of the organization or suborganization in the New Organization page.
- Choose a status of Active or Inactive.
The default is Active. This can be changed at any time during the life of the organization or suborganization by selecting the properties arrow. Choosing inactive disables log in to the organization or suborganization.
- Click OK.
The new organization or suborganization displays in the navigation pane.
- Choose Services from the View menu.
- Click New.
- Enable the desktop service for the new organization.
- Select Identity Management from the location pane.
- Select Organizations from the View menu.
- Select the newly created organization.
- Select Services from the View menu.
- Select Portal Desktop
- Change the value from DummyChannel to JSPTabContainer (or the name of the op-level container that will be used by the new organization) in Default Channel Name.
- Change the value from default to sampleportal (or the desktop type that will be used by the new organization) in Portal Desktop Type.
To Add a Service
Note
For current and complete information on the Access Manager admin console, refer to the Sun Java System Access Manager 2005Q1 Administration Guide.
- Log in to the Sun Java System Access Management Server administration console as administrator.
By default, Identity Management is selected in the location pane and Organizations is selected in the Navigation pane.
- Navigate to the organization or suborganization for which you want to add a service.
Use the View menu in the navigation pane.
- Choose Services from the View menu.
- Click New.
- Select the service or services to add from the data pane and click OK.
To Create a Template for a Service
Note
For current and complete information on the Access Manager admin console, refer to the Sun Java System Access Manager 2005Q1 Administration Guide.
- Log in to the Sun Java System Access Management Server administration console as administrator.
By default, Identity Management is selected in the location pane and Organizations is selected in the Navigation pane.
- Navigate to the organization or suborganization where the added service exists.
Use the View menu in the navigation pane.
- Choose Services from the View menu.
- Click the properties arrow next to the added service.
- Accept or modify the default attribute values for the service and click Save.
For information on setting Access Manager specific service attributes, see the Access Manager Administration Guide. For information on the setting Portal Server specific service attributes, see the appropriate appendix in this guide.
To Add a New User
Note
For current and complete information on the Access Manager admin console, refer to the Sun Java System Access Manager 2005Q1 Administration Guide.
- Log in to the Sun Java System Access Management Server administration console as administrator.
By default, Identity Management is selected in the location pane and Organizations is selected in the Navigation pane.
- Navigate to the organization or suborganization where the user will be created.
- Choose Users from the View menu and click New.
The New User page appears in the data pane.
- Select the services to assign to the user and click Next.
Typically, at a minimum you will want to add the Portal Desktop, Authentication Configuration, and Subscription services for most users.
- Enter the user information and click finished.
The new user appears in the navigation pane.
To Add a Service to a User
Note
For current and complete information on the Access Manager admin console, refer to the Sun Java System Access Manager 2005Q1 Administration Guide.
- Log in to the Sun Java System Access Management Server administration console as administrator.
By default, Identity Management is selected in the location pane and Organizations is selected in the Navigation pane.
- Navigate to the organization or suborganization where the user will be created.
- Choose Users from the View menu
- Select the user in the navigation pane and click the Properties arrow.
- Select Services from the View menu.
- Click New to choose the services to assign to the users.
- Check the services and click OK.
Typically, at a minimum you will want to add the Portal Desktop, and Subscription services for most users.
To Create a New Role
Note
For current and complete information on the Access Manager admin console, refer to the Sun Java System Access Manager 2005Q1 Administration Guide.
- Log in to the Sun Java System Access Management Server administration console as administrator.
By default, Identity Management is selected in the location pane and Organizations is selected in the Navigation pane.
- Navigate to the organization or suborganization where the role will be created.
- Choose Roles from the View menu and click New.
The New Role page appears in the data pane.
- Enter the role information (Name, Description, Role Type, Access Permissions) and click Finish.
The new role appears in the navigation pane.
Note
If you are creating a customized role for delegated administration, you must have previously defined the ACI privileges for the role. See Chapter 7, "Configuring Delegated Administration" for information.
To Assign a Role to a User
Note
For current and complete information on the Access Manager admin console, refer to the Sun Java System Access Manager 2005Q1 Administration Guide.
- Log in to the Sun Java System Access Management Server administration console as administrator.
By default, Identity Management is selected in the location pane and Organizations is selected in the Navigation pane.
- Navigate to the organization or suborganization where the role will be created.
- Choose Users from the View menu.
- Click the properties arrow next to the user who will be assigned the role.
The user profile information appears in the data pane.
- Click Roles from the View menu in the data pane.
The Add Roles page appears.
- Check the box next to the roles to assign and click Save.
The Roles for this User box is updated with the assigned roles.
- Click Save to save the changes.
Enabling Existing Users to Access the Portal Server
When you install the Portal Server on an existing instance of Access Manager, users are not added to use the Portal Server Desktop. In order to allow users to access the Desktop, you must enable them. Use the following procedures to enable users in the default organization or in another organization.
To Enable Users in the Default Organization
Before you start you will need the to obtain some configuration information. If you do not know all the details of the configuration, the information can be retrieved using a script from the /var/sadm/pkg/SUNWps/pkginfo file.
Note
For current and complete information on the Access Manager admin console, refer to the Sun Java System Access Manager 2005Q1 Administration Guide.
- Determine or retrieve the following information from the /var/sadm/pkg/SUNWps/pkginfo file:
- The distinguished name for the directory manager (referred to as DS_DIRMGR_DN/). Default value is cn=Directory Manager.
- The directory manager password (referred to as DS_DIRMGR_PASSWORD/).
- The fully qualified domain name of the directory server (referred to as DS_HOST/).
- The port on which the directory server runs (referred to as DS_PORT/). Default value is 389.
- The root suffix of the directory tree (referred to as DS_ROOT_SUFFIX/). Default value is dc=orgname,dc=com (such as dc=sun,dc=com).
- The default organization of the Portal Server installation (referred to as DS_DEFAULT_ORG/). Default value is o=domain-name.
- The base directory of the Portal Server installation. Default value is /opt.
If you do not know the configuration information, run the following script and refer to the output to obtain the information you will need to complete this procedure.
- Change directories to Access Manager utilities directory. For example, if the base directory is /opt, enter:
cd /AccessManager-base/SUNWam/bin
- If the root suffix of the directory server and the default organization are not the same, execute the following command:
./ldapsearch -h /DS_HOST/ -p /DS_PORT/ -D /DS_DIRMGR_DN/ -w /DS_DIRMGR_PASSWORD/ -b "ou=People,/DS_DEFAULT_ORG/,/DS_ROOT_SUFFIX/" "(uid=*)" dn | /usr/bin/sed ’s/^version.*//’ > /tmp/.tmp_ldif_file1
- If the root suffix of the directory server and the default organization are the same, execute the following command:
./ldapsearch -h /DS_HOST/ -p /DS_PORT/ -D /DS_DIRMGR_DN/ -w /DS_DIRMGR_PASSWORD/ -b "ou=People,/DS_ROOT_SUFFIX/" "(uid=*)" dn | /usr/bin/sed ’s/^version.*//’ > /tmp/.tmp_ldif_file1
- Execute the following command
grep "^dn" /tmp/.tmp_ldif_file1 | awk ’{
print $0
print "changetype: modify"
print "add: objectclass"
print "objectclass: sunPortalDesktopPerson"
print "objectclass: sunPortalNetmailPerson\n" }’ >
/tmp/.tmp_ldif_file2- Execute the following command.
./ldapmodify -c -h DS_HOST -p DS_PORT \ -D DS_DIRMGR_DN -w DS_DIRMGR_PASSWORD -f /tmp/.tmp_ldif_file2
- Remove all temporary files.
rm /tmp/.tmp_ldif_file1 /tmp/.tmp_ldif_file2
To Enable Users in a Non-Default Organization
Note
For current and complete information on the Access Manager admin console, refer to the Sun Java System Access Manager 2005Q1 Administration Guide.
- Determine or retrieve the following information from the /var/sadm/pkg/SUNWps/pkginfo file:
- The distinguished name for the directory manager (referred to as DS_DIRMGR_DN/). Default value is cn=Directory Manager.
- The directory manager password (referred to as DS_DIRMGR_PASSWORD/)
- The fully qualified domain name of the directory server (referred to as DS_HOST/)
- The port on which the directory server runs (referred to as DS_PORT/). Default value is 389.
- The root suffix of the directory tree (referred to as DS_ROOT_SUFFIX/). Default value is dc=orgname,dc=com (such as dc=sun,dc=com).
- The organization of the Portal Server installation for which you want to update the users (referred to as DS_ORG_TO_UPDATE/). Default value is ".
- The base directory of the Portal Server installation. Default value is /opt.
- Add services for the organization or suborganization containing the existing users you want to enable. See To Add a Service for information on the procedure.
- Create a template for each service you add. See To Create a Template for a Service for information on the procedure.
- Create and assign policies for each service. See To Add a Policy Service for a Peer or Suborganization, To Create a Referral Policy for a Peer or Suborganization, and To Create a Normal Policy for a Peer or Suborganization for information.
- Set the URL to which to redirect successfully authenticated users from the organization. See To Redirect Successful Login User to the Portal Desktop URL.
- Change directories to Access Manager utilities directory. For example, if the base directory is /opt, enter
cd /AccessManager-base/SUNWam/bin
- Enable users within the organization or organizations, do one of the following:
- To enable users only within a particular organization, defined as DS_ORG_TO_UPDATE/, then use the following command (type as one line):
./ldapsearch -h /DS_HOST/ -p /DS_PORT/ -D /DS_DIRMGR_DN/ -w /DS_DIRMGR_PASSWORD/
-b "ou=People,/DS_ORG_TO_UPDATE/,/DS_ROOT_SUFFIX/" "(uid=*)" dn |
/usr/bin/sed ’s/^version.*//’ > /tmp/.tmp_ldif_file1- To enable users in all organizations, then use the following command (type as one line):
./ldapsearch -h /DS_HOST/ -p /DS_PORT/ -D /DS_DIRMGR_DN/ -w /DS_DIRMGR_PASSWORD/
-b "/DS_ROOT_SUFFIX/" "(uid=*)" dn | /usr/bin/sed ’s/^version.*//’ > /tmp/.tmp_ldif_file1- Execute the following command:
grep "^dn" /tmp/.tmp_ldif_file1 | awk ’{
print $0
print "changetype: modify"
print "add: objectclass"
print "objectclass: sunPortalDesktopPerson"
print "objectclass: sunPortalNetmailPerson\n" }’ > /tmp/.tmp_ldif_file2- Execute the following command:
./ldapmodify -c -h DS_HOST -p DS_PORT \ -D "DS_DIRMGR_DN" -w DS_DIRMGR_PASSWORD -f /tmp/.tmp_ldif_file2
- Remove all temporary files.
rm /tmp/.tmp_ldif_file1 /tmp/.tmp_ldif_file2
- Change directory to Portal Server utilities directory.
cd /AccessManager-base/SUNWps/bin
- Execute the following to load the display profile for your non-default organization.
./dpadmin modify -u "uid=amadmin,ou=people,DS_DEFAULT_ORG,DS_ROOT_SUFFIX" -w DS_DIRMGR_PASSWORD -d "NON_DEFAULT_ORG,DS_DEFAULT_ORG,DS_ROOT_SUFFIX" AccessManager-base/SUNWps/samples/desktop/dp-org.xml
Creating a New Portal Organization Quick Start
The following task describes the steps to create a new organization and enable it for portal use. By default, when you log in, Identity Management is selected in the location pane, and Organizations is selected in the Navigation pane.
Note
For current and complete information on the Access Manager admin console, refer to the Sun Java System Access Manager 2005Q1 Administration Guide.
- Create the new organization.
- Add services for the new organization.
- Select Organizations from the View menu in the navigation pane and click on the newly created organization from the Name list.
- Select Services from the View menu.
- Click New.
The Add Services page appears in the data pane. Select the services you want to register for your organization. Minimum services that need to be added are:
- Configure each service by clicking the properties arrow. Click Create to modify the configuration attributes. See the Sun Java System Access Manager Administration Guide for a description of attributes that are not specific to Portal Server configuration
- Create the Desktop referral policy from the parent organization to the new organization.
The referral must define the parent organization as the resource in the rule, and it must contain a SubOrgReferral with the suborganization as the value in the referral.
- Select Identity Management from the location pane.
- Select the parent organization.
- Select Policies from the View menu.
- Click New to create new policy.
The Create Policy page appears in the data pane.
- Select Referral for the type of policy.
- For Name, type SubOrgReferral_Desktop. Then click OK.
The Policy is created and appears under Policies.
- Click the properties arrow next to SunOrgReferral_Desktop.
- Click Rules from the View menu in the data pane and click New. Make sure Portal Desktop is selected and click Next.
- Specify a name for the Portal Desktop rule and click Finish.
- Click Referrals from the View menu in the data pane and click Add. Make sure that the name of the suborganization is selected for Value in the data pane and click Create to complete the policy’s configuration.
- Create a normal Portal Desktop policy for the new organization.
- Navigate to the sub organization.
- Choose Policies from the View menu.
The policies for that organization are displayed.
- Select New in the navigation pane. The New Policy page opens in the data pane.
- Make sure you select Normal in Type of Policy.
- Type a name for the policy.
- Click OK.
- Choose Rules from the View menu in the data pane and click New. The Add Rule page opens in the data pane.
- Specify the name of the rule and select an action under Set Rule Actions. Click Finish.
- Choose Subjects from the View menu in the data pane and click New. The Add Subject page opens in the data pane.
- Select a subject that the Portal Desktop policy will be applied and choose Next to complete the subject configuration.
- Click Finish to complete the policy’s configuration.
- Create a new user in the new organization.
- Enable the desktop service for the new organization.
- Select Identity Management from the location pane.
- Select Organizations from the View menu.
- Select the newly created organization.
- Select Services from the View menu.
- Select Portal Desktop.
- Change the value from default to sampleportal (or the desktop type that will be used by the new organization) in Portal Desktop Type.
- Access the new organization’s Desktop.
Configuring AuthenticationThis section describes how to configure Portal Server authentication. Access Manager provides a framework for authentication. Authentication is implemented through plug-in modules that validate the user’s identity. Access Manager provides seven different authentication modules as well as a Core authentication module. The Access Manager admin console is used to set the default values, to add authentication services, to create an organization’s authentication template, and to enable the service. Because the Core authentication module provides the overall configuration for authentication, the Core authentication module must be added and a template for it created for each organization before you can configure any of the specific authentication modules.
Note
The authentication menu configuration feature provided by the Sun ONE Identity Server 5.1 administration console is not supported in this release of Sun Java System Access Manager. If you need to configure a selectable list of valid authentication modules, use the Access Manager administration console to set each authentication module with the same value in the authentication level attribute. Refer to To Configure the Authentication Menu for information on configuring authentication modules.
During installation the Core authentication is added and a template is created for it in the default organization. In addition, the installation also adds and creates templates for the following authentication modules:
- LDAP—LDAP authentication allows any valid user within the search base of the directory tree to log in to the Portal Server. This will automatically assign a user to a specific role.
- Membership—Membership authentication allows a user to create an account and personalizes it without the aid of an administrator. With this new account, the user can access it as an add user.
Note
Although the installation configures a basic authentication implementation consisting of the Core, LDAP and Membership modules, you will need to configure authentication manually if you create new organizations or if you want to set up additional authentication functionality such as the ability to authenticate to an external LDAP directory or identity provider.
The high-level steps to configure an authentication module are as follows:
- Adding the Core authentication service for each new organization. See To Add a Service for the steps to add a service.
- Creating a template for the Core authentication service. See To Create a Template for a Service for the steps to create template for a service.
- Adding the authentication services to support for each organization. See To Add a Service for the steps to adding a service.
- Creating service templates for the authentication services to support for the organization. See To Create a Template for a Service for the steps to create a template for an authentication service. For information on the setting the service attributes, see the Access Manager Administration Guide, Chapter 5, “Authentication Options.”
- Configuring the authentication menu. See To Configure the Authentication Menu for the steps to configure the authentication order.
- Configuring the order to use authentication services. See To Configure Authentication Order for the steps to configure the authentication order.
Authentication By Authentication Level
Each authentication module can be associated with an integer value for its authentication level. Authentication levels can be assigned by clicking the authentication module's Properties arrow in Service Configuration, and changing the corresponding value for the module's Authentication Level attribute. Higher authentication levels define a higher level of trust for the user once that user has authenticated to one or more authentication modules.
To Configure the Authentication Menu
Users can access authentication modules with a specific authentication level. For example, a user performs a login as a user with the following syntax:
http://hostname:port/deploy_uri/UI/Login?authlevel=auth_level_value
All modules whose authentication level is larger or equal to auth_level_value will displayed as an authentication menu for the user to choose. If only one matching module is found, then the login page for that authentication module will be directly displayed.
Note
For current and complete information on the Access Manager admin console, refer to the Sun Java System Access Manager 2005Q1 Administration Guide.
- Log in to the Sun Java System Access Management Server administration console as administrator.
By default, when you log in, Identity Management is selected in the location pane, and Organizations is selected in the Navigation pane.
- Navigate to the organization or suborganization that you want to configure authentication for.
Use the View menu in the navigation pan
- Choose Services from the View menu and click New.
- Click the properties arrow next to Core.
- Enable the appropriate authentication modules by selecting them in the Organization Authentication Modules field of the Organization section.
By default, Portal Server installation enables LDAP and Membership.
- Enter a value in the Default Auth Level for each authentication module (default is 0).
The value for each authentication module must be the same in order to appear in the authentication menu.
- Click Save.
To Configure Authentication Order
Note
For current and complete information on the Access Manager admin console, refer to the Sun Java System Access Manager 2005Q1 Administration Guide.
- Log in to the Sun Java System Access Management Server administration console as administrator.
By default, when you log in, Identity Management is selected in the location pane, and Organizations is selected in the Navigation pane.
- Navigate to the organization or suborganization that you want to configure authentication for.
Use the View menu in the navigation pan
- Choose Services from the View menu and click New.
- Click the properties arrow next to Core.
- Enable the appropriate authentication modules by selecting them in the Organization Authentication Modules field of the Organization section.
By default, Portal Server installation enables LDAP and Membership.
- Enter a value in the Default Auth Level for each authentication module (default is 0).
The value for each authentication module must be the same in order to appear in the authentication menu.
- Select Edit in Organization Authentication Configuration to specify the attribute information for each authentication module.
- Click Save
- Use the following URL to verify that the authentication menu appears with the appropriate choices by logging in to the admin server.
http://host:port/amserver/UI/login
If this is not the default organization, use the following URL to verify the authentication menu for the organization:
http://host:port/amserver/UI/login?org=org_name
To Configure LDAP Authentication to an External Directory
When you install the Portal Server, the installation program configures LDAP authentication to directory instance automatically. The installation program allows you to install an internal instance of the directory on the local server and configure LDAP authentication to that internal directory or to configure LDAP authentication to a pre-existing external instance of the directory. Once you have your initial configuration, there are some scenarios where you might want to configure authentication to an external LDAP directory. For example, you may want to isolate authentication information for particular organization onto a dedicated LDAP server for performance or security reasons.
Caution
Do not configure authentication to an external LDAP directory for the organization containing the amadmin user. This can prevent the amadmin user from authenticating and lock you out of the admin console. If you do inadvertently configure the organization containing the amadmin user, you will need to log in using the full DN of the amadmin and then correct the LDAP template. The amadmin DN is listed in the com.sun.authentication.super.user property in the AMConfig.properties file.
Note
For current and complete information on the Access Manager admin console, refer to the Sun Java System Access Manager 2005Q1 Administration Guide.
- Log in to the Sun Java System Access Management Server administration console as administrator.
By default, Identity Management is selected in the location pane and Organizations is selected in the Navigation pane.
- Navigate to the organization or suborganization that you want to configure authentication for.
Use the View menu in the navigation pane.
- Choose Services from the View menu.
- Click the properties arrow next to Core from Access Manager Configuration.
- Check Dynamically Created from the Dynamic User Profile menu.
- Click the properties arrow next to LDAP from the Access Manager Configuration menu.
- Set the appropriate LDAP Attributes for your server. The following example sets up access to the LDAP server ds-sesta1.sesta.com on port 389 with a search start point of ou=people,dc=sesta,dc=com and using a root user bind to cn=root,ou=people,dc=sesta,dc=com:
Primary LDAP Server and Port: ds-sesta1.sesta.com:389
Secondary LDAP server and port: ds-sesta1.sesta.com:389
DN to Start User Search: ou=people,dc=sesta,dc=com
DN for Root User Bind: cn=root,ou=people,dc=sesta,dc=com
Password for Root User Bind: root password
User Naming Attribute: uid
User Entry Search Attributes: employeenumber
User Search Filter: blank
Search Scope: subtree
Enable SSL to LDAP Server: off
Return User DN to Auth: off
Authentication Level: 0- Click Save.
Configuring Anonymous Authentication
The Portal Server supports two methods for implementing anonymous authentication:
To support anonymous authentication, the Portal Server installation program creates a user account, authlessanonymous, and sets up access for this user within the following two Portal Desktop Services global attributes:
Portal Server can support both authentication-less and anonymous authentication to be configured at the same in the sense that you can do the following:
- Configure the Desktop to work in authentication-less mode.
- Configure the authentication menu so that Anonymous is one of the displayed choices.
- Access the Desktop with browser A, thereby accessing it in authentication-less mode.
- Access http:/server/amserver/UI/login with browser B, and select Anonymous, and see the Desktop.
At this point you are using authentication-less mode in browser A and anonymous mode in browser B.
The way in which the Desktop is accessed occurs in two different ways. One, authentication-less access, was through a direct reference to /portal/dt and the other (anonymous) was indirectly through /amserver/UI/login.
The Access Manager Login menu could be avoided by configuring Access Manager to only have anonymous login in the menu.
Both authentication-less access and anonymous authentication are not supported simultaneously in that when you access /portal/dt without an Access Manager session, only one of two things happens:
You do not have to disable anonymous authentication to use authentication-less access. But if you want the above item a to work, you have to disable authentication-less access mode.
To Configure Anonymous Authentication (Anonymous User Session Method)
Note
For current and complete information on the Access Manager admin console, refer to the Sun Java System Access Manager 2005Q1 Administration Guide.
- Log in to the Sun Java System Access Management Server administration console as administrator.
By default, Identity Management is selected in the location pane and Organizations is selected in the Navigation pane.
- Navigate to the organization or suborganization that you want to configure authentication for.
All created organizations are displayed in the navigation pane.
- Select Service Configuration in the location pane.
- Click the properties arrow next to the Portal Desktop service.
The Portal Desktop attributes appear in the data pane.
- Select the value listed in the Authorized Authentication-less User IDs attribute and click Remove.
- Select the value listed in the Default Authentication-less User ID attribute and click Remove.
- Click Save.
- Choose Identity Management from the location pane.
- Choose Organizations from the View menu.
All created organizations are displayed in the navigation pane.
- Navigate to the organization or suborganization that you want to configure authentication for.
Use the View menu in the location pane.
- Choose Services from the Show menu.
- Add and configure the Anonymous service.
See To Add a Service and To Create a Template for a Service for information.
- Add Anonymous to the Authentication menu.
See To Configure Authentication Order for information.
- Create an anonymous user account.
See To Add a New User for information.
To Configure Anonymous Authentication (Authentication-less Access)
Note
For current and complete information on the Access Manager admin console, refer to the Sun Java System Access Manager 2005Q1 Administration Guide.
- Log in to the Sun Java System Access Management Server administration console as administrator.
By default, Identity Management is selected in the location pane and Organizations is selected in the Navigation pane.
- By default, when you log in, Identity Management is selected in the location pane, and Organizations is selected in the Navigation pane.
All created organizations are displayed in the navigation pane.
- Navigate to the organization or suborganization that you want to configure authentication for.
Use the View menu in the navigation pane.
- Create an authlessanonymous user account with the password authlessanonymous.
See To Add a New User for information.
- Select Service Configuration in the location pane.
- Select Portal Desktop in the navigation pane.
- Add the fully distinguished name for the authlessanonymous user to the Authorized Authentication-less User IDs attribute. For example:
uid=authlessanonymous, ou=People, dc=sesta, dc=com
- Specify the fully distinguished name for the authlessanonymous user in the Default Authentication-less User ID attribute.
- Click Save.
You must close and restart your browser to access the Desktop using the newly configured Authentication-less User ID method. The Authentication-less User ID method allows you to specify the UID of the user account in the query string. The auless UID is “desktop.suid” by default. The prefix “desktop” is controlled by the config parameter “cookiePrefix” in the desktopconfig.properties file. For example, to access the Desktop from the default organization of sestat.com, use the following URL:
http://server:port/portal/dt?desktop.suid=uid=authlessanonymous, ou=People,dc=sesta,dc=com
Note
If a user logs in a browser with locale that is not the user’s own language, all other users will share the same locale at the login prompt.
There are multiple options to get around this problem.
Configuring Portal Server for Federated Users
The Sun Java System Portal Server software supports users that have federated identities conforming to the Liberty Alliance specification. A federated user that are Liberty single signed on can access a personalized desktop at a portal server without the need for further authentication.
See the Sun Java System Access Manager Administration Guide for more information about Liberty-enabled authentication services. Example configurations with Portal Server acting as a service provider can be found in the following location:
PortalServer-base/SUNWps/samples/liberty
To Configure Federated Users
By default, federated users do not have permission to access the Sun Java System Portal Server acting as a service provider. Portal Server can handle federated users as follows:
- Federated users who are Liberty single signed on can access a personalized portal desktop.
- Federated users that are not Liberty single signed on are redirected to the authentication page of an identity provider
- Log in to the Sun Java System Access Management Server administration console as administrator.
By default, Identity Management is selected in the location pane and Organizations is selected in the Navigation pane.
- Select Service Configuration in the location pane.
- Select Portal Desktop in the navigation pane.
- Check Enable Federation.
- Specify the ID of the host provider.
- Click Save.
To Configure Authentication-less Access for Federated Users
By default, federated users do not have permission to access the authentication-less portal desktop.
Note
For current and complete information on the Access Manager admin console, refer to the Sun Java System Access Manager 2005Q1 Administration Guide.
- Log in to the Sun Java System Access Management Server administration console as administrator.
By default, Identity Management is selected in the location pane and Organizations is selected in the Navigation pane.
- Navigate to the organization or suborganization that you want to configure authentication for.
Use the View menu in the navigation pane.
- Select Service Configuration in the location pane.
- Select Portal Desktop in the navigation pane.
- Uncheck Disable Authentication-less Access for Federated Users.
- Click Save.
See To Configure Anonymous Authentication (Authentication-less Access) for more information on authentication-less access.
To Configure UNIX Authentication
Note
For current and complete information on the Access Manager admin console, refer to the Sun Java System Access Manager 2005Q1 Administration Guide.
- Log in to the Sun Java System Access Management Server administration console as administrator.
By default, Identity Management is selected in the location pane and Organizations is selected in the Navigation pane.
- Choose Organizations from the View menu in Identity Management.
All created organizations are displayed in the navigation pane.
- Select Service Configuration in the location pane.
- Click the properties arrow next to UNIX in the navigation pane (under Access Manager Configuration).
- Set the appropriate UNIX Attributes for your server.
- Click Save.
- Navigate to the organization or suborganization that you want to configure authentication for.
Use the View menu in the navigation pane.
- Choose Services from the View menu.
- Click New in the navigation pane.
- Click Core under Authentication in the data pane.
- Select Unix from the Organization Authentication Modules menu in the data pane.
- Click Save.
To Configure UNIX Authentication for the Organization Level
The UNIX authentication documented in To Configure UNIX Authentication is for configuring UNIX globally. This procedure is to configure at the organization level.
Note
For current and complete information on the Access Manager admin console, refer to the Sun Java System Access Manager 2005Q1 Administration Guide.
- Log in to the Sun Java System Access Manager administration console as administrator (amadmin) by entering http://fullservername:port/amconsole in your browser’s web address field.
- At the logon screen, enter amadmin as the user ID and the passphrase you chose during installation.
By default, Identity Management is selected in the location pane and Organizations is selected in the Navigation pane.
- Choose Organizations from the View menu in Identity Management.
All created organizations are displayed in the navigation pane.
- Choose Services from the View menu.
- Select New.
- Check UNIX in the right pane and click OK.
- Select the properties arrow next to UNIX.
- Select Yes in the Create Service Template (Unix) pane.
- Set the appropriate UNIX Attributes for your server.
- Select Save.
- Select the properties arrow next to Core.
- Highlight UNIX in Authentication Menu and select Save.
Overview of How Portal Server Uses Policy ManagementThis section describes how to use Access Manager Policy Management feature. See the Access Manager documentation for procedures to create, modify, and delete policies.
The Access Manager Policy Service enables you to define rules or access to resources. Policies can be role-based or organization-based and can offer privileges or define constraints. Portal Server ships with three policies:
- Ability to execute Portal Server Portal Desktop - Enables users to display the Desktop
- Ability to execute Portal Server NetMail - Enables user to run NetMail
Note
Chapter 8, "Administering the Portal Desktop Service" and Chapter 11, "Administering the NetMail Service" provide detailed descriptions on assigning their specific policies.
By default, the Policy Configuration service is automatically added to the top-level organization. Suborganizations must add their policy services independently of their parent organization. Any policy service you create must be added to all organizations. The high-level steps to use policies are:
- Adding the Policy service for an organization. (This will be done automatically for the organization specified at installation.) Suborganizations do not inherit their parent’s services, so you need to add a suborganization’s Policy service. See To Add a Service for information.
- Creating a referral policy for a peer or suborganization. You can delegate an organization’s policy definitions and decisions to another organization. (Alternately, policy decisions for a resource can be delegated to other policy products.) A referral policy controls this policy delegation for both policy creation and evaluation. It consists of a rule and the referral itself. If the policy service contains actions that do not require resources, referral policies cannot be created for suborganizations. See To Create a Referral Policy for a Peer or Suborganization for information.
- Creating a normal policy for a peer or suborganization. You create a normal policy to define access permissions. A normal policy can consist of multiple rules, subjects, and conditions. See To Create a Normal Policy for a Peer or Suborganization for information.
To Add a Policy Service for a Peer or Suborganization
Peer or Suborganizations do not inherit their parent’s services, so you need to add a peer or suborganization’s Policy service.
Note
For current and complete information on the Access Manager admin console, refer to the Sun Java System Access Manager 2005Q1 Administration Guide.
- Log in to the Sun Java System Access Management Server administration console as administrator.
By default, Identity Management is selected in the location pane and Organizations is selected in the Navigation pane.
- Navigate to the organization or suborganization that you want to create a referral policy.
All created organizations are displayed in the navigation pane.
- Select Organizations from the View menu in the navigation pane and select desired organization from the Name menu.
- Select Services from the View menu.
- Click New.
The Add Services page appears in the data pane. Click the check box for the to the following minimum services, then click OK.
- Configure each service by clicking the properties arrow. Click Create to modify the configuration attributes. See the Sun Java System Access Manager Administration Guide for a description of attributes that are not specific to Portal Server configuration
To Create a Referral Policy for a Peer or Suborganization
You can delegate an organization’s policy definitions and decisions to another organization. A referral policy controls this policy delegation for both policy creation and evaluation. It consists of a rule and the referral itself. The referral must define the parent organization as the resource in the rule, and it must contain a SubOrgReferral or PeerOrgReferral with the name of the organization as the value in the referral.
Note
For current and complete information on the Access Manager admin console, refer to the Sun Java System Access Manager 2005Q1 Administration Guide.
- Log in to the Sun Java System Access Management Server administration console as administrator.
By default, Identity Management is selected in the location pane and Organizations is selected in the Navigation pane.
- Navigate to the organization or suborganization that you want use to create a referral policy.
All created organizations are displayed in the navigation pane.
- Select Policies from the View menu.
- Click New to create new policy.
The Create Policy page appears in the data pane.
- For Name, type either SubOrgReferral_organization or either PeerOrgReferral_organization. Make sure you select Referral in Type of Policy. Then click OK.
- Select the type of service in Service and click Next.
- Click Rules from the View menu in the data pane and click Add. Then click Next.
The Add Rule template appears in the data pane.
- Enter the name of the rule in Rule Name and click Finish.
- Click Referrals from the View menu in the data pane and click Add.
The Add Referral template appears in the data pane.
- Enter SubOrgReferralName in Name.
Make sure that the name of the suborganization is selected for Value in the data pane and click Create to complete the policy’s configuration.
- Click Save in the data pane.
The message “The policy properties have been saved” is displayed when the data is saved.
To Create a Normal Policy for a Peer or Suborganization
You create a normal policy to define access permissions. A normal policy can consist of multiple rules, subjects, and conditions.
Note
For current and complete information on the Access Manager admin console, refer to the Sun Java System Access Manager 2005Q1 Administration Guide.
- Log in to the Sun Java System Access Management Server administration console as administrator.
By default, Identity Management is selected in the location pane and Organizations is selected in the Navigation pane.
- Navigate to the organization or suborganization that you want to assign a policy.
All created organizations are displayed in the navigation pane.
- Choose Policies from the View menu.
The policies for that organization are displayed.
- Select New in the navigation pane. The New Policy page opens in the data pane.
- For Name, type either SubOrgNormal_organization or either PeerOrgNormal_organization.Make sure you select Normal in Type of Policy. Click OK.
- Select a service from the Service menu and click Next. Enter the name of the rule in Rule Name. Make sure the appropriate checkbox is selected to grant execution privilege to the desired service.
- Choose Rules from the View menu in the data pane and click Add. The Add Rule page opens in the data pane.
- Choose Subjects from the View menu in the data pane and click Add. The Add Subject page opens in the data pane.
- Click Finish to complete the policy’s configuration.
The message “The policy properties have been saved.” is displayed when the data is saved.
Logging In to the Portal Server DesktopIf you installed the sample portal, users will be able to log in to the sample Desktop. In addition, the Portal Server supports a variety of other user logins. This section describes some of the other user ways users can log in to the Portal Server.
To Log In to the Sample Portal Desktop
To access the sample Desktop, type the following URL:
http://server:port/portal/dt
To Log In to a Suborganization
If users have access privileges to an organization, they can also log in to suborganizations within the organization. For example, if a user has access to the organization A which has a suborganization B, type the following URL to log in to suborganization B:
http://server:port/amserver/UI/login?org=B
To Log On Using Anonymous Authentication
Note
You must add the anonymous authentication module to support anonymous authentication. See Configuring Anonymous Authentication for information on adding and enabling anonymous authentication modules.
Managing LoggingPortal Server uses the Access Manager logging and debugging APIs.
By default, the Portal Server log and debug files are located in:
The Access Manager admin console allows you to define the following logging attributes:
See the Sun Java System Access Manager 2005Q1 Administration Guide for further information.