| Sun ONE Instant Messaging Administrator's Guide |
Chapter 6
Managing Instant Messaging Portal ChannelThis chapter explains how to manage and customize the Instant Messaging channel on the Portal Server Desktop.
The chapter contains the following sections:
Introducing Instant Messaging ChannelThe Instant Messaging channel displays the user’s personalized Contact List and the presence status of these contacts on the Portal Server Desktop. The user can initiate instant messaging sessions with the contacts listed in the Instant Messaging channel.
The Instant Messaging channel is based on a Portal Server content provider called IMProvider. The IMProvider is an extension of the JSPProvider in the Portal Server. As an extension of the JSPProvider, IMProvider uses the JSP files to generate the content page and the edit page for the Instant Messaging channel. The JSP files are also used to generate the pages used to launch the Instant Messenger. The IMProvider also defines an instant messaging-specific tag library and this tag library is used by the JSP files. The JSP files and the tag library use the channel properties that are defined by the IMProvider.
The sections below describe the channel properties, the tag library. It also describes how to customize the JSP files that are used by the IMProvider.
Display Profile Properties for Instant Messaging Portal ChannelThe Instant Messaging channel uses IMProvider as its content provider. The IMProvider display profile element is installed in the global desktop service display profile. This display profile defines the properties that are used by the IMProvider. The display profile includes properties that are required by JSPProvider as well as properties that are specific to the IMProvider.
Table 6-1 contains the IMProvider specific Display Profile Properties for the Instant Messaging Portal channel
Table 6-1 lMProvider specific Display Profile Properties for the Instant Messaging Channel
Code Example 6-1 shows a channel that is created using the IMProvider. This channel customizes several Display Profile properties. If the sample portal is installed, a channel called IMChannel is automatically created in the default organization. The IMChannel does not customize any of the Display Profile properties.
Code Example 6-1 Display Profile Definition for the Instant Messaging Channel
Instant Messaging Portal Channel Tag Library ReferenceThis section describes the tag library and provides a reference of the available tags for the Instant Messaging channel. The tag library is defined in a file im.tld in the directory /etc/opt/SUNWps/desktop/default/tld
Table 6-2 contains the tag libraries used by the file IMContent.jsp
Table 6-2 Tag Library Reference
Tag Name
Description
Attribute/Description
getContactGroups
Returns the list of contact groups that the user has defined.
id (optional)
scope (optional)
getContactGroup
Returns the list of contacts in the named contact group. The list is returned as a Collection of internal objects that can be passed to the obtainContact tag.
group (required)
The name of the contact group.
id (optional)
scope (optional)
getUsername
Returns the Instant Messaging user name for the contact.
id (optional)
scope (optional)
getToken
Returns the login token for the user. The login token is either an Identity Server SSOToken or the password of the user
id - (optional)
scope - (optional)
obtainContact
A context setup tag that is used to obtain the presence information for the indicated contact. The other tags can be used inside this tag.
contact (required)
The internal identifier of the contact obtained from the getContactGroup tag.
getContactPresence
Returns the current presence status for the contact. The value can be AWAY, BUSY, CLOSED, FORWARDED, IDLE, OPEN, OTHER. These values are obtained from the PresenceSession class in the Instant Messaging API.
id (optional)
scope (optional)
getContactName
Returns the common name for the contact.
id (optional)
scope (optional)
getContactUsername
Returns the IM user name for the contact.
id - (optional)
scope - (optiona
getDateTime
Returns the update time.
format (required)
id (optional)
scope (optional)
isSecureMode
Returns boolean value indicating whether the channel is accessed through the SRA gateway and if the Netlet is loaded.
id (optional)
scope (optional)
getCodebase
Returns the codebase used to download the Instant Messenger applet. This tag takes into account whether the Instant Messaging channel is accessed through the SRA gateway. If the channel is accessed through SRA gateway the Netlet is loaded.
id - (optional)
scope - (optional)
getIMServer
Returns the “-server” argument to be passed to the Instant Messenger. This tag takes into account whether the Instant Messaging channel is accessed through the SRA gateway. If the channel is accessed through SRA gateway the Netlet is loaded.
id (optional)
scope (optional)
debug
When the debug level of Identity Server is at message level then the messages are added to the log files.
id - (optional)
message - (required)
This message which will be printed in the log file.
logFile - (optional)
substitute
Replaces the locale specific contents of the archive data based on the user’s locale.
id - (optional)
data - (required)
The data that will be substituted based on the resource table.
ht - (optional)
locale - (optional)
Code Example 6-2 shows an example of how the tags are defined in a JSP file. The library's symbol (%@ taglib) is used with the tag name to retrieve the appropriate information or function.
Code Example 6-2 An example of how the tags are defined in a JSP file.
<%@ taglib uri="/tld/im.tld" prefix="im" %>
<%@ taglib uri="/tld/jx.tld" prefix="jx" %>
<im:getContactGroup id="contacts" group="My Contacts"/>
<jx:forEach var="contact" items="$contacts">
<im:obtainContact contact="$contact">
<br>
<im:getPresence id="p">
<jx:choose>
<jx:when test="$p=='online'">
<img src="im_online.gif">
</jx:when>
<jx:when test="$p=='idle'">
<img src="im_idle.gif">
</jx:when>
</jx:choose>
<im:getName>
</im:obtainContact>
</jx:forEach/>
Customizing Instant Messaging Portal ChannelWhile designed to work right out of the box, the Instant Messaging Portal channel is also customizable. It consists of JSP files that can be customized to an organization's specific needs. These JSP files are installed in the /etc/opt/SUNWps/desktop/default/IMProvider directory.
Table 6-3 contains the JSP files that can be modified to customize the Instant Messaging channel’s user interface look and feel.
Table 6-3 The JSP files that can be modified to customize the Instant Messaging channel .
File Name
Description
IMContent.jsp
This file can be modified to customize the Instant Messaging channel content page.
IMEdit.jsp
This file can be modified to customize the Edit page in the Instant Messaging channel.
pluginLaunch.jsp
This file can be modified to customize the Instant Messenger launch window.
jnlpLaunch.jsp
This file can be modified to customize the Java Web Start window that is used to launch the Instant Messenger.
invite.jsp
This file can be modified to customize the Conference Invite window in the Instant Messenger.
Perform the following, if you have the Instant Messaging channel provider referred as IMProvider and you want to customize the IMContent.jsp file for this channel:
- Create a directory IMChannel under /etc/opt/SUNWps/desktop/default/. Type:
mkdir /etc/opt/SUNWps/desktop/default/IMChannel
- Copy the file IMContent.jsp from the IMProvider directory to the IMChannel directory you have created.
cp /etc/opt/SUNWps/desktop/default/IMProvider/IMContent.jsp /etc/opt/SUNWps/desktop/default/IMChannel
Caution
Do not modify the original version of the JSP or template files in the Instant Messaging channel. Create a new version of the JSP or the template files to maintain the original version of these files. The Instant Messaging channel will automatically use the new version of the JSP or the template files.
- Modify the IMContent.jsp file according to your requirement. For example:
vi /etc/opt/SUNWps/desktop/default/IMChannel/IMContent.jsp
- Save the changes made to the file.
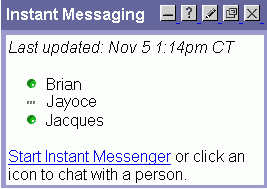
Customizing Instant Messaging Channel Content Page
IMContent.jsp is the Instant Messaging Portal channel content page. It contains the list of contacts and the presence status of the contacts. Instant Messenger can be lauched by clicking the link “Start Instant Messenger” or by clicking the presence status of the contacts.
Figure 6-1 shows the Instant Messaging channel content page example.
Figure 6-1 The Instant Messaging Channel Content Page Example
Code Example 6-3 contains the code example for generating the contact list in the above Instant Messaging Channel content page.
Code Example 6-3 The Instant Messaging Channel content page example.
<%@ page import="java.util.*" %>
<%@ taglib uri="/tld/im.tld" prefix="im" %>
<%@ taglib uri="/tld/jx.tld" prefix="jx" %>
<%@ taglib uri="/tld/desktop.tld" prefix="dt" %>
<%@ taglib uri="/tld/desktopProviderContext.tld" prefix="dtpc" %>
<%
if (request.getAttribute("invite") != null ||
request.getParameter("invite") != null) { %> <jsp:forward page="invite.jsp"/> <% }
String launchType = request.getParameter("launch");
if (launchType != null) {
if (launchType.equals("jnlp")) { %> <jsp:forward page="jnlpLaunch.jsp"/> <% }
if (launchType.equals("plugin")) { %> <jsp:forward page="pluginLaunch.jsp"/> <% }
}
else {
%>
<dt:obtainChannel channel="$JSPProvider">
function launch_<dt:getName/>(user) {
var launchURL = "IMLaunch?provider=<dt:getName/>&launch=<dtpc:getStringProperty key='clientRunMode'/>&msg=Welcome&last=false";
if (user.length > 0) {
launchURL = launchURL + "&username=" + user;
}
var myURL="<%= HttpUtils.getRequestURL(request) %>";
var urlprefix = window.location.protocol + "//" + window.location.hostname;
if (urlprefix != myURL.substr(0, urlprefix.length) {
launchURL = launchURL + "&secure=yes";
}
window.open(launchURL, '_blank', 'width=320,height=200,hotkeys=no,status=no,resizable=no,scrollba rs=yes');
return false;
}
<jx:declare id="fontFace" type="java.lang.String"/>
<dtpc:getStringProperty id="fontFace" key="fontFace1"/>
<font face="<%=fontFace%>">
<font size=-1><i>Last updated: <im:getDateTime format="{0,date,long} {0,time,short}"/></i></font>
<p>
<jx:set var="nogroups" value="true"/>
<dtpc:getStringProperty id="groups" key="contactGroup"/>
<jx:if test="$groups == ''">
<im:getContactGroups id="groups"/>
</jx:if>
<jx:forEach var="cg" items="$groups">
<jx:set var="nogroups" value="false"/>
<img src="im/images/folder_col.gif" border=0 align=absmiddle>
<b><jx:expr value="$cg"/></b><br>
<im:getContactGroup id="contacts" group="$cg"/>
<jx:set var="noneonline" value="true"/>
<jx:forEach var="contact" items="$contacts">
<im:obtainContact contact="$contact">
<im:getContactPresence id="p"/>
<jx:declare id="p" type="java.lang.String"/>
<jx:set var="anchortag">
<a onClick="launch_<dt:getName>('<im:getContactUsername/>')">
</jx:set>
<jx:choose>
<jx:when test="$p=='OPEN'">
<jx:expr value="$anchortag"/>
<img src="im/images/Online_13Padded.gif" alt="Open" border=0 align=absmiddle></a>
<im:getContactName/></br>
<jx:set var="noneonline" value="false"/>
</jx:when>
<jx:when test="$p=='ONLINE'">
<jx:expr value="$anchortag"/>
<img src="im/images/Online_13Padded.gif" alt="Online" border=0 align=absmiddle></a>
<im:getContactName/></br>
<jx:set var="noneonline" value="false"/>
</jx:when>
<jx:when test="$p=='IDLE'">
<jx:expr value="$anchortag"/>
<img src="im/images/Idle_13Padded.gif" alt="Idle" border=0 align=absmiddle></a>
<im:getContactName/></br>
<jx:set var="noneonline" value="false"/>
</jx:when>
<jx:when test="$p=='BUSY'">
<jx:expr value="$anchortag"/>
<img src="im/images/Online_13Padded.gif" alt="Busy" border=0 align=absmiddle></a>
<im:getContactName/></br>
<jx:set var="noneonline" value="false"/>
</jx:when>
<%-- Offline States - Uncomment this if you want users to see offline contacts --
<jx:when test="$p=='CLOSED'">
<jx:expr value="$anchortag"/>
<img src="im/images/Offline_13Padded.gif" alt="Offline" border=0 align=absmiddle></a>
<im:getContactName/></br>
</jx:when>
<jx:when test="$p=='AWAY'">
<jx:expr value="$anchortag"/>
<img src="im/images/Away_13Padded.gif" alt="Away" border=0 align=absmiddle></a>
<im:getContactName/></br>
</jx:when>
<jx:when test="$p=='FORWARDED'">
<jx:expr value="$anchortag"/>
<img src="im/images/Forwarded_13Padded.gif" alt="Offline" border=0 align=absmiddle></a>
<im:getContactName/></br>
</jx:when>
<jx:when test="$p=='OTHER'">
<jx:expr value="$anchortag"/>
<img src="im/images/Offline_13Padded.gif"
alt="Other" border=0 align=absmiddle></a>
<im:getContactName/></br>
</jx:when>
<jx:otherwise>
<jx:expr value="$anchortag"/>
<img src="im/images/Offline_13Padded.gif" alt="<%=p%>" border=0 align=absmiddle></a>
<im:getContactName/></br>
</jx:choose>
</im:obtainContact>
</jx:forEach>
<jx:if test="$noneonline == 'true'">
<i>No on-line
</jx:otherwise>
-- End of offline states --%>
contacts.</i><br>
</jx:if>
</jx:forEach>
<jx:if test="$nogroups == 'true'">
<p>
<font color="red">Warning</font>: Unable to get contact information from Instant Messaging server.
</jx:if>
<p>
Start the <a href="#" onClick="launch_<dt:getName>('')">
Instant Messenger</a> or click an icon to chat with a person.
</dt:obtainChannel>
<% } %>
Displaying Presence Information For All Contacts
By default, the IMContent.jsp file only displays presence information for on-line contacts. The IMContent.jsp file can be modified to display the presence information for all contacts in the selected contact group(s).
To display the presence information for all contact in the selected contact group:
- Create a directory IMChannel under /etc/opt/SUNWps/desktop/default/. Type:
mkdir /etc/opt/SUNWps/desktop/default/IMChannel
- Change to the IMChannel directory. Type:
cd /etc/opt/SUNWps/desktop/default/IMChannel
- Copy the file IMContent.jsp from the IMProvider directory to the IMChannel directory you have created.
Caution
Do not modify the original version of the JSP or template files in the Instant Messaging channel. Create a new version the JSP or the template files to maintain the original version of these files. The Instant Messaging channel will automatically use the new version of the JSP or the template files.
- Modify the IMContent.jsp file according to your requirement. For example:
vi IMContent.jsp
- Uncomment the following Java Script in the IMContent.jsp file.
<%-- Offline States - Uncomment this if you want users to see offline contacts --
<jx:when test="$p=='CLOSED'">
<jx:expr value="$anchortag"/>
<img src="im/images/Offline_13Padded.gif" alt="Offline" border=0 align=absmiddle></a>
<im:getContactName/></br>
</jx:when>
<jx:when test="$p=='AWAY'">
<jx:expr value="$anchortag"/>
<img src="im/images/Away_13Padded.gif" alt="Away" border=0 align=absmiddle></a>
<im:getContactName/></br>
</jx:when>
<jx:when test="$p=='FORWARDED'">
<jx:expr value="$anchortag"/>
<img src="im/images/Forwarded_13Padded.gif" alt="Offline" border=0 align=absmiddle></a>
<im:getContactName/></br>
</jx:when>
<jx:when test="$p=='OTHER'">
<jx:expr value="$anchortag"/>
<img src="im/images/Offline_13Padded.gif" alt="Other" border=0 align=absmiddle></a>
<im:getContactName/></br>
</jx:when>
<jx:otherwise>
<jx:expr value="$anchortag"/>
<img src="im/images/Offline_13Padded.gif" alt="<%=p%>" border=0 align=absmiddle></a>
<im:getContactName/></br>
</jx:otherwise>
-- End of offline states --%>
- Save the changes.
Single Instant Messaging Server Deployment Configuration
When your site contains a single Instant Messaging server, the users need not edit the server information in the channel’s Edit page. You can edit IMEdit.jsp to only display a part of the Edit page. The change made to the Edit page depends on the type of authentication used by the Instant Messaging channel.
If you are using Identity Server for user authentication, the entire Instant Messaging Server Information section can be removed from the Edit page. If you are using LDAP authentication, the Instant Messaging Server Information section can contain only the Username and Password fields.
Automatically Closing the Invite Window
The invite.jsp file generates the contents for the Invite window that is created when a user is invited to a conference in the Instant Messenger. This window is opened before the server checks whether the Instant Messenger is running. By modifying the invite.jsp the Invite window can be closed automatically.
To automatically close the Invite window:
- Create a directory IMChannel under /etc/opt/SUNWps/desktop/default/. Type:
mkdir /etc/opt/SUNWps/desktop/default/IMChannel
- Change to the IMChannel directory. Type:
cd /etc/opt/SUNWps/desktop/default/IMChannel
- Copy the file invite.jsp from the IMProvider directory to the IMChannel directory you have created.
Caution
Do not modify the original version of the JSP or template files in the Instant Messaging channel. Create a new version the JSP or the template files to maintain the original version of these files. The Instant Messaging channel will automatically use the new version of the JSP or the template files.
- Open the invite.jsp file. For example:
Inserting Instant Messenger Links in an OrganizationBy default the Instant Messenger links are added to the Application channel in the default organization. The Instant Messenger links allows the Instant Messenger to be launched from the Application channel. You need to add Instant Messenger links manually, if:
The contents for the Instant Messenger links are in the file /opt/SUNWps/samples/desktop/dp-IMChannel.xml. The dp-IMChannel.xml file also contains the sample IMChannel.
Edit a copy of the file dp-IMChannel.xml to add the Instant Messenger links information to the display profile for another organization and install the file using the dpadmin command:
Where,
ADMIN_DN - Replace with LDAP administrator DN. For example: amadmin
PASSPHRASE - Replace with the administrator’s password.
ORG_DN - Replace with the DN of the Organization where the links are to be added. For example: o=siroe.com, o=isp
The URL for launching the Instant Messenger using Java Plug-in will be a reference to the Instant Messaging channel with a launch argument. For example:
/portal/dt?action=content&provider=IMChannel&launch=plugin&username=sam
The URL for launching the Instant Messenger applet with Java Web Start will be:
/portal/imlaunch?channel=IMChannel&launch=jnlp&username=sam
Enabling Secure Mode for Sun ONE Instant Messenger in Sun ONE Portal ServerNetlet facilitates secure communication between the Instant Messenger and the server.
Note
The Instant Messaging channel automatically uses the secured mode when accessed through the Secure Remote Access gateway. The Instant Messaging channel does not use the secured mode when it is not accessed through the gateway.
To enable the secure mode, you need to add the Netlet Rule.
To add the Netlet Rule:
- Login to Sun ONE Directory Server Access Management Edition as Administrator
- Click the default organization link. Example: siroe.com.
- Select Services from the Show drop down list
- Scroll down to SRA Configuration and select Netlet.
- Click the arrow icon beside Netlet. The Netlet Rules are displayed in the right panel.
- Click Add under Netlet Rules.
- Type IM in the Rule Name field.
Note
The Netlet rule name can be different. You can configure the Instant Messaging channel to use a different Netlet rule.
- Remove the default value in the URL field and leave the field blank.
- Uncheck Download Applet check box, if the Instant Messaging resources are installed on the Portal Server host. Otherwise if the Instant Messaging resources and Portal Server are installed on different hosts, Select the Download Applet check box and enter the following string:
$IM_DOWNLOAD_PORT:$IM_WEBSERVER_HOST:$IM_WEBSERVER_PORT
For example:
49916:company22.siroe.com:80
where,
IM_DOWNLOAD_PORT. The port on which Instant Messaging resources are downloaded using Netlet.
IM_WEBSERVER_HOST. The host name of the web server serving the Instant Messenger. For example. company22.siroe.com
IM_WEBSERVER_PORT. The port number of the web server serving the Instant Messenger. For example, 80.
- Select the default value in the Port-Host-Port List and click Remove.
- Enter the localhost port on which Netlet will run in the Client Port field. For example: 49916.
- Enter the Instant Messenger host name in the Target Host(s) field.
- Enter the Instant Messenger port in the Target Port(s) field.
Note
The values for Netlet Port, Instant Messaging Host and Instant Messaging Port should be the same as the Instant Messaging service attributes mentioned in the Instant Messaging service panel.
- Click Add to List.
- Click Save to save the Netlet Rule.
Disallowing Users from Launching Instant MessengerYou can remove the ability for users to use the Instant Messaging channel by removing the channel from the user's display profile. For example, to remove the sample IMChannel that is automatically installed, do the following:
- Login to Sun ONE Directory Server Access Management Edition as Administrator.
- Click the organization link. Example: siroe.com.
- Select Services from the Show drop down list
- Click the arrow icon next to the Desktop service.
- Click the Container and Channel Management Link.
- Select the check box to the left of the IMChannel channel.
- Click Delete to delete the channel.