|
|
| Sun ONE Directory Proxy Server Admistrator's Guide |
Chapter 11 Configuring Security
Sun ONE Directory Proxy Server supports SSL/TLS for secure communication between its clients and backend directory servers in the following sections:
· Preparing to Set Up SSL and TLS
· Setting Up SSL Communication
Some of the information in this section is written with an assumption that you are familiar with the basic concepts of public-key cryptography and Secure Sockets Layer (SSL) protocol, and understand the concepts of intranet, extranet, and the Internet security and the role of digital certificates in an enterprise. If you are new to these concepts, we recommend you read the security-related appendixes of the manual, Managing Servers with Sun ONE Console.
If you are upgrading from iDAR 5.0x, then the procedure to migrate SSL configuration is detailed in the Directory Proxy Server Installation Guide.
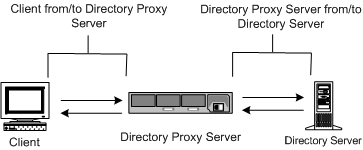
Directory Proxy Server has two separately configurable communication links. Each communication link can be plaintext or encrypted using Transport Layer Security (TLS) or Secure Sockets Layer (SSL) protocol. Availability of the two separate communication links enables you to configure TLS- or SSL-enabled communication between an LDAP client and Directory Proxy Server and between Directory Proxy Server and an LDAP directory. Figure 11-1 illustrates this capability of Directory Proxy Server.
Figure 11-1 Two Separate Communication Links in Directory Proxy Server
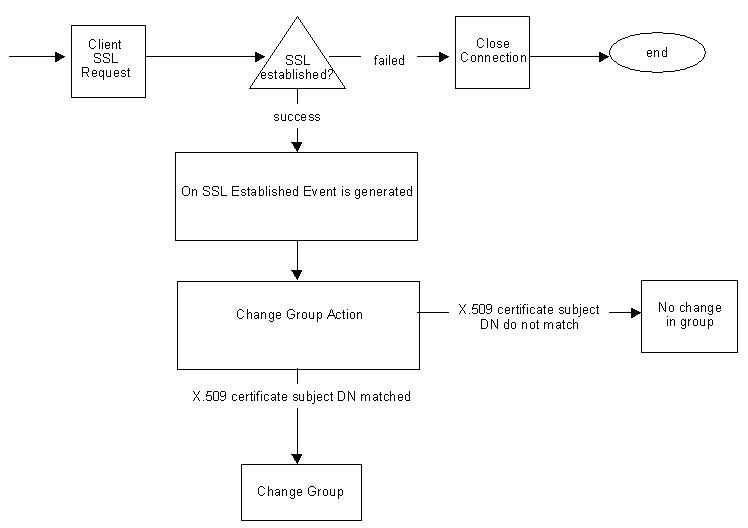
Directory Proxy Server can verify both client and server certificates, provided the trusted root CA certificate for the certificate being validated is installed and is available to Directory Proxy Server.
Figure 11-2 illustrates how Directory Proxy Server can verify the certificates presented to it by the clients after they establish an SSL session.
Figure 11-2 Certificate-Based Authentication of Clients
Preparing to Set Up SSL and TLS
You will need to set up SSL and TLS differently depending on whether you are using an internal security device, an external hardware device, or both. This section will tell you how to do this.
Setting up SSL or TLS with an Internal Security Device
To set up SSL or TLS with an internal security device, you must request and install a certificate. To request a certificate, run the Certificate Request Wizard. To install the certificate, run the Certificate Installation Wizard. When prompted, specify that you want to install the certificate on the internal security device.
Setting up SSL or TLS with an External Security Device
To set up SSL with an external security device, such as FORTEZZA, first install the PKCS #11 module provided by the external device manufacturer. Then run the Certificate Request Wizard, specifying the external security device when prompted.
Setting Up SSL with Internal and External Security Devices
Some servers and clients in your enterprise may use only internal security devices, while others may use both internal and external security devices. If your server needs to communicate with products running both internal and external security devices, run the Certificate Request Wizard two times. During the first use, when prompted, specify the internal security device. During the second use, when prompted, specify the external security device.
Setting Up SSL Communication
In general, setting up Directory Proxy Server for SSL-enabled communication involves these steps:
· Step 1. Install a Server Certificate for Directory Proxy Server
· Step 2. Set Up SSL Connections Between Directory Proxy Server and Clients
· Step 3. Set Up SSL Connections Between Directory Proxy Server and LDAP Servers
Step 1. Install a Server Certificate for Directory Proxy Server
When requesting and installing certificates, you use two wizards. You use the Certificate Request Wizard to request a new server certificate or to renew a certificate that you're already using. You use the Certificate Installation Wizard to install a certificate that you've received from a Certificate Authority (CA). The first time you use the Certificate Request Wizard, it will also create and install a key and certificate database for you.
To install a server certificate for Directory Proxy Server, follow these steps:
· Step A. Generating a Server Certificate Request
· Step B. Sending a Server Certificate Request
· Step C. Installing the Certificate
· Step D. To Install a CA Certificate or Server Certificate Chain
· Step E. Backing Up and Restoring Your Certificate Database
SSL Certificates
Sun ONE Directory Proxy Server can install three types of certificates: server certificates, server certificate chains, or trusted CA certificates.
A server certificate is a single certificate associated only with your server. It identifies your server to clients. You must request this type of certificate from a CA. To obtain and install a Server Certificate, generate a request and send it to the CA. Then install the certificate.
A server certificate chain is a collection of certificates automatically generated for you by your company's internal certificate server or a known CA. The certificates in a chain trace back to the original CA, providing proof of identity. This proof is required each time you obtain or install a new server certificate.
A trusted CA certificate is a single certificate automatically generated for you by your company's internal certificate server or a known CA. A trusted CA certificate is used to authenticate clients.
To obtain a trusted CA certificate, first go to the internal certificate server or CA's web site. Copy the necessary certificate information and save it to a file. Then use the Certificate Installation Wizard to install the certificate.
You can install any number of SSL certificates on a server. When setting up SSL for an instance of Directory Server, you need to install at least a server certificate and a trusted CA certificate.
Step A. Generating a Server Certificate Request
You can use Sun ONE Directory Proxy Server to generate a certificate request which you can then submit to a Certificate Authority (CA).
- In the Sun ONE Directory Proxy Server navigation tree, select the server instance with which you want to use SSL encryption.
- Double-click the server instance or click Open to open the management window for the server instance.
- From the Console menu, choose Security > Manage Certificates.
You can also click the Manage Certificates task.
If the security device does not have a password you are prompted to enter a new password.
- Click Request to open the Certificate Request Wizard.
- Choose "Request Certificate Manually," and then click Next.
- Enter the requested information:
Server Name. (Optional) Enter the fully qualified hostname of the machine for which you're requesting a certificate.
Organization. (Optional) Enter your organization's name.
Organizational Unit. (Optional) Enter your division, department, or other organizational unit.
City/locality. (Optional) Enter the city or locality in which your organizational unit is located.
State/province. (Optional) Enter the state or province in which your organizational unit is located.
Country/region. (Optional) Select the state or province in which your organizational unit is located, from the drop-down menu.
You can toggle between two views of the request form using the following buttons:
Show DN. Click to show the requestor information in distinguished name (DN) format. This button is visible only when you are entering information in fields.
Show Fields. Click to show the requestor information in fields. This button is visible only when you are entering information in DN format.
- Click Next.
- Enter the password for the security device that will store this certificate.
If you are using the internal (software) security device, this is the password for the key and certificate database. If you are using an external (hardware) module, this is the password for your SmartCard or other security device.
- Click Next.
- Select one of the following:
Copy to Clipboard. Click to copy your certificate request to the clipboard.
Save to File. Click to save your request as a text file. You will be prompted to choose a name and location for the file.
- Click Done to close the Certificate Request Wizard.
Step B. Sending a Server Certificate Request
Once you have generated a server certificate request, you send it to a CA for processing. Many CAs allow you to submit certificate requests through their web sites. Others may require you to send them an email message containing your request.
- Use your email program to create a new email message.
- Paste your certificate request into the message.
If you saved your certificate request to a file, open it in a text editor. Copy and paste the request into the body of the message.
If you copied the certificate request to the clipboard, paste it into the body of the message.
- Enter a subject and recipient for your request. The type of subject and recipient varies depending on which CA you are using. For more information, see your CA's web site.
- Send the email message to the CA.
Once you've submitted your request, you must wait for the CA to respond with your certificate. Turnaround time is highly variable and depends on the CA. If your company has an internal CA, it may take only a day or two to receive your certificate. If you are using an external CA, it could take as long as several weeks for that CA to respond to your request.
Step C. Installing the Certificate
Depending on the CA, you may receive your certificate in an email message or you may have to retrieve it from the CA's web site. Once you have the certificate, you can back it up and install it.
- Save, in a text file, the certificate data you received from the CA.
If you ever lose the certificate data, you can reinstall the certificate using this backup file.
- In the Sun ONE Directory Proxy Server navigation tree, select the server instance on which you want to install the certificate.
- Click Open to open the management window for the server instance.
- On the Tasks tab, click the Manage Certificates task button.
You can also open the Console menu, and then choose Security > Manage Certificates.
- Click the Server Certs tab.
- Specify where to store this certificate.
- If you want to store this certificate on the internal security device, select internal (software) from the Security Device drop-down list, and then click Install.
- If you want to store this certificate on an external hardware device, select the device from the Security Device drop-down list, and then click Install.
- Enter the certificate's location or enter its text.
In this local file. If your certificate is stored in a text file on your system, enter the full path to the file.
In the following encoded text block. If you copied your certificate to the clipboard, paste the certificate's text into the text field by clicking the Paste from Clipboard button.
- Click Next.
If the certificate information you entered above is valid, you see a page containing the details of your certificate.
- Verify that the certificate information is correct, and then click Next.
- Enter a name for the certificate, and then click Next.
- Enter the password for the security device that will hold this certificate.
If you are installing the certificate on the internal (software) security device, enter the password for the key and certificate database. If you are installing a certificate on an external (hardware) security device, enter the password for the device.
- Click Done.
Step D. To Install a CA Certificate or Server Certificate Chain
- Obtain the CA certificate or Server Certificate Chain from your CA.
- In the Sun ONE Directory Proxy Server navigation tree, select the server instance on which you want to install the CA certificate.
- Click Open to open the management window for the server instance.
- On the Tasks tab, click the Manage Certificates task button.
You can also open the Console menu, and then choose Security > Manage Certificates.
- Select the CA Certs tab, and then click Install.
- Enter the certificate's location or enter its text:
In this local file. If the certificate is stored in a text file on your system, enter the full path to the file.
In the following encoded text block. If you copied the certificate to the clipboard, paste the certificate's text into the text field by clicking the Paste from Clipboard button.
- Click Next.
If the certificate information you entered above is valid, you see a page containing the details of the certificate.
- Verify that the certificate information is correct, and then click Next.
- Enter a name for the certificate, and then click Next.
- Select the trust options for this certificate:
Accepting Connections from Clients. Check this box if you want to trust client certificates issued by this CA.
Making Connections to Other Servers. Check this box if you want to trust server certificates issued by this CA.
- Click Done.
Step E. Backing Up and Restoring Your Certificate Database
Whenever you install a certificate, you should back up your certificate database. If your database ever becomes corrupted, you can restore your certificate information from this backup.
To Back Up Your Certificate Database
- Open your server root folder.
- Copy all files in the alias folder to another location (preferably on a different disk).
This folder includes your certificates as well as the private key for your trust database.
To Restore Your Certificate Database From a Backup
· Copy your backup files to the alias sub-folder of your server root folder.
Step 2. Set Up SSL Connections Between Directory Proxy Server and Clients
To set up SSL connections between Directory Proxy Server and LDAP clients, follow these steps:
· Step A. Add Directory Proxy Server CA Certificate to Clients' Trust Databases
· Step B. Make Changes to the Directory Proxy Server System Configuration
· Step C. Make Changes to the Directory Proxy Server Network Groups
Step A. Add Directory Proxy Server CA Certificate to Clients' Trust Databases
When Directory Proxy Server presents its certificate to an LDAP client, the client tries to verify the validity of the certificate. As a part of this verification process, the client checks whether the CA that has issued the certificate is trusted by the client. For this reason, the root certificate of the CA that issued Directory Proxy Server's server certificate must be installed in the client's trust database.
In the last step of installing Directory Proxy Server's server certificate, you copied the Directory Proxy Server's CA certificate to a text file. Follow the documentation for each client application, and install the CA certificate in its trust database.
Step B. Make Changes to the Directory Proxy Server System Configuration
The Settings and Encryption tabs in the Directory Proxy Server Console window enable you to define SSL-enabled communication criteria for Directory Proxy Server. For details, see .
Make the following changes to the appropriate system configuration instances, and save your changes.
· In the Settings tab, specify a value in the "SSL port" field. Directory Proxy Server will listen on the port number you specify for LDAPS (LDAP over SSL) connections. By default, Directory Proxy Server does not listen for connections from LDAPS clients. This value must be present to enable LDAPS connections from clients that use the alternative port 636 method to establish TLS/SSL. This value must be different from the value in the Port field. (This option also requires TLS/SSL configuration found on the Encryption tab.)
If you need description for the parameters, click the Help button.
· In the SSL/TLS Encryption tab, specify all the required information.
If you need description for the parameters, click the Help button.
Step C. Make Changes to the Directory Proxy Server Network Groups
Directory Proxy Server uses network groups to identify clients and determine their access privileges to the information contained in an LDAP directory; for details, see Chapter 6 "Creating and Managing Groups."

In each group that you've configured, set the appropriate options in the Encryption tab to indicate whether you want to force the client to start a TLS session before sending any LDAP operation, leave the decision to the client, or disallow the client to start a TLS session. For example, you might want to enable "SSL is available" and "Clients MUST establish an SSL session" options. For more information about the options presented in the Encryption tab, see Step 9 of Chapter 6 "Creating and Managing Groups."
If referral following is enabled, you should check the Referral SSL Policy. Referral following is enabled by selecting Referrals in the list on the left side of the window.
Directory Proxy Server can follow referrals returned by the backend servers. The LDAP URL's returned must be in RFC 2255 format. If no host port is given, the client must have some knowledge of an appropriate LDAP server to contact.
Directory proxy server interprets LDAP URL's with no host or port number as a referral to the same host that issued the referral. For example:
Step 3. Set Up SSL Connections Between Directory Proxy Server and LDAP Servers
To set up SSL connections between Directory Proxy Server and LDAP servers, follow these steps:
· Step A. To Install a CA Certificate or Server Certificate Chain
· Step B. Add Directory Proxy Server CA Certificate to the LDAP Servers' Trust Databases
· Step C. Make Changes to the LDAP Server Properties
Step A. To Install a CA Certificate or Server Certificate Chain
This step is required if you want Directory Proxy Server to verify the certificate presented to it by an LDAP server. For details, see .
Step B. Add Directory Proxy Server CA Certificate to the LDAP Servers' Trust Databases
When Directory Proxy Server presents its certificate to an LDAP server, the server tries to verify the validity of the certificate. As a part of this verification process, the server checks whether the CA that has issued Directory Proxy Server's certificate is trusted by the server. For this reason, the root certificate of the CA that issued Directory Proxy Server's server certificate must be installed in the LDAP server's trust database.
In the last step of installing Directory Proxy Server's server certificate, you copied the Directory Proxy Server's CA certificate to a text file. Follow the documentation for each LDAP server, and install the CA certificate in its trust database. If you're using Sun ONE Directory Server, you can use the Manage Certificates Wizard, which can be launched from the Tasks tab of the Directory Server Console, to add the CA certificate to the Directory Server's trust database.
Step C. Make Changes to the LDAP Server Properties
The Encryption tab in the LDAP Server Property window enables you to define SSL-enabled communication criteria for each LDAP server. For details, see .
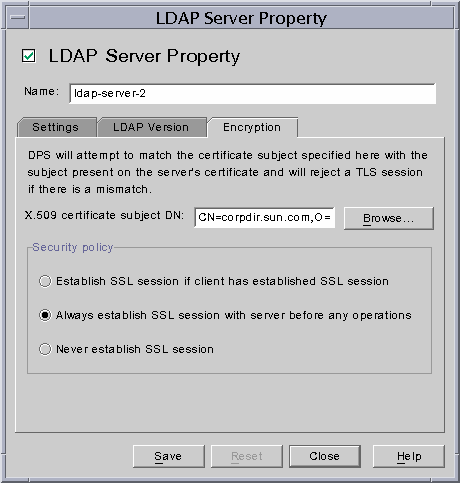
Make the following changes to the appropriate LDAP Server property objects, and save your changes.
· Set the "Security policy" option to an appropriate value so that Directory Proxy Server will always establish SSL/TLS to the backend server, never establish TLS/SSL to the backend server, or only establish SSL/TLS with the backend server when the client does the same to Directory Proxy Server.
· Set the "X.509 certificate subject DN" field to the LDAP server's certificate subject name (the subject attribute in the X.509 certificate). If specified, Directory Proxy Server will attempt to match the certificate subject with the subject present on the LDAP server's certificate and will reject a TLS session if there is a mismatch. (This attribute allows Directory Proxy Server to authenticate the LDAP server to which it is connecting. Directory Proxy Server accepts any name if this attribute is not set.)