|
|
| Sun ONE Server Console 5.2 Server Management Guide |
Chapter 11 Using SNMP to Monitor Servers
You can use the Simple Network Management Protocol (SNMP) to manage your Sun ONE servers. This chapter explains how SNMP works and tells you how to set it up on your network. The chapter contains the following sections:
- SNMP Basics
- Setting Up SNMP on UNIX Systems
- Using a Proxy SNMP Agent on UNIX Systems
- Reconfiguring a Native Agent on UNIX Systems
- Configuring the Master Agent on UNIX Systems
- Starting the Master Agent on UNIX Systems
- Enabling the Subagent on UNIX Systems
- Using the Windows SNMP Service
SNMP Basics
SNMP is a protocol used to exchange data about network activity. It defines a standard method of communication used to manage products from different vendors. This standard allows administrators to remotely manage hardware and software located across their network.
Each piece of controlled hardware and software is known as a managed device. A managed device is anything that runs SNMP, such as a host, router, or Sun ONE server.
The machine used to monitor and configure managed devices is called a network management station. A network management station is usually a powerful workstation running network management applications which graphically show information about managed devices. For example, a network management application might show which servers in your enterprise are running and which are shut down, or the application might report the number and type of error messages received.
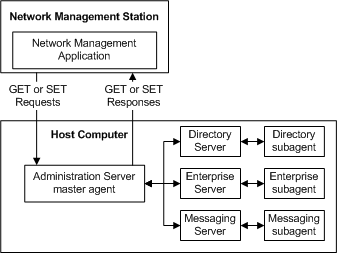
Sun ONE servers transmit data to a network management station using two types of agents: SNMP subagents and SNMP master agents. An SNMP subagent gathers information and sends it to an SNMP master agent. The SNMP master agent transfers the data to the network management station. Every Sun ONE server has an SNMP subagent except for Sun ONE Administration Server, which either has a master agent (on UNIX systems) or no agent (on Windows).
A single machine can host multiple subagents, but a machine can only have one master agent. For example, if you have one instance each of Enterprise Server, Directory Server, and Messaging Server installed on one host, each has its own subagent. All three subagents report to the same master agent. This master agent is located on the same host machine as the subagents. Figure 11-1 illustrates this example.
Figure 11-1 Network Management Station and Host Computer
Windows systems offer an SNMP master agent. Sun ONE Administration Server employs this service when utilizing SNMP. You can access and operate this master agent through the Network control panel. In UNIX environments, the master agent is installed with Administration Server.
Some UNIX operating systems support an extended version of SNMP called the SNMP multiplexing protocol (usually known as SMUX). This allows Sun ONE servers to operate without a master agent. For those versions of UNIX that do not support SMUX, you can use Sun ONE Server Console to manage the master agent that Sun ONE provides.
How SNMP Works
A managed device, such as a server, stores its configuration and management settings as variables. Some of these variables can be read and changed over SNMP while others cannot. The variables that the master agent can read and change are called managed objects. Managed objects are defined in a tree-like hierarchy known as a management information base (MIB).
Each Sun ONE server provides a management information base (MIB) for use in SNMP communication. This MIB contains managed objects pertaining to the server's operation. Each managed object has a unique object identifier. A server can report significant events to the network management station by sending "trap" messages (often called just "traps") containing these object identifiers. In addition, the network management station can initiate communication, and then specify one or more object identifiers when querying a server's MIB for data. The network management station can also remotely change variables in the MIB by specifying an object identifier and sending its new value.
Sun ONE MIBs
Each Sun ONE server has its own MIB. All Sun ONE MIBs are located in the ServerRoot/plugins/snmp directory.
A server's MIB contains variable definitions used when managing that particular server. Some of these variables can be modified over SNMP by a network management station while others are flagged as read-only or inaccessible. See your server documentation for detailed information about its management variables.
The Administration Server MIB
Sun ONE Administration Server stores its MIB in a file called netscape-main.mib.
The Administration Server MIB lists the object identifiers for all installed Sun ONE servers. It also defines the object identifier shared by all Sun ONE servers. This object identifier is
netscape OJBECT IDENTIFIER: :={enterprises 1450}
The netscape-main.mib file may look like this:
--
-- Netscape Main Mib for SNMP support
--
NETSCAPE-MIB DEFINITIONS ::=
BEGIN
IMPORTS OBJECT-TYPE
FROM SNMPv2-SMI
MODULE-IDENTITY
FROM SNMPv2-SMI
enterprises
FROM ObjectIds
OBJECT-IDENTITY, Counter64
FROM SNMPv2-SMI;netscape OBJECT IDENTIFIER ::= { enterprises 1450 }
-- All netscape sub-agents must branch off of the netscape root
-- above. Following objids for individual sub-agents have been
-- taken already.
-- http OBJECT IDENTIFIER ::= { netscape 1 }
-- nsmail OBJECT IDENTIFIER ::= { netscape 5 }
--
ENDTypes of SNMP Messages
SNMP defines three types of messages: GET, SET, and trap. The network management station uses GET messages to request data and SET messages to change variable values in the MIB. The messages sent by a server to the network management station are known as trap messages.
The following examples illustrate how a network management station, and the servers it communicates with, use GET and trap messages.
Network Management Station-Initiated Communication
A network management station can request information from a server or change the value of a variable stored in a server's MIB. For example:
- The network management station sends a GET message to the Administration Server master agent. The GET message is a request for the number of Directory Server errors encountered since the server was last started.
- The master agent forwards the message to the Directory Server's SNMP subagent.
- The subagent retrieves the data.
- The subagent sends the data to the master agent. The master agent sends a trap message containing the data to the network management station.
- The network management station displays the data through its network management application.
Server-Initiated Communication
The server subagent sends a trap message to the network management station when a significant event has occurred. For example:
- The Directory Server's subagent informs the master agent that the server has stopped.
- The master agent sends a trap message reporting the event to the network management station.
- The network management station displays the information textually or graphically through its network management application.
Setting Up SNMP on UNIX Systems
In general, to use SNMP on UNIX Systems you must have a master agent and at least one subagent installed and running on your system. You need to install a master agent before you can enable a subagent. Some UNIX systems have their own SNMP master agent. If your system has one of these native agents, you can either disable it or change the port number that it uses. If you disable the native agent, you can only use the master agent included with Administration Server. If you change the port number that the native agent uses, you can use it alongside Administration Server's master agent.
The procedures for setting up SNMP are different depending upon your system. Table 11-1 provides an overview of the procedures to follow in various situations. The actual procedures are described in detail later in this chapter.
Before you begin, examine your system.
- Is your system already running an SNMP agent that's native to your operating system?
- If so, does your native SNMP agent support SMUX communication? If your native agent supports SMUX, you don't need to install a master agent. However, you do need to change the native agent's configuration.
If you are unsure of how to verify this information, see your system documentation.
Table 11-1 Overview of Procedures for Enabling SNMP Master Agents and Subagents
If your server meets these conditions...
... follow these procedures
Using a Proxy SNMP Agent on UNIX Systems
If you want to use a native agent and the Sun ONE Server Console master agent concurrently, you must set up a proxy agent. The proxy agent fields requests from the Sun ONE master agent and then passes them on to the native agent. This scenario is illustrated in Figure 11-2.
Figure 11-2 Using a Proxy Agent With a Native SNMP Agent
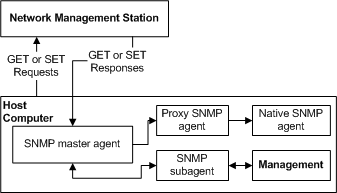
In order to use both master agents simultaneously, you need to install and start the proxy SNMP agent. You also have to restart the native SNMP master agent using a port number other than the one used by the Sun ONE Server Console master agent.
Installing and Starting the Proxy SNMP Agent
Before you install the proxy SNMP agent, make sure to stop the native master agent. See your system documentation for detailed instructions.
To Install the SNMP Proxy Agent
- Edit the CONFIG file located in the ServerRoot/plugins/snmp/sagt directory so that it includes the port that the SNMP proxy agent listens to. The file also needs to include the MIB trees and traps that the SNMP proxy agent forwards.
Here is a sample CONFIG file:
AGENT AT PORT 1161 WITH COMMUNITY public
SUBTREES 1.3.6.1.2.1.1,
1.3.6.1.2.1.2,
1.3.6.1.2.1.3,
1.3.6.1.2.1.4,
1.3.6.1.2.1.5,
1.3.6.1.2.1.6,
1.3.6.1.2.1.7,
1.3.6.1.2.1.8
FORWARD ALL TRAPS;To Start the SNMP Proxy Agent
- At the command prompt, enter
sagt -c CONFIG&
After the proxy SNMP agent starts, you need to restart the native agent on the port you specified in the CONFIG file.
To Restart the Native Agent
- At the command prompt, enter
snmpd -P portNumber (specified in the CONFIG file)
For example, on the Solaris platform, using the port in the sample CONFIG file above, you would enter
snmpd -P 1161
Reconfiguring a Native Agent on UNIX Systems
If your native agent supports SMUX, you don't need to install a master agent. However, you do need to change the native agent's configuration.
UNIX uses several configuration files to screen its communications. On some systems, /etc/snmp/conf/snmpd.conf needs to be changed so that the native agent accepts incoming messages from SMUX subagents. To change the file, add a line defining each subagent by its object identifier.
For example, you might add this line to snmpd.conf:
smux 1.3.6.1.4.1.1.1450.1 '' IPAddress netMask
where IPAddress is the IP address of the host on which the subagent is running and netMask is the network mask of that host (for example, 255.255.0.0).
Note Do not use the loopback address 127.0.0.1; use the actual host IP address instead.
Configuring the Master Agent on UNIX Systems
In order to use SNMP, you must configure the master agent by specifying community strings and trap destinations.
Community Strings
A community string is a password text string that an SNMP master agent uses for authorization. Whenever a network management station sends a message, it includes a community string. The agent receiving the message can then verify whether the network management station is authorized to obtain information. Community strings are not concealed when sent in SNMP packets; they are sent as ASCII text.
To ensure that a network management station is authorized to obtain information, the SNMP master agent compares the community string sent by the station to its list of accepted community strings. If the community string is listed, the network management station is authenticated.
Trap Destinations
An SNMP trap is a message the SNMP agent sends to a network management station. For example, an SNMP agent might send a trap when a server goes down. The SNMP agent must know the address of the network management station in order to send traps. This address is called a trap destination.
Configuring the Master Agent using Sun ONE Server Console
Sun ONE Server Console provides an easy way to work with SNMP parameters. You can add, edit, and remove community strings and trap destinations from the Administration Server management window. You can also set the SNMP operations that a particular community string can request, as well as view any trap destinations you have already configured.
To Add, Edit, or Remove a Community String using Sun ONE Server Console
- In the Sun ONE Server Console navigation tree, select the instance of Administration Server that you want to work with.
- Click Open to open the management window for the server instance.
- Click the Tasks tab.
- Click the Configure SNMP Master Agent button, and then click Communities.
Figure 11-3 The Communities Tab
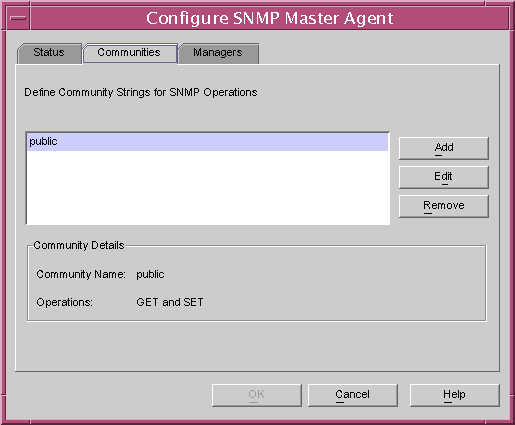
- Click the appropriate button for the task you are performing.
- If you want to add a community string, click Add.
- If you want to edit a community string, select it, and then click Edit.
- If you want to remove a community string, select it, and then click Remove.
- Enter community string information as necessary.
Community. Enter a community string you want to add, or edit the listed community string.
GET and SET. Choose this option if you want to use this community string for requesting data, replying to messages, and setting variable values.
GET only. Choose this option if you want to use this community string only for requesting data and replying to messages.
SET only. Choose this option if you want to use this community string only for setting variable values.
Figure 11-4 Adding a Community
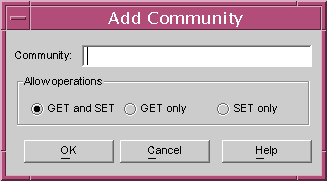
- Click OK.
To Add, Edit, or Remove a Trap Destination
- In the Sun ONE Server Console navigation tree, select the instance of Administration Server on which the master agent is running.
- Click Open to open the management window for the server instance.
- Click the Tasks tab.
- Click the Configure SNMP Master Agent button, then click Managers.
Figure 11-5 The Managers Tab

- Click the appropriate button for the task you are performing.
- If you are adding a trap destination, click Add.
- If you are editing a trap destination, select it, and then click Edit.
- If you are removing a trap destination, select it, and then click Remove.
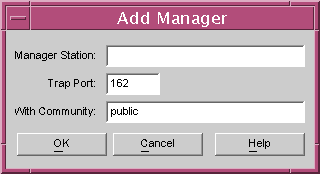
- If you are adding or editing a trap destination, enter Manager information as necessary:
Manager Station. Enter a valid system name or an IP address for the network management station.
Trap Port. Enter the port number that the network management station uses to listen for traps. The default is 162.
With Community. Enter the community string you want to use in the trap.
Figure 11-6 Adding a Manager
- Click OK.
Manually Configuring the Master Agent
Although you can easily set SNMP master agent parameters through Sun ONE Server Console, you may want to manually add or modify some settings. You can do this by editing the master agent's configuration file. This file is called CONFIG and it contains all master agent settings, whether entered manually or through Sun ONE Server Console.
To Configure the Master SNMP Agent Manually
- Log in as root.
- Check to see if there is a native agent (snmpd) running on port 161.
If a native agent is running, make sure you know which MIB trees it supports and how to restart it, then stop it.
- Edit the CONFIG file located in the ServerRoot/plugins/snmp/magt directory.
- (Optional) Define sysContact and sysLocation variables in the CONFIG file.
Instructions for editing the CONFIG file and defining the sysContact and sysLocation variables are detailed below.
Editing the Master Agent Config File
The CONFIG file defines the community and manager with which the master agent works. The manager value should be a valid system name or an IP address. Here is an example of a basic CONFIG file:
COMMUNITY public
ALLOW ALL OPERATIONSMANAGER your_manager_station_name
SEND ALL TRAPS TO PORT 162
WITH COMMUNITY publicDefining sysContact and sysLocation Variables
You can edit the CONFIG file to include initial values for the sysContact and sysLocation variables (these variables are defined as part of MIB-II, the MIB section of the second version of SNMP). The value for sysContact specifies the person in charge of the host system on which the master agent runs. The value for sysLocation specifies a physical address where the host machine can be found.
The following example CONFIG file defines the sysContract and sysLocation variables. The strings for the variables in this example are enclosed in quotes. Any string that contains spaces, line breaks, or tabs must be in quotes. Alternatively, you can omit the quotes and specify the value of these whitespace characters in hexadecimal notation.
COMMUNITY public
ALLOW ALL OPERATIONSMANAGER nms2
SEND ALL TRAPS TO PORT 162
WITH COMMUNITY public
INITIAL sysLocation 'Server room
4150 Network Circle
Santa Clara, CA 95054
USA'INITIAL sysContact 'John Doe
email: <john.doe@sun.com>'Starting the Master Agent on UNIX Systems
Once you have configured the SNMP master agent, you can start it from Sun ONE Server Console or from the command line.
Starting the Agent Using Sun ONE Server Console
Sun ONE Server Console can start the SNMP master agent on the standard port (161) only. If you want to use a non-standard port, see "Starting the Agent From the Command Line" below.
To Start the Master Agent Using Sun ONE Server Console
- Log in as root.
- Check to see if there is a native agent (snmpd) running on port 161.
If a native agent is running, make sure you know which MIB trees it supports and how to restart it, then stop it.
- In the Sun ONE Server Console navigation tree, select the instance of Administration Server on which the master agent is running.
- Click Open to open the management window for the server instance.
- Click the Tasks tab.
- Double-click Configure SNMP Master Agent.
- Click the Start button.
Starting the Agent From the Command Line
If you do not want to start the SNMP master agent from Sun ONE Server Console, you can launch it from the command prompt. If you want to run the agent on a port other than 161, you must modify your CONFIG or system services file and then start the agent from the command line.
To Start the Agent on the Standard Port
- Enter the following at the command prompt to start the master agent on port 161:
magt CONFIG INIT&
The INIT file contains information from the MIB-II system group, including system location and contact information. If INIT doesn't already exist, starting the master agent for the first time creates it. An invalid manager name in the CONFIG file causes the master agent to fail during startup.
To Start the Agent on a Non-Standard Port Using the Config File
- In the CONFIG file, specify a transport mapping for each interface over which the master agent listens for SNMP requests from network management stations. Transport mappings allow the master agent to accept connections on both the standard port and a nonstandard port.
The maximum number of concurrent SNMP requests is limited by your target system's limits on the number of open sockets or file descriptors per system process.
Here is an example of a transport mapping entry:
TRANSPORT extraordinary SNMP
OVER UDP SOCKET
AT PORT 1161
- After manually editing the CONFIG file, you should start the master agent by typing the following at the command prompt:
# magt CONFIG INIT&
To Start the Agent on a Non-Standard Port Using System Services
- Edit the /etc/services file to allow the master agent to accept connections on the standard port as well as on a nonstandard port. For information on editing this file, see your system documentation.
Enabling the Subagent on UNIX Systems
For information on enabling the subagent, see the documentation for your Sun ONE server. If you need more information, see your system documentation.
Using the Windows SNMP Service
Windows implements SNMP as a service. Any Sun ONE servers that use SNMP communicate directly with this service. Sun ONE Administration Server does not perform any SNMP-related tasks on Windows. All SNMP-related tasks are handled by the operating system.
To Set Up SNMP on Windows Systems
- Install the SNMP service on your server.
Refer to your Windows documentation for instructions.
- Configure your server software to use SNMP.
For more information, see your server documentation.
- Click Start, and then choose Settings > Control Panel.
- Open the Services control panel.
- Select the SNMP service from the list of services and then click the Start button.
- Click Close to exit the Services control panel.