| Sun ONE Calendar Server 6.0 Installation Guide for Solaris Operating Systems |
Chapter 3
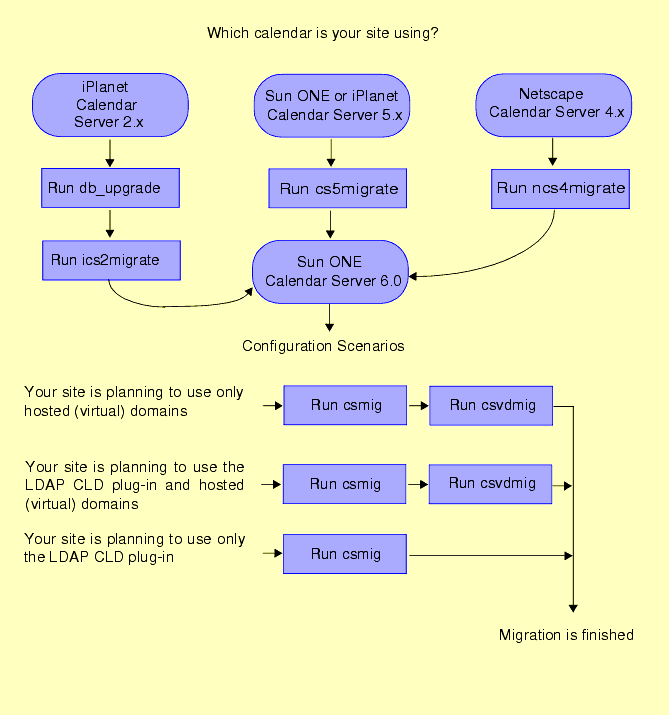
Migrating Calendar Server DataSun™ ONE Calendar Server 6.0 provides the following migration utilities:
- cs5migrate Utility – Migrates a Calendar Server 5.x database to Calendar Server 6.0 and upgrades the calendar database from Berkeley DB version 2.6 to version 3.2.9.
- csmig Utility – Assigns an owner to each calendar in the calendar database and maps each calendar ID (calid) to an owner, if needed, which allows support for hosted (virtual) domains and the LDAP Calendar Lookup Database (CLD) plug-in.
- csvdmig Utility – Upgrades a Calendar Server 6.0 site to use hosted (virtual) domains.
- ics2migrate Utility – Migrates data from iPlanet Calendar Server 2.x.
- ncs4migrate Utility – Migrates data from Netscape Calendar Server 4.x.
- csrename Utility – Renames calendar users in the calendar database and in the LDAP directory server (Calendar Server attributes with the “ics” prefix).
Figure 3-1 shows a roadmap for running the Calendar Server migration utilities.
Figure 3-1 Roadmap for Running the Calendar Server Migration Utilities
cs5migrate UtilityIf you are upgrading from Calendar Server 5.x to Calendar Server 6.0, you must run the cs5migrate utility before you can run Calendar Server 6.0. The cs5migrate utility performs these functions:
Migration Time
The cs5migrate migration time can vary, depending on several factors. First, cs5migrate must access the LDAP directory server to update the schema attributes, so the network connection to the LDAP server can greatly affect the migration time. If possible, run cs5migrate with a fast network connection to the LDAP server and when other network traffic is minimal.
Migration Scenario–On a Sun Fire™, UltraSPARC™ III Cu, 12 CPUs, 750 MHz, 12 GB memory, floating point processor, running Solaris 8 OS with 20 GB swap file space, cs5migrate migrated the following Calendar Server 5.x calendar database in approximately 1 hour and 15 minutes:
cs5migrate Syntax
The cs5migrate utility has the following syntax:
-q specifies quiet mode. cs5migrate does not display information if the migration is successful. Any errors, however, are displayed.
-d specifies dry run mode. A dry run reports what cs5migrate would do during an actual migration, but cs5migrate does not migrate any data or upgrade the database.
-r specifies to create the master component for recurring events.
-l min|max specifes the log mode and level of detail for the migration log (cs5migrate.log).
Note The -t option is not implemented in the current release.
source-directory is a required parameter that specifies the directory that contains the Calendar Server 5.x database files.
target-directory is a required parameter that specifies an existing directory where cs5migrate should create the new Calendar Server 6.0 database files.
Important You must create the target-directory before you run cs5migrate.
Migration Process
Before you run cs5migrate, perform these steps:
- Backup your Calendar Server 5.x database using a utility such as csbackup, the Sun StorEdge Enterprise Backup™ software, or Legato Networker®.
- It is also recommended that you rebuild your calendar database using the csbd rebuild command before you migrate. For information see, Chapter 5, “Managing Calendar Server Databases,” in the Sun ONE Calendar Server Administrator's Guide.
- If necessary, enable alarms by setting the caldb.serveralarms parameter in the ics.conf file to “yes”.
- If you need to move your Calendar Server 5.x database to another server, you can simply copy the database (*.db) files to the new server, if he files are not too large. Otherwise, create a tar file of the database files, copy the tar file to the new server, and then untar it.
To run cs5migrate, follow these steps:
- On Solaris and other UNIX systems, login as the user and group under which Calendar Server is running, such as icsgroup and icsuser.
- If necessary, stop Calendar Server using the stop-cal command.
- If necessary, create the target-directory. The target-directory must exist before you run cs5migrate.
- Run cs5migrate. For the syntax, see cs5migrate Syntax.
For example, on a Solaris system:
./cs5migrate -q -l max /var/opt/SUNWics5/csdb511
/var/opt/SUNWics5/csdb60
In this example, the /var/opt/SUNWics5/csdb60 directory must exist before you migrate.
For the migration status, view the cs5migrate.log file. If errors occur during the migration or if calendar database entries cannot be migrated, cs5migrate writes them to cs5migrateerror.log.
- After cs5migrate is finished, the caldb.berkeleydb.homedir.path parameter in the ics.conf file must point to the migrated database because cs5migrate does not modify the ics.conf file.
Either reset this parameter to point to the migrated database directory, or move the migrated database files to the directory indicated by the parameter.
- If you are using the LDAP data cache option (local.ldap.cache.enable = "yes") or the CLD cache option (caldb.cld.cache.enable = "yes"), create the ldap_cache and cld_cache directories in the target directory after you run cs5migrate.
- Check the permissions for the migrated database files. If you ran cs5migrate as icsuser, you shouldn't have any access problems. If you ran as superuser (root), which is not recommended, you might need to reset the permissions.
- Restart Calendar Server using the start-cal command.
csmig UtilityThe csmig utility assigns an owner to each calendar in the calendar database and maps each calendar ID (calid) to an owner, if needed.
The csmig utility supports hosted (virtual) domains and the LDAP Calendar Lookup Database (CLD) plug-in. Calendars in the migrated database are then accessible using this plug-in. The LDAP CLD plug-in provides horizontal scalability of the calendar database by allowing calendars to be distributed over a number of back-end servers. For information about the LDAP CLD plug-in, see the Sun ONE Calendar Server Administrator’s Guide.
This document describes these topics:
csmig Functions
The csmig migration utility performs these functions:
- csmig migrates both user and resource calendars in the current calendar database (*.db files) specified by the caldb.berkeleydb.homedir.path parameter. In the new destination target database, csmig updates entries required by the LDAP CLD plug-in in the calendar properties (calprops), events, todos (tasks), and group scheduling engine (gse) database files.
- csmig updates LDAP attributes for all relevant LDAP entries, including icsSubscribed, icsCalendar, icsCalendarOwned, icsFreeBusy, icsSet, and uid (for resource calendars) . csmig creates the icsDWPHost attribute for each calendar in the LDAP directory server database. icsDWPHost specifies the host name of the back-end server where a calendar resides.
- csmig assigns an owner to each calendar in the calendar database and maps each calendar ID (calid) to an owner, if needed. All default calids are kept as is, and no changes are made. Other calendars are mapped as follows:
- User calendars that don’t have valid owners will be owned by the user passed to csmig by the -c option. For example, if jsmith doesn’t have an owner, it will be converted to orphan:jsmith, if orphan is specified as the -c option.
- Resource calendars that don’t have an owner will be owned by the resource user passed to csmig by the -r option.
- If a resource calendar has any colons in the name, the colons are converted to underscores.
For example, a calendar named football with owner bkamdar will be converted to bkamdar:football. A calendar tchang:soccer with the owner bkamdar will be converted to bkamdar:tchang_soccer. (Only one colon should be in the calid.) A resource calendar named auditorium:room1 will be converted to auditorium_room1.
csmig Requirements
The requirements for using csmig are:
- The calendar database must not be corrupted. Use the csdb check command to check your calendar database, and if necessary, run the csdb rebuild command to rebuild the database. For information about these commands, see the Sun ONE Calendar Server Administrator’s Guide.
- You must have sufficient disk space for the new destination target database and if applicable, your backup database.
- To run csmig, log in as icsuser (or as the Calendar Server runtime user ID specified during configuration). If you run csmig as superuser (root), you might need to reset the permissions for the migrated files.
csmig Syntax
The csmig utility has the following syntax:
csmig [ -t DestinationDB ] [ -b Backend-DWPHost ]
[ -o OutputFile ] [ -e ErrorFile ] [ -m MappingFile ]
-c calendarOwner -r resourceOwner { migrate|dryrun }
-t DestinationDB specifies the destination target database that csmig generates. The default is MigratedDB.
-b Backend-DWPHost specifies the name of the DWP back-end host server. This name must match the DWP back-end host server name specified in the ics.conf file.
-o OutputFile specifies an output file that captures the csmig output to the screen as well as any errors that occur. The default is MigrateOut.
-e ErrorFile is the file where csmig writes any errors or database entries that cannot be resolved. If database entries cannot be resolved, they are not written to the destination database. The default is MigrateError.
-m MappingFile is an output mapping file generated in dryrun mode that list recommended changes for updating entries in the LDAP schema. For example:
Old calid = jsmith New calid = jsmith:basketball
The mapping file provides only a list of recommended changes to the LDAP schema. csmig does not actually make the changes to the schema.
In migrate mode, MappingFile is not used.
-c calendarOwner specifies the owner for user calendars that don’t have owners.
-r resourceOwner specifies the owner for resource calendars that don’t have owners.
csmig Migration Steps
After you have installed Calendar Server 6.0 on all of the servers in your configuration, you must run csmig to migrate your existing Calendar Server and LDAP data to the new Calendar Server 6.0 and LDAP data, which is required for the LDAP CLD plug-in to work properly. Here are the recommended steps to migrate calendar data using csmig:
- Configure Your LDAP Directory Server–Adding indexes can greatly improve the performance of your migration and calendar searches on LDAP data.
- Perform a Test Dry Run–A dry run reports what csmig would do during a migration, but it does not migrate any actual data. After the dry run, you can correct any errors and determine a plan to handle any unresolved calendars.
- Migrate Your Production Data–During a production run, csmig migrates the calendar database (.db files) and LDAP data (user and group preferences data), icsSubscribed, icsCalendar, icsCalendarOwned, icsFreeBusy, icsSet, and uid (for resource calendars). After the migration, all calendar resources will have an LDAP entry created.
Configure Your LDAP Directory Server
To improve performance, consider adding the following two new indexes to the slapd.ldbm.conf file:
For information about creating indexes in the slapd.ldbm.conf file, refer to your directory server documentation.
Perform a Test Dry Run
A test dry run performed on a staging server reports what would be migrated, but it does not perform the actual migration of your production database. A dry run allows you to determine a plan for migrating your production database. For example, you can decide how you want to handle “orphan” calendars, which are calendars that don’t have an owner.
To perform a test dry run using csmig, follow these steps:
- Log in as icsuser (or as the Calendar Server runtime user ID specified during configuration). If you run csmig as superuser (root), you might need to reset the permissions for the migrated files.
- Install Calendar Server 6.0 (if necessary) on the staging server.
- Copy a snapshot of your calendar database to the staging server.
- Install an LDAP server to mimic the production LDAP environment. Install a snapshot of the LDAP database on this server with the new indexes in the slapd.ldbm.conf file.
- Change to the cal_svr_base/opt/SUNWics5/cal/sbin directory.
- Consider creating a catchall calid for user calendars that don’t have an owner. For example, on Solaris systems, the following command creates a user with the calid of orphan:
./csuser -g orphan -s adminuser -y password -l en -c orphan create orphan
- Stop the Calendar Server using the stop-cal command (if necessary).
- Run the csdb check command to check your database for corruption. If corruption is indicated, run csdb rebuild to rebuild the database.
- Run csmig with the dryrun option. For example, on a Solaris system, enter:
./csmig -b sesta.com -o csmig.out -e csmig.errors -m csmig.map -c orphan -r calmaster dryrun
This command assigns user calendars without an owner to orphan and resource calendars without an owner to calmaster.
Check the output mapping file (csmig.map). The mapping file lists recommended changes for updating entries in the LDAP schema.
- Check the output, mapping, and error files. Resolve any LDAP issues or errors that you find. Determine how you will handle any unresolved calendars before the actual migration. Several options are:
- It is highly recommended that you migrate your calendar database on your staging server before you migrate your actual production calendar database. This steps allows you to see exactly how your data will be migrated and to correct any problems before you migrate your production database.
For example, on a Solaris system, the following command migrates the calendar database to the /var/opt/SUNWics5/testcsdb/ directory:
./csmig -t /var/opt/SUNWics5/testcsdb/ -b sesta.com -o csmig.out -e csmig.errors -m csmig.map -c orphan -r calmaster migrate
- After the test migration is finished, copy the migrated database to the /csdb directory specified by the caldb.berkeleydb.homedir.path parameter. Or, edit this parameter to point to the new location of the migrated database. Then perform these checks:
- Run csdb check on the new calendar database. The number events and todos in the migrated database should match the pre-migration totals.
- Search for icsCalendarOwned entries and make sure that the entries match the pre-migration number of calendars.
- Login to Calendar Express and verify some of the calendars in the migrated database.
If the test migration is successful, you are ready to migrate your production database.
Migrate Your Production Data
To migrate your production database using csmig, follow these steps:
- Log in as icsuser (or as the Calendar Server runtime user ID specified during configuration). If you run csmig as superuser (root), you might need to reset the permissions for the migrated files.
- Change to the cal_svr_base/opt/SUNWics5/cal/sbin directory.
- Stop the Calendar Server using the stop-cal command (if necessary).
- Backup the following data:
- Run csmig with the migrate option. For example, on a Solaris system, the following command migrates the calendar database to the /var/opt/SUNWics5/newcsdb/ directory:
./csmig -t /var/opt/SUNWics5/newcsdb/ -b sesta.com -o csmig.out -e csmig.errors -m csmig.log -c orphan -r calmaster migrate
- Check for any unresolved calendars in the error file and resolve them according to your plan from Step 10 under Perform a Test Dry Run.
- Copy the new migrated database to the /csdb directory specified by the caldb.berkeleydb.homedir.path parameter. Or, edit this parameter to point to the new location of the migrated database.
- Run the csdb check command to check your migrated database. If any corruption is indicated, run csdb rebuild to rebuild the database.
- Enable the LDAP CLD plug-in by making any necessary changes to the following configuration parameters in the ics.conf file:
- service.dwp.enable = "yes"
- service.dwp.port = "9779"
- csapi.plugin.calendarlookup = "y"
- csapi.plugin.calendarlookup.name = "*"
- caldb.cld.type = "directory"
- caldb.dwp.server.default = "default-server-name"
- caldb.dwp.server.server-hostname.ip = "server-hostname" (for each back-end server including the local server)
- caldb.cld.cache.enable = "yes" (if you want to use the CLD cache option)
- caldb.cld.cache.homedir.path specifies the location of the CLD cache directory. The default is cal_svr_base/var/opt/SUNWics5/csdb/cld_cache.
- Restart the Calendar Server using the start-cal command.
- Log in to the Calendar Server and verify that your configuration is working by checking several of the migrated calendars. To disable alarms while you are making your checks, set each of the following parameters in the ics.conf file to “no”:
csmig Tips and Troubleshooting
The section describes the following tips and trouble shooting solutions:
The csmig dry run calendar owner is not the owner I want for a calendar
For example, a calendar named tchang:myCalendar has the owner as jsmith in the calendar database, and the csmig dry run shows the mapping as jsmith:tchang_myCalendar. I would like to keep this calendar name as tchang:myCalendar and assign the owner as tchang.
Solution
Before the migration, use the cscal utility to change the owner of the calendar tchang:myCalendar to tchang. Once this is done, the migration will map this calendar to tchang:myCalendar and add icsCalendarowned to tchang’s LDAP entry.
The LDAP calendar search doesn’t work correctly
After migration, the LDAP calendar search is enabled, but the calendar search dialog does not return any results or returns only partial results.
Solution
Enabling the LDAP calendar search allows Calendar Server to search (&(objectclass=icscalendaruser)(icscalendarowned=*substr*)).
Manually run two different searches on the LDAP data with the following filters and compare the output:
Since the server uses the filter that includes icsCalendaruser objectclass, the LDAP server might have been deployed with the schema check disabled, and some calendar entries may have been provisioned without the icsCalendaruser objectclass.
The csmig dry run indicates duplicate calendar names
The csmig dry run mapping file and output file indicate that there is a duplicate calendar name. For example, in the original database, jsmith owns the following calendars:
The dry run indicates that during a migration, the two calendars will be merged, and the resulting calendar will be
The output file will include the following warning message:
Error modifying calendar properties, error=2
Solution
If you don’t want the two calendars to be merged, change the owner of basketball to a user other than jsmith before the migration. This will preserve the data integrity of the two separate calendars.
How do I assign orphan calendars to different owners?
By default csmig assigns all orphan calendars to a single owner, but I would like to assign different owners for some orphan calendars.
Solution
csmig doesn’t accept the mapping file in the command line. However, you can assign owners to the orphan calendars in the original database before the migration. Check the dry run mapping file for all orphan calendars. Then use the cscal utility to assign owners to the orphan calendars before the migration. Run csmig in dryrun mode again to verify the new owners.
How do I move calendar users to another back-end server?
How do I move users from one back-end server to another?
Solution
To move a calendar user, you export each of the user’s calendars on the original server and then import the calendars on the second server. After the calendars are moved, you can delete the calendars on the original server. For detailed steps about moving users, see the Sun ONE Calendar Server Administrator’s Guide.
csvdmig UtilityThe csvdmig utility modifies the Calendar Server database and LDAP directory server database for sites that want to use hosted (virtual) domains. The csvdmig utility adds the domain name to the user ID as follows:
csvdmig Syntax
The csvdmig utility has the following syntax:
-m MappingFile is an input parameter that specifies a mapping file. The default is MigrateMapping.
The mapping file is an input text file that maps existing users to their respective domains. You must create the mapping file before you run csvdmig. Specify one entry per line with a space between the old and new values. For example:
user1 user1@sesta.com
user2 user2@siroe.com
user3 user3@sesta.com
...
user-n user-n@siroe.com-c ConfigFile is an input parameter that specifies a Calendar Server configuration file. The default is the ics.conf file.
-t DestinationDB is an output parameter that specifies the location of the migrated database. The default is MigratedDB.
-e ErrorFile is an output parameter that specifies the name of the error file for errors that cannot be resolved. The default is MigrateError.
DB | LDAP specifies whether to modify the Calendar Server database (DB) or the LDAP directory server (LDAP). The default is the calendar database (DB).
csvdmig Examples
ics2migrate UtilityThe ics2migrate migration utility migrate iPlanet Calendar Server 2.x calendar data and LDAP user preferences to Calendar Server 6.0.
This section describes:
Migration Requirements
Calendar Server 2.x to 6.0 migration requires the following hardware and software:
- The source machine has the Calendar Server 2.x data that you plan to migrate.
- The target machine is where the migrated data will be created. This machine must have Calendar Server 6.0 (or later) installed.
- ics2migrate utility–Before you migrate, first check with your Sun technical support representative or account manager to ensure that you have the latest version of the utility.
The source machine and destination machines can be different servers or the same server. For a list of supported platforms refer to the Sun ONE Calendar Server Release Notes.
What Gets Migrated?
The following table lists the Calendar Server 2.x data and describes how ics2migrate migrates the data to Calendar Server 6.0.
The following table lists the Calendar Server 2.x LDAP attributes and describes how ics2migrate migrates the attributes to Calendar Server 6.0.
Migration Process
The ics2migrate steps are:
Upgrade the 2.x Calendar Database
Calendar Server 6.0 requires Berkeley DB version 3.2.9 from Sleepycat Software. Before you run ics2migrate, you must use the Berkeley DB db_recover and db_upgrade utilities to upgrade your calendar database to version 3.2.9. Calendar Server 6.0 includes the Berkeley DB utilities in the following directory:
cal_svr_base/opt/SUNWics5/cal/tools/unsupported/bin
For more information about the Berkeley DB utilities, refer to the following web site:
http://www.sleepycat.com/docs/utility/index.html
To upgrade your database to version 3.2.9:
- On Solaris and other UNIX systems, login as the user and group under which Calendar Server is running, such as icsgroup and icsuser.
- If necessary, stop the 2.x Calendar Server.
- Back up your calendar 2.x database, if you have not already done so.
- Remove (delete) any old share (__db_name.share) or log (log.*) files from the following directories:
cal_svr_base/opt/SUNWics5/cal/lib/http
cal_svr_base/var/opt/SUNWics5/csdb
- Run the db_upgrade utility to upgrade your 2.x calendar database to version 3.2.9. If you are not in the same directory with the 2.x calendar database, use the -h option to point to the database files.
Notes You must run db_upgrade on all 2.x database files (alarms.db, calprops.db, events.db, and todos.db). You must also run db_upgrade on all front-end and back-end servers in your Calendar Server configuration, even if a server is not directly connected to a calendar database.
- Locate the Calendar Server 2.x caldb.conf file in the csdb directory with the database files and change the first line in the file as follows:
Old value: caldb.version "1.0.0 [BerkeleyDB]"
New value: caldb.version= "1.0.0 [BerkeleyDB]"
Note If this file is not in the csdb directory, create it using a text editor and then set the first line to the new value.
Migrate the Data
Follow these steps to run where ics2migrate:
- Change to the directory where ics2migrate is located.
- Run ics2migrate using the syntax in ics2migrate Syntax.
- After migration, make sure that the caldb.berkeleydb.homedir.path parameter in the ics.conf file points to the migrated database.
- Run the csdb check command and, if necessary, the csdb rebuild command to rebuild your calendar database.
ics2migrate Syntax
To migrate both the Calendar Server 2.x database and LDAP user preferences
To migrate only the Calendar Server 2.x database
To migrate only the LDAP user preferences
Table 3-3 lists the ics2migrate options with a description of each option.
Check the Migration Results
After you have finished the migration, check the results:
The check command scans a calendar database for corruption. If the check command finds an inconsistency that cannot be resolved, it reports the situation in its output. If necessary, you can then run the csdb utility rebuild command to rebuild the calendar database (caldb).
For documentation about the csdb utility check and rebuild commands, see the Sun ONE Calendar Server Administration Guide on the documentation web site.
Migration Examples
Migrate Both Calendar Database and LDAP User Information
Migrate both the LDAP user information and the Calendar Server 2.x database. The Calendar Server 2.x database is stored in the /var/opt/SUNWicsrv/2x_db directory and the 6.0 database is in the /var/opt/SUNWics5/50_db directory.
Grant scheduling and free/busy access to all calendars and log minimal migration statistics in a log file named ics2migrate.log.
ics2migrate /var/opt/SUNWicsrv/2x_db /var/opt/SUNWics5/50_db -l min
Migrate in Quiet Mode
Perform the same migration as the previous example, except operate in quiet mode. ics2migrate does not display migration statistics on the console or generate a log file.
ics2migrate -q /var/opt/SUNWicsrv/2x_db /var/opt/SUNWics5/50_db
Migrate Only the Calendar Database
Migrate only the 2.x calendar database stored in the 2x_db directory (relative to the current directory) and create a 6.0 database in the /var/opt/SUNWics5/50_db directory.
ics2migrate -m db 2x_db /var/opt/SUNWics5/50_db
Migrate Only LDAP User Information
Migrate only the Calendar Server 2.x LDAP user information to version 6.0 format.
ics2migrate -m ldap
Migrate Both Calendar Database and LDAP User Information
Migrate both LDAP and calendar database information in the specified directories. Grant scheduling access only to each user’s default calendar, deny free/busy access to all calendars on the server, and do not generate statistical information to a log file.
ics2migrate -s def -f none 2x_db 50_db
ncs4migrate UtilityThis section describes how to migrate Netscape Calendar Server 4.x calendar data to Sun ONE Calendar Server using the ncs4migrate migration utility.
Netscape Calendar Server 4.x calendars are also known as CS&T calendars for the developer Corporate Software & Technologies Int. Inc.
If you need a copy of the ncs4migrate utility, contact your Sun technical support representative or account manager. When you get ncs4migrate copy it to your cal_svr_base/opt/SUNWics5/cal/sbin directory.
This section includes the following information:
Migration Requirements
The migration requires the following hardware and software:
The source machine and target machine can be different servers or the same server. For a list of supported platforms refer to the Sun ONE Calendar Server Release Notes.
What Gets Migrated?
The following table describes how ncs4migrate migrates Netscape Calendar Server 4.0 data to Calendar Server 6.0.
Migration Steps
Backup the Calendar Server 5.0 Database
Before you migrate, it is recommended that you perform these steps to ensure the integrity of your calendar database:
- Backup your calendar database using a utility such as csbackup, the Sun StorEdge Enterprise Backup™ software, or Legato Networker®.
For information, see the Sun ONE Calendar Server Administrator’s Guide.
- Run the csdb utility check command on your calendar database to check for any database corruption. If the check command detects any corruption, run the csdb utility rebuild command to rebuild the database.
For documentation about the csdb and csbackup utilities, see the Sun ONE Calendar Server Administrator’s Guide.
Prepare to Migrate
Before you run the ncs4migrate utility, perform these steps on the target machine:
- Log in as or become superuser (root) or as a user who has administrator rights to the system.
- Change to the cal_svr_base/opt/SUNWics5/cal/sbin directory.
- Create a text file named ncs4dirpaths.dat and specify the fully qualified directory path to the Netscape Calendar Server 4.0 database. For example:
/apps/ncs/calendar/unison/db/nodes/N0/perm
To locate the directory that contains the Netscape Calendar Server 4.0 database, search for the unison.dbd file.
If necessary, fulfill any requirements to allow ncs4migrate to access the node and read the directory where the Netscape Calendar Server 4.0 database is located.
Note
Do not use variables such as $CAL_HOME in the pathname. Variables are not be resolved during migration.
For information about creating an ncs4dirpaths.dat file for data on multiple nodes, see Migrating Data From Multiple Nodes.
- If you plan to migrate selected users, create a user filter file named ncs4userfilter.dat in the cal_svr_base/opt/SUNWics5/cal/sbin directory. ncs4userfilter.dat is a text file that specifies the users you want to migrate. Each line identifies a user in either of the following formats:
- Make sure that the LDAP server is running.
- To prevent updates to the calendar database during the migration, stop the Calendar Server. The Netscape Calendar Server, however, can be either running or stopped.
You are now ready to migrate the Netscape Calendar Server 4.0 data.
Migrate the Data
On the target machine, perform these steps:
- While logged in as superuser (root)or a user who has administrator rights to the system, change to the cal_svr_base/opt/SUNWics5/cal/sbin directory (if necessary).
- Type ncs4migrate on the command line.
The ncs4migrate utility then displays its welcome menu with the options shown in Table 3-5.
Note: Although ncs4migrate displays the (E)xport and (I)mport options, these options are not supported and should not be used.
- From the ncs4migrate menu, specify the S option to migrate all users. Or, if you are migrating specific users in a user filter file (ncs4userfilter.dat), specify the O option.
- Monitor the migration log file to check the migration status. See Checking the Migration Log File for more information.
- After the migration is finished, check the migrated calendar database as described in Check the Migrated Data.
Migrating Data From Multiple Nodes
To migrate Netscape Calendar Server 4.0 data from multiple nodes, perform these steps on the target machine:
- While logged in as superuser (root)or as a user who has administrator rights to the system, copy the Netscape Calendar Server 4.0 database directory from each node to the machine where you plan to run ncs4migrate. (Each Netscape Calendar Server 4.0 directory should contain a unison.dbd file.)
You can also migrate the Netscape Calendar Server 4.0 data directly from each node; however, you must first fulfill any requirements to allow ncs4migrate to access the Netscape Calendar Server 4.0 data on the other nodes.
- Change to the cal_svr_base/opt/SUNWics5/cal/sbin directory.
- In the ncs4dirpaths.dat file, specify a directory pathname for data from all nodes. For example, the following ncs4dirpaths.dat file incudes directory paths for three nodes:
/apps/ncs/calendar/unison/db/nodes/N0/perm
/apps/ncs/calendar/unison/db/nodes/N1/perm
/apps/ncs/calendar/unison/db/nodes/N2/perm- To run the migration utility, type ncs4migrate on the command line.
- From the ncs4migrate menu, specify the S option to migrate all users. Or, if you are migrating specific users in a user filter file (ncs4userfilter.dat), specify the O option.
- Monitor the migration log file to check the migration status. See Checking the Migration Log File for more information.
- After the migration is finished, check the migrated calendar database, as described in Check the Migrated Data.
Checking the Migration Log File
The ncs4migrate utility generates a log file with the following name in the cal_svr_base/opt/SUNWics5/cal/sbin directory:
ncs4migrate_yyyymmdd-hhmmss.log
where yyyymmdd-hhmmss is a timestamp that indicates when the migration started.
If the ncs4migrate utility is taking a long time to run, check that the log file is increasing in size as an indication that the utility is still running.
Note
To prevent the log file from becoming too large, consider omitting the ncs4migrate verbose (V) option.
Check the Migrated Data
After the migration is finished, perform these steps on the target machine:
- Run the csdb utility check command to scan the calendar database to determine if any corruption has occurred. If the check command detects any corruption, run the csdb utility rebuild command to rebuild the database.
For documentation about the csdb utility check and rebuild commands, see the Sun ONE Calendar Server Administration Guide on the documentation web site.
- If necessary, restart the Calendar Server.
Users can access the migrated calendar database using Calendar Express.
csrename UtilityThe csrename utility renames calendar users as follows:
- Calendar database files–Renames users (user IDs) in the calendar database files and then writes the new database files to a destination directory. The existing calendar database files are not modified.
- LDAP directory server–Converts the user IDs in the Calendar Server LDAP attributes (that is, attributes with the “ics” prefix). The LDAP directory server is modified in place.
The csrename utility is located in the following directory:
cal_svr_base/opt/SUNWics5/cal/sbin
Before you run csrename, you must first:
To you run csrename, you must log in as icsuser (or as the Calendar Server runtime user ID specified during configuration). If you run csrename as superuser (root), you might need to reset the permissions for the new database files.To modify the LDAP directory server attributes, you must also have administrative rights for that directory.
If your has a front-end/back-end server configuration, you must run csrename on each back-end server.
csrename Syntax
Use the following syntax o run csrename:
-t DestinationDB specifies the destination directory where csrename generates the new database with the converted user names. The default is MigratedDB.
After csrename is finished, the caldb.berkeleydb.homedir.path parameter in the ics.conf file must point to the destination database. Either reset caldb.berkeleydb.homedir.path to point to the destination database directory, or move the destination database files to the directory indicated by the parameter.
-c ConfigFile is an input parameter that specifies a Calendar Server configuration file. The default is the ics.conf file.
csrename uses the caldb.berkeleydb.homedir.path parameter in the configuration file to determine the location of the input calendar database. The default location of the calendar database is cal_svr_base/var/opt/SUNWics5/csdb.
-e ErrorFile is the file where csrename writes any errors or database entries that cannot be resolved. The default is MigrateError.
-m MappingFile specifies an input mapping file. The default is MigrateMapping.
The input mapping file is a text file that maps existing user IDs to new user IDs.
You must create the mapping file before you run csrename. Specify one entry per line with a space between the old and new values. For example:
tchang tc897675
jsmith js963123
...
bkamdar bk548769DB|LDAP specifies the database that gets updated:
csrename Examples
- Rename users based on the mapping file named DBMapFile and create the new calendar database in the destination directory named newcalDB:
csrename -t newcalDB -m DBMapFile rename DB
- Rename users based on values in the mapping file named NewNames, create the new calendar database in the destination directory named NewDB, and modify the Calendar Server attributes in the LDAP directory server:
csrename -t NewDB -m NewNames rename LDAP