| C H A P T E R 9 |
|
Multihead Administration |
The multihead feature on Sun Ray DTUs enables users to control separate applications on multiple displays, also called screens, or heads, using a single keyboard and pointer device attached to the primary DTU. Users can also display and control a single application, such as a spreadsheet, on multiple screens. System administrators create multihead groups that can be accessed by users. A multihead group, consisting of between two and 16 DTUs controlled by one keyboard and mouse may be composed of virtually any mix of Sun Ray DTUs, such as Sun Ray 1, Sun Ray 100, Sun Ray 150, Sun Ray 170, and Sun Ray 270, for instance. Each DTU other than the Sun Ray 2FS[1] presents an X screen of the multihead X display.
For the multihead feature to function properly:
1. You must be in administered mode; therefore, you must run utconfig before you run utmhconfig or utmhadm.
2. You must enable the multihead policy using either utpolicy or the Admin GUI.
3. Always run utmhconfig from a Sun Ray DTU.
| Note - Regional hotdesking is not enabled for multihead groups. |
A multihead group is comprised of a set of associated Sun Ray DTUs controlled by a primary DTU to which a keyboard and pointer device, such as a mouse, are connected. This group, which can contain a maximum of 16 DTUs, is connected to a single session.
The primary DTU hosts the input devices associated with the session. The remaining DTUs, called the secondaries, provide the additional displays. All peripherals are attached to the primary DTU, and the group is controlled from the primary DTU.
Multihead groups can be created easily by using a smart card to identify the terminals with the utmhconfig GUI utility.
| Tip - For best results, run utmhconfig only from a DTU. |
However, if you disconnect the secondary DTUs without deleting the multihead group to which they belong, the screens are not displayed on the single primary DTU. The primary DTU is still part of the multihead group, and the mouse seems to get lost when it goes to the disconnected secondary DTU. To recover from this situation, you can either reconnect the missing DTU, or delete the multihead group using the utmhconfig or utmhadm command, or you can delete the multihead group, replace the missing DTU, and create a new multihead group that incorporates the replacement DTU.
A multihead group can have its screens arranged in various configurations. For example, a user can arrange a multihead group of four screens as two rows of two screens (2x2) or as a single row of four screens (4x1). By default, when a user logs into a multihead group, the session uses the number of screens available; the layout, or geometry of these displays is generated automatically. You can use the -R option to utxconfig to manipulate the automatic geometry, as in the following examples:
 To override the automatic geometry, where geometry is expressed as columns x rows:
 To restore the automatic geometry on the next login:
When the mouse pointer is moved past the edge between two screens, it moves from one screen to the next. The geometry of the multihead group determines which screen is displayed at that moment.
Screen dimensions for the multihead group are automatically set, by default, to the largest supported by the primary DTU. The primary DTU is the one that controls the other DTUs in the group and to which all peripherals are attached.
To override the automatic sizing of screen dimensions, use the -r option to utxconfig:
 To override automatic sizing, where dimensions are expressed as width x height (for example, 1280 x 1024):
 To restore automatic sizing behavior on the next login:
 To explicitly choose not to use multiple displays for a session, type:
When the multihead feature is used, a small window indicating the current session on each screen is displayed with the current screen highlighted for easy identification. This window is automatically displayed for users during session creation. For example, the display in XINERAMA indicates that the user is on the second screen of a three-screen display.
FIGURE 9-1 The Multihead Screen Display

The administration tool for the multihead feature displays the current multihead groups and enables you to create new groups.
 On the command-line interface, type:
This enables the multihead policy for the failover group and restarts Sun Ray Server Software with the new policy on the local server without disrupting existing sessions.
| Tip - Issue the utrestart command on every server in the failover group. |
1. Start the Administration Tool.
FIGURE 9-2 Multihead Feature Enabled
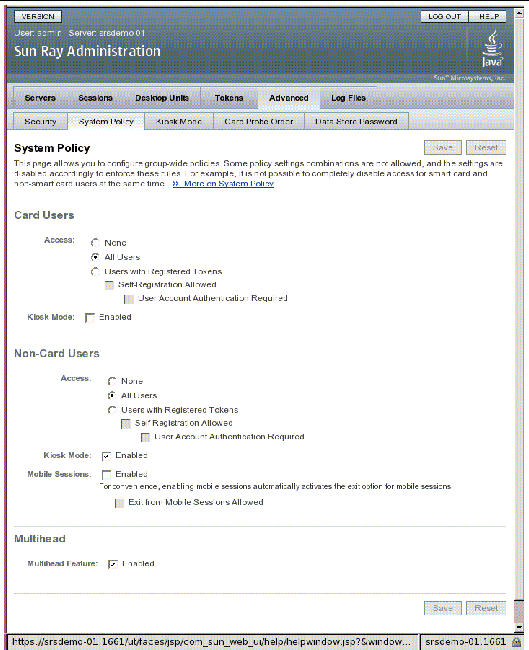
3. Select the System Policy tab (see FIGURE 9-2).
4. Select (or deselect) the Multihead Feature Enabled check box.
If a system restart is needed, an advisory message will appear.
1. On the command-line interface, type:
2. On the initial screen, click Create New Group.
FIGURE 9-3 utmhconfig GUI Lists Multihead Groups and Details
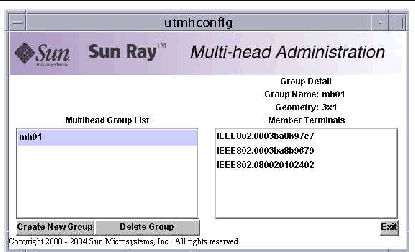
The Create New Multiheaded Group pop-up dialog box is displayed. The number of rows and the number of columns you enter are displayed as the group geometry when the group has been created.
FIGURE 9-4 Create New Multiheaded Group Pop-up Dialog Box
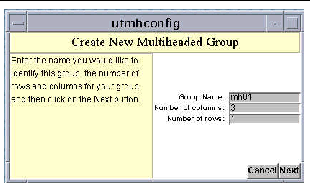
3. Enter the information for the group.
Enter a name for the group and the number of rows and columns.
FIGURE 9-5 Setup Display for the New Multihead Group
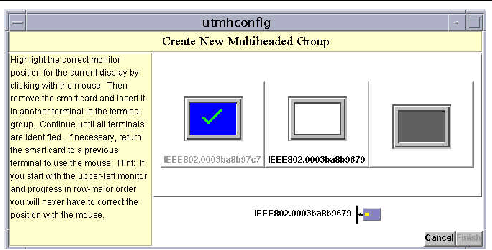
5. Select the DTUs within the multihead group and insert a smart card in each Sun Ray DTU in turn to establish the order of the group.
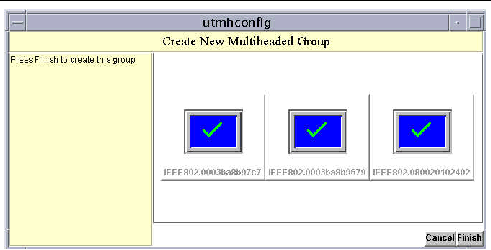
The Finish button, which was previously grayed out, is now active.
FIGURE 9-6 Completed Multihead Group List With Active Finish Button
7. Exit the session or disconnect by removing your card.
The XINERAMA extension to X11 creates a single large screen displayed across several monitors. With XINERAMA, only one toolbar is displayed, and a window can be moved smoothly from one part of the screen to the next.
Users can enable or disable XINERAMA as part of their X preferences. The utxconfig command handles this on an individual token basis; however, the user must log off for this changes to take effect.
The XINERAMA feature is enabled using the following command:
The XINERAMA feature is disabled using the following command:
To enable as default for a single system or failover group, as superuser, type the following command:
If you hotdesk from a multihead group to a DTU that is not part of a multihead group--that is, a DTU with a single head--you can view all the screens created in the original multihead group on the single screen, or head by panning to each screen in turn. This is called screen flipping.
The TerminalGroup policy module extends the Authentication Manager to support multihead groups. When a DTU connects to the Authentication Manager or a new smart card is inserted, the TerminalGroup module queries its database to determine whether the DTU is part of a multihead group and, if so, whether the DTU is a primary or secondary DTU of that group. If it is not identified as part of a multihead group, the DTU is treated normally.
FIGURE 9-7 Authentication Manager Flowchart for the Primary DTU
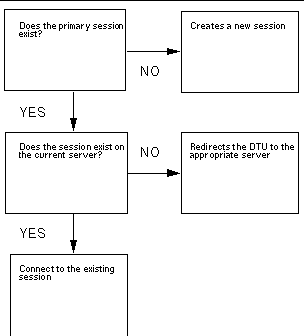
If the DTU is determined to be part of a multihead group and it is the multihead group’s primary DTU, a normal session placement occurs. If a session does not exist on the current server, but there is a preexisting session for the DTU or smart card on another server in the failover group, the primary DTU will be redirected to that server. If there is no session on any server, the request for a session is directed to the least-loaded server and a session is created there.
If a DTU is determined to be part of a multihead group, and it is a multihead group secondary DTU, the TerminalGroup module determines whether the multihead group primary DTU is locally attached to a session. If so, it tells the Session Manager to allow the secondary DTU to attach to that session also. If the primary DTU is not attached locally, the TerminalGroup module determines whether the primary DTU is attached to another server in the failover group (if any), and if it is, it redirects the secondary DTU to that server.
FIGURE 9-8 Authentication Manager Flowchart for the Secondary DTU
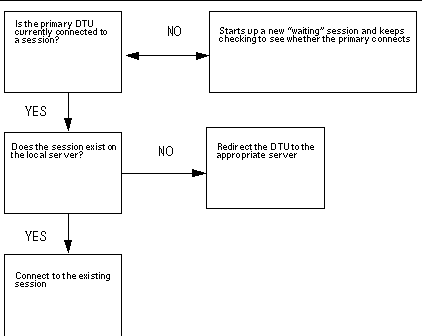
If the primary DTU is determined to not be attached to any server in the failover group at that moment, a Waiting for Primary icon is displayed on the DTU, and further activity is blocked on that DTU until the primary is discovered. The secondary DTU is redirected to the server to which the primary is attached.
Copyright © 2007, Sun Microsystems, Inc. All Rights Reserved.