Audit Policy Scans and Reports
This section provides information about audit policy scans, and provides procedures for running and managing audit scans.
Scanning Users and Organizations
A scan runs selected audit policies on individual users or organizations. You might want to scan a user or organization for a specific violation or execute policies not assigned to the user or organization. Launch scans from the Accounts area of the interface.
Note –
You can also launch or schedule an audit policy scan from the Server Tasks tab.
 To Scan a User Account or Organization
-
In the Administrator interface, select Accounts from the main menu.
-
In the Accounts list, perform one of these actions:
-
Select one or more users, and then select Scan from the User Actions options list.
-
Select one or more organizations and then select Scan from the Organization Actions options list.
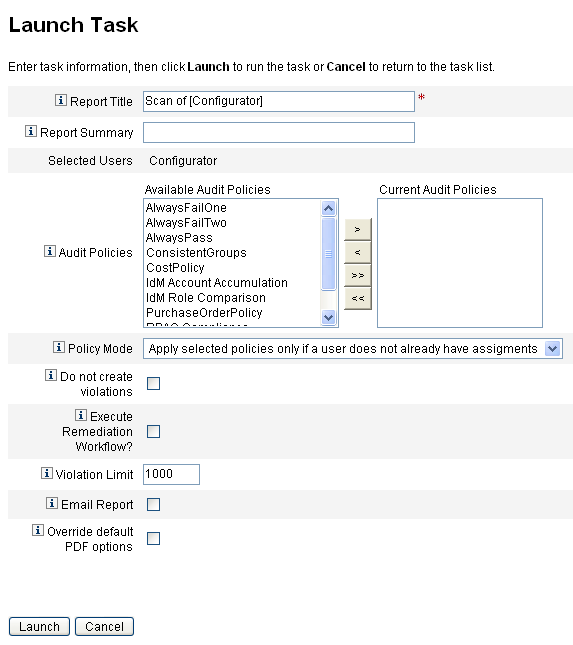
The Launch Task dialog displays. Figure 15–1 is an example of the Launch Task page for an audit policy user scan.
Figure 15–1 Launch Task Dialog

-
-
Enter a title for the scan in the Report Title field. (required)
-
Specify the remaining options.
These options include:
-
Report Summary: Enter a description for the scan.
-
Add Policies: Select one or more audit policies to run. You must specify at least one policy.
-
Policy Mode: Select a policy mode, which determines how the selected policies interact with users who already have policy assignments. Assignments can come directly from the user or from the organization to which the user is assigned.
-
Do not create violations: Enable this box if you want audit policies evaluated and violations reported, but do not want compliance violations to be created or updated, and do not want remediation workflows to be executed. Task results from the scan do show which violations would have been created, making this option useful when testing audit policies.
-
Execute Remediation Workflow?: Enable this box to run the remediation workflow assigned in the audit policy. If the audit policy does not define a remediation workflow, no remediation workflow will run.
-
Violation Limit: Edit this box to set the maximum number of compliance violations that can be emitted by the scan before it aborts. This value is a safeguard to limit risk when running an audit policy that may be overly aggressive in its checks. An empty value means no limit is set.
-
Email Report: Enable this box to specify recipients for the report. You might also have Identity Manager attach a file containing a report in CSV (comma-separated values) format.
-
Override default PDF options: Enable this box to override the default PDF options.
-
-
Click Launch to begin the scan.
To view the reports resulting from an audit scan, view the Auditor Reports.
Working with Auditor Reports
Identity Manager provides a number of Auditor Reports. The following table describes these reports.
Table 15–1 Auditor Reports Descriptions|
Auditor Report Type |
Description |
|---|---|
|
Access Review Coverage |
Shows the overlap or differences among the users that are implied by the selected access reviews. Because most access reviews have a user scope that is specified by a query or some membership operation, the exact set of users is expected to change over time. This report can show the overlap, differences, or both, between users specified by two different access reviews (to see if the reviews are going to be efficient in operation); between entitlements generated by two different access reviews (so you can see if the coverage changes over time); or between users and entitlements (so you can see if the entitlements were generated for all users scoped by the review. |
|
Access Review Detail |
Shows the current status of all user entitlement records. This report can be filtered by a user’s organization, Access Review and Access Review Instance, state of an entitlement record, and attestor. |
|
Access Review Summary |
Provides summary information about all access reviews. It summarizes the status of users scanned, policies scanned, and attestation activities for each access review scan listed. |
|
Access Scan User Scope Coverage |
Compares selected scans to determine which users are included in the scan scope. It shows the overlap (users included in all scans) or difference (users not included in all scans, but included in more than one). This report is useful when trying to organize multiple access scans to cover the same or different users, depending on the needs of the scan. |
|
Audit Policy Summary |
Summarizes the key elements of all audit policies, including the rules, remediators, and workflow for each policy. |
|
Audited Attribute |
Shows all audit records indicating a change of a specified resource account attribute. This report mines the audit data for any auditable attributes that have been stored. It will mine the data based on any extended attributes, which can be specified from WorkflowServices or resource attributes marked as auditable. For information on configuring this report, see Configuring the Audited Attribute Report. |
|
Audit Policy Violation History |
Graphical view of all compliance violations per policy that were created during a specified period of time. This report can be filtered by policy, and grouped by day, week, month, or quarter. |
|
User Access |
Shows the audit record and user attributes for a specified user. |
|
Organization Violation History |
Graphical view of all compliance violations per resource, that were created during a specific period of time. Can be filtered by organization, and grouped by day, week, month, or Quarter. |
|
Resource Violation History |
Graphical view of all compliance violations per resource that were created during the specified time range. |
|
Separation of Duties |
Shows separation of duties violations arranged in a conflicts table. Using a Web-based interface, you can access additional information by clicking the links. This report can be filtered by organization, and grouped by day, week, month, or quarter. |
|
Violation Summary |
Shows all current compliance violations. This report can be filtered by remediator, resource, rule, user, or policy |
The reports are available from the Reports tab in the Identity Manager interface.
Note –
The RULE_EVAL_COUNT value equals the number of rules that were evaluated during a policy scan. This value is sometimes included in reports.
Identity Manager calculates the RULE_EVAL_COUNT value as follows:
# of users scanned x (# of rules in policy + 1)
The +1 is included in the calculation because Identity Manager also counts the policy rule, which is the rule that actually decides if a policy is violated. The policy rule inspects the audit rule results, and performs the boolean logic to come up with a policy result.
For example, if you have Policy A with three rules and Policy B with two rules, and you scanned ten users, the RULE_EVAL_COUNT value equals 70 because
10 users x (3 + 1 + 2 + 1 rules)
Creating an Auditor Report
To run a report, you must first create the report template. You can specify various criteria for the report, including specifying email recipients to receive the report results. After a report template has been created and saved, it is available from the Run Reports page.
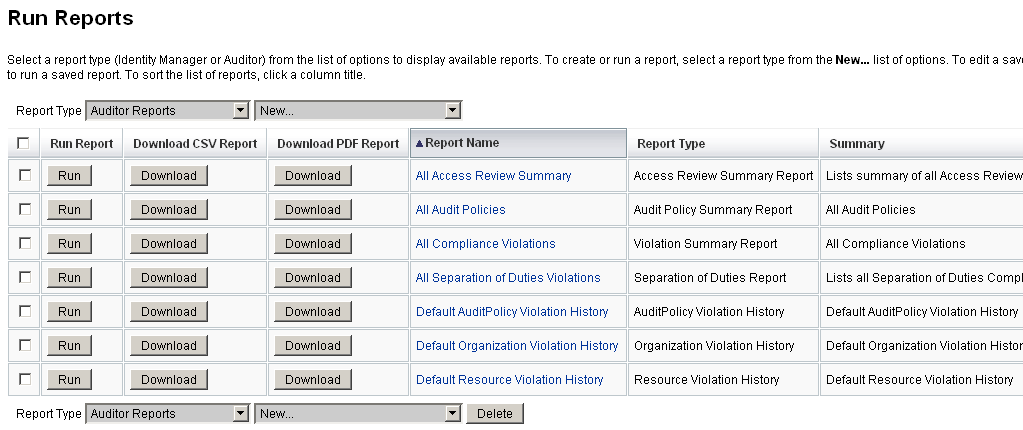
The following figure shows an example of the Run Reports page with a list of defined Auditor Reports.
Figure 15–2 Run Reports Page Selections

 To Create an Auditor Report
-
In the Administrator interface, click Reports in the main menu.
The Run Reports page opens.
-
Select Auditor Reports for the report type.
-
In the New list of reports, select a report.
The Define a Report page appears. The fields and layout of the report dialog varies for each type of report. Refer to Identity Manager Help for information about specifying the report criteria.
After entering and selecting report criteria, you can:
-
Run the report without saving.
Click Run to start running the report. Identity Manager does not save the report (if you defined a new report) or the changed report criteria (if you edited an existing report).
-
Save the report.
Click Save to save the report. After it is saved, you can run the report from the Run Reports page (the list of reports). After running a report from the Run Reports page, you can view the output immediately or at a later time from the View Reports tab.
For information about scheduling a report, see Scheduling Reports.
-
Configuring the Audited Attribute Report
The Audited Attribute Report (see Table 15–1) can report attribute-level changes to Identity Manager users and accounts. Standard audit logging, however, does not generate enough audit log data to support a full query expression.
Standard audit logging does write the changed attributes to the acctAttrChanges field in the audit log, but the changed attributes are written in a way that the report query can only match records based on the changed attribute’s name. The report query cannot accurately match the attribute’s value.
You can configure this report to match records containing changes to the attribute lastname, by specifying the following parameters:
Attribute Name = ’acctAttrChanges’
Condition = ’contains’
Value = ’lastname’
Note –
Using Condition=’contains’ is necessary because of the way data is stored in the acctAttrChanges field. This field is not multi-valued. Essentially, it is a data structure that contains the before/after values of all changed attributes in the form attrname=value. Consequently, the preceding settings allow the report query to match any instances of lastname=xxx.
It is also possible to capture only those audit records that have a specific attribute with a specific value. To do this, follow the procedure in the Configuring the Audit Tab section. Select the Audit entire workflow checkbox, click the Add Attribute button to select the attributes you want to record for reporting purposes, and click Save.
Next, enable the task template configuration (if it is not already enabled). To do this, follow the procedure in the Enabling the Task Templates section. Do not change the default value in the Selected Process Types list, just click Save.
The workflow can now provide audit records that are suitable for matching both the attribute name and the value. Although turning on this level of auditing provides much more information, be aware that there is a significant performance cost and your workflows will run slower.
- © 2010, Oracle Corporation and/or its affiliates
