| Sun StorEdge 3000 Family RAID Firmware 4.2x User's Guide |
| Sun StorEdge 3000 Family RAID Firmware 4.2x User's Guide |
| C H A P T E R 10 |
|
Host and Drive Channels |
This chapter explains how to view and edit channels for Fibre Channel, SATA, and SCSI arrays.
|
Note - Where procedures vary between platforms, the headings are marked appropriately. |
Topics covered in this chapter include:
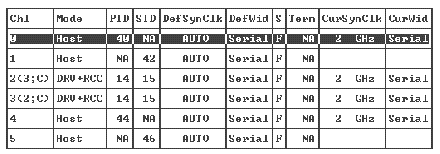
To view and configure channels choose "view and edit channelS" from the Main Menu. See Channel Status Table for a description of the Channel Status Table.
|
1. From the Main Menu, choose "view and edit channelS" to display the status of all host and drive channels for this controller.

|
Caution - Do not change the PID and SID values of drive channels. |
Each controller has a separate RS-232 port as well as an Ethernet port. This architecture ensures continuous communication in case one controller fails. Since the connection is established to only one controller at a time (even when the array is in redundant mode), the CurSyncClk and CurWid settings are displayed for the primary controller. If you map one LUN to the primary controller and another LUN to a secondary controller, only the established connection to the primary controller is displayed. If a primary ID is not mapped to a channel, and a secondary ID is mapped, either ASYNC displays in the CurSyncClk field or the field is left blank.
2. Select a channel to view the additional menu options available for that channel.
This menu option is described in Chapter 4 and Chapter 5.
This menu option is described in Chapter 4 and Chapter 5.
This section describes how to delete a host channel SCSI ID.
|
1. From the Main Menu, choose "view and edit channelS."
2. Select the host channel with the SCSI ID you want to delete.
3. Choose "view and edit scsi Id" to display existing IDs.
4. Select the ID you want to delete.
5. Choose "Delete Channel SCSI ID," and then choose Yes to confirm the deletion.
This change does not take effect until the controller is reset.
NOTICE: Change made to this setting will NOT take effect until the controller is RESET. Prior to resetting the controller, operation may not proceed normally. Do you want to reset the controller now? |
6. Choose Yes to reset the controller.
When a drive channel or DRV + RCCOM channel is selected, the "view and edit channelS" menu provides two menu options to change the default drive SCSI IDs:
These menu options are normally not used. However, when reassigning drive channels as Drive+RCCOM for a Sun StorEdge 3510 FC array or Sun StorEdge 3511 SATA array, it is necessary to assign a new secondary controller ID. See To Configure Channels 4 and 5 as Additional DRV + RCCOM Channels for more information.

|
Caution - If you edit a drive channel SCSI ID, you might create conflicts with the controller communication channels and create confusion tracking the status of drive IDs. |
Do not use this menu option. It is reserved and should be used only by qualified technicians.
Typically the default setting is not changed.
|
1. From the Main Menu, choose "view and edit channelS."
2. Select the channel for which you want the terminator enabled or disabled.
3. Choose "scsi Terminator," and choose Yes to change the setting.
The controller is reset and the channel configuration is updated.
Typically, the default setting for "sync transfer Clock" is not changed for host or drive channels. Do not use this menu option. It is reserved and should be used only by qualified technicians.
|
1. From the Main Menu, choose "view and edit channelS."
2. Select the drive channel or host channel whose sync transfer clock speed you want to change.
3. Choose "sync transfer Clock" to display a menu of sync transfer clock speeds.
4. Select a clock speed, and choose Yes to confirm your choice.
This change does not take effect until the controller is reset.
NOTICE: Change made to this setting will NOT take effect until the controller is RESET. Prior to resetting the controller, operation may not proceed normally. Do you want to reset the controller now? |
5. Choose Yes to reset the controller.
Typically the default setting for transfer width is not changed for the host or drive channel. Do not use this menu option. It is reserved and should be used only by qualified technicians.
|
1. From the Main Menu, choose "view and edit channelS."
2. Select the drive channel or host channel whose transfer width you want to change.
3. Choose "Wide transfer," and choose Yes to enable or disable wide transfer.
This change does not take effect until the controller is reset.
NOTICE: Change made to this setting will NOT take effect until the controller is RESET. Prior to resetting the controller, operation may not proceed normally. Do you want to reset the controller now? |
4. Choose Yes to reset the controller.
The SCSI Bus Byte parity check menu option must be enabled if the SCSI HBA also has this option enabled, which enables a handshake on both the host and the array to check parity and verify that there are no bit errors when transmitting data.
Use the following procedure to enable and disable parity checking.
|
1. From the Main Menu, choose "view and edit channelS."
2. Select the channel whose parity check setting you wish to change.
3. Choose "parity check," and then choose Yes to enable parity checking if it is currently disabled, or to disable parity checking if it is currently enabled.
Each controller has multiple channels (I/O paths) and each channel is powered by an I/O processor. The "view chip inFormation" menu option provides information about the host or drive channel's chip type and revision level, and a firmware identifier, which might include version information.
|
1. From the Main Menu, choose "view and edit channelS."
2. Select a host or drive channel.
3. Choose "view chip inFormation" to display the channel's chip information.
Use the "view channel host-id/Wwn" menu option to view the I/O processor's worldwide node name (WWNN) and worldwide port name (WWPN) for a selected host channel. Some host-based management software requires these names to address storage devices.
|
1. From the Main Menu, choose "view and edit channelS."
3. Choose "view channel host-id/Wwn" to display the channel's worldwide node name and worldwide port name.
The "View device port name list(wwpn)" menu option displays device port names for the host bus adapter (HBA) detected on a host loop. Device port names on the loop are displayed, with the exception of the controller's I/O processor itself.
Once you have displayed an HBA port name here, you can add it to the WWN list displayed when you choose "Host-ID WWN name list" from the "view and edit Host luns" menu. Adding port names to this list can speed the Host LUN mapping process.
You can also assign each port on the Host-ID WWN name list a name for ease of identification. This becomes especially useful when you want to set up multiple filtering entries so you can grant or deny specific hosts access to logical drives. See LUN Filtering (FC and SATA Only) for more information.
|
1. From the Main Menu, choose "view and edit channelS."
3. Choose "View device port name list(wwpn)."
A list of the device port names on the host loop is displayed.
An FC channel communicates at a rate of either 1 GHz or 2 GHz. You can set this data rate manually or use the default Auto setting to autosense the rate of communications.
|
Note - For the Sun StorEdge 3511 SATA array, channels 2, 3, 4, and 5 are 2-GHz only. |
|
1. From the Main Menu, choose "view and edit channelS."
2. Select a host or drive channel.
3. Choose "Data rate" to display a menu of data rate choices:
4. Choose a data rate from the menu, and choose Yes to confirm your choice.
This change does not take effect until the controller is reset.
NOTICE: Change made to this setting will NOT take effect until the controller is RESET. Prior to resetting the controller, operation may not proceed normally. Do you want to reset the controller now? |
5. Choose Yes to reset the controller.
Whenever a device is added to or removed from a Fibre Channel loop, issue a Loop Initialization Primitive (LIP) so that devices on the loop repeat the discovery process.
|
1. From the Main Menu, choose "view and edit channelS" to display the Channel Status Table.
2. Select a channel on which you want to issue the LIP.
3. Choose "issUe lip," and then choose Yes to issue a LIP.
| Sun StorEdge 3000 Family RAID Firmware 4.2x User's Guide | 817-3711-18 |
Copyright © 2009, Dot Hill Systems Corporation. All rights reserved.
 To Check and Configure Host and Drive Channels


