| Exit Print View | |
Sun Fire X4170 M2 and X4270 M2 Servers Installation Guide for Windows Operating Systems |

|
| Exit Print View | |
Sun Fire X4170 M2 and X4270 M2 Servers Installation Guide for Windows Operating Systems |

|
Part I Windows Server Installations
1. Assisted OS Installation With Sun Installation Assistant (SIA)
3. Installing Windows Server 2008
Installing Windows Server Using Local or Remote Media
Install Windows Server 2008 (SP2 or R2) Using Local or Remote Media
4. Post Installation of Windows Server 2008
Part II Windows Server System Administrator References
A. Supported Installation Methods
B. Supported Operating Systems
C. BIOS Defaults for New Installations
D. Downloading the ISO Image for the Tools and Drivers DVD
E. Incorporating Device Drivers Into Windows Server 2008 WIM Images for Windows Deployment Services
This chapter provides information about manually installing the Windows Server 2008 SP2 or Windows Server 2008 R2 operating system.
Note - The term “manually” refers to performing the installation by following the instructions provided in Chapters 2 through 4 of this guide, and not using the Sun Installation Assistant (SIA). If you prefer to perform an assisted Windows installation by using SIA, see ![]() Chapter 1, Assisted OS Installation With Sun Installation Assistant (SIA) of this guide for details.
Chapter 1, Assisted OS Installation With Sun Installation Assistant (SIA) of this guide for details.
This chapter includes the following topics:
Ensure that the following requirements are met before you proceed with the instructions in this chapter for manually installing the Windows Server operating system.
All applicable installation prerequisites for installing an operating system should have been met. For further information about these prerequisites, see ![]() Windows Installation Prerequisites.
Windows Installation Prerequisites.
An installation method (for example: console output, boot media, and install target) should have been chosen and established prior to performing the installation. For more information about these setup requirements, see ![]() Appendix A, Supported Installation Methods.
Appendix A, Supported Installation Methods.
Use the Microsoft Windows Server 2008 (SP2 or R2) operating system documentation in conjunction with the Windows Server operating system instructions provided in this chapter. You can obtain a copy of Microsoft’s Windows Server 2008 installation documentation at: http://www.microsoft.com/windowsserver2008/en/us/product-documentation.aspx
After completing this procedure, you should review and perform the required post installation tasks described later in this guide. For more details, see ![]() Chapter 4, Post Installation of Windows Server 2008 .
Chapter 4, Post Installation of Windows Server 2008 .
The procedure in this section describes how to boot the Windows Server 2008 (SP2 or R2) operating system from local or remote media. It assumes that you are booting the Windows installation media from one of the following sources:
Windows Server 2008 SP2 or Windows Server 2008 R2 (or subsequent release) CD or DVD
Windows Server 2008 SP2 or Windows Server 2008 R2 (or subsequent release) ISO image
Note - The Windows Server 2008 (SP 2 or R2) ISO image can be used for remote installation or for creating an installation CD or DVD.
Note - If you are booting the installation media from a PXE environment, refer to ![]() Windows Server Installation Using a PXE Network Boot for instructions.
Windows Server Installation Using a PXE Network Boot for instructions.
Ensure that the installation media is available to boot.
For Distribution CD/DVD. Insert the Windows 2008 Distribution media (CD labeled number 1 or the single DVD) into the local or remote USB CD/DVD-ROM drive.
For ISO image. Ensure that the ISO images are available and that the ILOM Remote Console application is aware of the first ISO image location.
For additional information about how to set up the installation media, see ![]() Table A-2.
Table A-2.
Reset or power on the server.
For example:
From the ILOM web interface, select Remote Control --> Remote Power Control tab, then select Reset from the Select Action list box.
From the local server, press the Power button on the front panel of the server to power off the server, then press the Power button again to power on the server.
From the ILOM CLI, type: reset /SYS
The BIOS screen appears.
Note - The next events occur very quickly; therefore, focused attention is needed for the following steps. Watch carefully for these messages as they appear on the screen for a brief time. You might want to enlarge the size of your screen to eliminate scroll bars.
In the BIOS power-on self-test screen, press F8 to specify a temporary boot device for the Windows installation.
The Please Select Boot Device menu appears.
Note - The menu that appears in your installation might differ depending on the type of disk controller installed in your server.
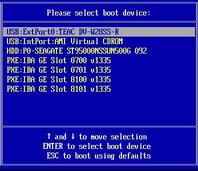
In the Please Select Boot Device menu, select the menu item according to the Windows media installation method you elected to use, then press Enter.
For example:
When prompted with Press any key to boot from CD, press any key.
The Windows installation wizard starts.
Continue the Windows installation wizard until the Installation Type dialog appears.
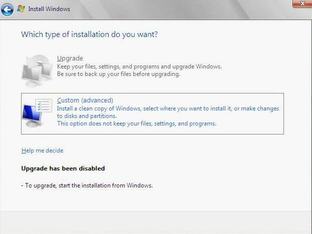
In the Installation Type dialog, click Custom (advanced).
The Where Do You Want to Install Windows dialog appears.
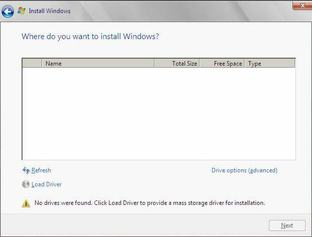
In the Where Do You Want to Install Windows dialog, perform one of the following tasks in the table below to specify a storage target for the Windows Server operating system edition.
|
(Load Driver) In the Load Drive dialog, do the following:
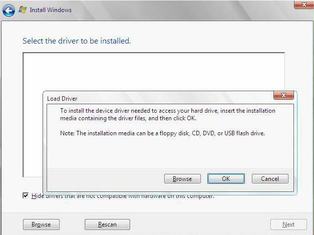
Ensure the driver(s) are accessible according to the installation method chosen (described in ![]() Appendix A, Supported Installation Methods).
Appendix A, Supported Installation Methods).
For example:
Floppy Disk Local. Storage driver(s) on a floppy disk in floppy drive A on the server.
Floppy Disk Remote. Storage driver(s) on a floppy disk in a floppy drive mounted as a device from the ILOM Remote Console.
Floppy Image. Storage driver floppy.img file is mounted as a device from the ILOM Remote Console.
Non-floppy Media. Storage driver(s) are on a local physical storage media (USB flash drive or CD/DVD) or virtual media mounted from the ILOM Remote Console.
In the Load Driver dialog, click Browse to navigate to the appropriate driver media folder as described below.
For systems configured with either of these SAS PCIe RAID HBA options SG-SAS6-R-INT or SG-SAS6-R-EXT-Z, navigate to the following directory on the Tools and Drivers DVD to load the appropriate LSI driver: windows/w2k8/drivers/64bit/hba/lsi/megaraid
For a system configured with either of these SAS PCIe HBA options SG-SAS6-INT or SG-SAS6-EXT-Z, navigate to the following directory on the Tools and Driver DVD to load the appropriate LSI driver: windows/w2k8/drivers/64bit/hba/lsi/mpt2
For Intel network driver installation (required for Windows Server 2008 R2), navigate to the following directory on the Tools and Driver DVD to load appropriate Intel driver: windows/w2k8R2/drivers/64bit/NIC/Intel
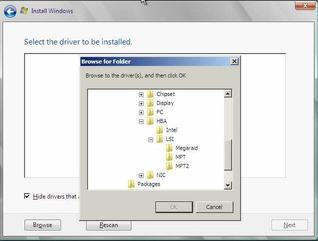
In the Browse for Folder dialog, select the appropriate driver, then click OK to load the driver.
The selected driver appears in the Select the Driver to Be Installed dialog.
For example:
Two example dialogs follow showing the selected driver to be installed for the two SAS PCIe HBA options. Note that the SAS PCIe HBA drivers are required only for Windows Server 2008 SP2 installations.
A third example dialog follows showing the selected driver for the on-board Intel Gigabit Network Device Driver. Note that the Intel Gigabit Network Device driver is required only for Windows Server 2008 R2 installations.
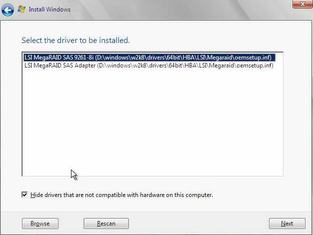
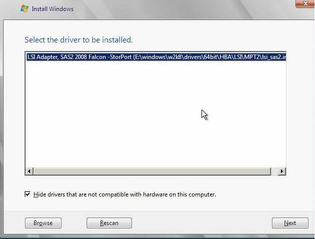

In the Select the Driver to Be Installed dialog, click Next to install the driver.
The Where Do You Want to Install Windows dialog appears.
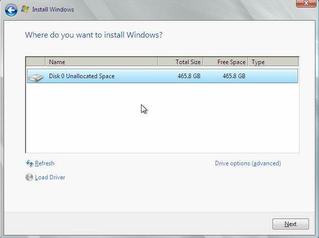
Note - If you previously removed or unmounted the Windows Server install media to load the drivers from the Tools and Drivers DVD, you might see the following message: Windows Cannot be installed to this disk. If this message appears, insert or re-mount the Windows install media, then click Refresh.
In the Where Do You Want to Install Windows dialog, do one of following:
Select the storage target listed and click Next to install the operating system, then proceed to Step 10.
- or -
Select the storage target listed and click Drive Options (Advanced) to view and change the default partition settings, then proceed to Step 9.
The partition settings for the selected target appear at the bottom of the Where Do You Want to Install Windows dialog.
(Partition Drive, advanced) In the lower portion of the Where Do You Want to Install Windows dialog, do the following:
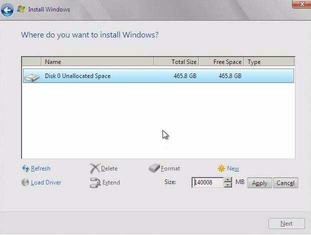
Click Delete to delete the selected storage target existing partition configuration.
A confirmation window appears.
Click OK to confirm the partition deletion.
Click New to create a new partition on the selected storage target.
In the Size scroll box, increase or decrease the partition size as needed, then click Apply.
The partition is created.
Click Next to install the operating system to the selected storage target.
The Windows installation program begins and will reboot the server multiple times during the installation process.
When the Windows installation is complete, Windows starts and prompts you to change the user password.
In the user password dialog, click OK and set up the initial user login account.
Note - Windows Server 2008 enforces stricter password schemes for user accounts. Password standards include restrictions on length, complexity, and history. For more details, click the Accessibility link at the account creation page.
After the initial user account is created, the Windows Server 2008 desktop appears.
Proceed to ![]() Chapter 4, Post Installation of Windows Server 2008 to perform the post installation tasks.
Chapter 4, Post Installation of Windows Server 2008 to perform the post installation tasks.
This section explains the initial information you will need to install the Windows Server 2008 (SP2 or R2) operating system over an established PXE-based network using a customer-provided Windows Imaging Format (WIM) image.
Topics included in this section:
Note that the procedure presented in this section documents the initial steps to install Windows 2008 over the network using a Windows Deployment Services (WDS). Specifically, it explains the steps for selecting the server PXE network interface card that will communicate with your WDS installation server. For further information about using WDS to install the Windows Server 2008 operating system, see Microsoft’s Windows Deployment Services documentation.
To use PXE to boot the installation media over the network, you must:
Configure the network (NFS, FTP, HTTP) server to export the installation tree.
Configure the files on the TFTP server that are necessary for PXE booting.
Configure the server’s MAC network port address to boot from the PXE configuration.
Configure Dynamic Host Configuration Protocol (DHCP).
To use WDS to perform the installation, you must:
Add the required system device drivers to the install.wim image and, if necessary, the boot.wim image.
For guidelines for adding drivers to the WIM installation image(s), see ![]() Appendix E, Incorporating Device Drivers Into Windows Server 2008 WIM Images for Windows Deployment Services.
Appendix E, Incorporating Device Drivers Into Windows Server 2008 WIM Images for Windows Deployment Services.
Obtain the WIM Administrator password.
Reset or power on the server.
From the ILOM web interface, select Remote Control --> Remote Power Control tab, then select Reset from the Select Action list box.
From the local server, press the Power button on the front panel of the server to turn off the server, then press the Power button again to power on the server.
From the ILOM CLI, type: reset /SYS
The BIOS screen appears.
Note - The next events occur very quickly; therefore, focused attention is needed for the following steps. Watch carefully for these messages as they appear on the screen for a brief time. You might want to enlarge the size of your screen to eliminate scroll bars.
Press F8 to specify a temporary boot device.
The Please Select Boot Device menu appears.
In the Please Select Boot Device menu, select the appropriate PXE installation boot device and press Enter.
The PXE installation boot device is the physical network port configured to communicate with your network installation server.
The Boot Agent dialog appears.
In the Boot Agent dialog, press F12 for a network service boot.
Continue the normal Windows Server 2008 SP2 or 2008 R2 WDS network installation.
For additional information, consult Microsoft’s Windows Deployment Services product documentation.
When the installation completes, proceed to ![]() Chapter 4, Post Installation of Windows Server 2008 to perform the post installation tasks.
Chapter 4, Post Installation of Windows Server 2008 to perform the post installation tasks.