Installing Clone Systems With an Initial Installation
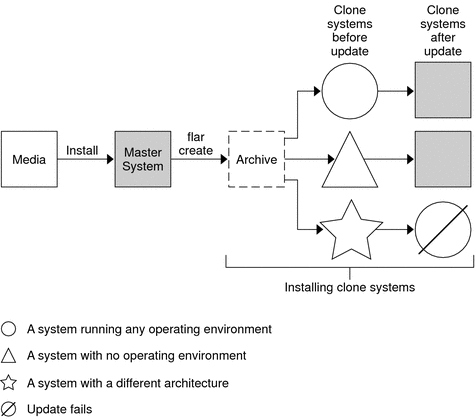
You can install a master system with a Solaris Flash archive for an initial installation by using any installation method: Solaris installation program, custom JumpStart, Solaris Live Upgrade, or WAN boot. All files are overwritten. The Solaris Flash installation is a five-part process.
-
Install the master system. You select a system and use any of the Solaris installation methods to install the Solaris OS and any other software.
-
(Optional) Prepare customization scripts to reconfigure or customize the clone system before or after installation.
-
Create the Solaris Flash archive. The Solaris Flash archive contains a copy of all of the files on the master system, unless you excluded some nonessential files.
-
Install the Solaris Flash archive on clone systems. The master system and the clone system must have the same kernel architecture.
When you install the Solaris Flash archive on a system, all of the files in the archive are copied to that system. The newly installed system now has the same installation configuration as the original master system, thus the system is called a clone system. Some customization is possible:
-
Scripts can be used for customization.
-
You can install extra packages with a Solaris Flash archive by using the custom JumpStart installation method. The packages must be from outside the software group being installed or a third-party package.
-
-
(Optional) Save a copy of the master image. If you plan to create a differential archive, the master image must be available and identical to the image installed on the clone systems.
For step-by-step instructions, see Installing the Master System.
Figure 1–1 shows an installation of clone systems with an initial installation. All files are overwritten.
Figure 1–1 Solaris Flash Initial Installation

- © 2010, Oracle Corporation and/or its affiliates
