|
| |
| Sun Java Enterprise System 2004Q2 Deployment Example Series: Evaluation Scenario | |
Chapter 3
Configuring and Verifying the Evaluation DeploymentThis chapter describes how to configure, start, and verify the components that you installed on your evaluation_host. This chapter contains the following sections:
About the Configuration ProcessThe installation procedure described in Chapter 2 accomplishes the following:
Before you can use your evaluation deployment, you must start the components and configure the components not configured by the installer. You perform the procedures in the following order:
- Start and verify Directory Server. You start Directory Server first because all the other components use directory services.
- Start Web Server. Starting Web Server starts the components that run in the Web Server web container, which are Identity Server and Portal Server. Identity Server must be running before you start the components that depend on Identity Server’s authentication services.
- Verify that Identity Server is running. Identity Server must be running because the other components use Identity Server’s authentication services.
- Verify that Portal Server is running.
- Configure Directory Server for Schema 2.
- Create, configure, and start an instance of Messaging Server.
- Create, configure, and start an instance of Calendar Server.
After you complete these procedures, you can use Java Enterprise System portal, messaging, and calendar services.
Starting and Verifying the Directory Server Default Instance
Directory Server provides directory services that support login and authentication for the portal, messaging, and calendar services. You begin verifying your evaluation deployment by verifying that you can start and administer the default Directory Server instance.
In this section you learn the following:
Starting Administration Server
Before starting the Directory Server default instance, start Administration Server. Administration Server is the administration tool for Directory Server.
To Start Administration Server
- Change directory to the server root directory:
cd /var/opt/mps/serverroot
- Run the command to start Administration Server:
./start-admin
Administration Server starts and displays a series of start-up messages. The startup process might take a few moments. When startup is complete, the following message is displayed:
startup:server started successfully
Starting the Directory Server Default Instance
After you start Administration Server, start the default Directory Server instance.
To Start the Directory Server Default Instance
- Change directory to the directory for the default Directory Server instance. The directory name is includes the unqualified name of the host system.
cd /var/opt/mps/serverroot/slapd-unqualified_evaluation_host
- Run the command to start Directory Server:
./start-slapd
Directory Server starts without a message.
Using Server Console to Verify the Directory Server Instance
After you start Directory Server, start Server Console and verify the LDAP directory configuration.
To Verify the LDAP Directory Configuration
- Change directory to the serverroot directory:
cd /var/opt/mps/serverroot
- Run the command to start Server Console:
./startconsole &
The Sun Java System Server Console Login dialog box is displayed.
- Type your administrator ID (admin) and password (password) and click OK.
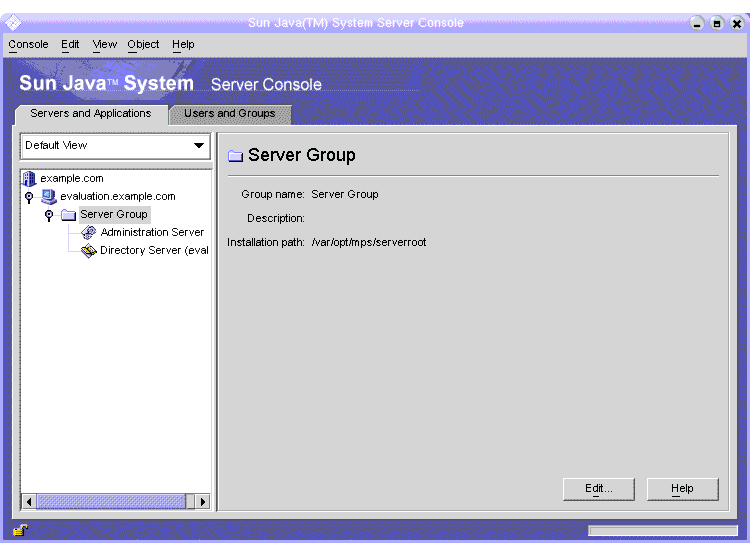
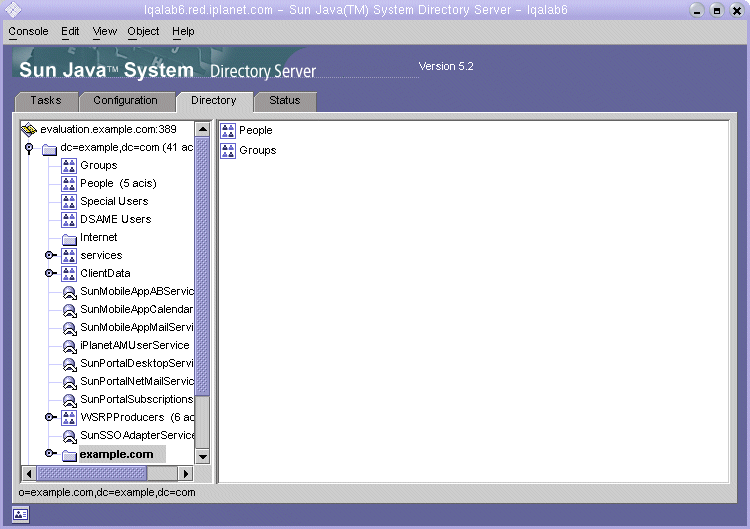
The Server Console is displayed, displaying information about the servers and applications in your Administration Server domain. Figure 3-1 shows information for the example.com domain. You see similar information for your domain.
Figure 3-1 Server Console’s Servers and Applications Tab
- Expand the nodes on the Servers and Applications tab and locate the node that represents the default Directory Server instance.
- The top-level node represents your default Administration Server domain. In Figure 3-1 this is the node labeled example.com. In your console window, it will be labeled with your evaluation_domain.
- On the next level, the nodes represent the systems in your Administration Server domain. In Figure 3-1, the example.com domain includes one system, named evaluation.example.com. In your console window, it will be labeled with your evaluation_host.
- On the next level is a node labeled Server Group. This node groups the component instances that are running on your evaluation_host. In Figure 3-1, the Server Group node groups the component instances that are running on evaluation.example.com.
- On the next level, the nodes represent the individual component instances in your Server Group. One of these nodes represents the default Directory Server instance. In Figure 3-1, this is the node labeled Directory Server (evaluation.example.com). In your console window it will be labeled Directory Server (evaluation_host).
Double-click the node that represents your default Directory Server instance. The Sun Java System Directory Server window is displayed.
- Click the Directory tab.
The LDAP directory tree is displayed.
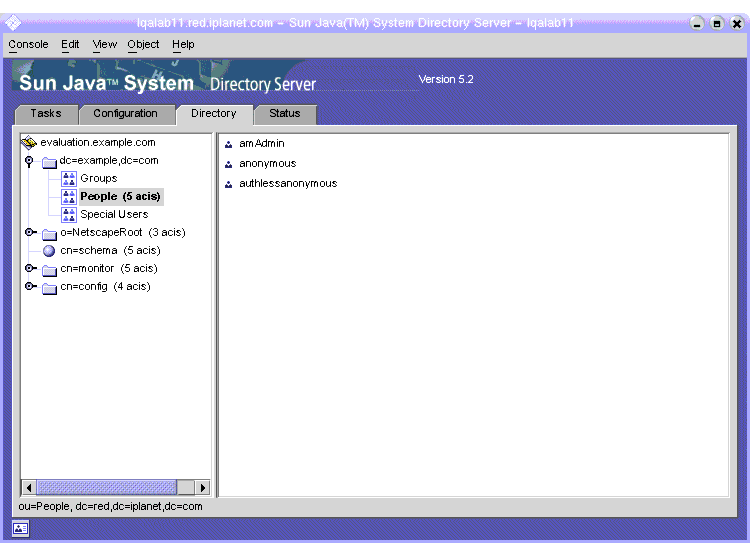
Figure 3-2 Default LDAP Directory Tree
- Verify the default LDAP domain set up by the installer.
Your default LDAP domain has the same name as your evaluation_domain. The default LDAP domain node is labeled with the individual domain components. For example, if your evaluation_domain is example.com, the default LDAP domain node is labeled dc=example,dc=com. Figure 3-2 shows the default LDAP domain node for example.com. You see a similar display for your LDAP domain.
- Locate the sample LDAP directory entries set up by the installer.
- Expand the default LDAP domain node.
- Click the People container.
The right pane displays the contents of the People container. Figure 3-2 shows the People container for the default Directory Server instance on evaluation.example.com. You see a similar display for the Directory Server instance on your evaluation_host.
- Verify that the People container contains entries for amAdmin, anonymous, and authlessanonymous.
These entries confirm that the Java Enterprise System installer populated the LDAP directory with the sample data you requested during installation.
- Leave the Server Console running.
Starting the Web Server Default InstanceAfter you start Directory Server, you start the Web Server default instance. Starting Web Server also starts Identity Server and Portal Server.
To Start the Web Server Default Instance
- Change directory to the Web Server default instance directory. The directory name includes the fully qualified name of the system on which you installed Web Server.
cd /opt/SUNWwbsvr/https-evaluation_host
- Run the command to start Web Server:
./start
The Web Server displays a sequence of startup messages. The startup process might take a few moments. When startup is complete, the following message is displayed:
startup: server started successfully
Verifying the Identity Server Default InstanceStarting the Web Server default instance starts the two components that run in Web Server’s web container, Identity Server and Portal Server.
In this section, you learn the following:
To Log In to Identity Server Administration Console and Verify Identity Server
- In a web browser, open the following URL:
http://evaluation_host/amconsole/index.html
The Login page is displayed.
- Type your administration user ID (amadmin) and password (password). Click Log in.
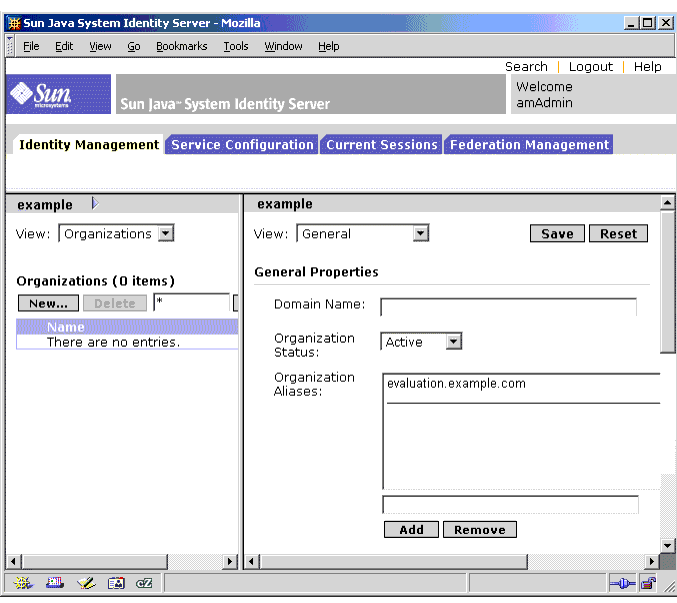
The console displays information about the default Identity Server domain.
- To confirm that your Identity Server is configured correctly, check the Identity Server domain name. It should match the first domain component in your evaluation_domain. For example, if your domain is example.com, the console displays example.
In Figure 3-3 the console displays information about the example domain. The domain name is displayed in the left panel, just below the Identity Management tab.
Figure 3-3 Identity Server Administration Console
- Log out of the Identity Server console. Click Logout in the upper right corner of the page.
Verifying the Portal Server Default InstanceThe installation procedure in Chapter 2 creates a sample portal desktop. In this section you open the sample portal desktop to verify that Portal Server is running.
To View the Sample Portal Desktop and Verify the Default Portal Server Instance
- In your web browser, open the following URL:
http://evaluation_host/portal/dt
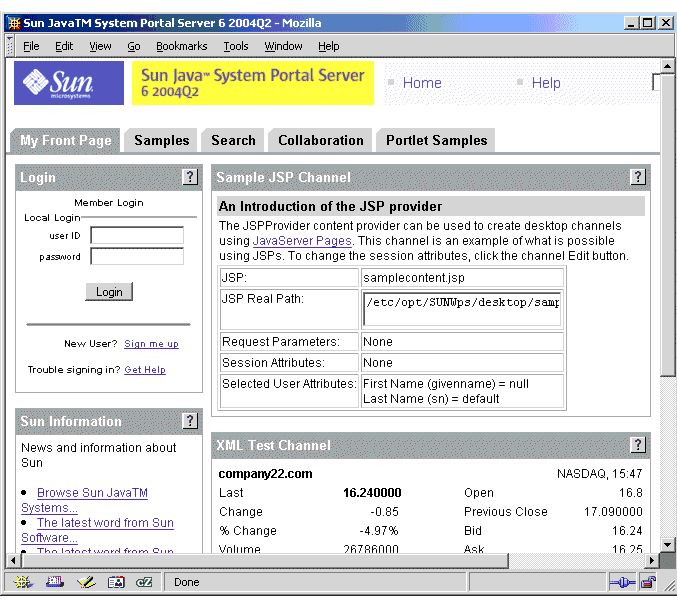
The Portal Server sample desktop is displayed. Figure 3-4 shows the sample desktop. Opening the sample desktop verifies that your default Portal Server instance is running.
Figure 3-4 Sample Portal Desktop
Configuring Directory Server for LDAP Schema 2The installation procedure in Chapter 2 creates an LDAP directory with a default LDAP schema. Before you configure Messaging Server and Calendar Server instances, you must apply Schema 2 to your LDAP directory tree.
Schema 2 adds LDAP attributes that support shared user entries. When you create user entries in a Schema 2 directory tree, the user entries can authenticate through Identity Server and log in to any service provided by a Java ES component.
In this section you learn the following:
Applying LDAP Schema 2 to Your Directory Tree
This procedure runs the Directory Server Preparation Tool (a Perl script named comm_dssetup.pl) and applies Schema 2 to your LDAP directory tree.
Note
The script displays a series of prompts. You answer most of the prompts by pressing Enter to accept the default value. The default values identify your default Directory Server instance.
To Apply Schema 2 to Your Directory Tree
- Change directory to the preparation tool directory:
cd /opt/SUNWmsgsr/lib
- Run the command that starts the preparation tool:
perl comm_dssetup.pl
The preparation tool displays a series of messages and then prompts you: Do You Want To Continue? [Y].
- Press Enter to accept the default value.
The preparation tool prompts you: Enter the Full Path to the Directory Where The Sun ONE Directory Server was Installed.
- Press Enter to accept the default value (/var/opt/mps/serverroot).
The preparation tool displays a numbered list of directory server instances and prompts you: Which Instance Do You Want? [1].
- Choose the default Directory Server instance created by the Java Enterprise System installer. For the evaluation deployment there is normally only one instance on your evaluation_host.
- If the default value for this prompt (1) specifies the correct instance (the instance name ends with your evaluation_host), press Enter to accept the default value.
- If there is more than one Directory Server instance, type in the number that specifies the default Directory Server instance and press Enter.
The preparation tool prompts you: Please Enter The Directory Manager DN [cn=Directory Manager].
- Press Enter to accept the default value (cn=Directory Manager).
The preparation tool prompts you for the Directory Manager password.
- Type password and press Enter.
The preparation tool prompts you: Will This Directory Server Be Used For Users/Groups? [Yes].
- Press Enter to accept the default value.
The preparation tool prompts you: Please Enter The Users/Groups Base Suffix [o=usergroup].
- Type the domain components that identify your evaluation_domain. For example, if your evaluation_domain is example.com, you type dc=example,dc=com.
The preparation tool displays a list of Sun ONE LDAP schemas and prompts you: Please Enter The Schema Type (1, 1.5, 2) [2].
- Confirm that the default value is 2. Press Enter.
The preparation tool prompts you: Do You Want To Update The Schema Files? [Yes].
- Press Enter to accept the default value (Yes).
The preparation tool prompts you: Do You Want To Configure New Indexes? [Yes].
- Press Enter to accept the default value (Yes).
The preparation tool prompts you: Do You Want To Reindex The New Indexes Now? [yes].
- Press Enter to accept the default value (yes).
The preparation tool displays a summary of the values that you entered and prompts you: Do You Want To Continue? [Y].
- Review the values you entered. Press Enter to accept the default value (y).
The preparation tool displays a series of informational messages, beginning with “generating files.” This may take a few moments.
The preparation tool generates script files and then prompts you: Ready to execute the script now. Do you want to continue? [Y].
- Press Enter to accept the default value (Y).
The preparation tool executes the generated scripts to configure the Directory Server instance. This may take a few moments.
The scripts display a long series of informational messages that ends with the following:
Successful Completion
You have configured your directory tree for Schema 2.
Verifying the Directory Tree
This procedure describes how to use the Server Console to verify the configuration performed by the Directory Server Preparation Tool.
To Verify that Directory Server is Configured With Schema 2
- Return to the Server Console’s Directory Server Window.
- In the View menu, choose Refresh.
The directory tree display is refreshed.
Figure 3-5 Schema 2 Directory Tree
- Review the new directory structure.
Compare Figure 3-5 and Figure 3-2. Notice the new LDAP entities in the dc=example,dc=com branch. You see similar changes in your directory tree.
This verifies that Schema 2 is applied to the directory tree.
Configuring Messaging ServerIn this section you learn the following:
Configuring a Messaging Server Instance
This procedure runs the Messaging Server configuration wizard to create and configure a Messaging Server instance.
To Create and Configure a Messaging Server Instance
- Change directory to the Messaging Server directory:
cd /opt/SUNWmsgsr/sbin
- Run the command that starts the configuration wizard:
./configure
The configuration wizard’s Welcome page is displayed.
- Click Next.
The Select Directory to Store Configuration and Data Files page is displayed.
- Click Next to accept the default value of /var/opt/SUNWmsgsr.
The Create New Directory? dialog box is displayed.
- Click Create Directory.
Note
If you previously installed and uninstalled Java ES, a different dialog box appears, stating that /var/opt/SUNWmsgsr is not empty. Click Accept Anyway to overwrite the existing directory.
The Select Components to Configure page is displayed.
- Click Next to accept the default values (Message Transfer Agent, Message Store, and Messenger Express are selected).
The Messaging Server User and Group page is displayed.
- Do the following:
- Do the following:
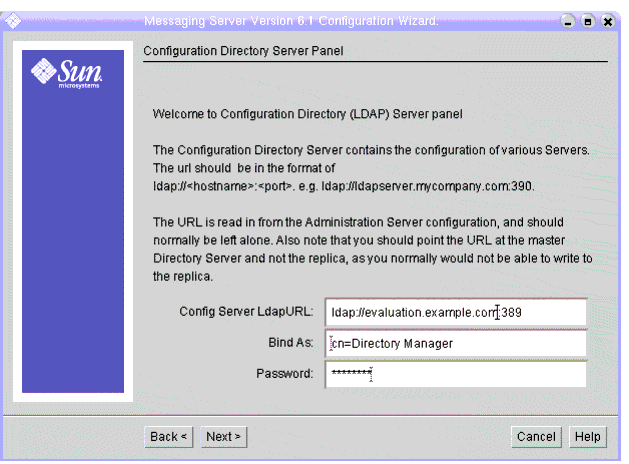
- In the Config Server LdapURL text field, confirm that the default value is ldap://evaluation_host:389.
- In the Bind text field, confirm that the default value is cn=Directory Manager. There must be a space between Directory and Manager.
- In the Password text field, type password.
Click Next. The User/Group Directory Server Panel page is displayed.
- Confirm the following default values:
- In the User/Group Server LdapURL text field, confirm that the default value is ldap://evaluation_host:389.
- In the Bind text field, confirm that the default value is cn=Directory Manager. There must be a space between Directory and Manager.
- In the Password text field, confirm that the default value is password.
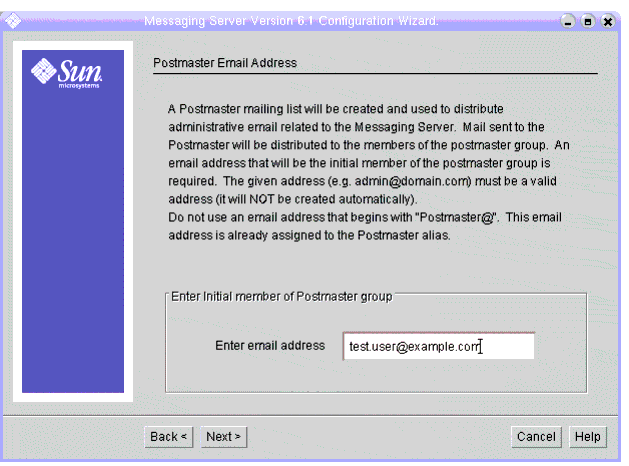
Click Next. The Postmaster Email Address page is displayed.
Figure 3-7 Postmaster Email Address Page
- Do the following:
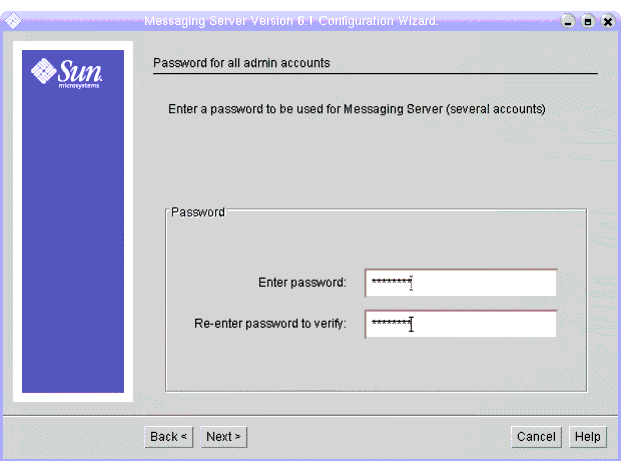
- Type the following values to establish an administrative password for Messaging Server:
- Do the following:
- Do the following:
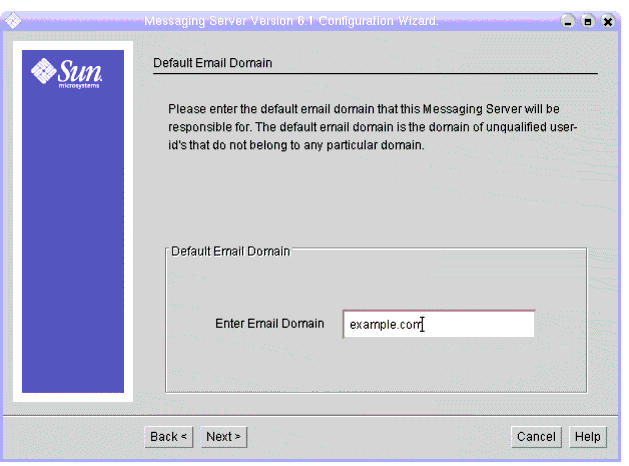
- In the Enter Organization DN text field, confirm that the default value is o=evaluation_domain,dc=domain_componnent1, dc=domain_component2. If your domain contains more than two domain components, you must specify all of them. For example, if your domain is my.example.com, you must type dc=my,dc=example,dc=com.
Click Next. The Ready to Configure page is displayed.
- Review the information. Click Configure Now.
- When the configuration process is complete, the Installation Summary page is displayed.
- Review the summary, and then click Close.
- Change directory to the Messaging Server directory:
cd /opt/SUNWmsgsr/sbin
- Run the command that specifies the ports for communicating with Messaging Server:
./configutil -o service.http.port -v 88
./configutil -o service.http.sslport -v 448
- Run the command that starts Messaging Server:
./start-msg
The startup process displays a series of startup messages. The startup process might take a few moments. When startup is complete, the following message is displayed:
starting job-controller server
You have created and started a Messaging Server instance.
Verifying the Directory Tree
This procedure describes how to use the Sun Java System Server Console to verify that the Messaging Server configuration tool performed additional directory tree configuration.
To Verify that Messaging Server Configuration Modified the Directory Tree
- Return to the Server Console’s Directory Server Window.
- In the View menu, choose Refresh.
The directory tree display is refreshed.
Figure 3-10 Schema 2 Directory Tree Modified by Messaging Server Configuration
- Review the modified directory tree.
Confirm that there is a new node for an LDAP organization. In Figure 3-5 the default LDAP domain node (dc=example,dc=com) has a sub node labeled example.com. The example.com node represents the LDAP organization that was created by the Messaging Server configuration tool. The full LDAP name for the new organization is o=example.com,dc=example,dc=com. In your directory tree, you see a similar node for your new organization.
Note
Your new LDAP organization supports single sign-on and proxy authentication. When you create LDAP entries for Java ES uses, you add them to this LDAP organization.
- Click the node for you new LDAP organization.
The right pane displays the contents of the organization.
- Confirm that the organization has the iplanet-am-managed-people-container object class.
- In the right pane, right-click the People container, and then choose Edit with Generic Editor from the menu.
The generic editor is displayed.
Figure 3-11 Generic Editor
- In the generic editor, confirm that the object class text field contains iplanet-am-managed-people-container. This verifies that you have successfully configured your Schema 2 directory tree for Java Enterprise System messaging services.
- Click OK to close the generic editor.
- Exit the console.
Configuring a Calendar Server InstanceIn this section you learn the following:
To Create and Configure a Calendar Server Instance
- Change directory to the Calendar Server directory:
cd /opt/SUNWics5/cal/sbin
- Run the command that starts the configuration wizard:
./csconfigurator.sh
The configuration wizard’s Welcome page is displayed.
- Click Next to continue.
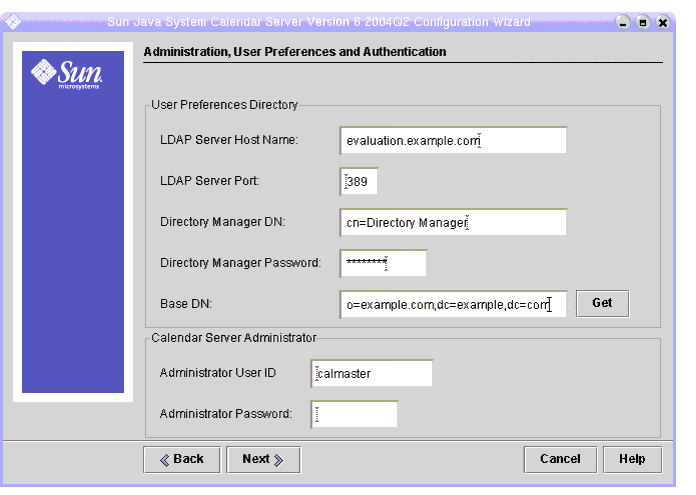
The Administration, User Preferences and Authentication page is displayed.
Figure 3-12 Administration, User Preferences and Authentication Page
- Do the following:
- In the LDAP Server Host Name text field, confirm that the default value is evaluation_host.
- In the LDAP Server Port text field, confirm that the default value is 389.
- In the Directory Manager DN text field, type cn=Directory Manager.You must put a space between Directory and Manager.
- In the Directory Manager Password text field, type password.
- In the Base DN text field, type the DN for your LDAP organization. For example, if your LDAP organization is example.com, you type o=example.com,dc=example,dc=com.
- In the Administrator User ID text field, confirm that the default value is calmaster.
- In the Administrator Password text field, type password.
Click Next. The wizard verifies the connection to the default Directory Server instance. A Question dialog box is displayed.
- Click Create It to create the calmaster user.
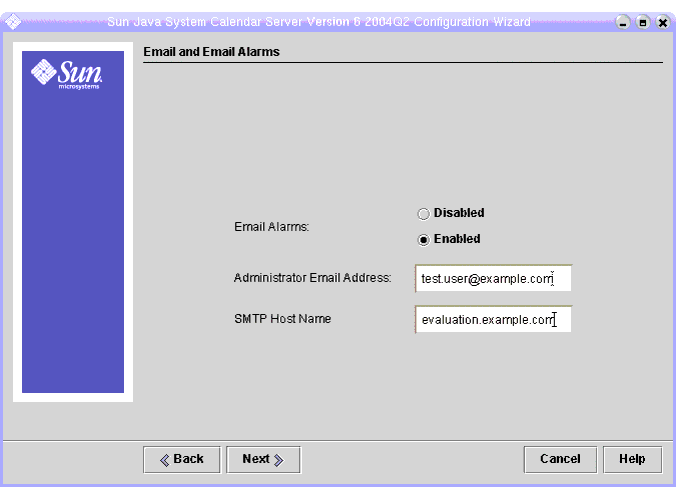
The Email and Email Alarms page is displayed.
Figure 3-13 Email and Email Alarms Page
- Do the following:
- In Email Alarms, confirm that the default selection is Enabled.
- In the Administrator Email Address text field, type test.user@evaluation_domain.
- In the SMTP Host Name text field, confirm that the default value is evaluation_host.
Click Next. The Problem Connecting to SMTP Host dialog box might be displayed.
- In the Problem Connecting to SMTP Host dialog box, click Accept, and then click Next to continue.
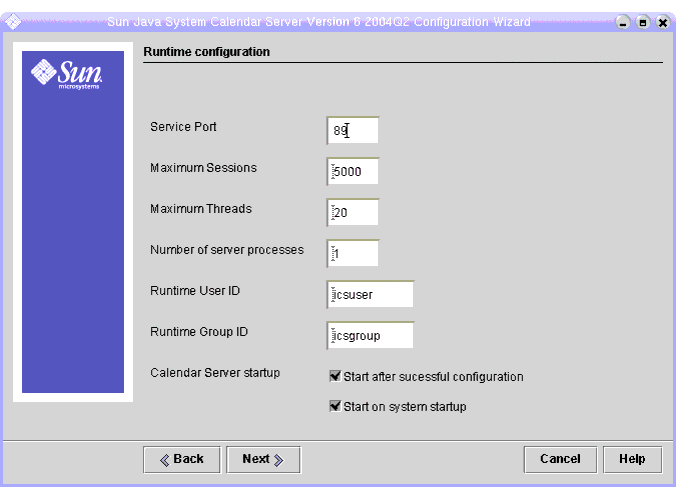
The Runtime Configuration page is displayed.
Figure 3-14 Runtime Configuration Page
- Do the following:
- In the Service Port text field, type 89.
- In the Maximum Sessions text field, confirm that the default value is 5000.
- In the Maximum Threads text field, confirm that the default value is 20.
- In the Number of Server Processes text field, confirm that the default value is 1.
- In the Runtime User ID text field, confirm that the default value is icsuser.
- In the Runtime Group ID text field, confirm that the default value is icsgroup.
- Confirm that Start After Successful Configuration is selected.
- Confirm that Start on System Startup is selected.
Click Next. The Create New User ID dialog box is displayed.
- Click Create User ID.
The Directories to Store Configuration and Data Files page is displayed.
- In the Directories to Store Configuration and Data Files page, click Next to accept the default values.
The Create New Directory? dialog box is displayed.
- In the Create New Directory? dialog box, click Create Directory. Do this for each new directory.
The Ready to Configure page is displayed.
- Click Configure Now.
When configuration is complete, the Configuration Summary page is displayed.
- Review the details and click Close.
You have verified, configured, and started all of the servers in the evaluation deployment.