|
| |
| Sun Java System Message Queue 3.5 SP1 Administration Guide | |
Chapter 4
Administration Console TutorialThis tutorial focuses on the use of the Administration Console, a graphical interface for administering a Message Queue message server. By following this tutorial, you will learn how to do the following:
The tutorial is designed to set up the destinations and administered objects needed to run a simple JMS-compliant application, HelloWorldMessageJNDI, which is available in the helloworld subdirectory of the example applications /demo directory (see Appendix A, "Location of Message Queue Data"). In the last part of the tutorial you run this application.
This tutorial is provided mainly to guide you through performing basic administration tasks using the Administration Console. It is not a substitute for reading through the Message Queue Java Client Developer’s Guide or other chapters of this Administration Guide.
Some Message Queue administration tasks cannot be accomplished using graphical tools; you will need to use command line utilities to perform such tasks as the following:
- Configuring certain physical destination properties
Some physical destination properties cannot be configured using the Administration Console. These can be configured as described in the section titled "Managing Destinations".
- Creating broker clusters
See "Working With Clusters (Enterprise Edition)" for more information.
- Managing a user database
See "Authenticating Users" for more information.
Getting ReadyBefore you can start this tutorial you must install the Message Queue product. For more information, see the Message Queue Installation Guide. Note that this tutorial is Windows-centric, with added notes for UNIX® users.
In this tutorial, choosing Item1 > Item2 > Item3 means that you should pull down the menu called Item1, choose Item2 from that menu and then choose Item3 from the selections offered by Item2.
Starting the Administration ConsoleThe Administration Console is a graphical tool that you use to do the following:
- Create references to and connect to brokers
- Administer brokers
- Create physical destinations on the brokers, which are used by the broker for message delivery
- Connect to object stores in which you place Message Queue administered objects
Administered objects allow you to manage the messaging needs of JMS-compliant applications. For more information, see "Message Queue Administered Objects".
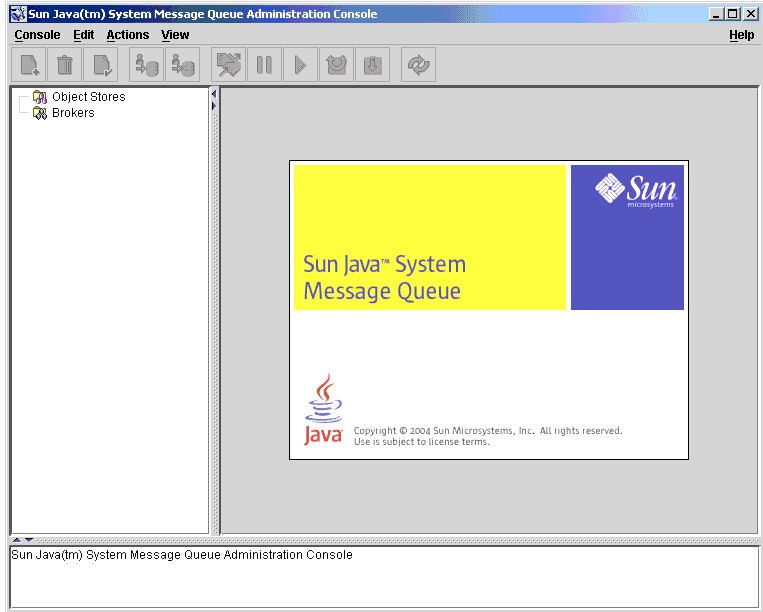
To Start the Administration Console
- Choose Start > Programs > Sun Java System Message Queue 3.5 SP1 > Administration.
You may need to wait a few seconds before the Console window is displayed.
Non-Windows users: enter the following command at the command prompt:
/usr/bin/imqadmin (on Solaris)
/opt/imq/bin/imqadmin (on Linux)
- Take a few seconds to examine the Console window.
The Console features a menu bar at the top, a tool bar just underneath the menu bar, a navigational pane to the left, a results pane to the right (now displaying graphics identifying the Sun Java System Message Queue product), and a status pane at the bottom.
No tutorial can provide complete information, so let’s first find out how to get help information for the Administration Console.
Getting Help
Locate the Help menu at the extreme right of the menu bar.
To Display Administration Console Help Information
- Pull down the Help menu and choose Overview. A help window is displayed.
Notice how the help information is organized. The navigation pane, on the left, shows a table of contents; the results pane, on the right, shows the contents of any item you select in the navigation pane.
Look at the results pane of the Help window. It shows a skeletal view of the Administration Console, identifying the use of each of the Console’s panes.
- Look at the Help window’s navigational pane. It organizes topics in three areas: overview, object store management, and broker management. Each of these areas contains files and folders. Each folder provides help for dialog boxes containing multiple tabs; each file provides help for a simple dialog box or tab.
Your first Console administration task, "Adding a Broker", will be to create a reference to a broker you manage through the Console. Before you start, however, check the online help for information.
- Click the Add Broker item in the Help window’s navigational pane.
Note that the results pane has changed. It now contains text that explains what it means to add a broker and that describes the use of each field in the Add Broker dialog box. Field names are shown in bold text.
- Read through the help text.
- Close the Help window.
Working With BrokersA broker provides delivery services for a Message Queue messaging system. Message delivery is a two-phase process: the message is first delivered to a physical destination on a broker and then it is delivered to one or more consuming clients.
Working with brokers involves the following tasks:
You can start the broker from the Start > Programs menu on Windows or by using the imqbrokerd command. If you use the imqbrokerd command, you can specify broker configuration information using command line options. If you use the Programs menu, you can specify configuration information using the Console and in other ways described in Chapter 5, "Starting and Configuring a Broker."
The broker supports communication with both application clients and administration clients. It does this by means of different connection services, and you can configure the broker to run any or all of these services. For more information about connection services, see "Connection Services".
Starting a Broker
You cannot start a broker using the Administration Console. Start the broker as described in the following procedure (also, see Chapter 5, "Starting and Configuring a Broker").
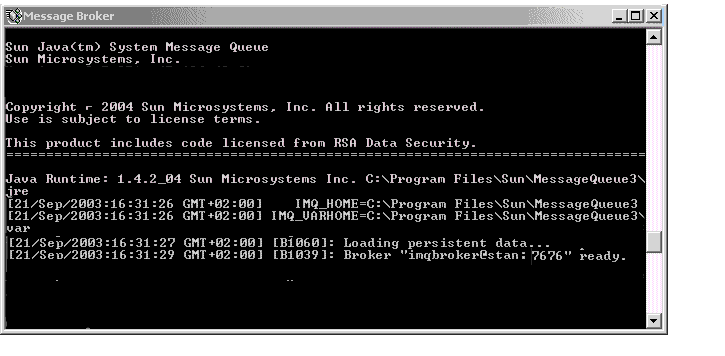
To Start a Broker
- Choose Start > Programs >Sun Java System Message Queue 3.5 SP1 > Message Broker.
Non-Windows: enter the following command to start a broker.
/usr/bin/imqbrokerd (on Solaris)
/opt/imq/bin/imqbrokerd (on Linux)
The command prompt window is displayed and indicates that the broker is ready.
- Bring the Administration Console window back into focus. You are now ready to add the broker to the Console and to connect to it.
You do not have to start the broker before you add a reference to it in the Administration Console, but you must start the broker before you can connect to it.
Adding a Broker
Adding a broker creates a reference to that broker in the Administration Console. After adding the broker, you can connect to it.
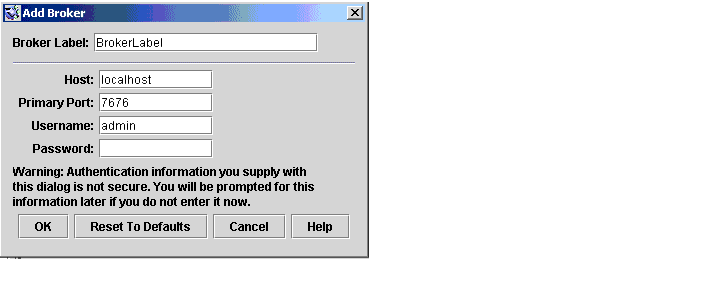
To Add a Broker to the Administration Console
- Right-click on Brokers in the navigation pane and choose Add Broker.
- Enter MyBroker in the Broker Label field.
This provides a label that identifies the broker in the Administration Console.
Note the default host name (localhost) and primary port (7676) specified in the dialog box. These are the values you will need to specify later, when you configure the connection factory that the client will use to set up connections to this broker.
Leave the Password field blank. Your password will be more secure if you specify it at connection time.
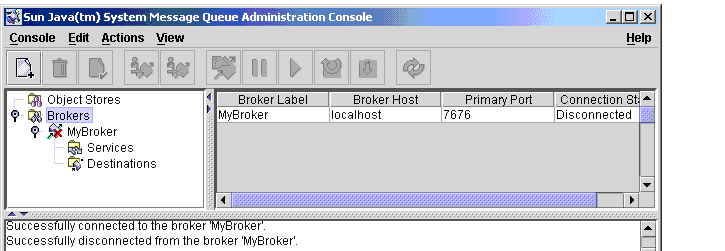
- Click OK to add the broker.
Look at the navigation pane. The broker you just added should be listed there under Brokers. The red X over the broker icon tells you that the broker is not currently connected to the Console.
- Right-click on MyBroker and choose Properties from the popup menu.
The broker properties dialog box is displayed. You can use this dialog box to update any of the properties you specified when you added the broker.
- Click Cancel to dismiss the dialog box.
Changing the Administrator Password
When you connect to the broker, you are prompted for a password if you have not specified one when you added the broker. By default, the Administration Console can connect to a broker as user admin with password admin. For improved security, it is a good idea to change the default administrator password (admin) before you connect.
To Change the Administrator Password
The change takes effect immediately. You must specify the new password whenever you use one of the Message Queue command line utilities or the Administration Console.
Although clients use a different connection service than administrators, you are also assigned a default user name and password so that you can test Message Queue without having to do extensive administrative set up. By default, a client can connect to the broker as user guest with the password guest. You should, however, establish secure user names and passwords for clients as soon as you can. See "Authenticating Users" for more information.
Connecting to the Broker
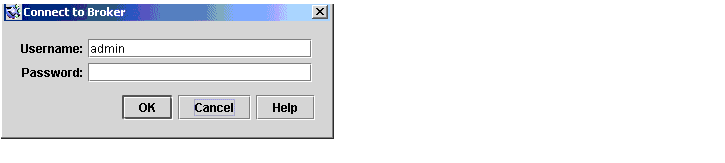
To Connect to the Broker
- Right-click MyBroker and choose Connect to Broker.
A dialog box is displayed that allows you to specify your name and password.
- Enter admin in the Password field or whatever value you specified for the password in "Changing the Administrator Password".
Specifying the user name admin and supplying the correct password connects you to the broker, with administrative privileges.
- Click OK to connect to the broker.
After you connect to the broker, you can choose from the Actions menu to get information about the broker, to pause and resume the broker, to shutdown and restart the broker, and to disconnect from the broker.
Viewing Connection Services
A broker is distinguished by the connection services it provides and the physical destinations it supports.
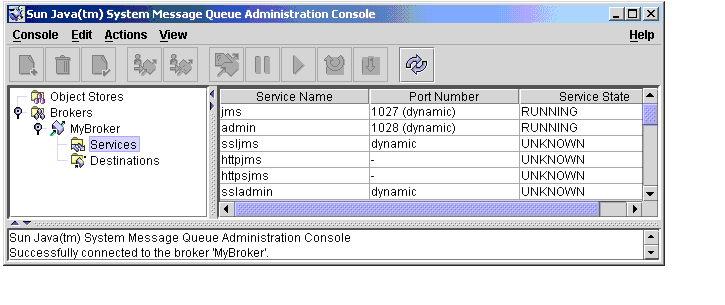
To View Available Connection Services
- Select Services in the navigation pane.
Available services are listed in the results pane. For each service, its name, port number, and state is provided.
- Select the jms service by clicking on it in the results pane.
- Pull down the Actions menu and note the highlighted items.
You have the option of pausing the jms service or of viewing and updating its properties.
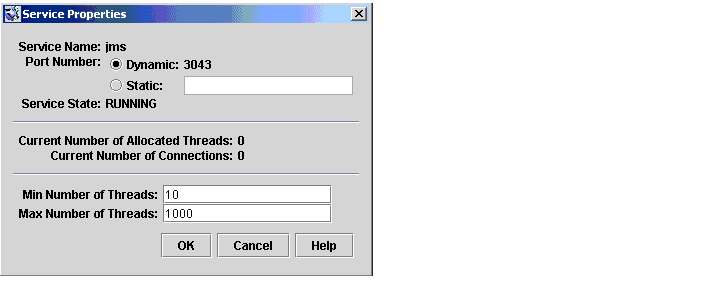
- Choose Properties from the Actions menu.
Note that by using the Service Properties dialog box, you can assign the service a static port number and you can change the minimum and maximum number of threads allocated for this service.
- Click OK or Cancel to close the Properties dialog box.
- Select the admin service in the results pane.
- Pull down the Actions menu.
Notice that you cannot pause this service (the pause item is disabled). The admin service is the administrator’s link to the broker. If you paused it, you would no longer be able to access the broker.
- Choose Actions > Properties to view the properties of the admin service.
- Click OK or Cancel when you’re done.
Adding Physical Destinations to a Broker
By default destination auto-creation is enabled for a broker, which allows it to create physical destinations dynamically. Thus, in a development environment, you do not have to explicitly create destinations in order to test client code.
However, in a production setting, it is advisable to explicitly create physical destinations. This allows you, the administrator, to be fully aware of the destinations that are in use on the broker.
You control whether the broker can add auto-created destinations by setting the imq.autocreate.topic or imq.autocreate.queue properties. For more information, see "Auto-Created (vs. Admin-Created) Destinations".
In this section of the tutorial, you will add a physical destination to the broker. You should note the name you assign to the destination; you will need it later when you create an administered object that corresponds to this physical destination.
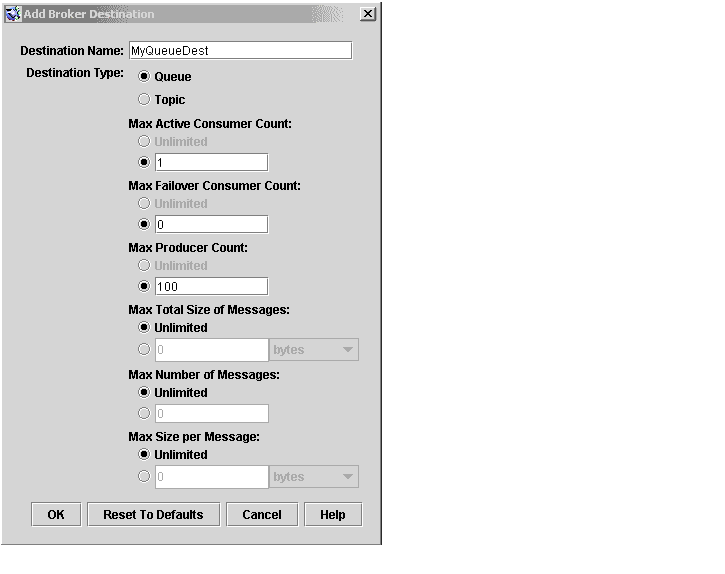
To Add a Queue Destination to a Broker
- Right-click the Destinations node of MyBroker and choose Add Broker Destination.
The following dialog box is displayed:
- Enter MyQueueDest in the Destination Name field.
- Select the Queue radio button if it is not already selected.
- Click OK to add the physical destination.
The destination now appears in the results pane.
Working With Physical Destinations
Once you have added a physical destination on the broker, you can do any of the following tasks, as described in the following procedures:
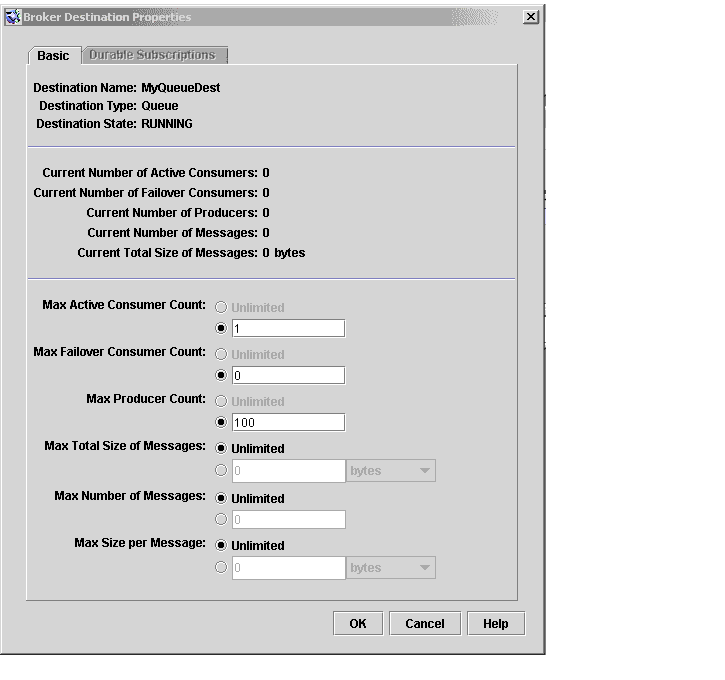
To View the Properties of a Physical Destination
- Select the Destinations node of MyBroker.
- Select MyQueueDest in the results pane.
- Choose Actions > Properties.
The following dialog box is displayed:
Note that the dialog box displays current status information about the queue as well as some properties that you can change.
- Click Cancel to close the dialog box.
To Purge Messages From a Destination
Purging messages removes the messages and leaves an empty destination.
To Delete a Destination
Deleting a destination purges the messages at that destination and removes the destination.
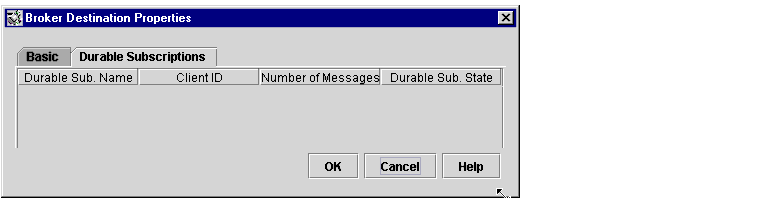
Getting Information About Topic Destinations
The broker topic destination properties dialog box includes an additional tab that lists information about durable subscriptions. This tab is disabled for queue destinations.
You can use this dialog box to:
Working with Object StoresAn object store, be it an LDAP directory server or a file system store (directory in the file system), is used to store Message Queue administered objects that encapsulate Message Queue-specific implementation and configuration information about objects that are used by client applications.
Although administered objects can be instantiated and configured within client code, it is preferable that you, as administrator, create and configure these objects and store them in an object store that can be accessed by client applications using JNDI. This allows client code to be provider-independent.
For more information about administered objects, see "Message Queue Administered Objects".
You cannot use the Administration Console to create an object store. You must do this ahead of time as described in the following section.
Adding an Object Store
Adding an object store creates a reference to an existing object store in the Administration Console. This reference is retained even if you quit and restart the Console.
To Add a File-system Object Store
- If you do not already have a folder named Temp on your C drive, create it now.
The sample application used in this tutorial assumes that the object store is a folder named Temp on the C drive. In general, a file-system object store can be any directory on any drive.
Non-Windows: you can use the /tmp directory, which should already exist.
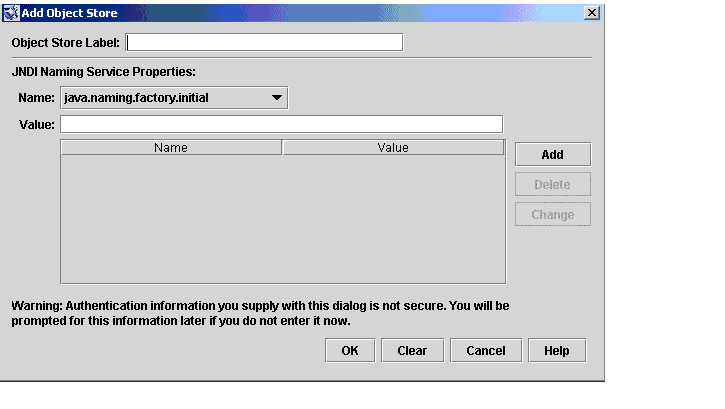
- Right-click on Object Stores and choose Add Object Store.
The following dialog box is displayed:
- Enter MyObjectStore in the field named ObjectStoreLabel.
This simply provides a label for the display of the object store in the Administration Console.
In the following steps, you will need to enter JNDI name/value pairs. These pairs are used by JMS-compliant applications for looking up administered objects.
- From the Name drop-down list, select java.naming.factory.initial.
This property allows you to specify what JNDI service provider you wish to use. For example, a file system service provider or an LDAP service provider.
- In the Value field, enter the following
com.sun.jndi.fscontext.RefFSContextFactory
This means that you will be using a file system store. (For an LDAP store, you would specify com.sun.jndi.ldap.LdapCtxFactory.)
In a production environment, you will probably want to use an LDAP directory server as an object store. For information about setting up the server and doing JNDI lookups, see "LDAP Server Object Store".
- Click the Add button.
Notice that the property and its value are now listed in the property summary pane.
- From the Name drop-down list, choose java.naming.provider.url.
This property allows you to specify the exact location of the object store. For a file system type object store, this will be the name of an existing directory.
- In the Value field, enter the following
file:///C:/Temp
(file:///tmp on Solaris and Linux)
- Click the Add button.
Notice that both properties and their values are now listed in the property summary pane. If you were using an LDAP server, you might also have to specify authentication information; this is not necessary for a file-system store.
- Click OK to add the object store.
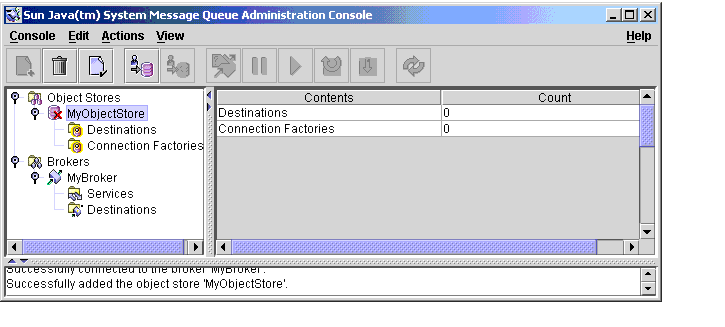
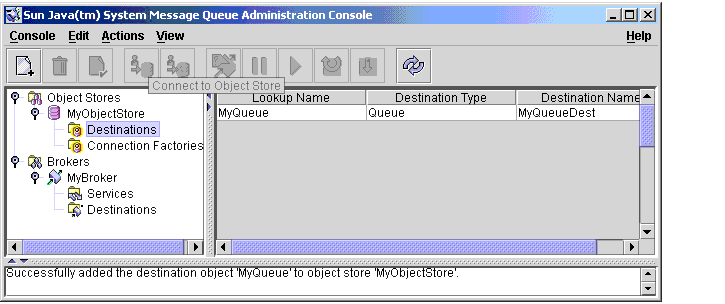
- If the node MyObjectStore is not selected in the navigation pane, select it now.
The Administration Console now looks like this:
The object store is listed in the navigation pane and its contents, Destinations and Connection Factories, are listed in the results pane. We have not yet added any administered objects to the object store, and this is shown in the Count column of the results pane.
A red X is drawn through the object store’s icon in the navigation pane. This means that it is disconnected. Before you can use the object store, you will need to connect to it.
Checking Object Store Properties
While the Administration Console is disconnected from an object store, you can examine and change some of the properties of the object store.
To Display the Properties of an Object Store
- Right click on MyObjectStore in the navigational pane.
- Choose Properties from the popup menu.
A dialog box is displayed that shows all the properties you specified when you added the object store. You can change any of these properties and click OK to update the old information.
- Click OK or Cancel to dismiss the dialog box.
Connecting to an Object Store
Before you can add objects to an object store, you must connect to it.
To Connect to an Object Store
Adding a Connection Factory Administered Object
You can use the administration console to create and configure a connection factory. A connection factory is used by client code to connect to the broker. By configuring a connection factory, you can control the behavior of the connections it is used to create.
For information on configuring connection factories, see the online help and the Message Queue Java Client Developer’s Guide.
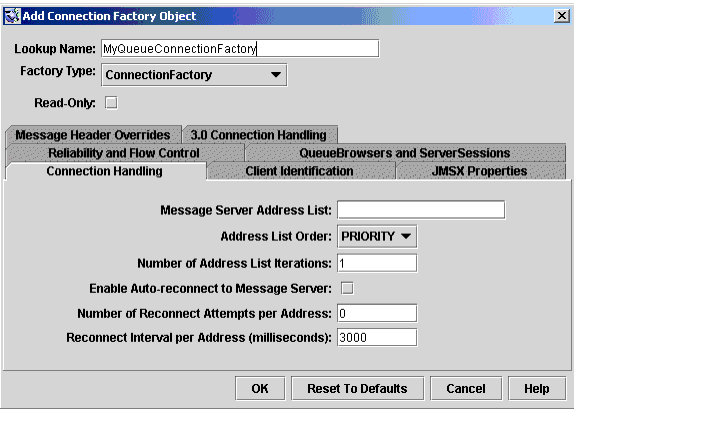
To Add a Connection Factory to an Object Store
- If not already connected, connect to MyObjectStore (see "Connecting to an Object Store")
- Right click on the Connection Factories node and choose Add Connection Factory Object.
The Add Connection Factory Object dialog box is displayed.
- Enter the name “MyQueueConnectionFactory” in the LookupName field.
This is the name that the client code uses when it looks up the connection factory as shown in the following line from HelloWorldMessageJNDI.java:
qcf=(javax.jms.QueueConnectionFactory)
ctx.lookup(“MyQueueConnectionFactory”)- Select the QueueConnectionFactory from the pull-down menu to specify the type of the connection factory.
- Click the Connection Handling tab.
- The Message Server Address List field is where you would normally enter the address of the broker to which the client will connect. An example for this field looks like this:
mq://localhost:7676/jms
You do not need to enter a value since, by default, the connection factory is configured to connect to a broker running on the localhost on port 7676, which is the configuration that the tutorial example expects.
- Click through the tabs for this dialog box to see the kind of information that you can configure for the connection factory. Use the Help button in the lower right hand corner of the Add Connection Factory Object dialog box to get information about individual tabs. Do not change any of the default values for now.
- Click OK to create the queue connection factory.
- Look at the results pane: the lookup name and type of the newly created connection factory are listed.
Adding a Destination Administered Object
Destination administered objects are associated with physical destinations on the broker; they point to those destinations, as it were, allowing clients to look up and find physical destinations, independently of the provider-specific ways in which those destinations are named and configured.
When a client sends a message, it looks up (or instantiates) a destination administered object and references it in the send() method of the JMS API. The broker is then responsible for delivering the message to the physical destination that is associated with that administered object:
- If you have created a physical destination that is associated with that administered object, the broker delivers the message to that physical destination.
- If you have not created a physical destination and the autocreation of physical destinations is enabled, the broker itself creates the physical destination and delivers the message to that destination.
- If you have not created a physical destination and the autocreation of physical destinations is disabled, the broker cannot create a physical destination and cannot deliver the message.
In the next part of the tutorial, you will be adding an administered object that corresponds to the physical destination you added earlier.
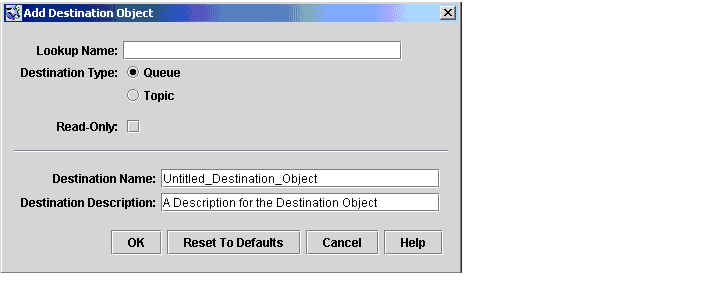
To Add a Destination to an Object Store
- Right-click on the Destinations node (under the MyObjectStore node) in the navigation pane.
- Choose Add Destination Object.
The Administration Console displays an Add Destination Object dialog box that you use to specify information about the object.
- Enter “MyQueue” in the Lookup Name field.
The lookup name is used to find the object using JNDI lookup calls. In the sample application, the call is the following:
queue=(javax.jms.Queue)ctx.lookup(“MyQueue”);
- Select the Queue radio button for the Destination Type.
- Enter MyQueueDest in the Destination Name field.
This is the name you specified when you added a physical destination on the broker (see "Adding Physical Destinations to a Broker").
- Click OK.
- Select Destinations in the navigation pane and notice how information about the queue destination administered object you have just added is displayed in the results pane.
Administered Object Properties
To view or update the properties of an administered object, you need to select Destinations or Connection Factories in the navigation pane, select a specific object in the results pane, and choose Actions > Properties.
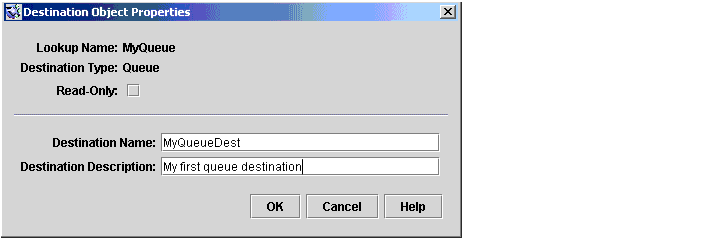
To View or Update the Properties of a Destination Object
- Select the Destinations node of MyObjectStore in the navigational pane.
- Select MyQueue in the results pane.
- Choose Actions > Properties to view the Destination Object Properties dialog box.
Note that the only values you can change are the destination name and the description. To change the lookup name, you would have to delete the object and then add a new queue administered object with the desired lookup name.
- Click Cancel to dismiss the dialog box.
Updating Console InformationWhether you work with object stores or brokers, you can update the visual display of any element or groups of elements by choosing View > Refresh.
Running the Sample ApplicationThe sample application HelloWorldMessageJNDI is provided for use with this tutorial (for the location, see Step 1, below). It uses the physical destination and administered objects that you created in the foregoing tutorial: a queue physical destination named MyQueueDest, a queue connection factory administered object and queue administered object with JNDI lookup names MyQueueConnectionFactory and MyQueue respectively.
The code creates a simple queue sender and receiver, and sends and receives a “Hello World” message.
To Run the HelloWorldMessageJNDI Application
- Make the directory that includes the HelloWorldmessageJNDI application your current directory; for example:
cd IMQ_HOME\demo\helloworld\helloworldmessagejndi (on Windows)
cd /usr/demo/imq/helloworld/helloworldmessagejndi (on Solaris)
cd /opt/imq/demo/helloworld/helloworldmessagejndi (on Linux)
You should find the HelloWorldMessageJNDI.class file present. (If you make changes to the application, you will need to re-compile it using the instructions for compiling a client application in the Quick Start Tutorial of the Message Queue C Client Developer’s Guide.)
- Set the CLASSPATH variable to include the current directory containing the file HelloWorldMessageJNDI.class as well as the following jar files that are included in the Message Queue product: jms.jar, imq.jar, and fscontext.jar. See the Message Queue Java Client Developer’s Guide for instructions on setting the CLASSPATH.
The JNDI jar file (jndi.jar) file is bundled with JDK 1.4. If you are using this JDK, you do not have to add jndi.jar to your CLASSPATH setting. If you are using an earlier version of the JDK, you must include jndi.jar in your CLASSPATH. See the Message Queue Java Client Developer’s Guide for additional information)
- Before you run the application, open the source file HelloWorldMessageJNDI.java and read through the source. It is short, but it is amply documented and it should be fairly clear how it uses the administered objects and destinations you have created using the tutorial.
- Run the HelloWorldMessageJNDI application by executing one of the commands below:
java HelloWorldMessageJNDI (Windows)
% java HelloWorldMessageJNDI file:///tmp ( Solaris and Linux)
If the application runs successfully, you should see the following output: