| Sun StorageTek NAS OS Administration Guide |
| Sun StorageTek NAS OS Administration Guide |
| C H A P T E R 1 |

This chapter provides an overview of the NAS Web Administrator graphical user interface. It includes the following sections:
|
Introduction |
The Web Administrator graphical user interface (GUI) makes it easy to set security and network configurations, and to perform administrative tasks on Sun Microsystems innovative NAS appliances and gateway systems.
Note: Most software features and functions described in this book apply to any configuration of the NAS appliance and gateway-system software. Where a feature or function is limited to a specific configuration, that configuration is identified specifically.
|
Using Web Administrator |
The Web Administrator graphical user interface (GUI) enables you to configure system parameters through a series of menus and panels. These panels and settings are discussed in later chapters.
This section describes the interface layout and how to use the Web Administrator online Help. The following subsections are included:
The Login panel enables authorized users to access the system through the Web Administrator graphical user interface (GUI). By default, there is no password for the system administrator. If you wish to set this password, follow the directions in Setting the Administrator Password.
To log in to the Web Administrator GUI:
1. Type the system administrator password in the Password field.
Passwords are case-sensitive. If there is no system administrator password, leave this field blank.
2. Click Apply to open the main Web Administrator display.
Web Administrator allows any number of simultaneous users, and employs a unique writer-lock mechanism to ensure that only a single GUI user can update data at a given time, while supporting concurrent read-only access to the same data. The data is locked only as long as is necessary to complete the update request. If one user is accessing data for write access and you request an update on the same data:
If the first user loses the connection to the NAS server before the update is finished, the lock will time-out after 30 minutes.
As necessary, the Administrator can view and reset the lock before the 30 minute time-out, using the datalock show and datalock reset lock-id CLI commands. Be careful if you do this, making sure it is safe to reset the lock.
With cluster (dual-server) configurations, the data subject to update is locked on both servers simultaneously. This means that the processing described above applies whether the two users are accessing the same server, or partner servers in a cluster configuration.
Note: Avoid simultaneous updates by Telnet/CLI and Web Administrator users.
The Web Administrator graphical user interface (GUI) is divided into sections, as shown below:

The content displayed in the Web Administrator GUI varies based on your hardware configuration.
The toolbar, shown below, is displayed at the top of the Web Administrator graphical user interface (GUI).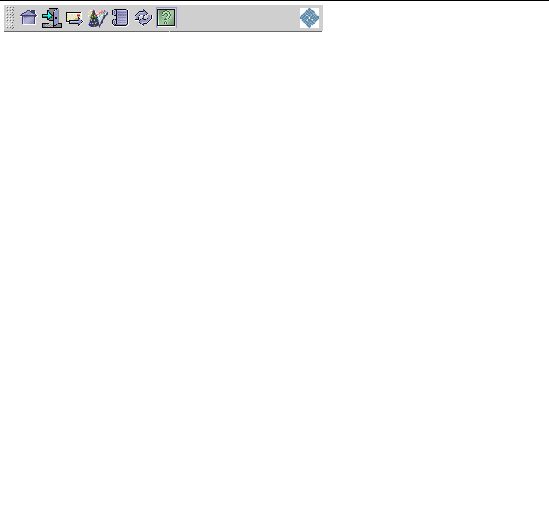
The toolbar icons are detailed in TABLE 1-1.
|
|
||
|
|
||
|
|
||
|
|
||
|
|
||
|
|
||
|
|
The navigation panel, shown in the following figure, enables you to navigate through the Web Administrator graphical user interface (GUI). You can access all configuration, setup, and administrative functions through this panel.

To open a folder, click the  symbol next to the folder, or double-click the folder. The symbol changes to the
  position, as shown in the following figure.
To close the folder, click the  symbol back to the
  position.
Throughout the Web Administrator graphical user interface (GUI), folders are represented with symbols.The folder symbols are shown in TABLE 1-2.
Certain panels in the Web Administrator graphical user interface (GUI) contain other buttons. Additional buttons are shown in TABLE 1-3.
|
|
||
|
|
||
|
|
||
|
|
||
|
|
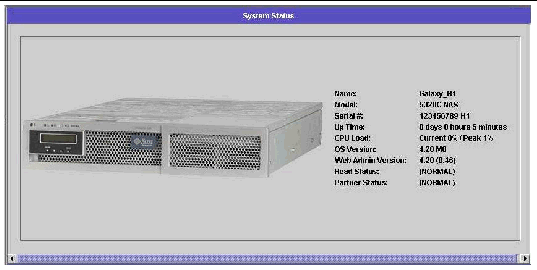
The content panel, shown in the following figure, contains general information about the system.
For information about system status, see Viewing System Status.
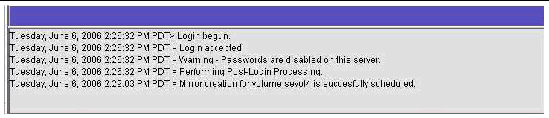
At the bottom of the Web Administrator display, the status panel displays all events that have occurred since the last logged in session. Use this panel to verify that your changes were saved or your system commands have run successfully. Errors and warnings are also displayed in this panel.
The following figure shows the status panel.
Note: The status panel displays the date and time for the client machine running the Web Administrator software, not the system's date and time.
The status messages are stored in a local log file, in case the client application requires diagnostic action. Some or all of the messages are included in the log file, according to how the administrator configures the log file.
The name of the log file is constructed from the IP address of the client and the number of the rotating version of the file:
n_n_n_n_cnt.log
where n are the components of the IP address and cnt is 1, 2, or 3, depending on the version of the log file. The file is located in the following location:
To view additional information about the Web Administrator software, click the Help button in the Web Administrator toolbar. The Help window consists of a Navigation pane on the left. and a Topic pane on the right.
To display a Help topic, use the Contents, Index, and Search tabs in the Navigation pane. Click the Search tab and click Tips on Searching to learn about the search feature.
The following table describes the Help tabs.
The meanings of the Help window icons are described in the following table.
|
|
Go back to the previous Help topic that you viewed in the current session. |
|
|
Go forward to the next Help topic that you viewed in the current session. |
|
|
|
Using the Configuration Wizard |
The configuration wizard runs automatically the first time a user logs into the Web Administrator software. The wizard is designed to guide you through the initial setup of your system. It helps you complete all of the steps necessary to establish communication between the system and your network. After you complete the wizard, you still need to set up your file system and configure user access.
The configuration wizard offers several options. Some of these options are determined by the system itself. Other options are determined by you, based on the network environment you are running. This guide cannot cover all of the configurations in the available space. This section provides an overview of the configuration wizard itself and describes the possible paths you can take through the wizard.
Other functions and features also vary based on the features of the system. These variations are discussed in the appropriate locations within this guide.
The wizard can take either of three primary paths. The path you use is based on your network environment:
On the first screen of the wizard, select the path appropriate to your network environment.
To run the configuration wizard:
1. Click the Wizard button ( ) on the toolbar.
The wizard is launched in a separate window.
2. Select the path that you want to take and click Next.
The wizard progresses through several steps, which are detailed starting with Initial Network Configuration. The steps are as follows:
Note: If the system boots using Dynamic Host Configuration Protocol (DHCP), confirm that the address of the DNS server is correct. If not, clear the Configure DNS checkbox to avoid delays in restarts and failovers.
3. Review your settings and click Finish on the last screen of the wizard.
The wizard saves your settings and lets you know if any configuration changes failed.
If you do not want to run the wizard, Initial Network Configuration describes accessing the same functions in the same sequence through the navigation panel.
|
Where to Go From Here |
Assuming you have initially configured your system by running the configuration wizard, the system is up and running and you have a basic understanding of how to navigate through the Web Administrator graphical user interface (GUI). From here, you need to establish your file system and configure user access.
Establishing your file system includes defining any logical unit numbers (LUNs), partitions, file volumes, and segments that you need to set. For more information about these concepts, see File-System Concepts.
When your file system is complete, you must set up user access rights and any other system management features. System Management covers the basic management functions. View the index to find any specific features, including descriptions of the features, how they work, when and why they apply, and any specific rules for setting them up.
| Sun StorageTek NAS OS Administration Guide | 819-4284-11 |
Copyright © 2007, Sun Microsystems, Inc. All Rights Reserved.


 becomes