| C H A P T E R 5 |
|
SAS Multipathing |
You can use J4200/J4400 arrays in a serial-attached SCSI (SAS) multipathing configuration. Multipathing provides higher availability by allowing data to use multiple paths to the arrays from Host Bus Adaptors (HBAs) on the same server or on different servers.
Multipathing capability resides in the operating systems running on the servers, not on the J4200/J4400 arrays. You enable, disable, and configure multipathing through the operating software.
This chapter includes the following information:
To use multipathing with the J4200/J4400 arrays, your configuration must meet the requirements specified in this section.
TABLE 5-1 lists the operating systems that support multipathing with the J4200/J4400 arrays
|
Linux RHEL 4, version 4.5 and higher |
To use the Solaris 10, update 6, operating system with multipathing and SATA drives, you must use a patch for the operating system. The patch ID is 138888-03 5.10 (SPARC) and 138889-03 5.10_x86 (x86).
| Note - These patches are required only for multipathing with SATA drives. Multipathing with SAS drives and Solaris 10, U6 requires no patches. |
To use multipathing with the J4200/J4400 arrays, the firmware in your configuration must meet these requirements:
For each operating system, TABLE 5-2 lists the required drivers.
For the Linux MPT drivers, go to the following location:
http://www.lsi.com/support/sun/sg_xpci8sas_e_sRoHS.html
To use multipathing with the J4200/J4400 arrays, your servers must be using the following HBA:
For the latest information about which versions of the Sun StorageTek Common Array Manager (CAM) you must use in a multipathing configuration, refer to the Sun Storage J4200/J4400 Array Release Notes, part number 820-3222-xx, which is available at the following location:
http://docs.sun.com/app/docs/prod/j4200.array
This section includes examples of how to cable J4200/J4400 arrays to each other and to host HBAs in a multipathing environment.
FIGURE 5-1 shows an example of SAS cables connecting the ports on the host’s HBA to the SIM boards on the back of an array.
FIGURE 5-1 Cabling Example for Multipathing With One Array and One Host
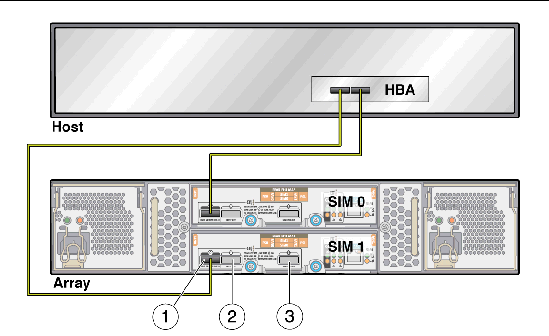
FIGURE 5-2 shows an example of cabling for multipath in a configuration with two hosts, with two HBAs on each host, and two arrays cabled together.
FIGURE 5-2 Cabling Example for Multipathing With Two Arrays and Two Hosts
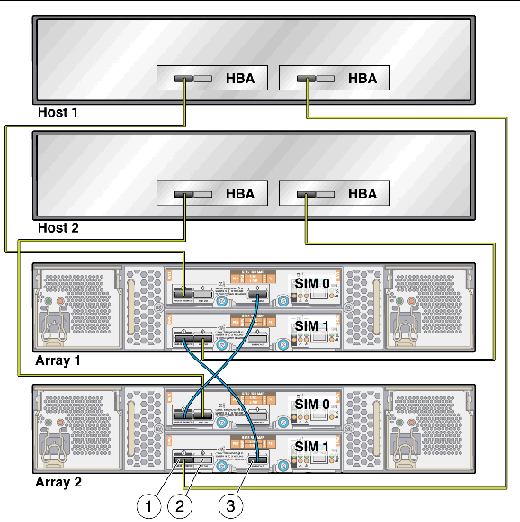
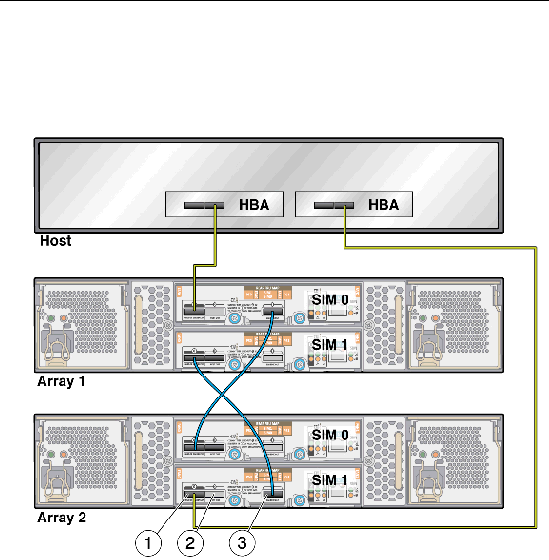
FIGURE 5-3 shows an example of cabling for multipath in a configuration with one host, with two HBAs on that host, and two arrays cabled together.
FIGURE 5-3 Cabling Example for Multipathing With Two Arrays and One Host
This sections describes how to enable and disable multipathing in the Solaris 10, update 6, operating system.
Use the stmsboot command to enable multipathing in the Solaris 10, update 6, operating system. stmsboot manages enumeration of multipath-capable devices with multipathing; it has these characteristics:
This section describes the stmsboot(1M) administration program for multipathing.
In the /dev and /devices trees, multipathing-enabled devices receive new names that indicate that they are under multipathing control.
TABLE 5-3 describes the options supported by stmsboot(1M).
stmsboot enables and disables multipathing on the host, with these conditions:
| Note - The system administrator is responsible for modifying application configuration (for example, backup software, DBMS, and so forth) to reflect updated device names. |
|
| Note - Multipathing is not supported on all controllers. After enabling multipathing, only supported controllers are placed under multipathing control. Non-supported controllers remain unchanged. |
| Note - stmsboot updates the /etc/vfstab file and dump configuration to reflect device-name changes during reboot. |
The following conditions apply to the stmsboot -e, -d, and -u options:
|
| Note - During reboot, /etc/vfstab and the dump configuration update to reflect the device-name changes. |
|
|
To enable multipathing on specific ports and disable multipathing on others, edit the /kernel/drv/mpt.conf file. To update vfstab(4) and dumpadm(1M) configurations to reflect the changed device names, type:
SAS devices, added and removed dynamically with the mpt(7d) driver, enable your system to detect specific targets and LUNs attached, with these conditions:
| Note - To clean up the CTD# for your device tables, run the following command: devfsadm -C. |
This section describes how to enable and disable multipathing in the
Windows 2008 operating system.
|
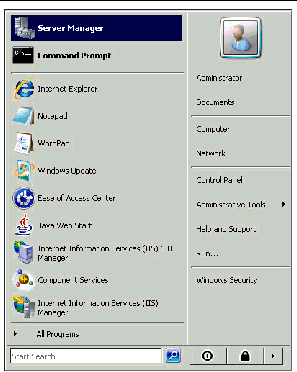
1. From the Start menu, select Server Manager, as shown in FIGURE 5-4.
FIGURE 5-4 Start Menu With Server Manager Selection
2. Select Features from the list of folders on the left to open the Features panel, as shown in FIGURE 5-5.
FIGURE 5-5 Server Manager Feature Display
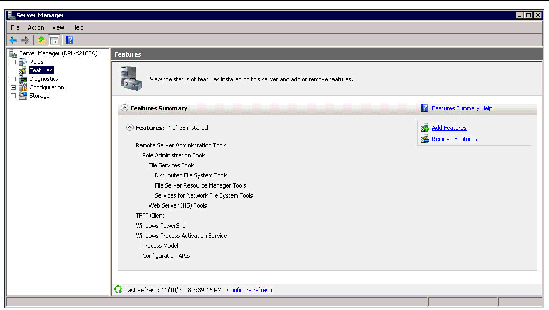
In the Features panel, you can click the Features Summary arrow to open or close the Features Summary and click the Features arrow to view the status of installed features.
3. Click Add Features to enable the Add Features Wizard.
The Add Features Wizard Select Features window opens with the default Features selected and a list of optional features available for installation in your system, as shown in FIGURE 5-6.
FIGURE 5-6 Add Features Wizard Select Features Window
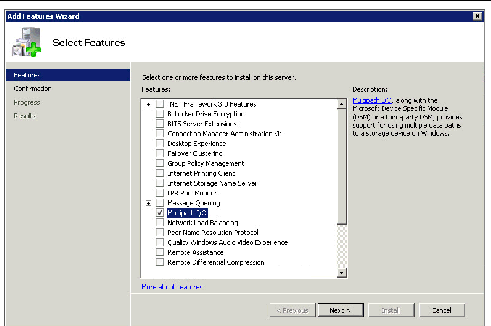
4. Select the Multipath I/O option from the Message Queuing sublist.
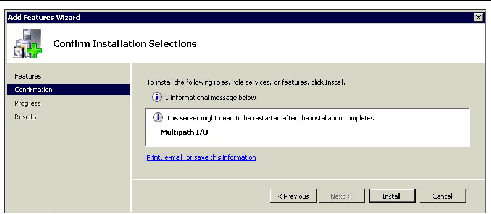
The Add Features Wizard Confirm Installation Selections window opens, as shown in FIGURE 5-7.
FIGURE 5-7 Confirm Installation Selections Window
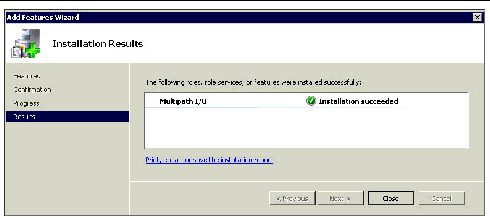
The Add Features Wizard Installation Results window opens as shown in FIGURE 5-8.
FIGURE 5-8 Add Features Wizard Installation Results Window
8. Close the Server Manager main window.
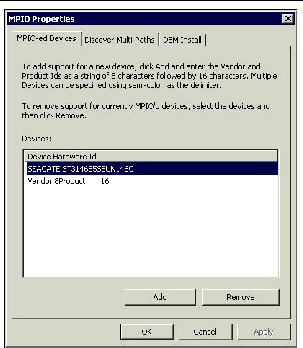
1. From the Windows Start menu (FIGURE 5-4), select Administrative Tools.
The MPIO Properties window, as shown in FIGURE 5-9..
FIGURE 5-9 MPIO Properties Window
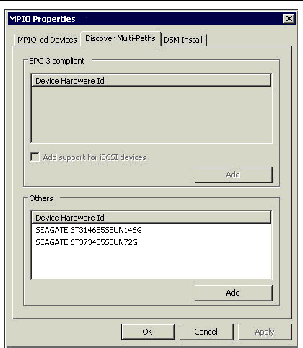
2. Select the Discover Multi-Paths tab, as shown in FIGURE 5-10.
FIGURE 5-10 MPIO Properties Window Device Multi-Paths Tab
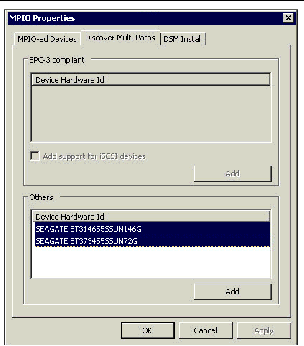
3. Highlight the Device Hardware for which you want to discover multipaths, as shown in FIGURE 5-11.
FIGURE 5-11 Highlighted Device Hardware for Discovering Multipaths
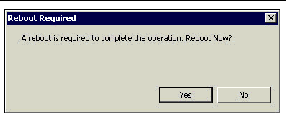
The Reboot Required window opens, as shown in FIGURE 5-12.
FIGURE 5-12 Reboot Required Window
| Note - For best results, after reboot, log in and change the default settings of the MPIO policies. See To Select a Load Balancing Policy. |
1. From the Windows Start menu, select Server Manager, as shown in FIGURE 5-4.
2. Select Diagnostics > Device Manager from the list of folders on the left to open the Device Manager window, as shown in FIGURE 5-13.
FIGURE 5-13 Device Manager Window
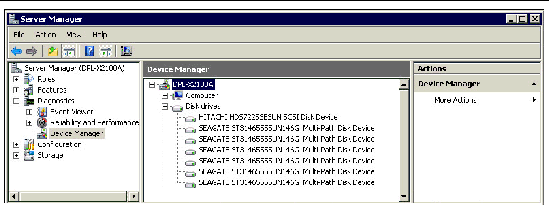
The list of disk drives opens, as shown in FIGURE 5-13.
5. Move your cursor over the device drive name for which you want information.
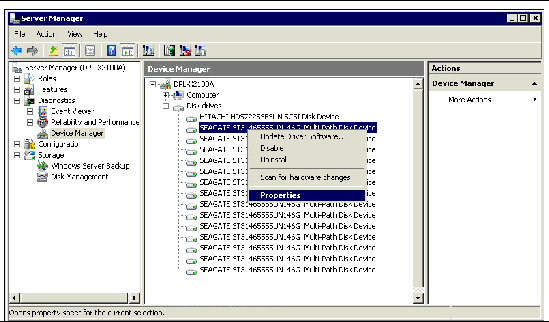
6. Right-click to open a menu and select Properties, as shown in FIGURE 5-14.
FIGURE 5-14 Menu to Modify Device Configuration
The Disk Drive Properties window opens, as shown in FIGURE 5-15.
FIGURE 5-15 Disk Drive Properties Window
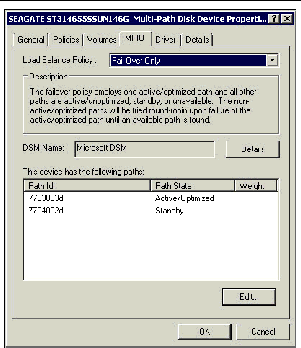
7. Use the drop-down menu to select a load-balancing policy, as shown in FIGURE 5-16.
The choices for load-balancing policies are listed in TABLE 5-4. By default, the Fail Over Policy is configured. For best results with the J4200/J4400 array, use the Round Robin policy.
FIGURE 5-16 Round Robin Load Balance Policy Selected
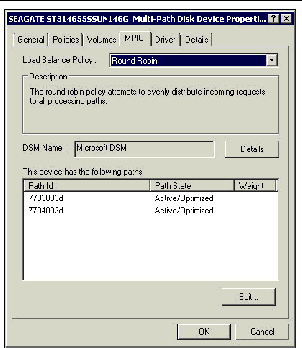
| Note - Load balance policie are set on a per-device basis. Repeat this procedure for each disk drive. |
|
1. From the Windows Start menu, select Administrative Tools > MPIO, as shown in FIGURE 5-17.
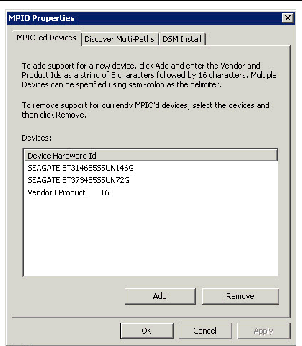
The MPIO Properties window opens, as shown in FIGURE 5-18.
FIGURE 5-17 Selecting Administrative Tools > MPIO From the Start Menu
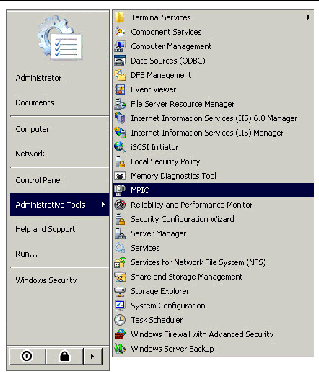
FIGURE 5-18 MPIO Properties Window
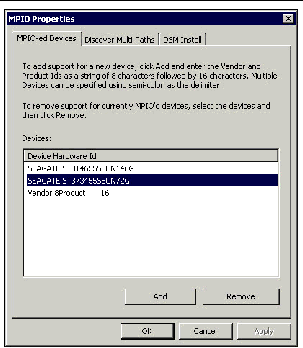
2. Highlight a device in the list, as shown in FIGURE 5-19.
FIGURE 5-19 Highlighting Device For Which to Disable Multipathing
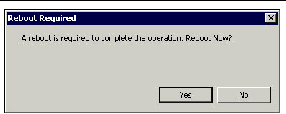
The Reboot Required window opens, as shown in FIGURE 5-20.
FIGURE 5-20 Reboot Required Window
5. After reboot, select Administrative Tools > MPIO from the Windows Start menu.
The MPIO Properties window opens, showing the device removed from the list, as shown in FIGURE 5-21.
FIGURE 5-21 MPIO Properties Window With Device Removed From List
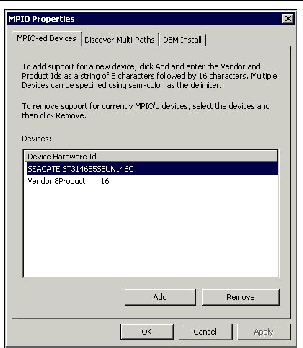
6. Repeat Step 2 through Step 5 until all devices are removed from the Device Hardware Id list.
7. From the Windows Start menu, select Server Manager to open the Server Manager window.
8. Select Features from the list of folders on the left to open the Features panel, as shown in FIGURE 5-22.
FIGURE 5-22 Server Manager Window With Features Panel Open
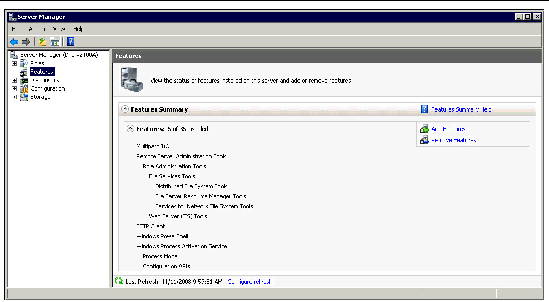
The Remove Features Wizard window opens, as shown in FIGURE 5-23.
FIGURE 5-23 Remove Features Wizard Window
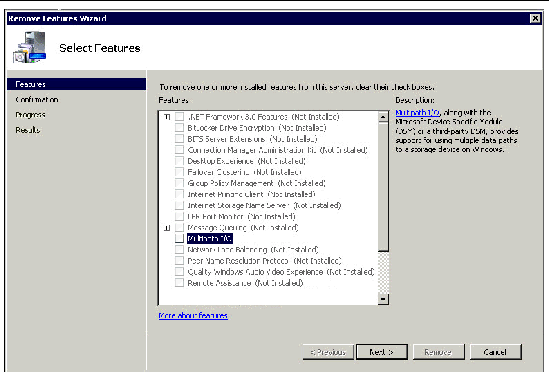
10. Highlight Multipath I/O from the Message Queuing sublist.
The Confirm Removal Selections window opens, as shown in FIGURE 5-24.
FIGURE 5-24 Confirm Removal Selections Window
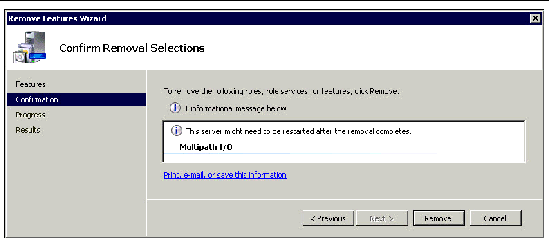
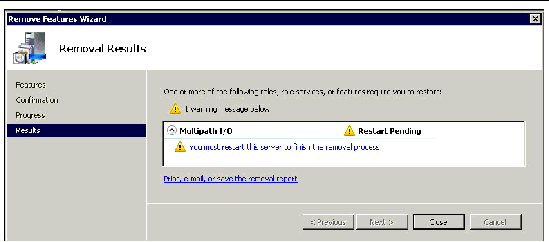
The Removal Results window opens, as shown in FIGURE 5-25.
FIGURE 5-25 Removal Results Window
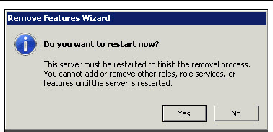
The system asks if you want to restart the server now, as shown in FIGURE 5-26.
FIGURE 5-26 Restart Now Window
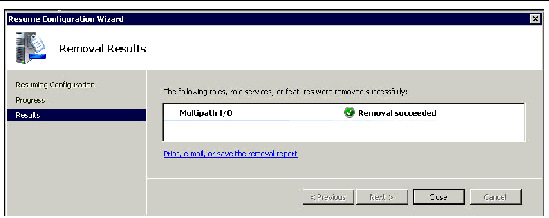
When the sever has restarted, the Removal Results window opens, as shown in FIGURE 5-27.
FIGURE 5-27 Removal Results Window
This section describes how to enable and disable multipathing in supported versions of the Linux operating system.
|
1. Attach a J4200 or a J4400 to a server with a supported version of Linux installed.
2. On the server, edit or create the /etc/multipath.conf file.
4. After the reboot, make sure that the OS discovers all the disks in the J4200/J4400 arrays either by using the Linux commands, fdisk or lsscsi.
5. Partition any disks you want to the desired sizes.
6. Use the Linux command modprobe to add the loadable kernel modules dm-multipath and dm-round-robin.
7. Start the multipathd daemon.
For Linux SUSE 9, use the following command:
For other supported Linux versions, use the following command:
8. Start the multipathing device mapper target autoconfig.
9. List the multipath devices that have been created.
The output should list the same number of devices as there are disks in the J4200/J4400 arrays; it will look similar to the following:
|
1. If a RAID volume, LVM volume, or volume mount have been placed over the device node of the multipathed disk, quiesce the volume.
2. Use the multipath -f command to disable multipathing to a specific device.
3. Use the multipath -F command to disable multipathing on all multipathed devices.
© © 2009 Sun Microsystems, Inc. All rights reserved.