| Sun Storage J4200 Array Chassis Replacement Guide |
| Sun Storage J4200 Array Chassis Replacement Guide |
|
Replacing a J4200 Array Chassis |
This document describes replacement procedures for the Sun Storage J4200 array chassis.

|
Caution - Only trained service personnel should remove the covers on this equipment. |
|
|
Caution - The power supplies in this equipment can produce high energy hazards. Only instructed personnel with authorized access to this equipment can remove and replace modules in the system. |
This product is intended for restricted access whereby access is controlled through the use of a means of security (for example, key, lock, tool, badge access), and personnel authorized for access have been instructed on the reasons for the restrictions and any precautions that need to be taken.
Before you start to replace a failed chassis, you must:
To determine that a chassis has failed, check the following:
| Note - A steady amber LED on any component, indicates a problem with that component. |
Observe the following electrostatic discharge (ESD) precautions:
1. From the back of the cabinet, locate the chassis (also referred to as a tray) that is being replaced (see Verifying a Chassis Failure).
2. Disconnect the power cord from each power supply:
a. Pull the power cord latch up and over the power cord.
b. Disconnect the power cable from the power supply connector.
|
|
Caution - For products with multiple power cords, all power cords must be disconnected to completely remove power from the system. |
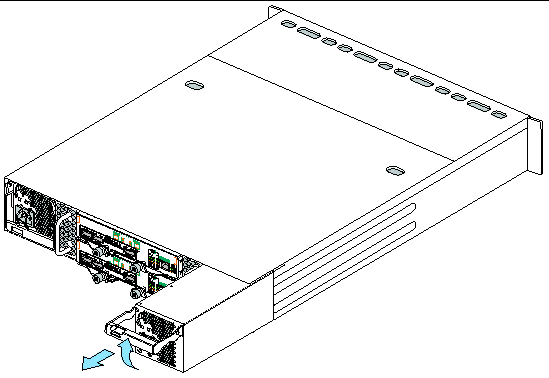
3. Label each mini-SAS cable connection. For example, “Tray 1, SIM Link Out to Tray 0, Host or SIM Link IN.”
4. Disconnect the labeled mini-SAS cables from each SIM board.
a. Grasp the metal body of the connector with one hand, and use your other hand to firmly grasp and pull the tab.
b. Pull the tab gently toward the connector body and then with your other hand, extract the connector from the bulkhead.
FIGURE 1 Removing the Power Cables and Mini-SAS Cables

5. Remove the two system locking clips from the lower corners of the chassis (FIGURE 2). You can use a Phillips head screwdriver for leverage to help you pull out each clip.
FIGURE 2 Removing the System Locking Clips

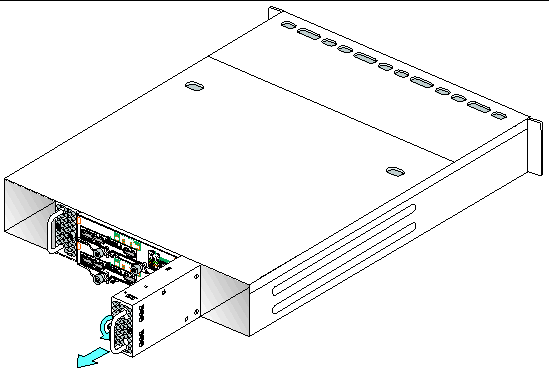
6. Remove each power supply from the chassis (FIGURE 3).
|
|
Caution - The power supplies in this equipment can produce high energy hazards. Only instructed personnel with authorized access to this equipment can remove and replace modules in the system. |
a. Pull the power supply handle out and lift it up to disconnect the power supply from the tray.
b. Pull the power supply out of the tray.
c. Place the power supply aside.
FIGURE 3 Removing a Power Supply
7. Remove each fan module from the chassis (FIGURE 4).
a. Loosen the captive screw on the fan module.
b. Pull the fan module handle toward you and pull the module out of the tray.
c. Place the fan module aside.
FIGURE 4 Removing a Fan Module
8. Remove each SIM board from the chassis (FIGURE 5).
a. Loosen the two captive screws on the SIM board.
b. Pull both ejector levers outward and pull the SIM board from chassis.
FIGURE 5 Removing a SIM Board From the Chassis

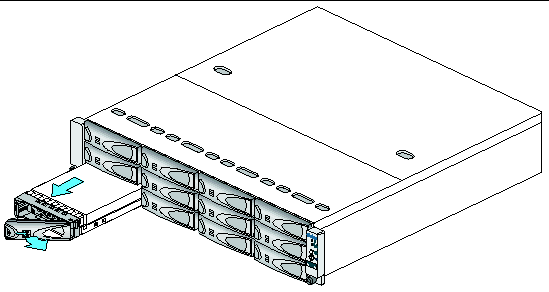
9. From the front of the cabinet, remove each disk drive and disk filler assembly (FIGURE 6).
|
|
Caution - Potential loss of data access- Data might be lost if an active disk drive is removed. If you remove an active disk drive accidentally, wait at least 30 seconds before reinserting it. |
a. Press the release button in and to the right to release the disk handle.
b. Pull the disk handle to eject the disk drive from the tray.
c. Grasp the middle of the disk drive and pull it toward you to remove it from the tray.
d. Record the slot location on the outer drive casing. Use the same slot location when installing each disk drive in the new chassis.
FIGURE 6 Removing a Disk Drive or Disk Filler Assembly
10. After you have removed all of the components from the chassis, remove the chassis from the cabinet (FIGURE 7).
|
|
Caution - The empty weight of a chassis is 9kg (20 lbs). You might need two people to remove the chassis from the cabinet. |
a. From the front of the cabinet, loosen the two captive screws on each side of the tray.
b. Grasp each side of the chassis and pull it toward you, and remove it from the cabinet.
FIGURE 7 Removing the Failed Chassis From the Cabinet

c. Package the failed chassis and return it to Sun, if instructed to do so, or properly dispose of the failed chassis.
|
|
Caution - Follow all ESD Precautionsand use care when handling all components. |
1. From the front of the cabinet, lift and slide the new chassis into the cabinet until the front flanges of the chassis touch the vertical face of the cabinet (FIGURE 8).
FIGURE 8 Installing the New Chassis in the Cabinet

2. Tighten the captive screw on each side of the tray front to secure the chassis to the cabinet.
3. At the back of the cabinet, slide a system locking clip onto each lower corner of the chassis (FIGURE 9). You can use a Phillips head screwdriver for leverage to help you push in the clip.
FIGURE 9 Installing the System Locking Clips

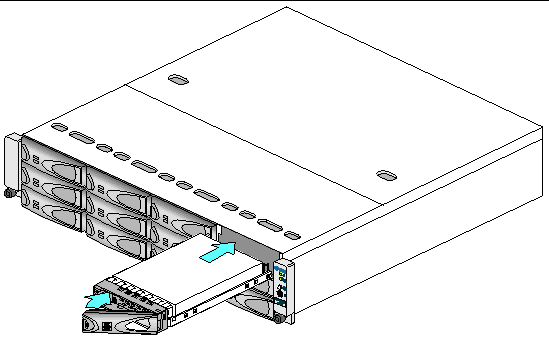
1. From the front of the cabinet, install each disk drive and disk filler assembly into the same slot each component occupied in the failed chassis (FIGURE 10). For each disk drive and disk filler assembly:
a. Align the disk component with the open slot and slide the drive into the tray.
b. Push the disk drive into the tray until the disk handle engages with the tray.
c. Press and close the disk handle to seat the drive into the tray.
FIGURE 10 Installing the Disk Drives and Filler Assemblies in New Chassis
2. From the back of the cabinet, install the two SIM boards in the SIM slots (FIGURE 11).
a. Align the SIM board with the open slot and slide it into the tray.
b. Push the assembly into the tray until it engages with the tray connectors.
c. Simultaneously push each ejector lever toward the middle of the board to seat it in the tray.
d. Tighten each captive screw to secure the board.
FIGURE 11 Installing a SIM Board

3. Install the two fan modules in the chassis slots (FIGURE 12).
a. Align the fan module with the open slot and push in to seat the module in the tray.
b. Tighten the captive screw to secure the fan module to the tray.
FIGURE 12 Installing a Fan Module

4. Install the two power supplies into the chassis slots (FIGURE 13).
a. Holding up the handle, align the power supply with its open slot.
b. Slide the power supply into the tray and carefully push the power supply to seat it in the chassis.
c. Push the handle down to lock the power supply in the chassis.
The latch tab locks the handle in place.
FIGURE 13 Installing a Power Supply

1. From the back of the cabinet, reconnect all mini-SAS cables to their original locations on each SIM board in the new chassis (FIGURE 14).
2. Reconnect the country-specific power cables into each of the power supply connectors (FIGURE 14). Replace the power cord latch over each connector.
FIGURE 14 Reconnecting the Mini-SAS and Power Cables

3. Check the status of each tray.
After the power-on sequence is complete, confirm the following:
If all tray and drive Ok/Power LEDs are steady green and the amber Service Required LEDs are off, the power-on sequence is complete and no faults have been detected.
Reseat the module to make sure that it is properly installed. If the LED is now green, the module is functioning properly. If the module remains blinking amber, contact Sun Customer Service Personnel.
If an alarm sounds after plugging in the first power cord, the alarm will shut off once the second power cord is connected.
If you need help installing or using this product in the United States, call
1-800-USA-4SUN(872-4786), or go to:
http://www.sun.com/service/contacting/index.xml
| Sun Storage J4200 Array Chassis Replacement Guide | 820-4413-11 |
Copyright © 2008, Sun Microsystems, Inc. All Rights Reserved.