Sun StorageTek NAS OS Software Release Notes, Version 4.22.M1
|
These release notes contain information for the Sun StorageTek NAS OS, release 4.22.M1. The Sun StorageTek NAS OS and its options, the StorageTek File Replicator and StorageTek Compliance Archiving Software, manage the following:
- Sun StorageTek 5320 NAS Appliance
- Sun StorageTek 5320 NAS Cluster Appliance
- Sun StorageTek 5320 NAS Gateway System
- Sun StorageTek 5320 NAS Cluster Gateway System
- Sun StorageTek 5220 NAS Appliance
- Sun StorEdge 5310 NAS Appliance
- Sun StorEdge 5310 NAS Cluster Appliance
- Sun StorEdge 5310 NAS Gateway System
- Sun StorEdge 5310 NAS Cluster Gateway System
- Sun StorEdge 5210 NAS Appliance
These release notes contain the following sections:
New Features in This Release
The current release, 4.22.M1, is a maintenance release for the 4.22 version of the NAS OS software. In addition to resolved issues, the 4.22.M1 version supports the most recent version of the array firmware. However, it is not necessary to upgrade the firmware. If you upgrade the firmware, see To Upgrade Array and Drive Firmware on 5300 and 5320 RAID Controllers.
The 4.22 version contains the following features:
- Certification for Microsoft Vista
- Using Sun StorageTek NAS appliances with Sun StorageTek Virtual Tape Library
- Support for the following standards or specifications:
- DFS for CIFS
- Storage Management Initiative - Specification (SMI-S): Using the SMI-S provider to communicate with other compliant proxy servers
- User level access to CIFS shares in Workgroup mode
- iSCSI: Support for Microsoft’s Volume Shadow Copy with iSCSI Checkpoints
- Antivirus update: Support for Computer Associates, Inc. Integrated Threat Management V8 and V8.1
- Improvements to In-Band RAID Management so that segments are allocated automatically and volumes can be attached.
- Changes to Web Administrator
- Navigation change: sorting tables and tab organization
- New pages for the In-Band RAID Management: Extend Volumes, Drive Properties, Search Volumes
See Addenda to the Documentation for the description of these features.
System Requirements
The Sun StorageTek NAS OS is pre-installed on all supported platforms. You do not need to install any software to manage the Sun StorageTek 5000 NAS family of products.
To access the Web Administrator management interface, you must have a network-attached computer running one of the following browsers. You must use a Java technology-enabled browser with Java Plug-In 1.4.0 (minimum version).
- Internet Explorer
- Mozilla
- Netscape Navigator
| Note - To download the latest Java Plug-in software, go to http://java.sun.com/javase/downloads/index.jsp.
|
 To Determine the Software Version To Determine the Software Version
|
Perform one of the following procedures.
- From the Web Administrator navigation panel, select System Operations
 Update Software.
- From the administrator console, type the version command, as shown in the following example and sample response:
> version
StorageTek Model 5320 NAS S/N ST532020051026002 Version 4.22 M1
If the appliance is not at the latest release, download and install the release of the Sun StorageTek NAS OS from the SunSolve site, http://sunsolve.sun.com.
To Determine Firmware Revision Levels
|
Use the following command to display the current revision level of the firmware of each RAID controller unit, expansion unit, controller NVSRAM, and drive.
raidctl get type=lsi target=profile ctlr=0..N
The current firmware revision level is 6.60.

|
Caution - The Sun StorageTek 6140 arrays can run with firmware revision level 7.10. However, for the Sun StorageTek NAS appliances, the arrays in the Sun StorageTek 5320 RAID Controller Unit MUST NOT USE firmware 7.10. They must continue to use firmware 6.60. Therefore, do not upgrade existing controller units to 7.10 and make sure any new controller units that you purchase have the part number 375-3583-01 to ensure that the proper firmware revision is installed.
|
Software Updates and Downgrades
Download the latest release of Sun StorageTek NAS OS software from the SunSolve site, http://sunsolve.sun.com. This action requires a valid service contract. Select the Patchfinder link and enter the appropriate patch number.
|
118216
|
Software for the Sun StorEdge 5210 Appliance
To upgrade from a release prior to release 4.05, contact SunSM Service to get Field Change Order 257 applied first. Upgrading from a release of 4.05 or greater does not need the FCO applied.
|
|
119351
|
Software for the Sun StorEdge 5310 Appliance
|
|
119352
|
Software for the Sun StorageTek 5320 or 5220 Appliance
|
When the software is upgraded, the previous release remains on the system so you can reboot to the previous release. Downgrading to a release earlier than the one loaded on your system, as indicated on the Shutdown the Server screen of the Web Administrator, is not supported. If required, contact Sun Services.
During an upgrade, the values file from the existing version is copied to and used by the new version. To preserve backwards compatibility, these files are maintained separately. Any changes you make to the values file, for example changing the SMB values, are made only in the new version’s values file. If you reboot the system using the previous version of the software, the values file for that version is used. (6692618)
| Note - If your site uses Sun StorageTek File Replicator, you must upgrade both systems of the mirror configuration so that mirror links are maintained. You must reboot the source and target systems at the same time. If you see the message "Mirror is incompatible" on either the source or the target system, reboot both systems again. (6735332)
|
Service Contact Information
If you need help installing or using this product, call 1-800-USA-4SUN, or go to:
http://www.sun.com/service/contacting/
Resolved Issues in This Release
The following issues have been resolved in this release. Change Request numbers are in parentheses.
- The panic that was observed during some filecopy operations no longer occurs. (6624049)
- The NAS OS software can now continue a mount operation when it encounters an invalid partition table for a LUN. (6658527)
- When a NAS server for a remote mirror is rebooted, the data in /proc/mirror/syncs is saved so that the status of the mirror is preserved. (6659833)
- The error “nbd.nbd_attach_part+106" encountered in some file replications is now prevented and does not cause a system crash. (6683978)
- The NAS server can now continue when it encounters a tape error. (6702550)
- The NDMP file history now reports the files that are backed up accurately. (6730402)
- The free disk space that is in a deleted segment can now be re-used. The free disk space entries in the partition table are sorted in ascending order of their start sector numbers. (6637013, 6710910)
- The LDAP password is now protected. (6397683)
- The partner server is now updated for the Initiator IQN Name when an access list member is changed on the primary server. (6426391)
- The Directory Tree Quota now works correctly. (6432802)
- The fsck operation now reports progress. (6542538)
- Requests from Microsoft Vista and XP clients that contain nonstandard file names are now handled without delays. (6611864)
- The operation of breaking the mirror of a file system that is marked as an error is now handled properly. (6626508)
- The NAS appliance does not crash when there is a memory shortage. (6627979)
- Saving the crash dump file does not cause the NAS OS to hang. (6630963)
- You can now create a mirror buffer for a large volume by specifying the segment to be used. (6638687) Use the following procedure:
a. At the command line, type the following commands:
set mirror.volume_name.xj.segment 2
savevars
b. In either the administrator console or the Web Administrator, navigate to the Disks and Volumes panel.
c. 6264880Create the mirror buffer with the segment.
- The roles of slave NICs are now displayed consistently. (6639281)
- The Microsoft Windows CIFS permissions are now enforced for creating files and folders. (6639651)
- The NAS OS now accepts Windows files with the domain of PrimaryGroup=Everyone correctly. (6680153)
- ACL errors do not cause missing files during NDMP backup operations. (6630821)
- When an NDMP backup operation is completed, the NAS server no longer panics. (6644283)
- During NDMP backups, subdirectories with modified data files are now backed up by default. This action is controlled by the ndmp.dump.pathnode variable, which is now enabled by default. (6636815)
- When performing NDMP backups of data that includes a deep directory structure and many types of large and small files, CPU utilization might reach 100%. Testing has confirmed that this condition is not an issue and that the NAS server continues to provide all services. (6721744)
- NDMP backs up hard links more efficiently so that out-of-space conditions are less likely to occur. (6656004)
- NDMP now initializes environment data correctly. (6678913)
- NDMP now handles the backup of FIFO/socket/piped and other device files without reporting error messages. (6682566)
- NDMP now handles path names that exceed 870 characters. (6664643)
- NDMP now handles reports of missing files correctly so that index creation does not fail. (6694843)
- The FTP log file can now be configured independently on each server of a NAS cluster. (6657287)
- The diagnostics output now includes the complete definition of the lookup.order.passwd environment variable. (6665281)
- In solutions in which the NAS appliance must check for a directory, the software now correctly reports the EEXIST status. (6665963)
- The software now handles iSCSI WRITE requests for reserved volumes correctly. (6666896)
- The Web Administrator can now be used to manage quotas. (6673812)
- The support for kerberos has been updated to prevent the Windows event caused by the wrong etype. (6675491)
- NTP and system clock are now synchronized. (6694745)
- The transaction size limits no longer cause intermittent client I/O errors. (6697883)
- When setting the time zone, the values for GMT+ and GMT- are now correct. (6702667)
- The NAS servers now operate properly while the controller array is not available. (6705494)
- NDMP now excludes the quota.user and quota.group files. (6705978)
- The passwd file on both servers of a cluster configuration are now the same. A change on one server is updated on the other server. (6719553, 6720153)
- The status command now reports the correct dispatch count. (6721231)
- The NAS servers no longer panic with a page fault in iscsi_basic_packet_get(). (6726357)
- The n_malloc and n_free counters are now handled properly so that “bad malloc/free balance” events are not created. (6737597)
- The documentation includes instructions not to write to the boot directory, /cvol or /dvol, and the “Mounting File Systems” topic includes a note. (6264880)
- When you use file replication in a cluster, a change role on the master cluster followed by a cluster failover results in a mirror loss because the change role does not conclude its operation. (6428902)
Workaround: Use the CLI to unset the mirror.changerole parameter and then establish mirroring.
- After adding access list members on a NAS server in a cluster, the initiator IQN Name is now correct for the partner server. (6426391)
Resolved Issues in Previous Release
The following issues have been resolved. Change Request numbers are in parentheses.
- It is no longer possible to unload the ssh module. This module contains functionality that is required by other parts of the system. (6595606)
- A failed or offline drive is now logged in the syslog and a SNMP trap is created on a Sun StorageTek 5210. SNMP trap is created on 5220/5320 systems. (6512312)
- When you delete a volume that is bounded by a volume on either side with no free space, another volume of the same size can now be created from the Web Administrator GUI. (6445486)
- Volumes with one or more attached segments no longer appear in the Web Administrator GUI after being deleted. (6439670)
- NFS exports containing extended characters (UTF-8) can now be mounted or viewed from EUC-KR clients. (6443034)
- The administrator console now prevents you from creating an iSCSI LUN on system volumes: cvol, dvol, tmp, proc, checkpoint, or readonly volumes. (6515138)
- The Web Administrator now releases a lock on the server. (6410459/6506346)
- The CPU utilization no longer reaches 100% when trying to run commands using an rsh connection. (6376034)
- The NAS appliance no longer appears to hang when attached to a tape library. Information from previous tape backups is now cleared so that the NAS appliance no longer receives failed access requests, resulting in a long boot delay. (6524650)
- Long filenames are now allowed in backup and restore operations. (6592230)
- Using the NAS appliance as a data server but without attached library hardware no longer causes the NAS appliance to crash. (6592583)
- A null session during a backup operation no longer causes the NAS appliance to crash. (6591010)
- An NFS request that requires access to a large directory or multiple clients no longer causes the NAS appliance to stall. (6554526/6577456)
- It is now possible to use a short filename (8.3) to get access to a CIFS share. (6573204)
- Joining a Windows domain that has an existing (pre-staged) computer account for the NAS appliance is now supported. When creating the account on a Windows 2000 domain controller, select "Allow pre-Windows 2000 computers to use this account." When creating the account on a Windows 2003 domain controller, select "Assign this computer account as a pre-Windows 2000 computer." (6500426)
- SGID-based inheritance now works properly for CIFS clients. (6529924)
- When searching for an ADS server to join the domain, a NAS appliance now searches the ADS domain by default and searches the DNS domain only if the ADS domain does not exist. Previous versions used the DNS domain by default. (6547657)
- The NAS appliance with a FC-connected C4 tape library now recognizes the robot and all tape drives. (6547423)
- Checkpoint age is now determined by individual mapping entries rather than the main entry. The ls command for .chkpnt on volume directories can now display accurate results. (6527721)
- The NAS OS can now handle UIDs of up to 10 digits. (6524252)
- Copying files with streams is now supported to improve compatibility with the Brocade StorageX solution. (6565909)
- On Windows systems, it is now possible to delete a quarantined file through a CIFS share. (6539915/649950)
- The NAS appliance can now handle an improper disconnection from a Telnet session. (6550235)
- An invalid rsync command no longer causes a Telnet session to hang. (6551606)
- The backup operations using NDMP have been improved. The current version meets performance requirements set by previous versions (6556386) and restores BakBone NetVault® datasets properly. (6575307 and 6564097)
- Using the product with the StorageTek Flexline FLX380 enterprise storage system has been improved. See About Online System Registration and Auto Service Request (ASR) for instructions. (6501665)
- After replacing the power supply to a controller unit after a power supply failure, the Web Administrator might no longer shows the file volumes as missing. (6498818)
- The Web Administrator now connects properly after creating a port aggregation (PA) bond. (6400350)
- Adding NFS exports from the System Manager panel of the Web Administrator no longer fails. (6438697)
- The NAS OS can now get the LUN initialization status from the RAID controller so the new LUN is displayed in the RAID management screen. (6435497)
- Scheduled checkpoints now occur at their appointed time without delays. (6445966)
- If the TCP/IP host address and the TCP/IP gateway address are mistakenly typed with the same address, it is now possible to fix the error. (6441168)
- When configuring multiple NIC ports using the administrator console, entering the same IP address for more than one port does not result in an error. (6436496)
- The online help now works from the Web Administrator on Solaris clients. (6428038)
- You can now use the Auto Assign LUN Path function for new LUNs. (6397065)
- On new systems, or when you add a new controller or expansion unit, all LUNs are now online. (6337658)
- Firmware for an appliance with an array with a large number of drives can now be upgraded efficiently. (6519937)
- When deleting a HA/PA bond on a clustered system, the IP address of the bond might be assigned to a different unused port on the partner head. This no longer causes a link failure on the partner head. (6449658)
- If both Fibre Channel (FC) cables are pulled on one head, and then a recovery option is initiated from the other head, the system now goes to the QUIET/ALONE state. (6436683)
- In a cluster configuration, Web Administrator and administration console now report the state of both servers. (6229943, 6240366)
- After a mirror breaks, promoting a volume following a rename operation, the promoting operation no longer works as if you were adding the mirror and not promoting it. (6433113)
- The Antivirus Configuration list no longer accepts duplicate names. (6436698)
- If a system is configured to use two scan engines, and one of them is stopped, the other scan engine no longer stops and denies access. (6433675)
- When enabling anti-virus protection for the first time, existing client connections to Common Internet File System (CIFS) mapped shares are no longer exempt from scanning and are protected. (6417994)
- The Solaris iSCSI initiator can now handle heavy I/O loads without causing time-outs or protocol error conditions. (6439416 / 6428783)
- When the Symantec Anti-Virus Scan Engine quarantines a file, the log information no longer overwrites the original file. (6418443)
- Installing new NICs no longer causes existing PA bonds to change roles. (6407988)
- An attempt to promote a volume created with multiple segments in a mirror after the mirror is broken no longer fails. (6387400 / 6437373)
Known Issues
The issues described in these sections are not resolved. If a solution is available, it is included. Change Request numbers are in parentheses.
- The Sun StorageTek 5x10 NAS Provider software makes the Sun StorageTek NAS appliance comply with the SMI specification. The Provider’s Operations Manager does not display the number of megabytes available or in use for any volume. The Operations Manager > Storage Vols tab always reports 0 MB in the Available and Total Used columns even though the volumes have available space and are in use. (6674937)
- The Sun StorageTek 5x10 NAS Provider software’s Operations Manager does not report information about CIFS shares. The Operations Manager > Shares tab does report NFS share information correctly. (6674935)
- After uninstalling the VSS provider, ST5xxxVssProvider, some values for it remain in the registry. These values are a side-effect of support for other non-NAS storage systems and have no effect. The provider is uninstalled successfully and no action is needed. (6656318)
- The Microsoft Volume Shadow Copy Service (VSS) works only with those applications that are enabled for VSS. VSS will fail with an initialization error if the application is not able to work with VSS. (6637188) For detailed information see Microsoft’s information at http://technet2.microsoft.com/windowsserver/en/library/2b0d2457-b7d8-42c3-b6c9-59c145b7765f1033.mspx?mfr=true
- The batteries used in Sun StorageTek NAS appliances, in particular the Sun StorageTek 5310 NAS appliance, are designed to be replaced every two years. When this limit is exceeded, the low battery power can cause the appliance to change from write-through mode to cache mode or to change back and forth between the two modes. (6647737)
- Workaround: Changing the battery requires a service call. See Service Contact Information. You can determine the state of the battery power in the following ways:
- The system log contains the message: “UPS: Battery requires replacement” or “UPS: Low battery condition.”
- The SNMP trap reports: “EnvUps Low Battery” or “EnvUps Replace Battery.”
- The LCD panel displays the error: U22 or U23.
- On the back of the controller tray, the Service Action Required LED is a steady amber. The Battery Status LED might be a blinking green, indicating that the battery is charging. The charging state becomes more frequent as the battery power decreases.
- Poor RX/TX optical signal strength might result in degraded performance. (6207069)
Workaround: If there are no other critical hardware errors and you see significant performance degradation, this degradation could be related to Fibre Channel link errors. Contact Sun Services for assistance. See Service Contact Information.
Web Administrator Issues
- The Forward and Back buttons of the web browser do not operate on the pages of the online Help. (6487868)
Workaround: Use the table of contents in the left panel of the browser to navigate to specific pages.
- When extending a file volume, you cannot display the Extend Volumes panel by right-clicking on the file volume in the System Manager tab. To display the panel, use the Navigator tab, choose File Volume Operations > Extend Volume. Then select the volume from the Existing Volumes box. (6723373)
- The Status column on the Drive Properties page now includes the status of “Bypass.” This indicates that the firmware is unable to read the drive’s properties. Other properties are blank or show a value of 0. (6728211, 6729286)
Workaround: Replace the drive.
- The key combination for launching the New LUN dialog has changed. In previous versions, the combination was Alt+L. The current combination is Alt+N. (6586683, 6721781)
- When using the Web Administrator to delete multiple IP addresses at the same time for a port aggregation bond, the result can be the error message: "Configure NIC failed - Invalid IP Aliases." (6482862)
Workaround: Either use the Web Administrator to remove the IP addresses in LIFO order (last in, first out) or use the CLI to remove the IP addresses.
- The administrator console and the Web Administrator are not consistent in how they accept space characters in the administrator password. (6502582)
Workaround: Do not use spaces in the administrator password.
- During LUN initialization, the View LUN Information panel might not show the proper LUN status. (6378027)
Workaround: Refresh the panel, or wait until LUN initialization is complete.
- Some volumes might remain unmounted if the disk detach command fails due to the existence of compliant volumes.
Workaround: Manually mount all unmounted volumes.
- The Add Quota window overwrites any existing quota settings without providing a warning. (6438298)
Workaround: Verify the new settings before submitting the update.
- Creating two LUNs with volumes creates the LUNs and volumes successfully, but does not populate the Create File Volume screen and the View File Volume screen with the volume data from the second LUN. However, the Edit Volume Properties, Delete File Volumes, and Attach Segments screens do contain the data from both volumes. (6425260)
Workaround: Perform a Scan for New Disks to populate the screens with the complete data.
- In a CIFS shared directory on a NAS appliance in Workgroup/Secure Share mode, files that are copied, deleted, or renamed are not updated. (6432492)
Workaround: Use the F5 key to refresh the view on the Windows client.
- In-band RAID management (IBRM) does not prevent the deletion of a LUN in a Volume Group while that Volume Group is being rebuilt. (6443672)
Workaround: Do not delete LUNs in a Volume Group while that volume group is being rebuilt.
- Moving files using drag and drop can cause the Microsoft Windows Explorer to hang for a few minutes if the directory has a Korean name from a Windows XP client. (6441365)
Workaround: Wait a few minutes for the move to complete.
- The In-Band RAID Management (IBRM) screen might display phantom tray instances with ID 0. (6396234 / 6398799)
Workaround: These instances can be ignored safely. To update the display, perform a recovery process.
- When configuring a bond by selecting Networking Configuration > Configure Network Adapters, you can add the IP address only to bottom of the list, even if there is a blank field at the top of the list. (6401617)
Workaround: To control the order of the list, you must delete all the IP addresses and add them in the order you want. As an alternative, use the CLI to configure the bond.
- The Web Administrator’s Manage RAID screen cannot be used to change a LUN from offline to online. (6331263)
Workaround: The change requires a service call. See Service Contact Information.
- SCSI errors might occur during writing to direct-attached SCSI LTO3 tape drives. (6347059)
Workaround: Use the on-board Fibre Channel / SCSI bridge on the robot to connect to a Fibre Channel port on the NAS appliance or gateway system.
- When LUN creation requires several minutes to complete, the Web Administrator might provide ambiguous information. (6273163 / 6273171 / 6276198)
Workaround: Close the Web Administrator and browser. Open a new browser and restart the Web Administrator.
- Upgrading firmware using In-Band RAID Management (IBRM) might cause all LUNs on the Sun StorEdge 6130 array to fail over to a single RAID controller. (6283300)
Workaround: Place the LUNS on the primary path.
- The Notification Email URL field shows the hostname but when you click on it, you do not connect to the Web Administrator. (6217684)
Workaround: If the name server does not resolve the hostname, use the IP address to connect. To prevent this condition, verify that the host name entered for notification is registered in a name server (for example, DNS or Network Information System).
- After you delete a bond, the IP address for a High Availability and Port aggregation bond is not restored properly. (6212483)
Workaround: Select a different IP address for the bond.
- When you select Configure NFS > Setup Hosts > Add User, the changed information does not display and the system appears to stop working. (5054655)
Workaround: If the NIS or NIS+ database has many mappings, you must wait for the system to finish processing. Do not reboot your system.
Microsoft Windows Issues
- An attempt to map a share fails with the following error: “Unable to get Unix credentials.” (6721315) This condition occurs due to a combination of a limitation in the NAS OS’s authentication level and the length of the security identifier (SID).
Workaround: On the Windows system, change the Domain Controller Security Policy and the Domain Security Policy to allow anonymous SID/Name translation. Navigate to Administrative Tools > Domain Controller Security Policy > Local Policies > Security Options and Administrative Tools > Domain Security Policy > Local Policies > Security Options. In both locations under Network Access, clear the checkboxes to remove restrictions.
- If a change from workgroup mode to domain mode is done using an invalid password or insufficient permissions, the join operations fail although the security mode indicates the NT Domain. (6503245)
Workaround: Enter the correct information and when prompted to reboot, reboot the system manually.
- Windows Vista cannot navigate to target links under DFS root. (6628071)
- When the Sun StorageTek NAS device is in user level workgroup mode, a Windows client in Workgroup mode cannot map user’s share even when supplying correct credentials. (6628132) This is because the Sun StorageTek NAS OS does not support the Windows default authentication level.
Workaround: On the Windows client, set LM compatibility to a level below 3.
- Differences have been observed among Windows versions in access control of files and folders when the Windows client and server are in workgroup mode. When you try to add local users or groups from the Sun StorageTek NAS appliance to the access control list (ACL) of files or folders in the Ultimate and Business releases of Microsoft Vista, the local users or groups are not displayed for selection. (6637985) There is no workaround.
Distributed File System (DFS) Issues
- When DFS is enabled on any Windows client, the client is unable to get access to the storage server through an intermediate link. (6626924)
Workaround: Avoid more than a single referral. Point the first referral to the storage server rather than to another DFS share.
- Any link added from the CLI is not handled properly. (6637651) The syntax for the command to create a link to a DFS share is:
ln -s \\server\share\path /dfsvol/referral
However, in the Sun StorageTek NAS’s CLI, the leading double backslash is not handled properly.
Workaround: When creating a DFS link from the NAS CLI, use a single backslash character.
- When DFS is enabled on Windows 2000 clients, the client is unable to map a share. (6618545)
Workaround: Use the UNC pathname to get access to a DFS share.
- The DFS namespace is limited to 18000 links. The DFS administrator tool has a limited display of the links. (6613994) The number of links from a DFS client is limited to 4500. (6645411)
rsync Issues
- When using both rsync and NDMP, if you issue one command while the other operation is still running, both operations succeed but performance is poor. (6557706)
Workaround: Avoid performing an rsync operation on a volume during a backup operation of that volume. Wait until the first operation is complete before issuing the second command.
- In a cluster configuration, if an ssh client is connected to a head that fails over to the second head, the rsync operation is interrupted because the ssh client does not recognize the second head.
Workaround: Establish a new ssh connection to the second head, now in the ALONE state. (6556518)
- Because rsync uses ssh, a problem with ssh is observed when you use rsync. If the NAS appliance does not require a password, an rsync operation displays a prompt for one. (6557009)
Workaround: Enter any text at the prompt and the rsync operation continues.
NDMP Issues
- Backup operations to the NAS appliance from a Sun StorEdge Enterprise Backup Software (EBS) system can fail because there is a mismatch between how EBS and NDMP assign numbers to the drives. (6687198)
Workaround: Run EBS’s jbconfig utility and change the drive numbers to match the inquiry output.
- In some cases, multiple device files are created for each physical SCSI device. This causes very slow performance. (6377691) Use the ndmp devices command to list all the devices. If extraneous device files are listed, you can define an environment variable to prevent them. However, this variable is only helpful in this particular situation. Some tape drives and libraries work without setting this variable and in those cases the variable must not be set.
Workaround: Use the following procedure to set the environment variable:
a. At the command line, type the following commands:
set scsi.mpt1.scan ex:0.0-256:in:0.0-7
savevars
b. Reboot the NAS server.
- When restoring files, the status of the operation is recorded in the syslog. This file is restricted to 233 characters. If the locations of files have a long path, the status messages are truncated. The files are restored successfully. (6722909)
- The error "checkpoint database error" indicates that the file system is full, and not a problem with the checkpoint itself. (6721297) When a volume with checkpoints is at 100% and has no available space, the next attempt to modify a checkpointed block fails and generates the error.
- An attempt to mirror a renamed volume onto another NAS server of a cluster fails. (6723972) This is because, although the volume is renamed, the volume identifier does not change. The system recognizes the renamed volume and fails the attempt properly.
Workaround: To avoid the failure, either remove the existing nbd volume or promote it before attempting to mirror the renamed volume.
- Tape libraries and drives connect to the Sun StorageTek 5310 through its Adaptec controller. The Adaptec driver reports errors for some types of drives when Enable Disconnect is set to YES, its default setting. A frequent error is "aic0 resource shortage or qfrozen." (6235719)
Workaround: Use the following procedure to disable the disconnect:
a. Identify the Adaptec drivers:
ndmp devices
b. Disconnect the drivers, using the following command for each device:
aic adapter-num target-num disconnect disable
c. List the status of the devices:
show *aic*
- When using Veritas NetBackup and one of the Sun StorageTek Virtual Tape Library products with the Sun StorageTek NAS devices, the NetBackup software reports error messages indicating that it does not recognize the Sun StorageTek NAS device as an NDMP device. (6593317)
Workaround: Upgrade NetBackup to the most recent version. However, release 6.5 of NetBackup uses a device mapping file that does not include support for Sun StorageTek Virtual Tape Library. In that case, use the device mapping file at this location: http://seer.entsupport.symantec.com/docs/289062.htm.
- Importing a NetBackup image fails due to a difference in the way Sun Microsystems and Symantec have implemented NDMP. (6612128)
- For information about changes needed when upgrading to Version 4 of NDMP, see Upgrading to NDMP V4.
- NDMP V2 is not supported, but an attempt to backup a system that uses the V2 protocol is not prevented and will cause an error. (6528317)
- When you replicate a volume, the resulting volume is identified with the type “nbd.” This type of volume does not have a checkpoint and therefore attempts to back up the data fail. (6563888)
Workaround: Create a checkpoint for the file system manually, using the following procedure:
1. On the replicated volume, create a checkpoint, for example, test.
2. On the mirror system, verify the checkpoint using the ls command:
ls /volume_name.chkpnt/test
3. From the DMA, edit the default path to specify the complete checkpoint path, that is, from the volume name to /volume_name.chkpnt/test.
4. Back up the replicated volume.
- In a cluster system, do not attach both NAS heads to the same tape drive because if one head fails during a backup, data on the media can be lost. (6527152)
Antivirus Issues
- The NAS OS supports scan engines of several vendors. Each vendor determines the maximum file size it can scan. See the vendor documentation to determine the maximum size. A common maximum size is 2 GB. (6504741)
- The Computer Associates scan engine, Integrated Threat Management (formerly eTrust) does not scan Microsoft Office files. (6645605)
Workaround: Install the most recent version of the scan engine, at least version 7.3.0.12. Refer to Computer Associates Service Center for your location: http://www.ca.com/worldwide/
- On a CIFS share on the NAS device, the Computer Associates eTrust scan engine does not scan a streamed file (6590048).
- The Trend Micro scan engine reports a file larger than 2GB incorrectly as corrupted. (6505262)
Workaround: In the Antivirus Configuration panel, set the Max Scan Size to a value less than or equal to 2GB.
Array Firmware Issues
- On a Sun StorageTek NAS 5310 appliance that has an expansion unit in location B containing trays with tray IDs that have two digits, the Web Administrator reports the expansion unit as unknown. The array firmware uses the tray ID to report status but requires a single digit. (6582567)
Workaround: Use single digits for the tray IDs.
- The communication between the LUN path and the Controller fails. (6504220)
Workaround: Reset the controller and the NAS 5320 C appliance.
- The over temperature alarm on a 6140 array does not turn on the tray fault amber LED. (6490889)
Workaround: Check the NAS system log file for messages that indicate over temperature.
- MPP is able to reconcile only two out of the four LUNs when four initiators are assigned to two hosts on the same array. (6503637)
Workaround:
- Assign all four initiators to one host.
- Assign different LUN numbers to the volumes from each host.
- Assign both hosts to a host group and then map the volumes to that host group.
- You might receive an incorrect email message stating that a critical error has been logged for a full file system. (6517078)
Workaround: Verify that the file system is not full.
- Removing multiple hot spare drives from a tray and reinserting them can result in a drive having its LUN remain in a degraded state. (6502481)
Workaround: Remove hot spare drives and replace failed drives one at a time.
Cluster Issues
- When Dynamic DNS is enabled, both servers in the cluster configuration show the same DNS settings and each one is updated when a change is made. However, the Forward and Reverse Lookup zones are not updated properly. The lookup zones include only the name of the NAS server on which the DNS was enabled and do not include the name of the partner server. (6709459)
Workaround: To ensure that the lookup zones are the same, you must perform a manual update. From the navigation panel, choose Network Configuration >Configure TCP/IP > Set Up DNS and click on Apply to save the changes.
- When you issue the netserv command in a cluster configuration, both servers perform the command, enabling or disabling network services. However, the partner server is not performing the command. (6727727)
Workaround: Issue the netserv command on each server in the gateway cluster configuration.
- When a Sun StorageTek NAS cluster device begins a failover or failback process, any Volume Shadow Copy Service (VSS) in progress at the time of the failover/failback does not complete successfully. (6629545) During the snapshot process, VSS requires that the LUN on the NAS device be exposed to update some information on the volume(s) and during copy operations. If a failover or failback happens before VSS hides the LUN, the snapshot fails.
Workaround: Restart the procedure.
- When you assign a LUN to a server in a gateway cluster configuration, you must manually scan the disk on both servers to pick up the new LUN. Otherwise, the new LUN on the current server is not recognized by the partner server and the mismatch can cause the partner server to reboot. (6577612)
Use the following procedure when adding a LUN in a gateway cluster:
1. On the current server, use the Web Administrator to navigate to Volume Operations > Create File Volumes and then click Scan for New Disks.
2. On the current server, navigate to High Availability > Recover and assign the LUN ownership to the desired server and click Apply.
3. On the partner server, navigate to Volume Operations > Create File Volumes and then click Scan for New Disks.
4. On the current server, navigate to High Availability > Recover and then click Restore to move the LUN to the server that owns the LUN.
- The Web Administrator supports multiple logins at a time. However, multiple logins from the Web Administrator and administrator console is not supported. In a cluster configuration, you must log in to each server separately to manage that server.
- Cluster recovery fails when a LUN is offline and a server is in the ALONE state, causing both servers to have incorrect LUN information. (6480807)
Workaround: Reboot the ALONE server a second time and then repeat the recovery.
- After reassigning a primary slave NIC on Head 1, an HA bond goes into failover mode on Head 2, resulting in an inability to connect to Head 1 using either the Web Administrator or the administrator console. (6485209)
Workaround: Log in to the system console and recover the bond on Head 2. Reassign the primary slave on Head 1 and recover the bond on Head 2.
- Using the Web Administrator to change the Down and Restore Timeout value will update the partner server but not the current server. (6497601)
Workaround: Use the administrator console to modify the value.
- When a server is in the ALONE state, it is possible to create an HA/PA bond. It is not possible to delete a bond. (6508824)
Workaround: Do not modify bonds while the server is in the ALONE state. Creating or deleting bonds in the ALONE state causes inconsistencies.
- If both Fibre Channel (FC) cables are pulled on Server 2 and then restored, a volume might not be mounted. (6435436)
Workaround: Mount the volume manually.
- The reboot command restarts both servers in a cluster configuration. It is not possible to use the command to reboot one server. (6389192)
Workaround: To reboot one server in a cluster, use the LCD menu or the administrator console. You can use the LCD menu, the administrator console, or the reboot command to reboot both servers.
- If the configuration wizard was used to set up the cluster and failover was enabled on only one server, you cannot enable failover on the partner server. (6387567)
Workaround: Use the Web Administrator to log into the partner server and enable failover.
- If the QUIET server experienced system problems during recovery, some of its volumes might fail to mount on the ALONE server. (6214772)
Workaround: Use the following command to mount a volume:
mount -f /volume-name
- A server can modify file permissions only on file systems owned by that server and not on those owned by the partner server. (6262339/6222886)
Sun StorageTek File Replicator Issues
The following replicator-specific issues are not resolved at this time. Change Request numbers are in parentheses.
- It is not possible to change the target system of a mirror link after it is established. If the target system does not exist, the link status is reported as “Link is down.” (6734812)
Workaround: Break all the existing mirrors to the incorrect target system and re-establish them with the correct information.
- If a volume name contains special characters, some operations cannot be performed from the administrator console. (6727124)
Workaround: Rename the volume without special characters.
- The View Mirror Statistics panel has a “Completed (MB)” value. This value changes while a replication is in progress. When the replication is completed and the mirror volume reaches the state of In Sync and the system is rebooted, this column displays the value of 0 MB properly. (6726758)
- The NAS server might panic while creating a bonded interface if the server is using Dynamic DNS and there is an expired Kerberos ticket in the the internal credential cache. (6751421)
Workaround: Before you create a bond, save the Dynamic DNS configuration to ensure that all Kerberos credentials are valid and current. Use either of the following methods to re-save the configuration and refresh the credentials:
- In the Web Administrator, navigate to Network Configuration > Configure TCP/IP > Set Up DNS. Click Apply.
- In the administrator console, go to the DNS & SYSLOG menu. Select 7.
- The Promote With Rename function does not rename both volumes and shares. Although the volume is renamed, the share on the mirror remains pointing to a volume with the original name. (6490007)
Workaround: Remove the share and create a new share that points to the volume with the changed name.
- Removing a Sun StorageTek File Replicator license and reinstalling it might cause problems in reestablishing a new sync. (6507058)
Workaround: After reinstalling the license, reboot the system.
- When configuring a network card, you are not prevented from entering a zero (“0”) in the first segment of the IP address, resulting in an invalid address. (6424098)
Workaround: Do not enter a zero (“0”) in the first segment. The address must be valid.
- After a refresh of the display, the View Mirror Statistics panel might not display mirrored volumes. (6438307)
Workaround: In the left-side Navigator Tree of the Web Administrator, select another node. Then select the node displayed previously. If the mirrored volumes are still not displayed, log out of Web Administrator and close the browser. Open a new browser window, restart the Web Administrator, and log in again.
- More than 52 volumes cannot be displayed in the administrator console’s Add Mirror menu so you cannot add more mirrored volumes. (6441717)
Workaround: Use the Web Administrator to create more mirrors.
- After renaming a volume, operations such as change role or break/promote from the target fails. (6437381)
Workaround: Unmount the volume and then remount it.
- An attempt to promote a volume created with multiple segments in a mirror after the mirror is broken fails. (6437381)
Workaround: Avoid this problem by unmounting and remounting the volume after renaming or attaching segments. The volume can be replicated after it has been remounted. Alternatively, the head can be rebooted instead of unmounting/remounting the volume. The target system (mirror) is not affected and does not need to be rebooted.
- If there is a system failure such as a power failure within 10 seconds of the start of a change role process, both systems might be set as the TARGET and there will be no MASTER, causing loss of the mirror. (6198655)
Workaround: Contact Sun Technical Support for help in establishing your mirror.
- If you do a Change Role operation while there is heavy I/O activity on the master volume, the master might time out and you might lose CIFS access to the volume. (6248243)
Workaround: Unmount the volume and then remount it.
- The RESYNC option is not available in the Web Administrator. (6198789)
Workaround: Use the administrator console.
iSCSI-Specific Issues
The following iSCSI-specific issues are not resolved at this time.
- When creating an iSCSI LUN, the system displays warnings and errors even though the LUN is created successfully. (6696038) During the creation process, the existing size is being compared to the configured size until it matches the configured size. The messages are intended to show the progress of the LUN creation.
- When creating an iSCSI LUN, you can specify the maximum size of 2 TB but the server displays the error "Not enough space in volume." (6511473)
Workaround: Because the file system requires space for the metadata about the LUN, the LUN cannot be allowed to reserve the entire maximum space. Although the size check is functioning as designed and the result is the successful use of 2 TB of space, it is not possible to define a LUN with the size of 2 TB. To prevent errors, configure a LUN with a size smaller than 1992 GB.
- An iSCSI login might result in a rejection due to too many connections. (6444187)
Workaround: An iSCSI session supports four simultaneous connections to the NAS appliance or gateway system. Wait approximately a minute for old sessions to time out and log in again.
- Execution of an I/O operation with DataDigest Enabled results in DataDigest errors from Solaris clients. This is due to the zero copy implementation of the Solaris iSCSI initiator. (6446747)
Workaround: Do not use Data Digest with Solaris clients. If Data Digest is needed, use an iSCSI HBA implementation.
Documentation Issues
The following issues have been identified in the online Help and the Administration Guide:
- When adding a new LUN to a Sun StorageTek 5210 NAS appliance, the online Help for the Add LUN wizard displays drives labeled 4.21 instead of the most recent version. (6723373)
- The Manage Mirrors panel has a column that shows the Sync Status of a volume. The status Switch is displayed while the role is changing. (6725823)
- The description of file volumes with the type RAW is not correct. The Create File Volumes/Segment panel states that the limit for raw volumes is one for each LUN. However, the limit is one for each NAS server. Also, the minimum size for a raw volume is not stated. The minimum size for a raw partition is 4 GB. (6543882)
- The description of the System Status panel does not include two fields for the two NAS servers that are included in cluster configurations: Head Status and Partner Status. These fields are described in the “Viewing System Status” topic. The stable states for each of these fields include NORMAL, ALONE, and QUIET. In addition, the fields display the transient states of the servers. A server that is rebooting has the status OFFLINE. During the process, the other NAS server has the status of TRANSITION. (6508140)
- The restrictions on the names of host groups are the following: The name must begin with a letter of the alphabet (a-z, A-Z), and can include up to 80 characters, but must not use a space character or quote characters. (6528132, 6615674) The restriction on the names of hosts continue to be that the name must begin with a letter of the alphabet (a-z, A-Z), and can include up to 80 alphanumeric characters: a-z, A-Z, 0-9, hyphens (-), and periods (.), but must not end with a hyphen or period character.
- The description in the “Breaking the Connection and Promoting a Mirrored File Volume” topic does not include the following restriction: A compliance volume cannot be promoted. (6334823)
- The instructions for creating a new LUN do not state that the existing LUNs in the volume group that will contain the new LUN must all be in the online state to make use of available free space. If any volume in the volume group is in a rebuild, copyback, or critical state, removing that volume does not release the space for the new LUN. (6733280)
- The “About Port Bonding” and “About Port Aggregation Bonds” topics are not correct. They state that the port aggregation protocol, 802.3ad (LACP), is supported; however, only the EtherChannel protocol is supported. Also, these sections do not explain how traffic is balanced in the port bond. The only load balancing policy that the NAS OS can support is the destination-xor algorithm so that the traffic for a particular client always uses the same port. (6727233)
- The definition of the Recover button on the Bond NIC Ports Panel is incomplete. (6537456) The Recover function operates only on High Availability port bonds defined for a cluster configuration. This function does not provide a failover service for NIC ports on single NAS server.
- The procedure for “Configuring Name Services” contains typographical errors in Steps 3, 4, and 5. These steps contain the word “lock-up” instead of the proper word, “lookup.”
- The description of file checkpoints states that there is no maximum number of checkpoints that you can schedule. (6230070) For a specific volume, the number of checkpoints is limited to five.
- The description of a mirror bond does not state that to create a bond between mirror ports, you first create the bond and then change the role of the bond. (6610864) Use the following procedure to create a mirror bond:
a. From the navigation panel, choose Network Configuration > Bond NIC Ports.
b. Create the bond.
c. From the navigation panel, click File Replicator > Manage Mirrors.
d. Change the role of the bond from Primary to Mirror.
- In the Getting Started Guide (819-4283-11), on page 67, is the following text: “To connect a controller unit and two expansion units, four 2-meter...”
Correction: This sentence refers to a controller enclosure, not a controller unit.
- In the Getting Started Guide (819-4283-11), on page 131, the sentence starting “The two scripts...” is duplicated.
Correction: The sentence that has the linked URL is correct.
- In the Getting Started Guide (819-4283-11), on page 131, a step in the procedure is not formatted properly.
Correction:
- Step 5 should have this example:
# Smcli IP_address_controller_B -f CtrlBModRegion12
- Step 6 should be "Reset controller A"
- The command example for Step 6 is:
# Smcli IP_address_controller_A -c...
similar to the command example in Step 7.
Addenda to the Documentation
This section includes information that is additional to or overrides information in the documentation. It contains the following topics:
Deleting a LUN
To delete a LUN, you must first remove the data and file systems on the LUN, then remove the partitions, and then unmap the LUN. (6691582)
|
|
Caution - In a cluster configuration, if a LUN is unmapped from a NAS gateway cluster without removing its partitions, the NAS server cannot be recovered after a reboot.
|
1. Verify both servers of the cluster are in the NORMAL state.
2. Remove all data and file systems from the LUN.
3. In the administrator console, type disk to display a list of disks.
4. For each disk, type disk xxxx stat where xxxx is the name of the disk. This command displays the attributes of each partition in the disk, as shown in the following example for the disk, isp3d000:
disk isp3d000 stat
# START SEC SIZE SEC  TYPE    OWNER
- --------- --------- ------- ----------
1       240  31457280 nbd     /mirror4
2 209715440  12288000 raw     <raw>
3 222003440   2048000 sfs2    /bh1
4 224051440  10240000 sfs2    /bh2
5 234291440  20475904 sfs2    /extseg
6 254767344      2048 free
5. Detach the partitions using the following command:
disk xxxx detach
6. Verify the LUN has detached by repeating the disk command. The LUNs now have the Type “free.”
7. Unmap each LUN on the array.
About Workgroup Security
In previous releases, Sun StorageTek NAS appliances in a Windows environment had one of two security modes: Domain or Workgroup/Secure Share. In this release, a third mode called User Level Workgroup allows the appliances to authenticate users. To create this access, a Windows password database is now included in the software, located in /dvol/etc/smbpasswd.
To add a user, use the administrator console and navigate to Configuration > Users to create the account and password. For an existing user account, reset the password using the same password if desired, so that the password is recorded in the password database and the user account can be authenticated.
The User Level Workgroup access supports the autohome feature and user groups. When adding users or groups to the access control list (ACL) of Windows files or folders, use the Windows client to display the list of users or groups from the NAS appliance and then select the users or groups to add them to the ACL.
| Note - The Sun StorageTek NAS OS supports NTLM/LM authentication but does not support NTLMv2/LMv2 authentication. This means that the NAS OS does not support LM Compatibility levels of 3 or greater and reports an authentication error. Set the Windows client’s LM Compatibility level to a value below 3.
|
About Distributed File System (DFS) Support
Distributed File Systems (DFS) allows administrators to group shared folders located on different servers by connecting within a DFS namespace. A DFS namespace becomes a virtual view the shared folders, a map of all the locations of folders. The starting point of the DFS namespace is the root, which has links to its targets, which themselves have links to targets. The targets are the shared folders on various servers. To users, the files in the folders appear to reside on a single, high-capacity disk and they can navigate through the folders without needing to know the actual location.
This release supports the stand-alone DFS namespace, meaning that the configuration information is stored locally in the registry of the root server.
- The Sun StorageTek NAS appliances can be a DFS root. When a client attempts to access a root or link in the stand-alone namespace, the appliance, as the namespace’s root, provides the list of targets to the client.
- The Sun StorageTek NAS appliance can be a DFS target, a member of the list of targets maintained by the DFS root.
- The NAS appliance is recognized as a Windows NT 4.0 client.
To configure the Sun StorageTek NAS appliance as part of a DFS stand-alone namespace, click on the Enable DFS checkbox when you create the share or when you edit the properties of an existing share on a volume.
To configure a volume to be a target in a DFS namespace, use Microsoft Windows DFS tools. On a Windows system, navigate to Administrative Tools > Distributed File System. Any share on a NAS server can be a DFS target.
About Volume Shadow Copy (VSS)
Microsoft’s Volume Shadow Copy service and transport coordinates point-in-time copies of data between file-based storage (NAS) devices and block-based storage (fiber-channel networks). It creates a framework within which components such as data applications, backup applications, and storage hardware can communicate.
The point-in-time copy or shadow copy is also called a snapshot or a checkpoint. The Sun StorageTek NAS appliance acts as a provider for the VSS framework, creating and storing iSCSI checkpoints.
To support the Volume Shadow Copy service, the Sun StorageTek NAS appliance communicates with a DLL installed on the Windows client.
| Note - The DLL for the Volume Copy Shadow Service on Windows clients is supported only on Windows 2003 Server.
|
- Using the Volume Shadow Copy Service
1. Download the VSS provider package, vssNAS5xxxProvider2.msi, from the Sun Download Center.
2. Install the VSS provider on the Windows 2003 system.
3. From the Windows Service Manager, start the Sun StorageTek 5xxx provider service and start the VSS service.
4. Start the backup application.
5. Run the backup job.
The snapshot process starts and creates a snapshot in the checkpoint directory on the Sun StorageTek NAS devices.
Updating Antivirus Support
The current release supports Computer Associates, Inc. Integrated Threat Management V8 and V8.1, formerly named eTrust. These products are certified with the current NAS OS using its default setting, RepairInfectedFiles=0 in the ICAP server configuration file. This value indicates that infected files are quarantined but not repaired.
Installing the Storage Management Initiative - Specification (SMI-S) Provider
With the Sun StorageTek 5x10 NAS Provider software, Sun StorageTek NAS appliances comply with the SMI specification. Administrators use SMI-S compliant clients to manage many Sun StorageTek NAS appliances through a J WEBM server acting as proxy. The provider software supports Sun StorageTek NAS OS versions 4.21 and 4.22.
1. Download the Sun StorageTek 5x10 NAS Provider package, SUNW5x10p8.zip, from the Sun Download Center to a Solaris host,
2. Install J WEBM server and configure it to use a port other than 5988. The installation script checks for dependencies and installs the following CIMOM run-time files:
- WSIjapi: WBEM Solutions Java APIs
- WSIwslib: WBEM Solutions shared libraries
- WSIutils: WBEM Solutions common utilities
- WSIjwsrlog: J WBEM Server Reliable Log Repository
- WSIjws: WBEM Solutions J WBEM Server
- WSInpi: WBEM Solutions J WBEM Server Native Provider Interface
- WSIrmicpa: J WBEM Server RMI Client Protocol Adapter
- WSIjwsdoc: WBEM Solutions J WBEM Server documentation
- WSIjwsmof: WBEM Solutions J WBEM Server MOF files
- WSImof: WBEM Solutions DMTF MOF files
3. Copy SUNW5x10p8.zip to the same system and unzip the contents to a directory.
4. Go to the directory and run the following command to install the provider:
pkgadd -d path
where path is the full pathname of the directory.
By default, the package is installed in the /opt/SUNW5x10p/bin location.
5. Go to /opt/SUNW5x10p/bin and run the setup file.
6. At the prompt for port number, enter the port number where the J WEBM server is running.
7. Edit the /var/log/nasprovider/nashost.conf file and provide values for the Sun StorageTek NAS appliance. For each appliance, add its IP address, its administrator password, and its model type. The following example shows an entry for a Sun StorageTek 5320 NAS appliance:
# This is the configuration file for StorEdge 5x10 NAS Provider.
# Each entry contains three parts: ipaddress<tab>adminpassword<tab>model
#
#ip:
#password:
#model:
#Example:
ip:	10.12.178.113
password:	nas
model:	5320
8. Connect from any CIM client to get the NAS information.
Improvements to Volume Management
In previous releases, extending a volume that exceeded 256 GB required the storage administrator to create a new segment for the volume and then attach the segment to the volume. In this release, extending a volume expands the size of a file volume in one operation: the partition is initialized, the segment is created, and the segment is attached. A new page, Extend Volumes, has been added to the Web Administrator.
Enhancements to Web Administrator
The Web Administrator has modified to improve navigation, search, and sorting. Because of the new segment enhancements, a new page has been added: Extend Volume. Other new pages are Search Volumes, and Drive Properties.
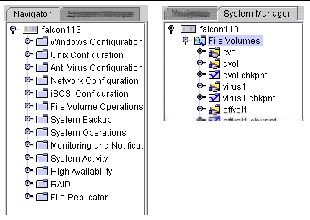
Navigation Panel
In this release, the navigation panel has been split into two tabs, Navigator and System Manager, shown in the following figure. Administrators use the Navigator tab to get access to all configuration, setup, and administrative functions and use the System Manager tab to see or search for all volumes.
FIGURE 0-1 Navigation Tab and System Manager Tab
Searching for Volumes
A popup menu and a new Search Volumes page have been added.
To search for a volume, navigate to System Manager tab > File Volumes and right-click to display the popup menu. Click on Search Volume to open the Search Volumes window. Enter a partial name and select the Search button to see a list of all volumes with matching names. Select the volume and click Apply.
Sorting Tables
Storage components are displayed in tables that can become long. To change the order of the display, the Web Administrator now provides sorting from the column heading instead of from separate arrows. The sorting mechanism now uses a standard method so it is more reliable.
About the McAfee Secure Internet Gateway
You can use a McAfee Secure Internet Gateway 3000, 3100, 3200, and 3300 appliance or the McAfee Secure Web Gateway 3400 appliance that runs a minimum of SCM Version 4.21 Patch 5, to scan files stored on the Sun StorageTek NAS device. The McAfee appliance works in the same way as the other supported scan engine software products, as described in the online Help and in Chapter 4 of the Sun StorageTek NAS OS Administration Guide (819-4284-nn).
To perform the antivirus scans, configure the McAfee appliance with the following attributes:
- Verify that the McAfee appliance is running the minimum supported software, Version 4.21 Patch 5. If not, you can obtain it from the McAfee SCM Support page.
- Change the Response Modification Service Settings service path to /avscan from its default path of /RESPMOD.
- For efficient performance, change the value for the ICAP Policy Protocol’s Transfer-Complete attribute to the * character, if it is not already set.
About the rsync Protocol
The rsync protocol transfers new files and changes to existing files between a Sun StorageTek 5000 NAS system and a remote system. Use rsync for purposes that require more efficiency than the ftp protocol and more control than the rcp protocol, but do not require a real-time replication solution such as the Sun StorageTek File Replicator option. It is most efficient when the file exists on both systems and only changes are transferred.
Restrictions on rsync
The implementation of the rsync protocol in this release has the following limitations (6544680):
- The connection between the NAS system and the other location must use ssh. A direct connection is not secure and cannot be supported.
- The protocol is supported in server mode only. This means that the remote system initiates the transfer, either by sending file system objects to the NAS head or by copying file system objects from the NAS head.
- The rsync protocol’s daemon mode is not supported.
- The ACLs of file system objects or any extended attributes are not saved.
- The admin user is the only user who can log in and perform operations.
Configuring rsync
The rsync feature is disabled by default. To use the feature at any time, issue the following command before using the rsync command:
load rsync
To enable the rsync feature, edit the inetload.ncf file to load rsync each time the NAS system reboots, using the following procedure:
1. Edit the inetload.ncf file, located in the /dvol/etc directory.
2. At the end of the file, add a comment and the command:
# The rsync module provides remote copy of incremental file changes.
# YYYY:MM:DD
rsync
3. Save and close the file.
4. Issue the following commands to use the new version of the inetload.ncf file:
> unload inetload
> load inetload
The rsync protocol is now enabled in the current session and is enabled after a system reboot.
Using rsync
This release supports the rsync protocol in server mode. This means that from the system where you are logged in, you can copy file system objects from your system to the NAS head or you can copy file system objects from the NAS head to your system. The rysnc process copies the following:
- If the file does not exist at the destination, it copies the file.
- If the file exists at the destination, it copies the changes to the file.
The rsync command uses the system’s ssh client to transfer the files.
1. Log in to a network system. This example uses a Windows system.
2. Click Start > Run from your Windows desktop.
3. In the Run window, type cmd and click OK.
4. Enter the rsync command, using the following syntax:
>rsync [OPTIONS] source_location destination_location
where both source_location and destination_location are the current directory or one specified in the format: [USER@]hostname:directory_name. The hostname is the IP address or DNS name, the single colon specifies that the transfer uses the ssh client, and the directory_name is the path.
For example, to copy changes to files in the current directory on the system you are logged into (local) to the NAS appliance in your network (remote_nas) in its Monday directory, use the following command:
rsync [OPTIONS] * remote_nas:Monday
To retrieve files that might have changed from the NAS appliance and put them in the local Wednesday directory, use the following command:
rsync [OPTIONS] remote_nas:Monday/* Wednesday/*
To see all the options of the command, use one of the following commands on a network system:
>man rsync
>rsync --help
About Online System Registration and Auto Service Request (ASR)
The online Help and Sun StorageTek NAS OS Administration Guide describe the Online System Registration feature but do not emphasize that, in addition to registering the system, this feature monitors the system and can generate automatic service requests (ASR). This feature notifies the Sun Technical Support Center when events that generate a critical alarm occur.
ASR is available to all customers with current StorageTek Warranty or StorageTek Spectrum Contracts. The service is available from activation until the end of warranty or contract period. The service levels are based on the contract level and response times of the connected devices. The ASR service uses SSL security and your Sun online account credentials to authenticate transactions but does not monitor stored data. The feature collects only the following information:
- Activation event: Static data collected for purpose of registration and entitlement.
- Heartbeat event: Dynamic data collected daily to establish whether a device is capable of connecting.
- Alarm event: Critical events received through the secure transport, triggering Service Requests.
- Alert event: Additional events collected to provide context for existing or imminent cases. Not all events sent to Sun Microsystems open a Service Request. Only critical events that require Sun Service to fix are opened automatically and sent to your local Sun Technical Support Center.
Details and security documentation are available at: http://www.sun.com/service/remoteconnectstorage
Requirements for Online System Registration and ASRs
Each NAS system must be enabled individually and meet the following requirements:
- Sun StorageTek NASOS firmware, version 4.21.M1 and higher.
- A Sun Online Account. This is the same account used for the Sun Download Center (SDLC). To obtain an account, go to: http://javashoplm.sun.com/ECom/docs/Welcome.jsp
- An outbound-only HTTP connection through port 443 using HTTPS (HTP with TLS) to communicate with Sun Services. The connection can be direct or by proxy.
- Ability to resolve Domain Name Service lookups.
Enabling Online Registration and ASRs
You configure the registration using the Web Administrator’s Online Registration Panel. To register the system, log into the Web Administrator and do the following:
1. From the navigation panel, choose System Operations > Online System Registration.
2. Read Sun’s privacy policy and disclaimer. To continue, click the Agree button.
3. If you do not have a Sun Account, click on the here link at the bottom of the dialog. This opens the Sun Online Account Registration portal. Click Register to begin to create the account.
4. If you have a Sun Account, type its ID in the Sun Account ID and enter its password.
5. Click Next to go to the Proxy Server tab.
6. If your site will use a proxy server, enter the name of the proxy server you want Sun Services to use and its port number. If the proxy server uses authentication, enter its user name and its password.
The information for registration is complete. To enable the Auto Service Request feature:
7. Click Next to go to the Options tab.
8. Select both options: Send Heartbeat Data and Send Fault Events. The heartbeat data is a daily check without regard to the type of event. The fault events are sent when a failure is occurring.
9. Read the Purpose statement and click OK to submit the request.
Your site’s contact email account receives a confirmation message that the system has been activated. The Online System Registration dialog identifies the system as Registered.
If you prefer to stop sending heartbeat or fault events to Sun Services, use the same procedure to display the Options tab and clear the checkboxes. The system remains registered but the information is not sent.
Creating a Core Dump File
A serviceability enhancement in version 4.21 was a diagnostic email message that support engineers can use to diagnose and solve problems. For some specific problems, the support engineer might need to perform a core dump analysis, which requires a core file. A core file contains a snapshot of the contents of physical memory when a system crash occurs.
The following procedure configures the NAS server to capture a core dump and save it as a file in a directory on the backend storage. When you complete the procedure, the next system failure or panic saves the core dump data to a raw disk partition and, after the system reboots, then saves the data to a file, leaving the raw disk partition available for any future core dump procedures. For more detail on core dump files and advanced configuration, see document 89129 in the SunSolve Knowledgebase, located on the SunSolve site, http://sunsolve.sun.com.
| Note - Do not perform this procedure unless a support engineer requests a core file.
|
1. To make a raw disk partition of sufficient size to capture the size of physical memory, log into the administrator console and make the following selections:
a. From the Configuration menu, choose Disks & Volumes.
b. Identify a drive with at least 6 GB of available space and that does not already have a raw partition.
c. Type the letter of the drive to select it.
d. Choose 1, Edit.
e. Use the arrow keys to scroll to the desired free space.
f. Select 1, Create.
g. Select 3, Raw.
h. For size, enter 6000.
i. Select 7, Proceed with create.
2. Press the Esc key to display the command line.
3. Identify a directory location to store the core files or create a new one. Do not use /cvol or /dvol flash storage.
4. Enter the following commands:
set kern.dumpdir /volume/path
savevars
where /volume/path is the path to an existing directory to store the core files.
5. If you have a cluster configuration, repeat this procedure for each NAS head in the cluster.
6. If it is possible to create the conditions under which the system panics or an NMI is generated, perform those actions. The system then reboots.
After the system reboots, the core file is saved in the directory you specified, with the filename, vmcore.x.gz, incrementing x for each new core file.
Configuring Quotas With Limits
The following information was not included in the description of the Configure User and Group Quotas Panel: (5058072)
Hard and Soft Limits
A hard limit is the absolute maximum amount of space available to the user or group. When a user’s or group’s storage reaches a soft limit, which is equal to or lower than the hard limit, a grace period of seven days starts in which files can be removed. After the grace period, the user or group cannot write to the volume until the amount of space used is below the soft limit.
The hard limit must be equal to or higher than the soft limit. For disk space, it can be no more than approximately 2 terabytes. For the number of files, the hard limit can be no more than 4 billion files.
The root user and root group do not have hard or soft limits for space or files and cannot have quotas defined.
Collecting Information for Configuration
You configure the Sun StorageTek NAS OS software using the Web Administrator’s Configuration wizard. The following worksheet lists information you can gather before you start the wizard, depending on the type of environment you select: Windows Only, Unix Only or Both. (6250174)
| TABLE 0-1
|
|
For All environments
|
|
|
For Server Name, a string to identify this NAS appliance. Begin with a uppercase or lower case character or number 0-9, can include hyphen, underscore, or period character. Limit is 30 characters.
|
|
|
For Contact, the name of your company, department, or unit.
This string will be included in diagnostic messages.
|
|
|
Network adapters
If your network does not use a Dynamic Host Configuration Protocol (DHCP) server, you must specify a static IP address for each network port:
>Internet Protocol (IP) address
>netmask
>network interface card (NIC) port role
>alias IP address (optional)
|
|
|
Default gateway IP address
|
|
|
For Windows or Both environment
|
|
|
For Domains and Workgroups Active Directory Service (ADS):
Name of this NAS appliance’s domain:
Username and password of a domain user or, if ADS, the Windows 2000 user who is domain administrator.
For ADS Container, the ADS path location of the Windows 2000 administrative user in LDAP distinguished name (DN) notation (common name and organizational unit). Do not include the domain name in the path.
For Site, the site name. Specify if the ADS domain controller is in a different subnet than this NAS appliance.
For Workgroup Name, the name of an existing group
|
|
|
For configuring the NAS appliance as a Windows Internet Naming Service (WINS) client:
IP address of the server for NetBIOS name resolution.
IP address of a server to be contacted if the first WINS server does not respond.
Name of this NAS appliance’s domain
|
|
|
For DNS Server, either the IP address of a new one or
the name of an existing one
Name of the domain that contains this NAS appliance
|
|
|
For UNIX or Both environment
|
|
|
For DNS Server, either the IP address of a new one or
the name of an existing one
Name of the domain that contains this NAS appliance
|
|
|
For Network Information Service (NIS)
Name of the domain the NAS appliance uses for NIS services
Either the IP address of a new NIS server or the name of an existing one.
If you do not know the IP address, you can let the server be acquired.
For NIS+ (name service with added security), configure NIS+ after you complete the wizard.
|
|
|
For LDAP Server:
Name of the domain that contains the LDAP server
Password for the domain server.
IP address of the LDAP server.
If you use a proxy domain, the name of the proxy.
|
|
|
Identify the lookup order of the name services to use for each type:
>user
>group
>netgroups
>hosts.
|
|
|
For All environment
|
|
|
For Email Notification, either the IP address of your SMTP server
or the DNS name of your SMTP server
Up to 4 email addresses to receive notification messages
|
|
|
For a remote log: Either the DNS host name or
the IP address of the system where system log will reside.
For a local log: Full path and filename of the log file.
Specify the number and size of archive files
|
|
|
Specify time, date, and working language
|
|
|
For registering the system for online Sun Service, your Sun Account ID and password.
The ID for an outbound-only HTTP connection through port 443 using HTTPS or
if your network uses a proxy server, the name of the proxy server and its port number. This server might require a username and password also.
|
|
Using a Sun StorageTek Flexline 380
To use the Sun StorageTek NAS 5320 Gateway Appliance with a StorageTek Flexline FLX380 enterprise storage system that has FLA/FLC expansion trays, you must run a script to create a host entry in the NVSRAM for the NAS LUNs. Patch 124128-01 contains the scripts and instructions, available from http://sunsolve.sun.com
Exempting a Host Group from Virus Scans
Using the /dvol/etc/approve file to exempt a host group as documented does not exempt the share from scanning. The correct syntax for exempting a host group in the approve file includes an @ symbol, as in the following:
vscan sharename @hostgroup access=noscan
An alternative is to use the Configure Share function. (6540932)
Configuring Sun StorageTek File Replicator
- Starting with version 4.22, when you upgrade to a new version of the Sun StorageTek NAS OS software, you must upgrade both the master system and the mirror system so that the mirror links can be created. If you upgrade only one system, the mirror links do not restart. Upgrade both systems before attempting to restart the Sun StorageTek NAS appliance.
- It is not possible to mirror volumes of size exactly equal to 1024 MB or 1 GB as stated in the documentation. The minimum size of a mirrored volume is 1046 MB. (6440799)
- Volumes that have greater than 90% utilization cannot be mirrored. The documentation only states that the minimum buffer space that can be defined is 100 MB. In addition to the 100 MB minimum requirement, the mirror buffer cannot be larger than 50% of the available free space. (6440868)
Upgrading to NDMP V4
With this release, the default version of NDMP is V4. The NDMP client is a data management application (DMA) and it must be changed to continue to work with systems running this release:
- Change the DMA to use NDMP V4 so that it can be a client of systems that use either V4 or V3. By setting the DMA to use NDMP V4, the DMA uses the V4 protocol as a client to NAS OS 4.21 systems and can use the V3 protocol as a client to other systems that support only NDMP V3. If the DMA remains set to V3, it can be a client to a system running NAS OS 4.21 but will use the V3 protocol.
- Change the name of the administrator account. The administrator account is now "admin" instead of the name “administrator” used in version 4.20 and previous versions.
- Change the drive paths. The format of the drive paths and the paths themselves have changed. (6517142) To obtain the proper drive paths, run the following command from the command line:
ndmp devices
For example, the format of the drive path for robot and jukeboxes has changed from isp1m001 to the following:
/dev/scsi/changer/0
where 0 is the target ID
The format for the drive path for a tape drive has changed from isp1t001 to the following:
/dev/rmt/0
where 0 is the target ID
- Change the log path. After an upgrade, the log path is reset to the default location, /dvol/etc/backup. Specify the full path to a valid volume used to store intermediate backup data and the permanent log of backup history. The file name remains ndmp.log.
- Any NDMP bitmap files created during a backup operation are deleted automatically. Occasionally, for example, when multiple file volumes are backed up in a single backup job, some NDMP bitmap files, named ndmp.n, might remain. These can be deleted. (6184861)
Using a Sun StorageTek 5320 NAS Expansion Unit With a Sun StorEdge 5300 RAID EU Controller Enclosure
This release of the NAS OS software enables you to configure a new expansion unit as back-end storage for a Sun StorEdge 5310 system that has the Sun StorEdge 5300 RAID EU Controller Enclosure. After a firmware upgrade, the controller enclosure can recognize and manage the new expansion unit. The following table shows which configurations are supported and where the procedures are documented.
TABLE 0-2 Supported Combinations of Controllers and Expansion Units for Sun StorageTek 53xx NAS Systems
|
|
Controller
|
|
Expansion
|
Sun StorEdge 5300 RAID EU Controller Enclosure
|
Sun StorageTek 5320 RAID Controller Unit
|
|
Sun StorEdge 5300 EU Expansion Enclosure
|
Supported for Sun StorEdge 5310 and Sun StorageTek 5320 NAS systems and documented in:
- Sun StorEdge 5310 NAS Appliance and Gateway System Getting Started Guide
- Sun StorageTek 5320 NAS Appliance and Gateway System Getting Started Guide (819-4283-nn)
|
Not supported.
|
|
Sun StorageTek 5320 Expansion Unit
|
Supported in Sun StorEdge 5310 and Sun StorageTek 5320 NAS systems with 4.20.M3 software (minimum) and documented in the release notes for that release and also Sun StorageTek 5320 NAS Appliance and Gateway System Getting Started Guide (819-4283-11)
|
Supported for Sun StorageTek 5320 and documented in Sun StorageTek 5320 NAS Appliance and Gateway System Getting Started Guide (819-4283-11)
|
Using a Sun StorageTek 5320 RAID Controller Unit With a Sun StorEdge 5300 RAID CU Controller Enclosure
This release of the NAS OS software enables you to configure an existing Sun StorageTek 5320 NAS appliance with two types of controllers: a 5320 RAID controller unit and an 5300 RAID controller enclosure. After a firmware upgrade on the appliance, it can recognize both types of controllers and manage them. However, each controller stores data in separate back-end storage independently of the other controller. The advantage of this configuration is to improve I/O throughput but the disadvantage is the storage arrays are independent and do not provide failover protection for each other. This configuration and procedure does not apply to Sun StorageTek 5320 NAS Gateway systems or Sun StorEdge 5310 NAS systems.
To Upgrade Array and Drive Firmware on 5300 and 5320 RAID Controllers
|
Use this procedure to upgrade the array and drive firmware to run a Sun StorageTek 5320 NAS appliance with both a StorEdge 5300 RAID controller and StorageTek 5320 RAID controller. The NAS server updates each controller with different files, one at a time, when it is powered on. In general, the plan for upgrading the controllers is the following:
- Download the new firmware for one controller to the NAS server.
- Power down the other controller.
- Power cycle the NAS server to upgrade the first controller.
- Verify the new firmware is in effect.
- Download the new firmware for the second controller to the NAS server.
- Power down the first controller to prevent its new firmware from being overwritten.
- Power cycle the NAS server to upgrade the second controller.
- Verify the new firmware is in effect.
- Power on the first controller.
This procedure upgrades the 5300 RAID controller first and then the 5320 RAID controller.
| Note - Follow the power cycle instructions exactly because the server upgrades the controller during that process.
|
1. Download the latest patch from www.sunsolve.sun.com and unzip the file.
2. Review the patch readme file to determine which firmware revision levels are associated with the patch.
3. From a Sun StorageTek 5320 NAS Appliance, enable ftp. Refer to the Sun StorageTek NAS OS Administration Guide for information about how to enable ftp using the Web Administrator or CLI.
4. Change to the directory where you downloaded the patch.
|
To Upgrade the Sun StorEdge 5300 RAID Controller
|
5. Use ftp to connect to the Sun StorageTek 5320 NAS Appliance or, in a cluster configuration, server 1. Log in as the admin user.
6. Enter bin for binary mode.
7. At the ftp prompt, create the following directories on /cvol by entering these commands:
mkdir /cvol/firmware
mkdir /cvol/firmware/2882
mkdir /cvol/firmware/2882/ctlr
mkdir /cvol/firmware/2882/nvsram
mkdir /cvol/firmware/2882/jbod
mkdir /cvol/firmware/2882/drive
8. Use the put command to copy each file to the appropriate directory:
ftp> put filename /cvol/newdir/filename.ext
Firmware files are truncated after they are copied to their directories. The following table shows example directory and firmware file names.
TABLE 0-3 Directory and Firmware File Examples for 5300 RAID Controllers
|
Component
|
Directory
|
Example File Name
|
|
RAID controller
|
/cvol/firmware/2882/ctlr
|
RC_06601110_chromium2_apollo_288x.dlp
|
|
RAID controller NVSRAM
|
/cvol/firmware/2882/nvsram
|
N288X-660843-501.dlp
|
|
Fibre Channel EU
|
/cvol/firmware/2882/jbod
|
esm9631.s3r
|
|
SATA EU
|
/cvol/firmware/2882/jbod
|
esm9722.dl
|
|
Drive Firmware
|
/cvol/firmware/2882/drive
|
D_HDS7250SASUN500g_0604
|
9. Log out of the ftp session.
10. Power down the NAS server. In a cluster configuration, power down both server 1 and server 2.
11. Power down the StorageTek 5320 RAID controller and all attached trays. Do not power down the StorEdge 5300 RAID controller or its trays. The controller must be powered on to be upgraded.
| Note - Do not power down the RAID controller while the upgrade is in progress. Upgrade times can vary.
|
12. Power up the NAS server or server 1.
When the NAS server is powered on, it downloads the new firmware to the StorEdge 5300 RAID controller and then removes the files.
| Note - In cluster configurations, do not power on server 2 at this time. If server 1 comes up in QUIET mode, select the TAKE ALL LUNs command from the LCD.
|
13. Use the administrator console to connect to the NAS server or server 1, and log in to a user account with admin privileges.
14. Verify that the new firmware has been loaded by entering this command:
raidctl get type=lsi target=profile ctlr=0
Check the system log for failures and to make sure that downloading is complete.
|
To Upgrade the StorageTek 5320 RAID Controller
|
15. Change to the directory where you downloaded the patch.
16. Use ftp to connect to the NAS server or server 1, and log in as the admin user.
17. Enter bin for binary mode.
18. At the ftp prompt, create the following directories on /cvol by entering these commands:
mkdir /cvol/firmware
mkdir /cvol/firmware/399x
mkdir /cvol/firmware/399x/ctlr
mkdir /cvol/firmware/399x/nvsram
mkdir /cvol/firmware/399x/jbod
mkdir /cvol/firmware/399x/drive
19. Change to the same directory that you created for the previous firmware. Those files have been removed.
20. Use the put command to copy each file to the appropriate directory:
ftp> put filename /cvol/newdir/filename.ext
Firmware files are truncated after they are copied to their directories. The following table shows firmware file names and directories.
TABLE 0-4 Directory and Firmware File Examples for 5320 RAID Controllers
|
RAID controller
|
/cvol/firmware/399x/ctlr
|
RC_06601110_chromium2_apollo_399x.dlp
|
|
RAID controller NVSRAM
|
/cvol/firmware/399x/nvsram
|
N399X-660843-501.dlp
|
|
EU
|
/cvol/firmware/399x/jbod
|
esm9884.esm
|
|
Drive Firmware
|
/cvol/firmware/399x/drive
|
D_HDS7250SASUN500G_0604
|
21. Log out of the ftp session.
22. Power down the NAS server or server 1.
23. Power down the StorEdge 5300 RAID controller and all attached trays.
| Note - Do not power down if the upgrade is in progress. Upgrade times can vary.
|
24. Power up the 5320 RAID controller and all attached trays.
You powered the RAID controller down in Step 11 but it must be powered on so that the NAS server can upgrade its firmware.
25. Wait until the LEDs on the StorageTek 5320 RAID controller and its trays display as solid.
26. Power on the NAS server or server 1.
When the NAS server is powered on, it downloads the new firmware to the StorageTek 5320 RAID controller and then removes the files.
| Note - In cluster configurations, do not power on server 2 at this time. If server 1 comes up in QUIET mode, select the TAKE ALL LUNs command from the LCD.
|
27. Use the administrator console to connect to the NAS server or server 1, and log in to a user account with admin privileges.
28. Verify that the new firmware has been loaded by entering this command:
raidctl get type=lsi target=profile ctlr=0
Check the system log for failures and to make sure that downloading is complete.
29. Power down the NAS server. In a cluster configuration, power down both server 1 and server 2.
30. Power up the StorEdge 5300 RAID controller and its trays.
At this point, both the StorEdge 5300 and StorageTek 5320 RAID controllers and their trays are powered on.
31. Wait until the LEDs on the StorEdge 5300 RAID controller and its trays display as solid.
32. Power on the NAS server. In a cluster, power on both server 1 and server 2.
| Note - If you are running a cluster system and server 2 powers up in QUIET mode, run a recovery from server 1. If you ran the TAKE ALL LUNs command in Step 12 or Step 26, you might need to distribute LUNs also.
|
Release Documentation
The following documentation is posted on the documentation Web site at:
http://www.sun.com/hwdocs/Network_Storage_Solutions/nas
|
Title
|
Part Number
|
|
Sun StorageTek NAS OS Release Notes
|
820-3050-nn
|
|
Sun StorageTek NAS OS Administration Guide
|
819-4284-nn
|
|
Sun StorageTek 5320 NAS Appliance Setup [poster]
|
819-4385-nn
|
|
Sun StorageTek 5320 NAS Gateway System Setup [poster]
|
819-4286-nn
|
|
Sun StorageTek 5320 NAS Appliance and Gateway System Getting Started Guide (Sun StorageTek 5320 back-end storage)
|
819-4283-nn
|
|
Sun StorageTek 5320 NAS Appliance and Gateway System Getting Started Guide (Sun StorEdge 5300 back-end storage)
|
819-6387-nn
|
|
Sun StorageTek 5320 NAS Appliance and Gateway System Storage Regulatory and Safety Compliance Manual
|
819-7315-nn
|
|
Sun StorageTek 5320 NAS Array Regulatory and Safety Compliance Manual
|
819-6048-nn
|
|
Sun StorageTek 5220 NAS Appliance Setup [poster]
|
819-7166-nn
|
|
Sun StorageTek 5220 NAS Appliance Getting Started Guide
|
819-7167-nn
|
|
Sun StorageTek 5220 NAS Appliance Regulatory and Safety Compliance Manual
|
819-7366-nn
|
|
Sun StorageTek 5220 NAS Array Regulatory and Safety Compliance Manual
|
819-7367-nn
|
|
Setting Up the Sun StorEdge 5310 NAS Appliance [poster]
|
819-1168-nn
|
|
Sun StorEdge 5310 NAS Gateway System Poster
|
819-3240-nn
|
|
Sun StorEdge 5310 NAS Appliance and Gateway System Getting Started Guide
|
819-3237-nn
|
|
Sun StorEdge 5310 NAS Appliance and Gateway System Administration Guide
|
819-3238-nn
|
|
Sun StorEdge 5310 NAS Appliance Safety and Compliance Guide
|
819-0881-nn
|
|
Sun StorEdge 5210 NAS Appliance Administration Guide
|
819-5376-nn
|
|
Sun StorEdge 5210 NAS Hardware Installation, Configuration, and User Guide
|
817-6660-nn
|
|
Sun StorEdge 5210 Expansion Unit Safety, Regulatory, and Compliance Manual
|
817-7515-nn
|
|
Sun StorEdge 5300 RAID Expansion Unit and Sun StorEdge 5300 Expansion Unit Safety and Compliance Guide
|
819-0882-nn
|
| Sun StorageTek NAS OS Software Release Notes, Version 4.22.M1
|
820-3050-11
|
    |
Copyright © 2008 Sun Microsystems, Inc. All Rights Reserved.