Chapter 4 Use Cases for Sun GlassFish Web Space Server
The following are some of the use cases for working with portlets that are generally available as part of the core and the samples for Sun GlassFish Web Space Server.
-
Use Case for Enterprise Social Networking - Introduces some of the portlets which are helpful for Enterprise Social Networking.
-
Using the Expense Report Portlet - Introduces the Expense Report portlet that enables expenses reclaim using Sun GlassFish Web Space Server.
-
Working With Communities and Organizations - Introduces some of the important tasks that an administrator can perform on Communities and Organizations:
-
Virtual Hosting of Portal Pages - Explains the procedure for virtual hosting of portal pages.
-
Using the Mail Portlet - Explains how you can configure your mail client on Web Space Server using the Mail portlet.
-
Exporting and Importing of Portal Data - Explains how to export and import data that is on a portlet, a Community, or an Organization.
-
Enabling Sharing of a Portlet - Explains how you can share portlets with an external web sites and Facebook.
-
Using Document Library Plugins on OpenOffice - Explains how you can use Document Library plugins on OpenOffice to interface with Content Management feature of Web Space Server.
-
Using the Widget Consumer Portlet - Explains how you can use the Widget Consumer Portlet to display the information from external widgets.
-
Workflow Portlet - Explains how an admin user can define a workflow that can be used by other users.
-
Tagging in Web Space Server - Explains how you can use the tagging system.
Use Case for Enterprise Social Networking
Sun GlassFish Web Space Server supports Enterprise Social Networking. This section introduces some of the portlets that are helpful for Enterprise Social Networking. These portlets are bundled as part of samples.
You can view the list of your friends and their profiles on the Friends widget.
 To Add a Friend
This procedure uses the Search and Invite Friends widget and the Requests widget to add a friend to the Friends widget.
-
Log in to Web Space Server.
Select Social Networking Sample Users from the Sample Users portlet and click the Admin User link.
-
Add the Search and Invite Friends and Requests widgets to a private page.
-
Click the Search Users button in the Search and Invite Friends widget.
-
Select a user and click the Add as Friend link corresponding to the user.
In this example, click the Add as Friend link corresponding to the user Chris Editor.
-
Log out and log in again as the user you selected as friend.
In this example, select Social Networking Sample Users from Sample Users portlet and click the Chris Editor link.
-
Click the Confirm link in the Requests portlet.
The admin user and Chris Editor are now friends and can chat with each other. The Online Friends and Settings options in the menu bar on the right-bottom of the page are helpful in chatting and in displaying the online status of friends.
Using the Expense Report Portlet
The Expense Report widget models the expense reports process that is typical in any large organization. An Expense Report is a report comprising details of the expenses (such as business travel, relocation, broadband bills claim) incurred by an employee that can be reclaimed from the organization.
An Expense Report created by employees can be approved by their superior. Users available to the system are mapped to either the Employee role or the Manager role. Consider the following example:
Paul Tester (Employee) submits an Expense Report for a business trip. Mary Manager (Manager) verifies and approves the Expense Report.
-
Paul Tester submits an Expense Report. Paul performs the following steps to submit his report:
-
Paul selects the expense category, and types an expense amount and description and saves the report. The system assigns a unique expense ID to the report.
-
Paul reviews the report summary.
-
Paul submits the saved report for approval by his manager.
-
-
Mary Manager verifies the details of the Expense Report. She can either approve or reject the report.
The following is the process involved:
The following procedures explain how to submit and approve an expense report:
 To Submit an Expense Report
To access the Expense Report portlet, you need to select the Edit Preferences button from the menu controls and enable the JavaCAPS Workflow engine. The Workflow engine service needs to be available in order to use the Expense Report portlet.
-
Log in to Web Space Server as Paul Tester.
-
Click the Add a New Expense Report link.
-
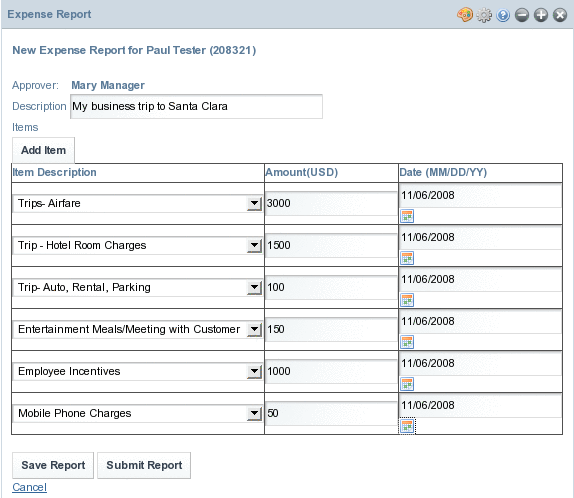
Type a description for the Expense Report.
Type the values for Item Description, Amount, and Date fields. Click Add Item to add a new row.
Figure 4–1 To Submit an Expense Report
-
Click Save Report.
-
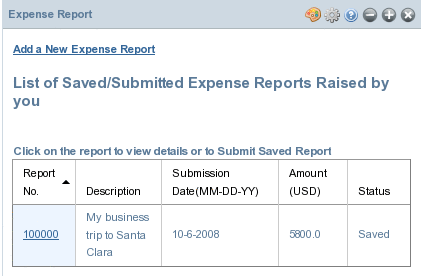
Click the Go back to Report Summary link to view the report summary.
The summary page displays the Report No., Description, Submission Date, Amount, and the Status.
Figure 4–2 To Submit an Expense Report
-
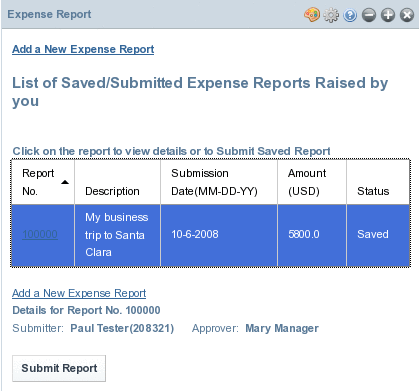
Click the number under Report No.
The report is enabled for submission.
Figure 4–3 To Submit an Expense Report
-
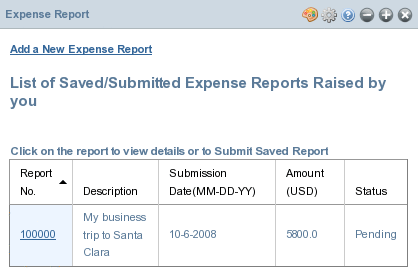
Click Submit Report.
The report is submitted for approval. The Status of the report changes to Pending.
Figure 4–4 To Submit an Expense Report
 To Approve an Expense Report
-
Log in to Web Space Server as Mary Manager.
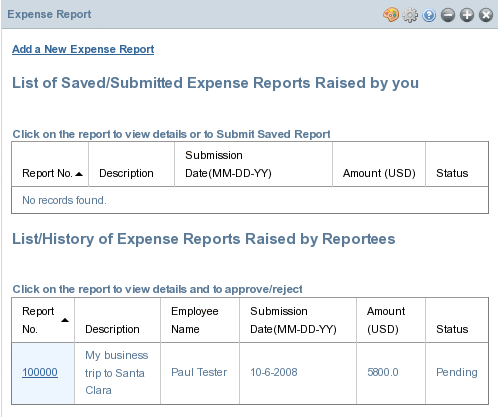
The report submitted by Paul is displayed under the List/History of Expense Reports Raised by Reportees section in the Expense Report portlet.
Figure 4–5 To Approve an Expense Report
-
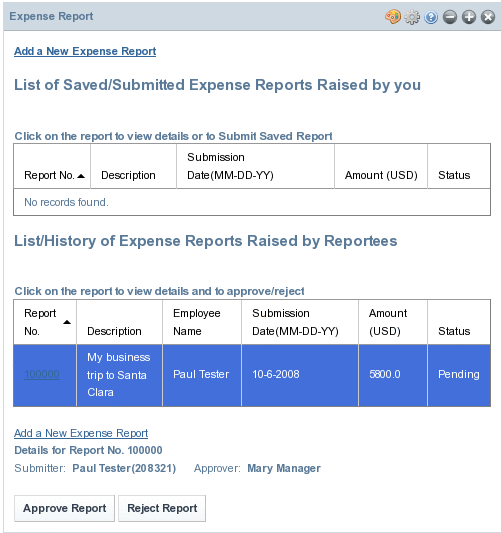
Click the report ID.
Details of the submitter are displayed. Also, the Approve Report and Reject Report buttons become active.
Figure 4–6 To Approve an Expense Report
-
Click the Approve Report button to approve the report.
Working With Communities and Organizations
The following topics describe some of the tasks that you can perform on Communities and Organizations in Web Space Server.
Adding Public and Private Pages to Communities and Organizations
The following procedure explains how you can add a public page and a private page to an Organization. You can add public page and private pages to a Community by following the similar procedure.
For the procedure to create an Organization, see To Create an Organization.
 To Add a Public Page and a Private Page to an Organization
-
Log in to Web Space Server as the admin user.
-
Navigate to Control Panel -> Portal -> Organizations from the Welcome menu.
All existing Organizations are listed.
-
To add a page, click the Actions button corresponding to an Organization and choose Manage Pages from the menu.
For example, you can add pages to an Organization called Test Organization.
-
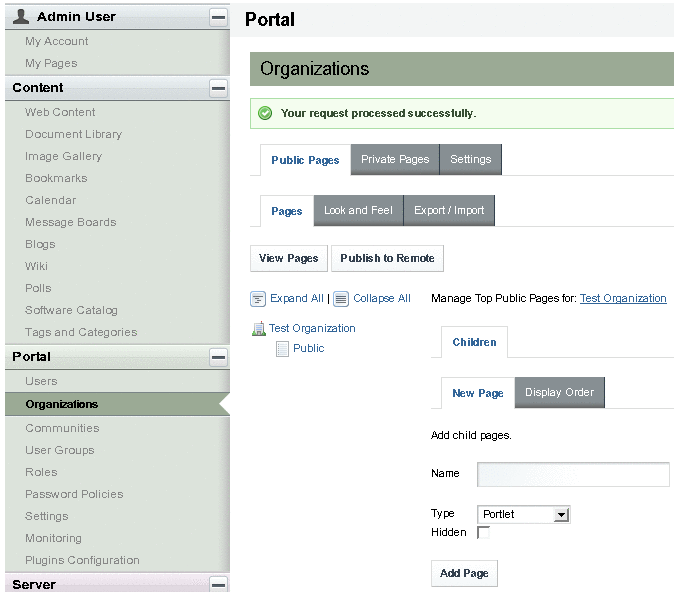
To add a public page, click the Public Pages tab and type a name and type for the page.
For example, you can create a public page named Public with the type portlet.
-
Click the Add Page button.
The page is added to the Organization.
Figure 4–7 Adding a Public Page
-
To add a private page, click the Private Pages tab and type a name and type for the page.
For example, you can create a private page named Private with the type portlet.
-
Click the Add Page button.
The page is added to the Organization.
-
To change the display order for pages, click the Display Order tab.
Enabling Crawling of Page URLs by Search Engines
You can enable crawling of a page URL by a search engine for the pages on Communities and Organizations.
 To Enable Crawling of Page URLs by Search Engines
This procedure describes how to enable the crawling of a page URL on the CMS Community. You can enable crawling for the pages on any other Community or Organization.
-
Log in to Sun GlassFish Web Space Server as the admin user.
-
Choose Add Application from the Welcome menu, and add the My Communities portlet to your page.
-
Click the Communities I Own tab on the My Communities portlet.
-
Click the Actions button corresponding to the CMS community and choose Manage Pages from the menu.
-
Navigate to Settings -> Sitemap.
-
Click the desired server engine link.
Clicking the Google or Yahoo link, adds your sitemap to the sitemaps to crawl on that search engine
-
Click the preview link to view the XML file that is sent to the webmaster at the selected search engine.
Virtual Hosting of Portal Pages
Web Space Server supports virtual hosting of Communities and Organizations. Public and Private pages in a Community or an Organization have a unique common friendly URL. You have to provide separate host names for public and private pages for virtual hosting of public and private pages on separate machines.
 To Virtual Host a Page on a Community
-
Log in to Sun GlassFish Web Space Server as the admin user.
-
Navigate to Control Panel -> Portal -> Communities from the Welcome menu.
All existing Communities are listed.
-
Click the Actions button corresponding to a selected Community and choose Manage Pages from the menu.
In this example, click the actions button corresponding to the Guest community.
-
Click the Settings tab.
-
Click the Virtual Host tab.
-
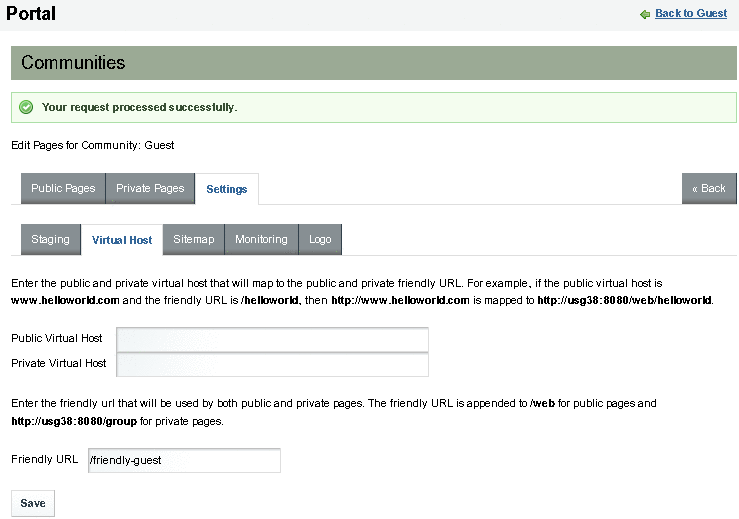
Specify a Friendly URL.
In this example, guest is the default friendly URL. You can change it to something else, say friendly-guest.
Figure 4–8 Virtual Hosting Using the Friendly URL
-
Click Save.
-
To view the public page, click the Public Pages tab.
-
Click the View Pages button.
The public page for the Community opens in a separate browser with its virtual hosting URL. Similarly, you can view the virtually hosted private pages of the Community.
Using the Mail Portlet
Use the Mail portlet to configure your email account on Sun GlassFish Web Space Server.
 To Install the Mail Portlet
-
Choose Control Panel -> Server -> Plugin Installations.
-
Click Install More Portlets under Portlet Plugins tab.
-
Type mail as the search keyword and click Search Plugins.
-
Select the portlet link, and click Install to install the portlet.
 To Configure Email Accounts
This procedure describes how to configure an email account and also illustrates the steps to add an IMAP Gmail account..
-
Log in to Web Space Server as the admin user.
-
Choose Add Applications from the Welcome menu and add the Mail portlet to your page.
-
Click the Configure Email Accounts link.
You are prompted to add mail accounts.
In order to add a Gmail account, you must first enable IMAP for the account.
-
Click Add a Gmail Account.
-
Type your Gmail user name and password and click Save.
Your email account is added.
-
Click the Check Your Email link.
You can read the mails and folders in your Gmail account and can compose new messages.
Exporting and Importing of Portal Data
You can back up a portlet, Community, or Organization by exporting their data to the disk. When you upgrade the Web Space Server installation on your machine, or when you reinstall Web Space Server due to some other reason, you can import the data back to your portlet.
 To Export and Import Data of a Portlet
This procedure uses an example of exporting a Calendar portlet event.
-
Log in to Sun GlassFish Web Space Server as the admin user.
-
Click Add Application from the Welcome menu and add a portlet to your page.
In this example, add the Calendar portlet.
-
Click the Add Event button.
In this example, add a weekly event called Project Meeting. You can modify permissions for the guest user by clicking the Permissions link.
-
Click Save.
-
Click the Export/Import button from the menu controls for the portlet.
-
Click Export and save the file to the disk.
A .lar file is exported to your disk. The file includes the event description.
-
To import the event information, import the file to the Calendar portlet of a Web Space Server installation.
 To Export and Import Data from a Community or Organization
You can export the data residing on a Community or an Organization. When you import the data to a Community or Organization on another Web Space Server installation, all pages related to the Community or Organization are imported.
-
Log in to Sun GlassFish Web Space Server as the admin user.
-
Navigate to a page on a Community or an Organization.
-
Choose Manage Pages from the Welcome menu.
-
Click the Export/Import tab.
Figure 4–9 Exporting a Page
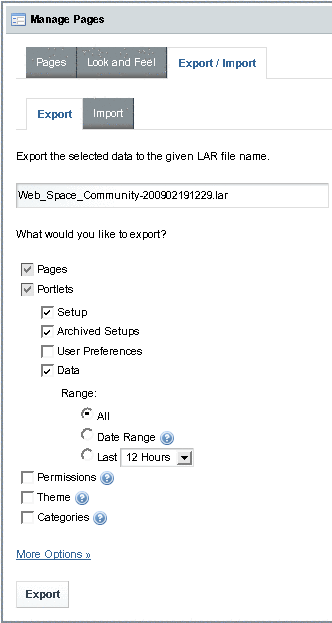
The .lar file that gets exported uses the naming convention Community/Organization-name-unique-#id..lar
The default export includes all the options that are initially selected. At the minimum, all pages and all portlets are exported. The options are:
-
Pages - All private and public pages associated with the Community or the Organization.
-
Portlets - All portlets on Community or Organization pages.
-
Setup - The current setup information of the portlets.
-
Archived Setup - Archived setup information of the portlets.
-
User preferences - User preferences such as Look and Feel and language attributes applied to portlets.
-
Data - The data reside inside portlets. The default Range for Data is All. You can specify a Date Range for Data. When a Date Range is specified, only the data pertaining to the date range is exported.
-
Permissions, Theme, and Categories options - You can export Permissions, Theme, and Categories associated with pages and portlets. For more information, click the help button.
Note –When you import, you need to select the same options that were selected while exporting.
-
-
Click Export.
Enabling Sharing of a Portlet
You can enable sharing of a portlet on any web site, on Facebook, and by Friends.
 To Share a Portlet With Other Web sites
Consider the example of sharing the Calendar portlet on a web site created by you. This procedure assumes that you have already added Calendar portlet to your page.
-
Log in to Sun GlassFish Web Space Server.
-
Click the Configuration button among the edit controls for the portlet.
In this example, click the Configuration button among the edit controls for the Calendar portlet.
-
Click the Sharing tab.
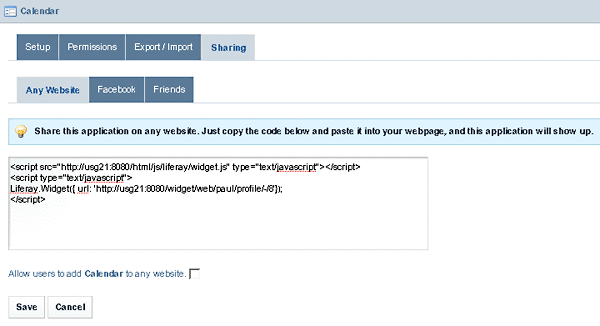
Figure 4–10 The Code for Sharing the Portlet on Any Web site
-
Select and copy the code for sharing the portlet on any web site.
-
Select the Allow Users to add Calendar to Any Web site option.
-
Click Save.
-
Open the source code of any web site and copy the sharing code into it, then save changes to add the portlet to the web site.
For example:
-
Open the Mozilla Classic browser
-
Choose Edit Page from the File menu.
-
Click HTML Source.
-
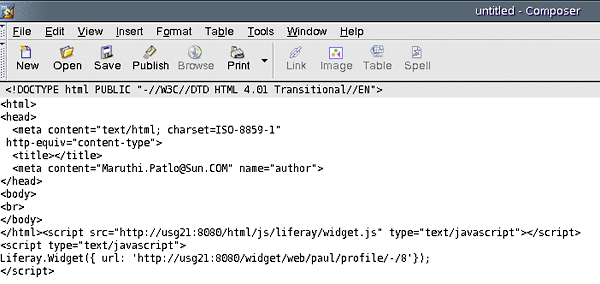
Paste the copied code into the page.
Figure 4–11 Adding the Sharing Code to the Source code of a Web site
-
Click Save.
-
In the dialog box that appears, type a title and click OK.
-
Save the page on your desktop.
In this example, you can name the page as Calendar Sharing.
-
Open the page in a web browser.
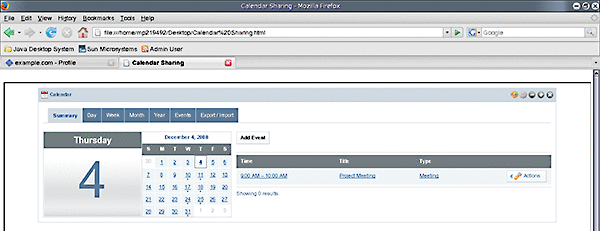
Note that the Calendar portlet is added to the page.
Figure 4–12 The Portlet Added to the Web site
-
 To Share a Portlet With Facebook
This procedure assumes that you have already added the Calendar portlet to your page.
-
Log in to Sun GlassFish Web Space Server.
-
Click the Configuration button among the edit controls for the portlet.
In this example, click the Configuration button among the edit controls for the Calendar portlet.
-
Click the Sharing tab.
-
Click Facebook under Sharing.
-
Click Get the API Key and Canvas Page URL from Facebook link and follow the instructions to get the API key and canvas page URL from Facebook.
-
Type the API key and the canvas page URL and click Save.
-
Access the portlet on Facebook by using the canvas page URL.
 To Allow Sharing of a Portlet With Friends
The Friends portlet lists the Web Space Server users who are registered as your friends. You can authorize your friends to access a portlet that is on your page.
-
Log in to Sun GlassFish Web Space Server.
-
Click the Configuration button among the edit controls for a portlet.
-
Click the Sharing tab.
-
Click Friends under Sharing.
-
Select the Allow Users to Share portlet With Friends option and click Save.
Using Document Library Plugins on OpenOffice
Document Library Plugins are helpful to establish an interface with Web Space Server from OpenOffice. Document Library Plugins are shipped along with the standard product. When you install the plugins on OpenOffice, you will be able to interface with the CMS feature of Web Space Server. This feature enables you to use OpenOffice to edit the documents you have in the Document Library. Also, you can add documents to the Document Library.
Note –
You can download OpenOffice freely from http://www.openoffice.org/.
 To Store a Document to CMS
-
Open OpenOffice – Writer.
-
Choose Tools -> Extension Manager.
-
Click the Add button and navigate to ShareSpaceDocumentLibraryPlugin.oxt.
Figure 4–13 Installing the Document Library Plugins
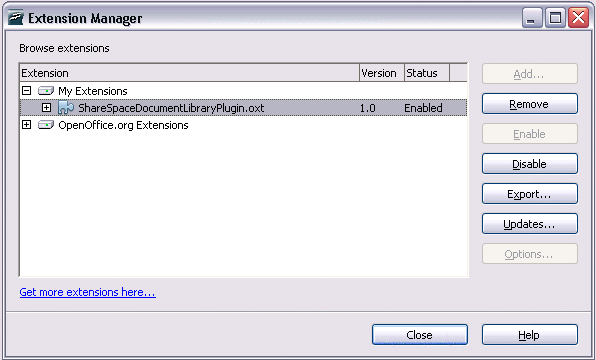
The Document Library plugins are added to your page. The Load Document from CMS and Store Document to CMS buttons are added to the toolbar.
-
Type some content that you want to store on the CMS.
-
Click the Store Document to CMS button to upload the document to CMS.
Using the Widget Consumer Portlet
You can embed a web widget by copying a JavaScriptTM or flash code snippet and pasting it in the text box after clicking the Configuration button on the Widget Consumer portlet. On saving the changes to the configuration, you will be able to view the web widget from the portlet.
Widget Consumer portlet is an instanceable portlet. You can add any number of instances of the portlet to your page with each portlet instance embedding a separate widget. For example, YouTube links provide a code snippet named Embed at the right top corner. You can copy and paste this code to the Widget Consumer portlet to view the YouTube link.
 To Configure the Widget Consumer Portlet
This procedure describes how to copy the code snippet for a web widget from the web site cricinfo.com and use it on the Widget Consumer portlet.
-
Log in to Sun GlassFish Web Space Server as the admin user.
-
Choose Add Application from the Welcome menu and add the Widget Consumer portlet to your page.
-
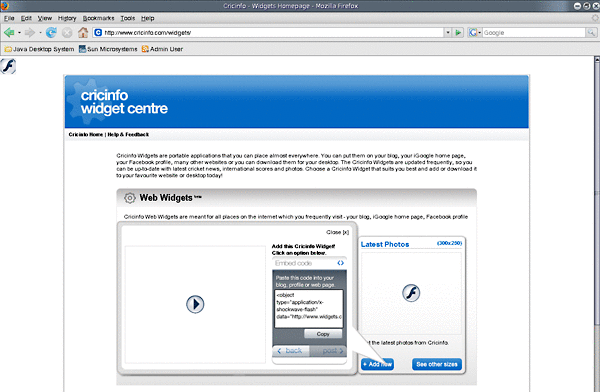
Copy the code snippet to embed a web widget.
In this example, copy the code snippet to embed a web widget from the site cricinfo.com.
Figure 4–14 Copying the Code Snippet to Embed a Widget
-
Click the Configuration button on the portlet.
-
Paste the widget code into the text box.
-
Click Save.
You can view the widget from the Widget Consumer portlet.
Workflow Portlet
Admin users can define a workflow and upload the workflow definition file through the Workflow Portlet UI. They can also initiate a workflow instance. To create a workflow, you need a workflow definition file that contains workflow definition.
The following topics explains how to create and configure a workflow:
Creating a Workflow
To create a workflow, you need to create a workflow definition file in XML format that conforms to the jBPM Process Definition Language (JPDL) standard.
For example, say that you are creating a workflow for a leave application and approval process.
-
The admin user creates a workflow definition called LeaveApproval.
-
The admin user creates a workflow instance (Workflow State 1).
-
The test user uses the workflow instance to apply for leave (Workflow State 2).
-
The manager receives the holiday request. The manager can approve or reject the request, or can send the request for reconsideration (Workflow State 2).
-
The test user can verify to see whether the process has ended.
The following is the scenario involved:
The following procedures provide the detailed process steps:
 To Add a Workflow Definition
-
Log in to Web Space Server as the admin user.
-
Create a new page by clicking Add Page.
-
Type a name for the page and click Save.
For example, name it Workflow.
-
Click the tab for the page.
The page opens.
-
Choose Add Applications from the Welcome menu, and add the Workflow portlet to the page.
-
Click the Add Definition button.
-
Add the workflow definition in XML format and click the Save New Version button.
You can copy and paste a workflow definition. In this example, LeaveApproval version 1.0 is the name of the workflow definition.
Figure 4–15 Adding a Workflow Definition
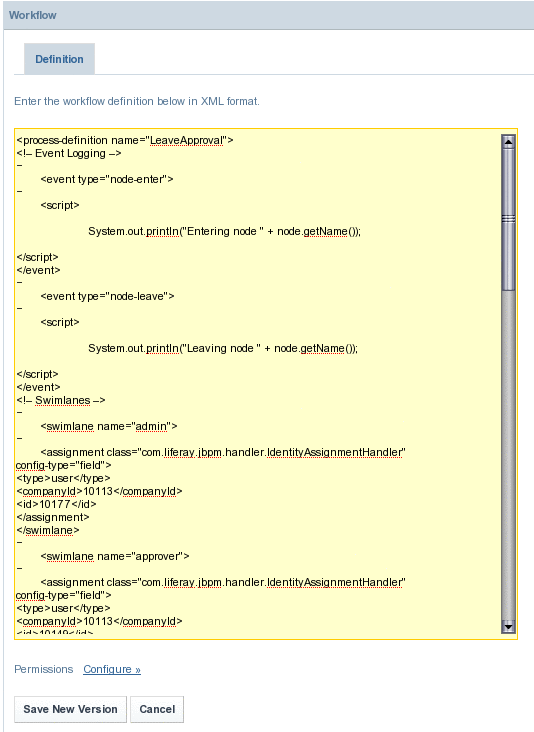
A workflow is created with a version number associated with it.
-
Log out and log in back in to Web Space Server for the changes to take effect.
 To Create a Workflow Instance
-
Log in to Web Space Server as the admin user.
-
Choose Add Applications from the Welcome menu, and add the Workflow portlet to the page.
-
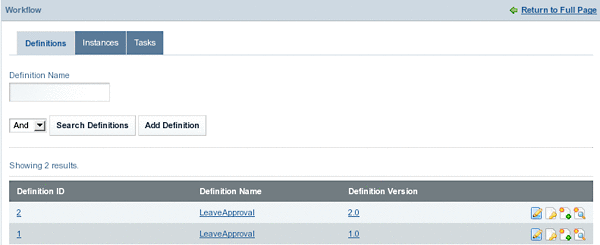
Click Search Definitions on the Workflow portlet to view all workflow definitions.
Figure 4–16 Creating a Workflow Instance
-
Click the Add Instances button next to a workflow definition.
In this example, you can create an instance for version 1.0 of the LeaveApproval workflow definition.
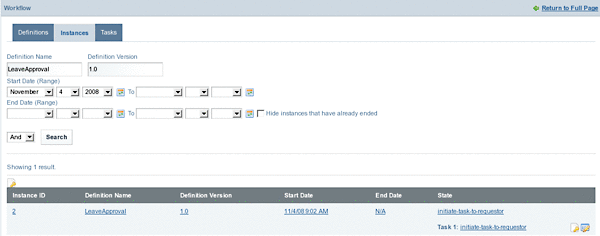
An instance is created for the Workflow Definition. Provide values for the fields such as the Definition Name, Definition Version, Start Date (Range), and End Date (Range), and click Search to search for the instance. To hide the instances that have already ended, select the Hide the instances that have already ended checkbox.
You can create any number of instances for a version of Workflow Definition.
Figure 4–17 Adding Workflow Instances
-
Click the Manage button for the instance.
-
Click Save to save the task.
The task will be assigned to a requester.
Note –If the admin user clicks the Signal button next to an Instance, the instance is promoted to the next state of workflow. The requester is not allowed to use an instance which is promoted to the next state of the workflow.
Accessing a Workflow Instance
Accessing a workflow instance follows the series of steps necessary to complete the workflow cycle for the instance.
 Workflow Process Steps: To Request an Holiday
-
Log in to Web Space Server as Paul, the test user.
-
Click the Tasks tab on the Workflow portlet.
You can use the Task Name, Definition Name, Current Date, Start Date, and End Date fields to search for a task. To hide the instances that have already ended, select the Hide the instances that have already ended checkbox.
-
Click a Task for an Instance which have not ended.
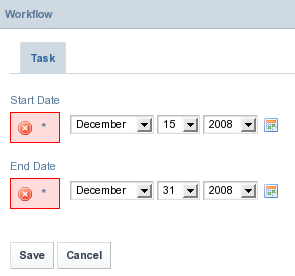
In this example, click the Holiday Request task for an Instance. Select a start date and an end date.
Figure 4–18 Workflow Process Steps: To Request an Holiday
-
Click Save.
 Workflow Process Steps: To Evaluate Holiday Request
-
Log in to Sun GlassFish Web Space Server as Mary Manager.
-
Click the Tasks tab on the Workflow portlet.
-
Click a Task for an Instance which have not ended.
In this example, click the Evaluate Holiday Request task for an Instance.
The manager can place comments against the request. The manager can exercise Approve, Reject, and Send Back for Review options.
The Instance ends on clicking the Approve or Reject button.
 Workflow Process Steps: To Ascertain the Request Status
-
Log in to Sun GlassFish Web Space Server as Paul, the test user.
-
Click the Tasks tab on the Workflow portlet.
The End Date field next to the task name has the date and time of approval on it.
Configuring Workflow for MySQL
You need to make some configuration changes, if you have installed Sun GlassFish Web Space Server on MySQL database. If you are installing the Web Space Server evaluation bundle, no changes are required, as the workflow is configured for HSQL by default.
 To Configure Workflow for MySQL
-
Copy the saw-impl-jbpm.jar file from <Web Space Server install dir>\glassfish2\domains\domain1\applications\j2ee-modules\saw-web\WEB-INF\lib.
-
Paste the saw-impl-jbpm.jar file to a temp folder.
-
Extract the saw-impl-jbpm.jar file.
unjar saw-impl-jbpm.jar
-
Remove the commenting for the following section in the hibernate-cfg.xml file and change the appropriate values to point to the MySQL database.
<!-- JDBC connection properties (begin) --> <property name="hibernate.connection.driver_class">com.mysql.jdbc.Driver</property> <property name="hibernate.connection.url">jdbc:mysql://localhost:3306/lportal</property> <property name="hibernate.connection.username">lportal</property> <property name="hibernate.connection.password">lportal</property> <!-- JDBC connection properties (end) --> -
jar the saw-impl-jbpm.jar file again.
-
Create a directory structure sources/saw-web-5.2.0.1/WEB-INF/lib/ under <root-dir>/webspace-for-gfv2/var/webspace/war-workspace, and paste the saw-impl-jbpm.jar file into it.
-
Change directory to <root-dir>/webspace-for-gfv2/var/webspace/war-workspace.
cd <root-dir>/webspace-for-gfv2/var/webspace/war-workspace
-
Run ant -f synchronize.xml for saw-web-5.2.0.1.
-
Restart GlassFish server.
Tagging in Web Space Server
The tagging system in Web Space Server helps to group blogs, wikis, and articles. Admin user can create tag sets and tags, and can define permissions to use tags by using the Tags and Categories portlet. Tags follows a kind of taxonomy and classification, as the admin user can define tag sets and tags within them. Users will have the freedom to create their own tags or to use the existing tags.
The basic process of using the tagging system is:
-
The admin user creates tags and tag sets, and defines permissions for usage.
-
The user applies tags for his blogs, wikis, or articles. The users can select the tags that they want to apply, or can define their own tags.
-
Any content that is tagged is grouped or aggregated.
- © 2010, Oracle Corporation and/or its affiliates
