| Sun 10-Gigabit Ethernet PCI-X Adapter Installation and User’s Guide |
| C H A P T E R 2 |
|
Installing the Adapter |
This chapter describes how to install the Sun 10-Gigabit Ethernet PCI-X adapter in your system and verify that it has been installed correctly. The chapter then describes how to install the driver software using the automated script. Finally, this chapter describes how to edit the network host files after installing the adapter on your system.
This chapter contains the following sections:
| Note - If you are installing the Sun 10-Gigabit Ethernet PCI-X adapter in a machine running the Solaris x86 Operating System Dynamic Reconfiguration (DR) is not supported. |
A new Sun 10-Gigabit Ethernet PCI-X ixgb driver is bundled with the first release of Solaris 10 and later OSs. The ixgb driver supports x86 or x64 platforms only.
To download and install the ixge driver for SPARC platforms, go to:
http://www.sun.com/products/networking/ethernet/10gigabitethernet/support.xml

|
Caution - If your are installing the Sun 10-Gigabit Ethernet PCI-X adapter into a machine running Solaris 10, you mustinstall the software beforeyou install the hardware. Failure to install the software before installing the hardware will allow the Sun 10-Gigabit Ethernet PCI-X adapter to attach to an older version of the software. See Using the Installation Script. |
|
The following instructions describe the basic tasks required to install the adapter. Refer to your system installation or service manual for detailed PCI adapter installation instructions.
1. Halt and power off your system.
2. Power off all of the peripherals connected to your system.
4. Attach the antistatic wrist strap to yourself and to the system.
Attach the adhesive copper strip of the antistatic wrist strap to the metal casing of the power supply. Wrap the other end twice around your wrist, with the adhesive side against your skin.
5. Holding the PCI adapter by the edges, unpack it and place it on an antistatic surface.
6. Using a No. 2 Phillips screwdriver, remove the PCI filler panel from the slot in which you want to insert the PCI adapter.
Save the filler panel screw for Step 9.
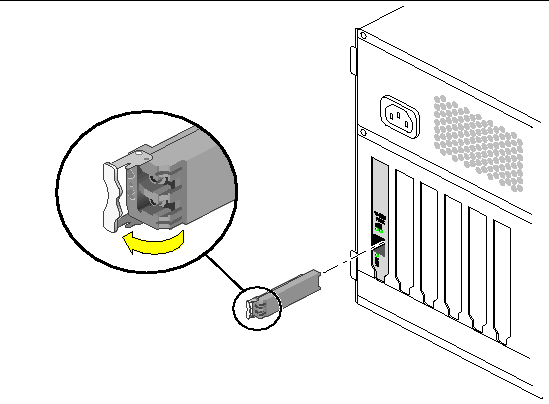
7. Insert the adapter into the PCI opening.
Holding the PCI adapter by the edges, align the adapter edge connector with a 66 MHz PCI slot or a PCI-X slot. Slide the adapter face plate into the small slot at the end of the PCI opening.
8. Applying even pressure at both corners of the adapter, push the PCI adapter until it is firmly seated in the slot.
9. Secure the adapter to the PCI slot using the screw you removed in Step 6.
| Note - Green LEDs do not light until the correct driver is installed. |
|
The Sun 10-Gigabit Ethernet PCI-X adapter requires an optical transceiver to create and Ethernet connection. The optical transceiver Part Number: 135-1172-01 is available from Sun Microsystems.
1. Pull the white locking handle into the full horizontal position.
You will feel the handle click into position when it is fully opened.
2. Holding the optical transceiver by the edges, align the transceiver with the slot in the Sun 10-Gigabit Ethernet PCI-Xadapter and slide it into the opening.
3. Applying even pressure at both corners of the transceiver, push the transceiver until it is firmly seated in the slot.
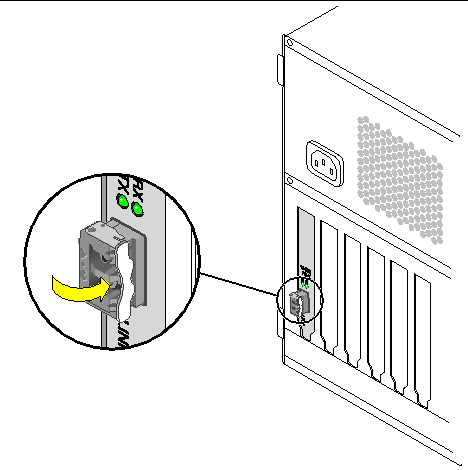
4. Push the handle closed to lock the optical transceiver in place.
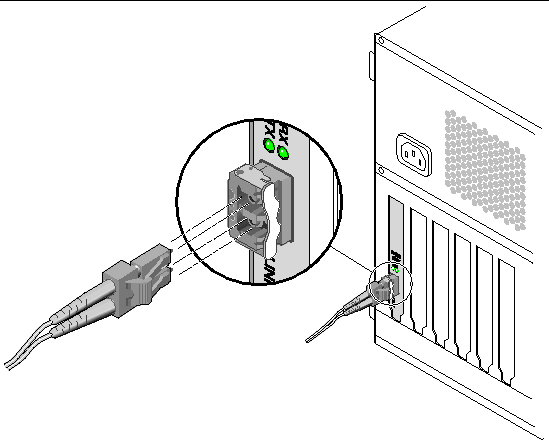
6. Connect the Ethernet cable.
|
After you have installed the Sun 10-Gigabit Ethernet adapter, but before you boot your system, perform the following tasks to verify the installation. Refer to the your Solaris documentation for the detailed instructions.
| Note - Verification is not required if your system supports dynamic reconfiguration (DR). Verification is not supported if your system is running Solaris x86 software. |
1. Power on the system, and when the banner appears, press the Stop-A key sequence to interrupt the boot process and display the OpenBoot (ok) prompt.
2. List the network devices on your system.
The output from this command is extensive. Look for ethernet@ and network@ to see the network devices. In this example, the ethernet@1 device is the Sun 10-Gigabit Ethernet adapter, shown in bold italics for ease of use.
/pci@9,600000/ethernet@1 identifies the 10-gigabit Ethernet port.
| Note - If you do not see the device listed, check that the adapter is properly seated. If necessary, reinstall the adapter. |
3. View the device that you installed.
Using the previous example, type:
4. View the .properties file for a list of device properties.
The .properties command displays the specific information about the installed adapter. If you are using the Sun 10-Gigabit Ethernet adapter, your output will be similar to the following:
5. Type the following when you finish looking at the .properties values:
After verifying the adapter installation, use the boot -r command to perform a reconfiguration boot on your system.
|
 After the Solaris OS boots, execute the prtconf -pv command:
# prtconf -pv compatible: ’pci8086,1048.108e.a11f.2’ + ’pci8086,1048.108e.a11f’ + ’pci108e,a11f’ + ’pci8086,1048.2’ + ’pci8086,1048’ + ’pciclass,020000’ + ’pciclass,0200’ vendor-id: 00008086 |
If you have a Sun Enterprise system that supports dynamic reconfiguration (DR), you do not have to reboot your system after installing the adapter.
The process of adding and configuring an adapter with DR involves connecting the attachment point and configuring its occupant. In most cases, the cfgadm(1M) command can perform both steps at once.
The Sun 10-Gigabit Ethernet CD provides automated installation for the Sun 10-Gigabit Ethernet PCI-X driver software. In most cases, you can use the following procedure and execute the installation script. If you have any problems, see Appendix C for manual installation procedures.
The script first checks to ensure that the software driver package has already been installed. If the package is installed, the script verifies the patch level and updates the driver with the updated patch if necessary. If the packages are not installed on Solaris 9 or 10 software, the installation script installs the latest prepatched packages. If the system does not require updating because the patch level is at or beyond the current installed version, the script exits with an appropriate message.
|
1. At the system console, become superuser (root).
2. Insert the Sun 10-Gigabit Ethernet Adapter CD into a CD-ROM drive that is connected to your system.
, it should automatically mount the CD-ROM to the /cdrom/cdrom0 directory.
| Note - If you are installing the software from the download site, follow the online download instructions. |
3. Change to the directory were the installation script resides:
4. Execute the installation script:
You’ll see the following output:
5. Reboot the system to load the driver:
6. Verify the installation to ensure that the driver installed and loaded properly.
Unless you have the latest version of the driver software installed, the green LEDs on the adapter will not go on. For ixge, ensure that you have version 1.30 or later installed.
|
Use the modinfo command to verify that you have the current driver (v1.30 or later) installed.
If you type grep IXGE, using uppercase letters, you will get only the specific driver information:
|
Use the modinfo command to verify that you have the current driver installed.
If you type grep IXGB, using uppercase letters, you will get only the specific driver information:
After installing the driver software, you must create a hostname.ixgenumber file where number = the instance number of the ixge interface.) for the adapter’s Ethernet interface. You must also create both an IP address and a host name for its Ethernet interface in the /etc/hosts file.
|
|
Caution - Ensure that the optical transceiver is correctly seated beforeconfiguring the interface. |
1. At the command line, use the grep command to search the /etc/path_to_inst file for ixge interfaces.
In the example above, the device instance is from a Sun 10-Gigabit Ethernet PCI-X adapter. For clarity, the instance number is in bold italics.
2. Use the ifconfig command to set up the adapter’s ixge interface.
Use the ifconfig command to assign an IP address to the network interface. Type the following at the command line, replacing ip-address with the adapter’s IP address:
|
|
Caution - If the optical transceiver is unplugged after the interface has been configured using the ifconfigcommand, you mustunconfigure and reconfigure the interface. |
On Solaris operating systems, use the following commands to unconfigure and reconfigure the interface:
On Linux operating systems, use the following commands:
Where number corresponds to the device instance of the Sun 10-Gigabit Ethernet PCI-X adapter you plan to configure.
Refer to the ifconfig(1M) man page and the Solaris or Linux documentation for more information.
To use the adapter’s ixge interface in the Step 1 example, create an
/etc/hostname.ixge0 file, where 0 is the number of the ixge interface. If the instance number were 1, the filename would be
/etc/hostname.ixge1.
The following example shows the /etc/hostname.ixgenumber file required for a system called zardoz that has a Sun 10-Gigabit Ethernet adapter (zardoz-11).
3. Create an appropriate entry in the /etc/hosts file for each active ixge interface.
# cat /etc/hosts # # Internet host table # 127.0.0.1 localhost 129.144.10.57 zardoz loghost 129.144.11.83 zardoz-11 |
After installing the driver software, you must create a hostname.ixgbinstance file (where instance is the instance number of the ixgb interface) for the adapter’s Ethernet interface. You must also create both an IP address and a host name for its Ethernet interface in the /etc/hosts file.
|
1. At the command line, execute the prtconf -D command to find the ixgb interfaces.
2. Execute the ifconfig command to set up the adapter’s ixgb interface.
3. Create an appropriate entry in the /etc/hosts file for each active ixgb interface.
| Sun 10-Gigabit Ethernet PCI-X Adapter Installation and User’s Guide | 819-0938-13 |
Copyright © 2008 Sun Microsystems, Inc. All Rights Reserved.
 To Install the Adapter