| C H A P T E R 6 |
 Finishing Up
 |
This chapter describes tasks to perform after replacing components within the server. Topics include:
After replacing components inside of the server, perform the following tasks:
If it was removed for the component replacement procedure.
| Note - When replacing the hard drives or power supplies, not all of these tasks are necessary. The replacement procedures for those components address this fact. |
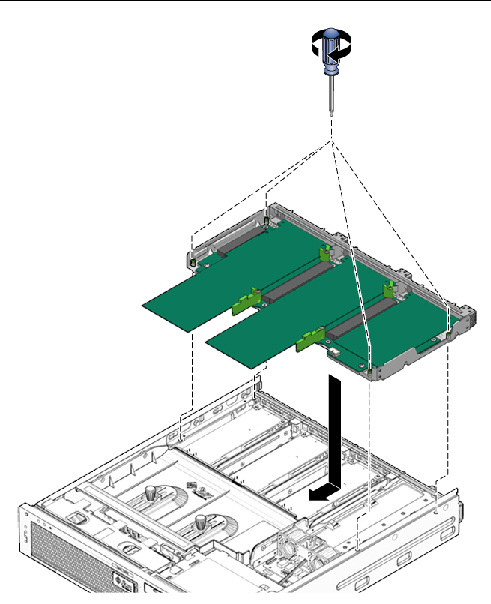
1. Position the PCI mezzanine onto the chassis.
2. Lower the PCI mezzanine and slide it toward fron of server (FIGURE 6-1).
3. Tighten the PCI mezzanine screws (FIGURE 6-1).
FIGURE 6-1 Lowering the PCI Mezzanine and Tightening the Screws
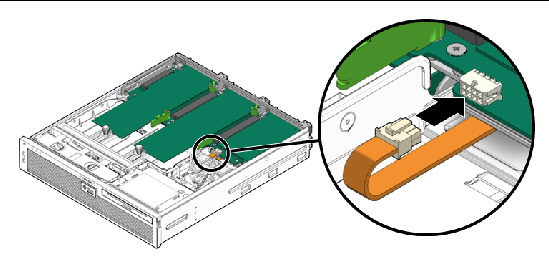
4. Reconnect the PCI mezzanine cable (FIGURE 6-2).
FIGURE 6-2 Reconnecting the PCI Mezzanine Cable
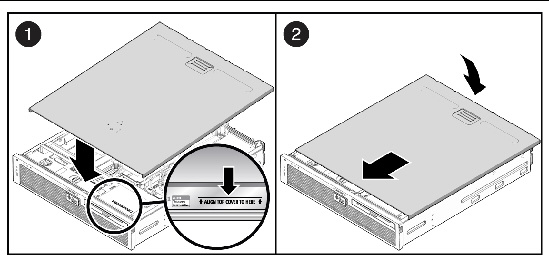
1. Place the top cover on the chassis.
Set the cover down so that it hangs over the rear of the server by about an inch (25 mm).
2. Carefully align the front of the top cover with the black line (with arrows) printed on top of the media bay assembly (FIGURE 6-3).
3. Slide the cover forward until it latches into place (FIGURE 6-3).
FIGURE 6-3 Installing the Top Cover
4. Remove the antistatic precautions.
See Removing Antistatic Measures.
1. Remove any antistatic straps or conductors from the server chassis.
2. Remove the antistatic wrist strap from yourself.
| Note - You will be handling the chassis, which is metal, so the wriststrap is no longer necessary. Additionally, this gives you more freedom of movement for installing the server into the rack. |
3. Lift the server from the antistatic mat and reinstall it into the rack.
See Reinstalling the Server Chassis in the Rack.

|
Caution - The server weighs approximately 40 lb (18 kg). Two people are required to carry the chassis and install it in the rack. |
1. On the rack, ensure that the rails are extended.
2. Place the ends of the chassis mounting brackets into the slide rails.
FIGURE 6-4 Returning the Server to the Rack
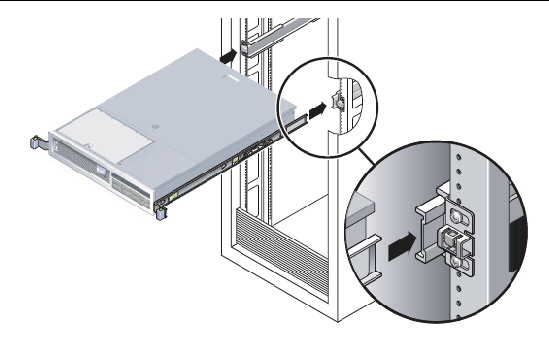
3. Slide the server into the rack until the brackets lock into place.
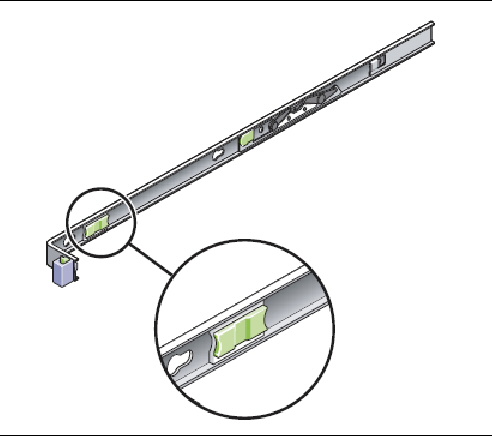
4. Release the slide rails from the fully extended position by pushing the release levers on the side of each rail (FIGURE 6-5).
5. While pushing on the release levers, slowly push the server into the rack.
Ensure that the cables are not in the way.
6. Reconnect the CMA into the back of the rail assembly:
| Note - Refer to the server installation guide for detailed CMA installation instructions. |
a. Insert the smaller extension into the clip located at the end of the mounting bracket (FIGURE 6-6).
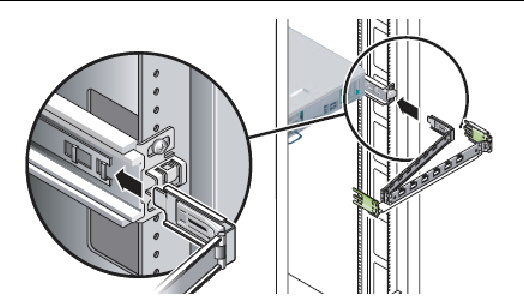
b. Plug the CMA rail extension into the end of the left sliding rail assembly.
The tab at the front of the rail extension clicks into place.
7. Reconnect the cables to the back of the server.
See Reconnecting Cables to the Server.
| Note - If the CMA is in the way, disconnect the left CMA release and swing the CMA open. |
1. Reconnect the power, Ethernet, and PCI/XAUI cables as appropriate:
2. If necessary, reinstall the appropriate cables into the CMA.
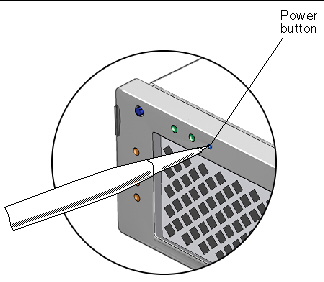
As soon as the power cords are connected, standby power is applied. Depending on the configuration of the firmware, the system might boot. If not, follow this procedure.
 If the server does not boot, do one of the following:
FIGURE 6-7 Powering On the Server

Copyright © 2014, Oracle and/or its affiliates. All rights reserved.